
dash speaker replacement


Driver
Joined: Aug 2014
Posts: 102
Likes: 1
From: WA
I just did this a few weeks ago and used a shortcut that I didn't see documented anywhere else. If you haven't already taken it off, you'll see that removing the speaker grill gets you nowhere lol. The screws are all underneath and it's bigger than that opening. Everything I found said to remove the entire dashboard and support to get it out. This involves taking out your whole nav system and everything for that one speaker. I removed the glovebox, lower portion of passenger side of the dash board, and the far right heater vent. The duct for the heater vent is the one thing in the way of getting your speaker out without removing the entire dash. I used some very long extensions to take the screws out and then squished that duct to the side. It is an EXTREMELY tight fit and you put a lot of stress on the duct, but it's just soft flexible plastic. Mine didn't crack/deform/break at all. It's a frustrating job but totally worth it to have a working speaker again. Taking the whole dash out is probably going to leave you with lots of squeaks, rattles, broken clips and heart ache.
Also note you don't need to remove the A-pillar trim at any point.
Here's some tips that might help. These are from the dash removal instructions. There are a lot more steps to get the whole dash out, but I only included what you will need to get to the speaker. By the end of these steps, you should be able to move the heater duct and access the speaker.
#1: always disconnect negative battery cable first.
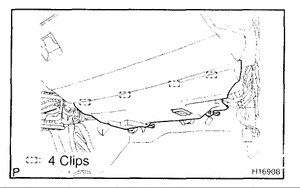
REMOVE NO. 2 UNDER COVER Using a screwdriver, pry the No. 2 under cover to remove it.
HINT: Tape the screwdriver tip before use.
REMOVE NO. 2 GARNISH Using a screwdriver, remove the No. 2 garnish.
HINT: Tape the screwdriver tip before use.
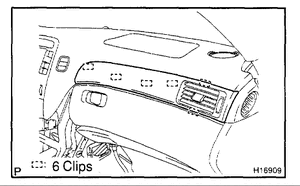
REMOVE FINISH PANEL ASSEMBLY
Remove the 4 bolts and 3 screws.
Using a screwdriver, remove the finish panel assembly.
HINT: Tape the screwdriver tip before use.
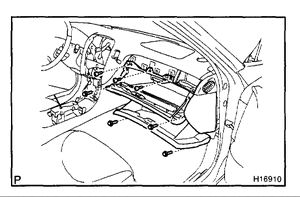
REMOVE GLOVE COMPARTMENT DOOR
Remove the glove compartment door stopper.
Employ the same manner described above to the other side.
Remove the glove compartment door from the finish panel assembly.
Remove the lower cover and 2 box plates from the finish panel assembly

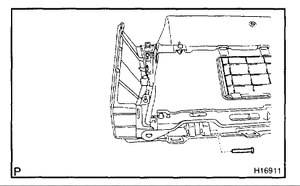
DISCONNECT FRONT PASSENGER AIRBAG ASSEMBLY CONNECTOR Disconnect the from passenger airbag assembly connector as shown in the illustration.
Also note you don't need to remove the A-pillar trim at any point.
Here's some tips that might help. These are from the dash removal instructions. There are a lot more steps to get the whole dash out, but I only included what you will need to get to the speaker. By the end of these steps, you should be able to move the heater duct and access the speaker.
#1: always disconnect negative battery cable first.

REMOVE NO. 2 UNDER COVER Using a screwdriver, pry the No. 2 under cover to remove it.
HINT: Tape the screwdriver tip before use.

REMOVE NO. 2 GARNISH Using a screwdriver, remove the No. 2 garnish.
HINT: Tape the screwdriver tip before use.

REMOVE FINISH PANEL ASSEMBLY
Remove the 4 bolts and 3 screws.
Using a screwdriver, remove the finish panel assembly.
HINT: Tape the screwdriver tip before use.

REMOVE GLOVE COMPARTMENT DOOR
Remove the glove compartment door stopper.
Employ the same manner described above to the other side.
Remove the glove compartment door from the finish panel assembly.
Remove the lower cover and 2 box plates from the finish panel assembly

DISCONNECT FRONT PASSENGER AIRBAG ASSEMBLY CONNECTOR Disconnect the from passenger airbag assembly connector as shown in the illustration.
Last edited by notwealthy; Mar 4, 2016 at 07:09 AM.
Driver
Joined: Aug 2014
Posts: 102
Likes: 1
From: WA
See above for updated instructions. There is a pigtail with a connector at the end. I think there's close to a foot of wire connected to it, which makes it easy to unplug. I got good used replacement Mark Levinson tweeter for about $70 on ebay.

Thread
Thread Starter
Forum
Replies
Last Post
scb71
Lexus Audio, Video, Security & Electronics
3
Dec 25, 2018 08:30 PM
MacroZed
IS - 3rd Gen (2014-present)
22
Sep 2, 2018 11:06 PM
ls460love
LS - 4th Gen (2007-2017)
3
Oct 16, 2009 11:39 AM


