
Subwoofer removal/install back seat removal what I learned...pics
 11-21-15, 06:02 PM
#1
Lexus Test Driver
Thread Starter
Well this site has helped me out quite a bit so I am going to try to give back a little bit and see if help describe a few tip on sub removal and reinstall. I am sure this will prob read kind of scattered and all over the place but just try to pick out what u need and run with it.
Removal....bummer...no fun unless u have done it before then a piece of cake. I could do it in 15 min easy now.
Remove bottom rear seat....pull up from front portion of seat it should pop up..then gently pull up and out a little bit ....then on bottom left and bottom right disconnect heated seat plug. Then remove seat bottom and put away in garage.
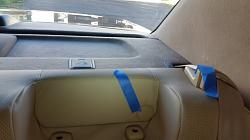
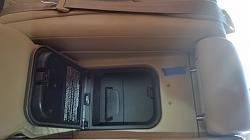
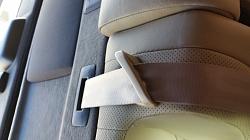
remove seat back.....bigger bummer.....many little tricks...easy now...but tricky before. Start at bottom remove large black bolts qty 4 use socket w long extension.....then disconnect 2 white plugs far left bottom.......then remove two big head rests.....note circular caps behind head rests...remove those to expose large retaining nut......remove on each side. Then flip down arm rest of seat...then as u look around the black pass through to the trunk, look at the trim to the pass through....u want to snap that trim away to expose the 3rd retaining nut...sneaky! Now she is loose. Besides the seatbelts the seatback is now free. Now this is what I did...this doesnt mean u need to do this...I removed the entire seat back as well...I did this by unscrewing the seatbelt retainers on top of the seats...very simple...just a couple phillips head screws. You would need to remove all 3 belt retainers across the top....then slip the back seat out completely.
Now removing the rear deck takes a little finesse. First remove the two black push down retainers on the front of the deck..left and right. Then pop out the sub grill......to remove the deck use a up and out wiggle...up and out...keep it low or it will mark up your side pillars.......once u get her moving your doing something right. Once exposed remove 4 bolts from sub and un clip....remove...reinstall.......
I will include a few pics that might help u with locations of nuts and bolts.....before u reinstall everything pleas make sure the rear deck is in correctly...it fits a certain way in front of the rear window shade....over under....you will figure it out. But you are best off running your shade up and down before bolting the back seat in.
Hope this helps someone.....I will do a separate tute on the amp removal....feel free to hit me up w questions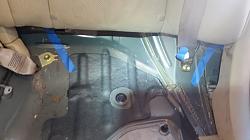
Removal....bummer...no fun unless u have done it before then a piece of cake. I could do it in 15 min easy now.
Remove bottom rear seat....pull up from front portion of seat it should pop up..then gently pull up and out a little bit ....then on bottom left and bottom right disconnect heated seat plug. Then remove seat bottom and put away in garage.
remove seat back.....bigger bummer.....many little tricks...easy now...but tricky before. Start at bottom remove large black bolts qty 4 use socket w long extension.....then disconnect 2 white plugs far left bottom.......then remove two big head rests.....note circular caps behind head rests...remove those to expose large retaining nut......remove on each side. Then flip down arm rest of seat...then as u look around the black pass through to the trunk, look at the trim to the pass through....u want to snap that trim away to expose the 3rd retaining nut...sneaky! Now she is loose. Besides the seatbelts the seatback is now free. Now this is what I did...this doesnt mean u need to do this...I removed the entire seat back as well...I did this by unscrewing the seatbelt retainers on top of the seats...very simple...just a couple phillips head screws. You would need to remove all 3 belt retainers across the top....then slip the back seat out completely.
Now removing the rear deck takes a little finesse. First remove the two black push down retainers on the front of the deck..left and right. Then pop out the sub grill......to remove the deck use a up and out wiggle...up and out...keep it low or it will mark up your side pillars.......once u get her moving your doing something right. Once exposed remove 4 bolts from sub and un clip....remove...reinstall.......
I will include a few pics that might help u with locations of nuts and bolts.....before u reinstall everything pleas make sure the rear deck is in correctly...it fits a certain way in front of the rear window shade....over under....you will figure it out. But you are best off running your shade up and down before bolting the back seat in.
Hope this helps someone.....I will do a separate tute on the amp removal....feel free to hit me up w questions


 02-10-19, 03:34 PM
#3
Driver School Candidate

I followed this explanation with much interest (incidentally the author deserves every compliment, he certainly has mine). I have a problem with sat/nav because although the system seems to be working generally my LS4340 '03 will not pick up GPS signals all of the time and I sometimes find myself driving in the North Sea. You will gather from this I am in the UK.
I suspect a problem with the GPS antenna which I believe sits next to the speaker. I have not investigated this because of what I see as an enormous problem removing the seats to get to the parcel shelf. My auto has all the complications of radio and heating controls as well as 'massaging seats' and I dread not getting it back together again.
This solution via the enlarged hole method is certainly one I could handle but before proceeding can anybody who has done this fix tell me whether you can get to the GPS antenna module this way?
Would very much appreciate your input and especially anybody who might have had the problem I have described.
AlRose
02-11-19, 08:47 AM
#4
Instructor

The GPS antenna is behind the navigation screen towards the top of the dash - it is not behind any speaker and definitely not in the rear of the car. I also highly doubt the antenna itself is the source of your problem.
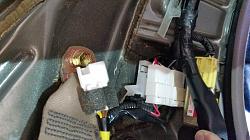
You should check the nav ECU, located in the trunk under the panel on the RH side. I once forgot to reconnect a cable back there and it was the GPS antenna. It was either the small square-ish connector or the coax-type cable. In addition, if your speed sensor signal is not working properly (it runs from the trunk to behind the nav screen), this will affect your positioning on the screen as well, since the car uses a combination of GPS, wheel speed, and compass to determine your position on the map. You can build a switch to cut off the speed sensor signal when you want to type on the screen while in motion, and if you don't flip the switch to restore the signal, you can see that your positioning on the screen will become wildly inaccurate.
To access the nav diagnostic screen, go into the language selection screen, then tap top left, bottom left, top left, bottom left, then bottom right. Tap GPS to see the status of your GPS reception. Do not touch the other buttons without reading on these forums which are safe to touch. If you tap the wrong one (the one related to firmware loading), your nav screen will turn into Japanese and become unusable. To exit the screen, turn ignition OFF.
See https://www.clublexus.com/forums/ls-...-01-03-ul.html for how to remove the rear seats. Removing the seats is easy even on the UL package, just read the instructions before you start. I've run wires from the trunk to the front of the car without cutting any holes.
The following users liked this post:
AlRose (02-11-19)
02-11-19, 11:02 AM
#5
Driver School Candidate
StanVanDam. Very much appreciate your input. Perhaps I should have emphasised my model is LS430 year 2003. In my case the GPS Module is under the rear parcel shelf to the left of the sub-woofer.
When I got the car I had a screen reading saying 'Insert Disc' When I checked, it already had a disc inserted. I put in another disc with the same result. So I swapped the computer from my previous LS430( same Pt No) and this gave me a fix, or so I thought because it is 'quirky' sometimes it reads the GPS ok and other times not. At the moment it is in sulking mood.
Having changed the computer and disc I assumed problems with the GPS module.
Of course I will go back to the computer connections and make sure they are sound, perhaps a little bit of WD40 to clean contacts? Or could it be a faulty Antenna Mast Pole? As you see I am clutching at straws.
Also I do not think I can access the Nav diagnostic screen using the method you describe, on my model. I've tried before but will give it another go in view of your much clearer instructions.
Again StanVan Dam many thanks for you very thorough input.
02-11-19, 12:22 PM
#6

I've done alot of things "by the book" when working on these cars. One thing I refused to do was this lol. Utility knife and a sharp blade, good enuff when the cover is back on.
Good write up though for those who are willing. May need that info when doing rear shocks too.
Good write up though for those who are willing. May need that info when doing rear shocks too.
02-14-19, 10:11 AM
#7
Moderator
I've done alot of things "by the book" when working on these cars. One thing I refused to do was this lol. Utility knife and a sharp blade, good enuff when the cover is back on.
Good write up though for those who are willing. May need that info when doing rear shocks too.
Good write up though for those who are willing. May need that info when doing rear shocks too.
Trending Topics
02-14-19, 12:50 PM
#8
Driver School Candidate
Thanks for that. Actually I am very 'red faced'. I have been asking for help in getting GPS back on my SatNav. I decided to have another look at the back of the computer and found I had plugged the GPS Antenna in the wrong slot. It's working fine now, surprise, surprise. I count myself fortunate I did not cause anything to short out.
02-14-19, 12:52 PM
#9
Driver School Candidate
Thanks for that. Actually I am very 'red faced'. I have been asking for help in getting GPS back on my SatNav. I decided to have another look at the back of the computer and found I had plugged the GPS Antenna in the wrong slot. It's working fine now, surprise, surprise. I count myself fortunate I did not cause anything to short out.
03-18-19, 08:54 AM
#10
Instructor
Thanks Caverman for the excellent write-up. Did this over the last 2 weekends. My ML sub had died (broken wire where the suspension joins the cone and the foam was shot) so I replaced it with the Dayton Audio SD215A-88. To fit that sub I had to cut away some of the U pieces, and also had to grind some notches in the rim of the sub where the screws hold the 2 halves of the ML mount together.
Sound is a little more bassy than I'm used to but turned the bass down one notch and now it sounds awesome. At $60 for the sub this is a cheap and effective fix and since the speaker is an 8ohm+8ohm dual coil speaker, getting the 16ohm the ML needs is easy. :-) Highly recommended.
Sound is a little more bassy than I'm used to but turned the bass down one notch and now it sounds awesome. At $60 for the sub this is a cheap and effective fix and since the speaker is an 8ohm+8ohm dual coil speaker, getting the 16ohm the ML needs is easy. :-) Highly recommended.
03-18-19, 01:09 PM
#11
Lexus Test Driver
I've used this video for sub replacement:
Polk Audio subwoofer works great and i was able to keep the stock bracket and use it with the new woofer without cutting the woofer's metal like in the video but trimming the tabs on the bracket itself, i did it on a bench grinder or it can be done by hand filing just will take longer to do. trimming tabs on top of the stock bracket allowed for the replacement subwoofer to fit in and i just had to drill some additional pilot holes and find proper length screws to tighten the woofer to the bracket on all 8 holes
I also found out that the rear seatbelt guides don't have to be removed from the seat, there is a push tab on the back top corner of them that allows for them to be unsnapped and belts can be slid through the openings
i went and got the proper speaker connectors instead of soldering as well
I also found out that the rear seatbelt guides don't have to be removed from the seat, there is a push tab on the back top corner of them that allows for them to be unsnapped and belts can be slid through the openings
i went and got the proper speaker connectors instead of soldering as well
Last edited by vredniykot; 03-18-19 at 01:14 PM.
03-18-19, 01:25 PM
#12
I just used some self tappers and ditched the stock bracket. If I cared more I would put some a gasket material around it like that flexible weather stripped...but its a low powered sub in a car and Im only into home audio. I dont like the infinite baffle approach, plus the little 8 isnt really worth messing with, building a new enclosure would make more sense to me to control cone movement on the lil 8.

Thread
Thread Starter
Forum
Replies
Last Post