
Mark levinson front door speaker distortion


Thread Starter
Lead Lap


Joined: May 2006
Posts: 3,682
Likes: 304
I am very familiar with the foam surround disintegrating and causing havoc on the subwoofer for the LS430 as well as the door speakers. Before I refoamed my subwoofer, it was buzzing and rattling away. After refoaming it is perfect. My door speakers have different symptoms. Depending upon the music, there is extreme distortion with no rattling or buzzing. I know the foam is also rotted but are the door speakers in our cars also prone to go bad internally as in the voice coil or other speaker parts? I hate to attempt the refoam only find out the speaker is shot. Anyone have any experience trying to refoam front door speakers only to find out the speaker internally is no good?
Last edited by Bocatrip; Sep 30, 2010 at 07:31 PM.
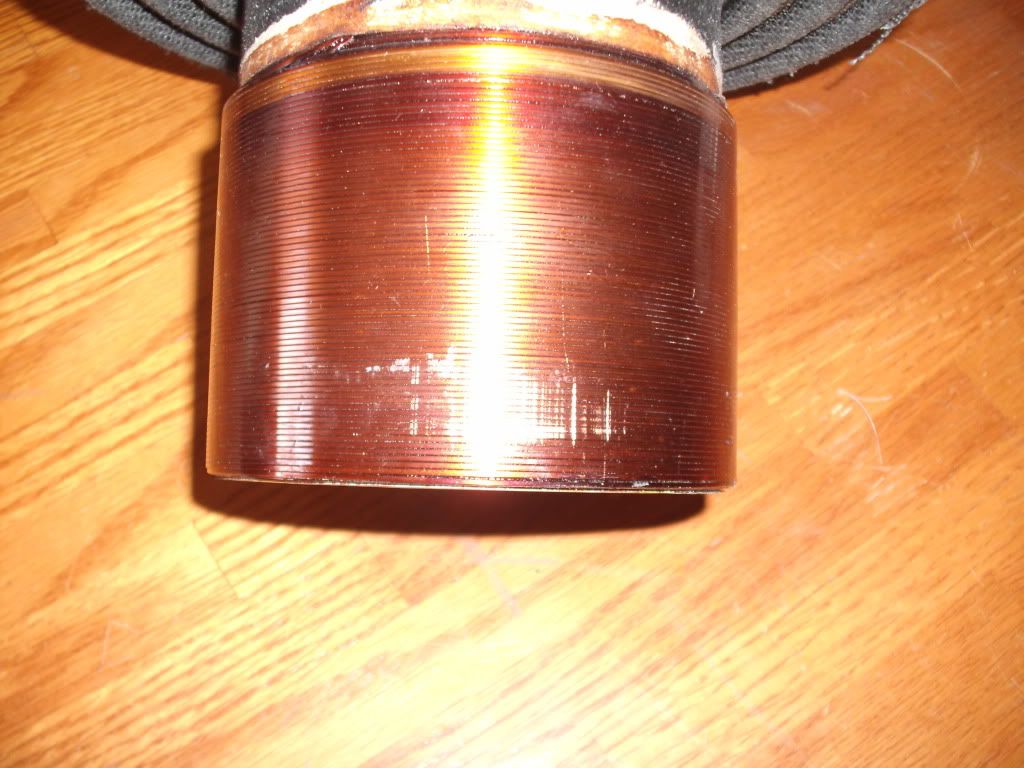
One problem with the door speakers is that they sit vertically. The foam surround is an integral part of the speakers suspension. When it rots out it allows the voice coil to rock and since the speaker is sitting vertically they will start to sag. Once that happens the coil will rub against the pole piece and top plate of the motor structure. If thats the case you will need to replace the speaker.
Thread Starter
Lead Lap
Joined: May 2006
Posts: 3,682
Likes: 304
One problem with the door speakers is that they sit vertically. The foam surround is an integral part of the speakers suspension. When it rots out it allows the voice coil to rock and since the speaker is sitting vertically they will start to sag. Once that happens the coil will rub against the pole piece and top plate of the motor structure. If thats the case you will need to replace the speaker.
If the coil was allowed to rub against the pole piece or top plate there is already damage to it. At that point its best to replace the speaker. Depending on how bad the coil has rubbed it could cause a short and damage other components.
Thread Starter
Lead Lap
Joined: May 2006
Posts: 3,682
Likes: 304
Thank you HiloDB1 for that great info. However, it now looks like the refoaming is no longer in the cards as speaker exchange has now twice sent me the wrong refoam kit. Aren't the door speakers for the ML fronts 6 3/4"? I think I will most probably bite the bullet and get a new ML driver's side speaker from Lexus. I was able to find one for $129. My only other choice is getting a pair of aftermarket "wierd brand" 8ohm speakers and replace both fronts. I don't want to replace them with 4ohm and take a chance with my 10 year old amp overworking itself. Unfortunately, sometimes these unknown 8ohm speakers might sound worse than what I have. At least with the factory it will be acceptable and will work.

Instructor

Joined: Feb 2009
Posts: 1,199
Likes: 215
From: Ontario, Canada
The correct door speaker refoam kit is at SimplySpeakers (TL-FSK-6bt Toyota, Lexus 6" Foam Speaker Repair Kit FSK-6bt (PAIR) $26.95+shipping). It fits absolutely perfectly without any modification. I just did my passenger door speaker last night, which was my first door speaker to experience a torn surround (after 16 years in-service). My subwoofer surround failed 5 years ago (11 years in-service), and I repaired it using the SimplySpeakers 8" kit (TL-FSK-8M-Toyota, Toyota Avalon, Lexus, 8" Foam Speaker Repair Kit, FSK-8M-Toyota (SINGLE) $23.00+shipping". My repair on the subwoofer has lasted over 5 years now and I often play bass-heavy music.
For my front right door speaker that I refoamed yesterday, I used the same tube of glue that SimplySpeakers sent me for my subwoofer surround kit 5 years ago, and the glue had the exact same flow and consistency as new. It comes in a metal tube, and the consistency/rubber content makes an airtight yet easily breakable seal on the cap. I would have no worries using an old tube of the SimplySpeakers glue.
The videos at
and
are highly relevant to this repair.
Summarized steps:
1) Remove door panel - pry out the plastic cover behind the handle, remove short screw. Dislodge clip on rear control panel trim, pull up and towards rear, detach 2 connectors, remove 1 long screw. Look under the armrest, remove 1 long screw. Look under the rubber trim at bottom, remove 3 short screws. Look inside window vent hole, remove 1 screw. Both outside edges of the door have 2 clips at the top and bottom that need to be popped out - a quick pull at each corner will dislodge the clips. Once all clips are dislodged, wiggle/lift the entire panel up, remove all connectors, lift the plastic holders of the ball joint cables to get enough slack to remove them
2) Remove door speaker - remove three 10mm bolts, pinch the bottom of the left and top cable holders to remove them, undo the speaker connector.
3) Disassemble door speaker - remove four T20 torx bolts underneath the foam, but don't remove this foam - use pliers or screwdriver to make a small hole out of the foam first. The case is glued shut with pliable speaker glue, start prying at one end, then insert shims or progressively larger tools to slowly pull apart the glue, then work around to other 3 corners.
4) Remove old surround - get yourself an Olfa knife, flexible double-headed razorblade, small flatheaded screwdrivers, Q-tips, and 70% isopropyl (or other glue-dissolving solvents that can be dipped onto a Q-tip). Use all of these tools to completely remove the outside edge of the surround, fully clean the frame of old surround and glue, and remove the surround from the inside of the cone (but don't apply any solvent to the cone!). For the inside of the cone, once you remove the top layer of surround, you can get your fingers underneath the glue layer, roll it off the edge, then you can roll the last layer of glue+surround off with your fingers all in one piece, going slowly all the way around. At all times, be extremely careful to not cut/damage the cone when removing the surround, and to not get any solvent on the cone (look at how a wet sheet of paper dries - shape is permanently distorted).
5) Apply new surround to cone - if your surround got bent in the mail, set it inside the frame for 5-10 minutes to restore its shape. Then turn the surround upside-down, apply speaker glue (specially made to be flexible AND removable in the future) to the center of the inside cone-touching edge, in a ~1/8" bead, enough glue so that it spreads across the entire edge after you press it onto the cone. According to the SimplySpeakers video, you should wait 1-3 minutes for the glue to tack up (I didn't wait), then flip the surround right-side up, center onto the frame (use the notch in the surround to line up to the notch in the frame), then set the surround down as evenly as possible onto the cone. Ensure that the surround sits with equal pressure onto the cone all the way around - I used as many fingers as I could to get all the way around and to hold the surround down with equal pressure until the glue started bonding. Rotate your equal-pressure holding pattern, and after 10-30 minutes when you are sure the surround has been glued on evenly, you can reach underneath the frame to press the glue into the surround, going around the entire edge to feel for air bubbles or uneven gluing. Wait at least 1 hour before next step.
6) Apply new surround to frame - after waiting at least an hour of gluing to the cone, lift up the outside edge and apply a ~1/8 bead to the center of the frame or use the tip to spread an thin but full layer across the frame edge. Go all the way around with the glue, and press the surround evenly onto the frame, using a finger to go all the way around several times to flatten out air bubbles and uneven glue. Keep doing this for 5-10 minutes until the glue takes hold. Wait overnight before testing the speaker.
7) Reinstallation is the opposite of removal. Remember the glue you tore apart on the frame? Reglue the frame to reduce vibrations. Install the 3 bolts, connect the speaker, turn on your music system and play a variety of music at moderately high volumes to ensure your refoaming process was successful. If you missed gluing any spots, this will manifest as vibration/buzzing, and you'll either have to add more glue if possible, or redo everything.
Budget at least 4 hours, and ideally more - you should wait overnight for the final glue drying step. All refoaming steps are same for subwoofer refoaming. Speaker refoaming doesn't require any advanced skills or training - anyone with time and patience can DIY repair the door speaker and subwoofer, and this is a lot cheaper and less wasteful than buying new speakers.
In addition, with the ML system at least, you cannot buy any aftermarket speakers that are tuned anywhere near as well in the time domain AND frequency domain. There was careful design and calibration of the ML speakers and amplifier to achieve an above-average frequency response accuracy (flatness of response) across the majority of audible frequencies, whereas most systems have jumps or depressions at various audible frequencies due to poor calibration in time and frequency domains for the given acoustic environment and the environment's reverberations/echos/reflections. For this reason alone, I consider refoaming the original speakers to be the best and cheapest option (although most time-consuming), and would never consider aftermarket speakers.
For my front right door speaker that I refoamed yesterday, I used the same tube of glue that SimplySpeakers sent me for my subwoofer surround kit 5 years ago, and the glue had the exact same flow and consistency as new. It comes in a metal tube, and the consistency/rubber content makes an airtight yet easily breakable seal on the cap. I would have no worries using an old tube of the SimplySpeakers glue.
The videos at
Summarized steps:
1) Remove door panel - pry out the plastic cover behind the handle, remove short screw. Dislodge clip on rear control panel trim, pull up and towards rear, detach 2 connectors, remove 1 long screw. Look under the armrest, remove 1 long screw. Look under the rubber trim at bottom, remove 3 short screws. Look inside window vent hole, remove 1 screw. Both outside edges of the door have 2 clips at the top and bottom that need to be popped out - a quick pull at each corner will dislodge the clips. Once all clips are dislodged, wiggle/lift the entire panel up, remove all connectors, lift the plastic holders of the ball joint cables to get enough slack to remove them
2) Remove door speaker - remove three 10mm bolts, pinch the bottom of the left and top cable holders to remove them, undo the speaker connector.
3) Disassemble door speaker - remove four T20 torx bolts underneath the foam, but don't remove this foam - use pliers or screwdriver to make a small hole out of the foam first. The case is glued shut with pliable speaker glue, start prying at one end, then insert shims or progressively larger tools to slowly pull apart the glue, then work around to other 3 corners.
4) Remove old surround - get yourself an Olfa knife, flexible double-headed razorblade, small flatheaded screwdrivers, Q-tips, and 70% isopropyl (or other glue-dissolving solvents that can be dipped onto a Q-tip). Use all of these tools to completely remove the outside edge of the surround, fully clean the frame of old surround and glue, and remove the surround from the inside of the cone (but don't apply any solvent to the cone!). For the inside of the cone, once you remove the top layer of surround, you can get your fingers underneath the glue layer, roll it off the edge, then you can roll the last layer of glue+surround off with your fingers all in one piece, going slowly all the way around. At all times, be extremely careful to not cut/damage the cone when removing the surround, and to not get any solvent on the cone (look at how a wet sheet of paper dries - shape is permanently distorted).
5) Apply new surround to cone - if your surround got bent in the mail, set it inside the frame for 5-10 minutes to restore its shape. Then turn the surround upside-down, apply speaker glue (specially made to be flexible AND removable in the future) to the center of the inside cone-touching edge, in a ~1/8" bead, enough glue so that it spreads across the entire edge after you press it onto the cone. According to the SimplySpeakers video, you should wait 1-3 minutes for the glue to tack up (I didn't wait), then flip the surround right-side up, center onto the frame (use the notch in the surround to line up to the notch in the frame), then set the surround down as evenly as possible onto the cone. Ensure that the surround sits with equal pressure onto the cone all the way around - I used as many fingers as I could to get all the way around and to hold the surround down with equal pressure until the glue started bonding. Rotate your equal-pressure holding pattern, and after 10-30 minutes when you are sure the surround has been glued on evenly, you can reach underneath the frame to press the glue into the surround, going around the entire edge to feel for air bubbles or uneven gluing. Wait at least 1 hour before next step.
6) Apply new surround to frame - after waiting at least an hour of gluing to the cone, lift up the outside edge and apply a ~1/8 bead to the center of the frame or use the tip to spread an thin but full layer across the frame edge. Go all the way around with the glue, and press the surround evenly onto the frame, using a finger to go all the way around several times to flatten out air bubbles and uneven glue. Keep doing this for 5-10 minutes until the glue takes hold. Wait overnight before testing the speaker.
7) Reinstallation is the opposite of removal. Remember the glue you tore apart on the frame? Reglue the frame to reduce vibrations. Install the 3 bolts, connect the speaker, turn on your music system and play a variety of music at moderately high volumes to ensure your refoaming process was successful. If you missed gluing any spots, this will manifest as vibration/buzzing, and you'll either have to add more glue if possible, or redo everything.
Budget at least 4 hours, and ideally more - you should wait overnight for the final glue drying step. All refoaming steps are same for subwoofer refoaming. Speaker refoaming doesn't require any advanced skills or training - anyone with time and patience can DIY repair the door speaker and subwoofer, and this is a lot cheaper and less wasteful than buying new speakers.
In addition, with the ML system at least, you cannot buy any aftermarket speakers that are tuned anywhere near as well in the time domain AND frequency domain. There was careful design and calibration of the ML speakers and amplifier to achieve an above-average frequency response accuracy (flatness of response) across the majority of audible frequencies, whereas most systems have jumps or depressions at various audible frequencies due to poor calibration in time and frequency domains for the given acoustic environment and the environment's reverberations/echos/reflections. For this reason alone, I consider refoaming the original speakers to be the best and cheapest option (although most time-consuming), and would never consider aftermarket speakers.

Thread
Thread Starter
Forum
Replies
Last Post
Bocatrip
LS - 3rd Gen (2001-2006)
48
Mar 8, 2012 03:47 PM
cjbdvm04
Lexus Audio, Video, Security & Electronics
1
Feb 10, 2005 09:41 AM