When you click on links to various merchants on this site and make a purchase, this can result in this site earning a commission. Affiliate programs and affiliations include, but are not limited to, the eBay Partner Network.
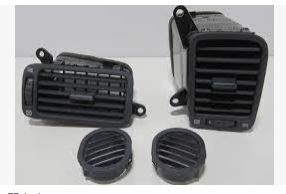
I had difficulty removing the center vent assembly and thought I would share what I experienced. I studied an online video to accomplish the task, but of course it wasn’t as easy as shown. The video shows 2 clips on each side of the assembly that need to be released, but it doesn’t show the difficulty in pulling the whole thing out. There is a clip on the back side of the assembly up high. It clicks into a bracket in the dash as shown in the pix. You have to pull the assembly toward you from the bottom and this creates a sort of bind. I was afraid I was going to break something, but it finally gave way and I was able to get it out. The pix show the tools I used, the placement of paper towels to avoid damaging the climate control panel beneath the center vent assembly, one of the release clips on the side, the clip on the back of the assembly, and the bracket in the dash. After getting it out, I was then finally able to fix the horizontal portion of my left vent, which has been on my to-do list for months. This is the video I studied:
Hello there,
thanks to this thread I could remove the centre vent. Now I would like to enlarge the perspective to the adjustable side vents (not the ducts leading to the doors).
Reason why: The soft foam dams are coming undone, and brownish worms are blown into the car.
I am careful not to break the plastic. The only detail I could get in the repair manual is this little nothing on page BO-81:
No further instruction provided. (And they're selling it as repair manual.)
I already tried to find an access screw from the oval side ducts, but .... nothing.
Screws? Clips? Sliders? Levers?
Any solid advice out there? I do have appropriate prying instruments, but I don't know where to place the lever. Has any of you ever done this - successfully?
Those vents, once broken, are gone. Cannot be reordered.
Cheers, thanks!
For the center vent, I take a long flathead screwdriver and shine a light through the vent to the inner right and left sides along with holding another plastic flat trim removal tool on the outer frame of the vent applying light pressure to unclip one clip at a time to walk the vent out of the dashboard.
For the side vents, I assume it would be similar, try and look for a clip on the inner side with a flashlight and see if you can release it while simultaneously gently prying on the frame of the vent to see if it'll pop out.
Thanks for the suggestion.
I need to remove the duct that runs from the center to the side vent. I need to lower the steering column in order to replace the ignition switch and this duct is in the way.
For the center vent ....
For the side vents, I assume it would be similar ....
I tried, and spied, hard ... to no avail. Assumptions can be treacherous .
You are right for the centre vent. The clip is can easily be seen (red circle).
In the side vent, there is no such clip (right),
That's why I am asking explicitly for advice from somebody who successfully removed the side vents. I guess it's just a snap thing. I pried with a tool - up to the point where I thought I'd break something.
I had difficulty removing the center vent assembly and thought I would share what I experienced. I studied an online video to accomplish the task, but of course it wasn’t as easy as shown. The video shows 2 clips on each side of the assembly that need to be released, but it doesn’t show the difficulty in pulling the whole thing out. There is a clip on the back side of the assembly up high. It clicks into a bracket in the dash as shown in the pix. You have to pull the assembly toward you from the bottom and this creates a sort of bind. I was afraid I was going to break something, but it finally gave way and I was able to get it out. The pix show the tools I used, the placement of paper towels to avoid damaging the climate control panel beneath the center vent assembly, one of the release clips on the side, the clip on the back of the assembly, and the bracket in the dash. After getting it out, I was then finally able to fix the horizontal portion of my left vent, which has been on my to-do list for months. This is the video I studied: https://www.youtube.com/watch?v=HbRswRHO9mQ
I have a 1995 lexus ls400 and my vents have a thermometer and a clock above them. I cant find a video anywhere on how to remove this. and i know its different because the only clips i can find are on the bottom not on the sides. Do you know of a way that i can remove these safely without breaking anything?
I have a 1995 lexus ls400 and my vents have a thermometer and a clock above them. I cant find a video anywhere on how to remove this. and i know its different because the only clips i can find are on the bottom not on the sides. Do you know of a way that i can remove these safely without breaking anything?
This should help you for 1995-1997. Looks like you pry very carefully on both sides with plastic pry tools (might want to tape the edges of your climate vents to prevent scratching) in order to pull it straight back, then disconnect the connectors at the top for the clock.
Recently went through this on my 1995. Can confirm no magic other than just being careful not to break anything. It just pulls straight out but seems very easy to break the plastic when trying to work it out. Then you need to disconnect two plastic connectors, which may be fused from time and heat. One to the hazard light switch and the other to the clock. One thing I tried to do is use as wide plastic pry tools as possible as I believe that distributes the force more across the plastic vs concentrating the force of your pulling in one location.

 05-19-19, 06:26 PM


 .
.