
'14 IS250 interior door trim replacement


Thread Starter
Driver School Candidate
Joined: Mar 2017
Posts: 17
Likes: 1
From: Texas
Hey everyone,
im trying to see if it is possible to replace the silver plastic trim that runs along the arm rest on the two front doors on my is250?
Does this piece pop out? And is it sold separately from the door panel?
im trying to see if it is possible to replace the silver plastic trim that runs along the arm rest on the two front doors on my is250?
Does this piece pop out? And is it sold separately from the door panel?
Lexus Test Driver


Joined: Feb 2017
Posts: 6,260
Likes: 1,752
From: Richmond Hill, Ontario, Canada
Try this...also i believe there are Youtube videos that also show how take it apart
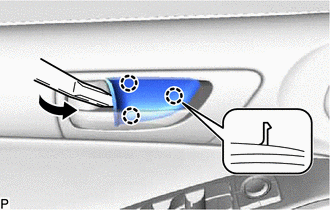
3. REMOVE FRONT DOOR INSIDE HANDLE BEZEL PLUG(a) Using a moulding remover, disengage the 3 claws to remove the front door inside handle bezel plug.
 4. REMOVE MULTIPLEX NETWORK MASTER SWITCH ASSEMBLY WITH FRONT DOOR ARMREST BASE PANEL (for Driver Side)(a) Using a moulding remover, disengage the 2 clips, 7 claws and 6 guides.
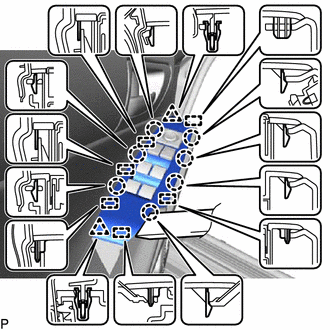 (b) Disconnect the connector to remove the multiplex network master switch assembly with front door armrest base panel.
5. REMOVE POWER WINDOW REGULATOR SWITCH ASSEMBLY WITH FRONT DOOR ARMREST BASE PANEL (for Front Passenger Side)(a) Using a moulding remover, disengage the 2 clips, 7 claws and 6 guides.
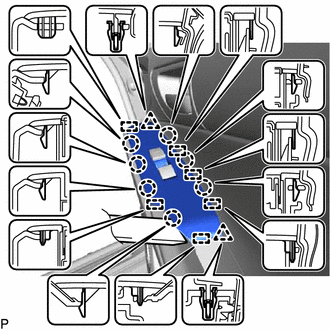 (b) Disconnect the connector to remove the power window regulator switch assembly with front door armrest base panel.
6. REMOVE FRONT DOOR ARMREST COVER(a) Using a moulding remover, disengage the 2 claws.
 (b) Disengage the 2 guides to remove the front door armrest cover.
7. REMOVE COURTESY LIGHT ASSEMBLY
Click here
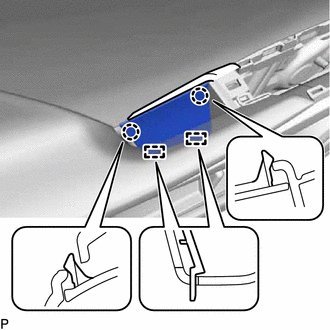
8. REMOVE FRONT DOOR NO. 1 STIFFENER CUSHION(a) Remove the screw and front door No. 1 stiffener cushion.
 9. REMOVE FRONT DOOR TRIM BOARD SUB-ASSEMBLY(a) Put protective tape around the front door panel.
 (b) Remove the 3 screws.
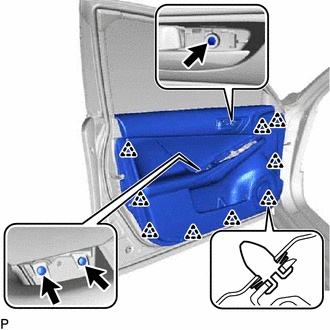 (c) Using a clip remover, disengage the 9 clips.(d) Pull out the front door trim board sub-assembly as shown in the illustration.
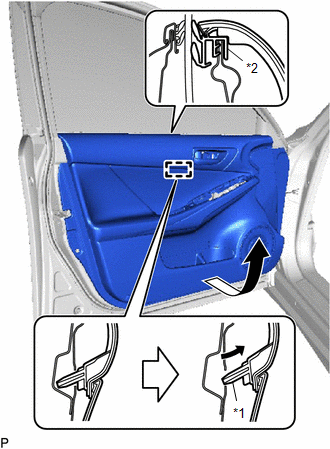 *1
*1
Reference Boss
*2
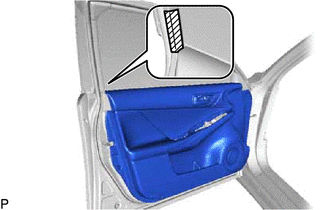
Front Door Inner Glass Weatherstrip
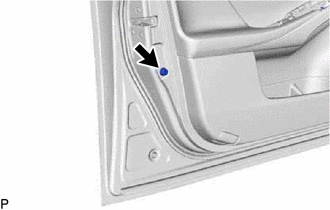
(e) Disengage the reference boss from the front door panel.
(f) Raise the front door trim board sub-assembly and disconnect the front door trim board sub-assembly together with the front door inner glass weatherstrip.
(g) Disconnect each connector.
3. REMOVE FRONT DOOR INSIDE HANDLE BEZEL PLUG(a) Using a moulding remover, disengage the 3 claws to remove the front door inside handle bezel plug.
4. REMOVE MULTIPLEX NETWORK MASTER SWITCH ASSEMBLY WITH FRONT DOOR ARMREST BASE PANEL (for Driver Side)(a) Using a moulding remover, disengage the 2 clips, 7 claws and 6 guides.(b) Disconnect the connector to remove the multiplex network master switch assembly with front door armrest base panel.5. REMOVE POWER WINDOW REGULATOR SWITCH ASSEMBLY WITH FRONT DOOR ARMREST BASE PANEL (for Front Passenger Side)(a) Using a moulding remover, disengage the 2 clips, 7 claws and 6 guides.
(b) Disconnect the connector to remove the power window regulator switch assembly with front door armrest base panel.6. REMOVE FRONT DOOR ARMREST COVER(a) Using a moulding remover, disengage the 2 claws.
(b) Disengage the 2 guides to remove the front door armrest cover.7. REMOVE COURTESY LIGHT ASSEMBLY
Click here
8. REMOVE FRONT DOOR NO. 1 STIFFENER CUSHION(a) Remove the screw and front door No. 1 stiffener cushion.
9. REMOVE FRONT DOOR TRIM BOARD SUB-ASSEMBLY(a) Put protective tape around the front door panel.(b) Remove the 3 screws.(c) Using a clip remover, disengage the 9 clips.(d) Pull out the front door trim board sub-assembly as shown in the illustration.*1Reference Boss
*2
Front Door Inner Glass Weatherstrip
(e) Disengage the reference boss from the front door panel.
(f) Raise the front door trim board sub-assembly and disconnect the front door trim board sub-assembly together with the front door inner glass weatherstrip.
(g) Disconnect each connector.
Thread Starter
Driver School Candidate
Joined: Mar 2017
Posts: 17
Likes: 1
From: Texas
Thanks that helps with getting the door off which doesn't seem too bad.
But the silver trim trim piece along that armrest on the door, can that be repaired or purchased from somewhere?
But the silver trim trim piece along that armrest on the door, can that be repaired or purchased from somewhere?
Lexus Test Driver
Joined: Feb 2017
Posts: 6,260
Likes: 1,752
From: Richmond Hill, Ontario, Canada
There may be some screws holding it on, but i think once you get the trim panel off that holds the switches you will probably get a better idea.
You may not need to take the entire door panel off.

Lexus Test Driver
Joined: Dec 2015
Posts: 1,476
Likes: 60
From: California
I believe the piece does come off seperately as a few guys on here have sent it out to get wrapped in real carbon fiber.
There may be some screws holding it on, but i think once you get the trim panel off that holds the switches you will probably get a better idea.
You may not need to take the entire door panel off.
There may be some screws holding it on, but i think once you get the trim panel off that holds the switches you will probably get a better idea.
You may not need to take the entire door panel off.
Or can I just disregard all the other images except the part that instructs about the window switch trim?
Lexus Test Driver
Joined: Feb 2017
Posts: 6,260
Likes: 1,752
From: Richmond Hill, Ontario, Canada
[/QUOTE]Or can I just disregard all the other images except the part that instructs about the window switch trim?[/QUOTE]
Yes to the above...the trim is only held in with clips. Get a quality trim tool that won't damage the trim...nothing metallic.
If you're using something metal (which i don't advise), wrap it in masking tape first.
Yes to the above...the trim is only held in with clips. Get a quality trim tool that won't damage the trim...nothing metallic.
If you're using something metal (which i don't advise), wrap it in masking tape first.
Trending Topics
Lexus Test Driver
Joined: Feb 2017
Posts: 6,260
Likes: 1,752
From: Richmond Hill, Ontario, Canada
I think the driver's door had Philip screws (the star point).
For the IS it's either Philip screws or just clipped it. The clips can be a little tough to release all at once as the surrounding plastic is thin, so if you pry too hard it will crack.
Patience and an extra hand to release a couple clips at once would be good.

Thread
Thread Starter
Forum
Replies
Last Post
sallydrive
IS - 2nd Gen (2006-2013)
1
Aug 14, 2012 07:27 PM