


Show me your PPF or Clear Bra!!!!
Thread Starter
Lead Lap
Joined: Dec 2013
Posts: 606
Likes: 2
From: VA
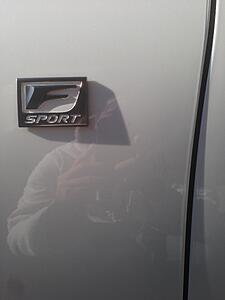
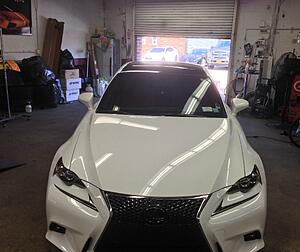
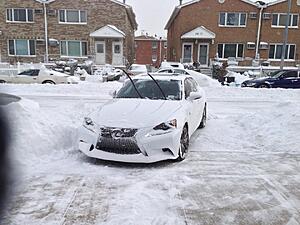
I have been a happy owner of a white/red F Sport for the past three months. the only two things that make me unhappy is traffic the DMV area and rockchips!!!! i feel like i find an additional chip each time i operate the car. i've been seriously considering getting a ppf or clear bra for the entire front end.
However, my concern is:
1) the ppf isn't wrapped fully around the front end, except for the hood at most places, the film is cutoff a few mm to 1 cm shy of the edge of the bumper, fender, headlights, etc.; and
2) because of these short cutoff and to the fact that i have a lighter color car, i'm concerned with how the buildup of road grime will look on the edges of the ppf, and how it affects the over appearance of the vehicle (particularly on white cars because you can see everything!)
so i need some help from my CL family. please show me pictures of your CLEAN vehicle with the ppf, some nice closeups of the edges of the ppf would be nice to see how well the craftsmanship is and how close they could get it to the edge. second, please show me DIRTY pictures (lol) of your car with the ppf.
advice, explanations, etc., would also be nice on how you keep the ppf clean and your overall car clean so the road grime buildup doesn't occur, at least too badly.
Pole Position
Joined: Jul 2013
Posts: 243
Likes: 0
From: NY
I too have the UW but with the Suntek PPF which also has self-healing properties. I had my guy do a full nose install, meaning the full hood, bumper, fenders and side mirrors. He does custom cuts so there's no pre-cut kits therefore he was able to tuck the bra under the hood so it was more flush.
However since I didn't tell him to take the bumper off, he cut around the sharp lines and around the headlights and the surround grill as well. The seams are hardly noticeable from 2+ feet if you're standing, unless you're really up close looking for it you won't see it.
I've also had the PPF on since last August, survived a harsh winter here in NYC and washed it on my own every two weeks or so during the winter time. Unless you're planning to take the ride to a mud rally event I don't think it is so easy to get the seams dirty. But do take care when waxing the car and make sure to not get any wax on the seams or it may get stuck and build up over time. Aside from that you can just take a cotton swab with alcohol and run it along the seams to clean it off and it helps.
Sorry, I didn't flip the first picture.
I don't really have a dirty car pic but the PPF has survived snow, salt and rain thrown in!
However since I didn't tell him to take the bumper off, he cut around the sharp lines and around the headlights and the surround grill as well. The seams are hardly noticeable from 2+ feet if you're standing, unless you're really up close looking for it you won't see it.
I've also had the PPF on since last August, survived a harsh winter here in NYC and washed it on my own every two weeks or so during the winter time. Unless you're planning to take the ride to a mud rally event I don't think it is so easy to get the seams dirty. But do take care when waxing the car and make sure to not get any wax on the seams or it may get stuck and build up over time. Aside from that you can just take a cotton swab with alcohol and run it along the seams to clean it off and it helps.
Sorry, I didn't flip the first picture.


I don't really have a dirty car pic but the PPF has survived snow, salt and rain thrown in!

Thanks Alius! I was actually having the same concern as im getting my PPF done this coming Monday as well. it looks good and my guy is doing custom cutting as well. I was worried if I would like the gloss black on my roof but your picture just took away those concerns, it looks great! and as you already know, Im still jealous of you and your foglights 

Lexus Test Driver
Joined: Sep 2013
Posts: 1,216
Likes: 1
From: MN
I had mine done on full bumper, full fender, full hood, a-pillar, roof line, side mirrors, door cups, door edges & rear bumper ledge with Xpel Ultimate. How ever I'm not happy with quality of the work. When I picked it up I noticed there were a lot of water and bubbles under the hood film but installer insisted all of those will go away. After several months those have turned into small bumps (similar to zit and looks like rock chips) which now they claim are dust particles and states that can't be avoided. I'm asking the installer to redo the hood but they want me to wait to see if the hotter weather will work those out. I doubt it!
Also there is no way to prove they've installed Xpel Ultimate or some cheap 3M film. Last time I took it in they must have tried to buff it out or something since I notice little swirl marks all over the hood. If this is Xpel wouldn't the swirl marks get healed and go away?
I also had 3M Crystalline 90% installed on the windshield (with FormulaOne Pinnacle 35% all around) but even with 50-70 degree weather it feels like seats are getting hotter. This was supposed to reject ~40% of solar heat but again no way to validate they indeed used this film. Based on how the interior is getting heated up I'm doubting they used 3M Crystalline.
Driver School Candidate
Joined: Apr 2014
Posts: 13
Likes: 0
From: OH
Just got my AWD 350 F Sport last Thursday (black/red) and taking it in next Friday for a partial wrap using Xpel Ultimate and also doing the Opticoat pro as well. I will post pics when it's finished.
And wouldn't ya know it - on the way home from Detroit today, which has roads worse than some 3rd world countries, a piece of road debris came up from the car in front of me and put a nice 2-3 inch long dent in the lower lip and slightly scratched the bottom of the plastic grill piece. Was not happy - new car feeling basically gone.
I called the body shop and they recommended not getting it fixed because it's really not that big but it just angers me. It's really not too bad and the black color hides it well. He said it would be about $700 and that the paint they use, while it matches, isn't as durable as they can't heat as high as the factory can.
I don't think the wrap would have done much as the dent would still be there because it was a solid hit at about 65 - looked like a piece of drywall. Sucks.
Anyway, hopefully that won't be a problem for the wrap but at least I will know that it will be more protected than now. Looking forward to the results.
Here is a copy and paste from my build thread......
Xpel Ultimate ppf is installed. I'm pretty happy with the product, but the install on the front bumper was a pain. The installer with 15 years experience said it was the hardest one that he's done. I also insisted that as many edges as possible were wrapped which caused him some grief. They had two guys on the car and it took seven hours to fully wrap the front bumper, the hood, the mirrors, and the front fenders. You really can't tell where it's been installed and where it wasn't (example = fender vs door). The finish, clarity, and shine of the Xpel is top notch.
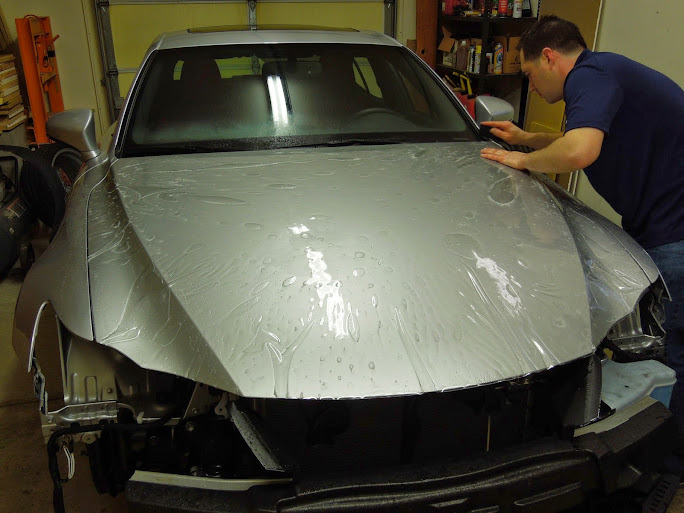
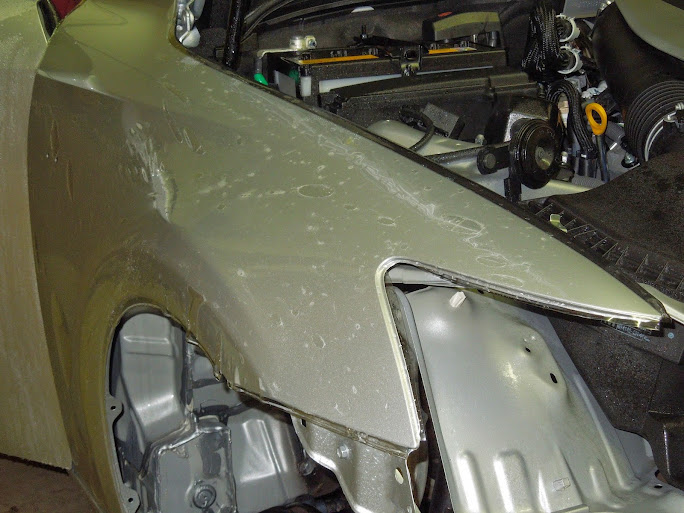

seams on bottom front

seam between drl and headlight

seam on front/side

corner treatments had to be done like this to keep it from lifting up or bunching
the seams can't be seen from more than 2-3 feet away

Xpel Ultimate ppf is installed. I'm pretty happy with the product, but the install on the front bumper was a pain. The installer with 15 years experience said it was the hardest one that he's done. I also insisted that as many edges as possible were wrapped which caused him some grief. They had two guys on the car and it took seven hours to fully wrap the front bumper, the hood, the mirrors, and the front fenders. You really can't tell where it's been installed and where it wasn't (example = fender vs door). The finish, clarity, and shine of the Xpel is top notch.
seams on bottom front
seam between drl and headlight
seam on front/side
corner treatments had to be done like this to keep it from lifting up or bunching
the seams can't be seen from more than 2-3 feet away

Driver School Candidate
Joined: Mar 2014
Posts: 27
Likes: 0
From: tn
hi just got mine done, no pic's sorry.. but had the dealer do it was $700.00
here is a link to the brand they use, it's pre cut
http://premiumshield.com/
here is a link to the brand they use, it's pre cut
http://premiumshield.com/
Trending Topics
Lexus Test Driver
Joined: Sep 2013
Posts: 1,216
Likes: 1
From: MN
Here is a copy and paste from my build thread......
Xpel Ultimate ppf is installed. I'm pretty happy with the product, but the install on the front bumper was a pain. The installer with 15 years experience said it was the hardest one that he's done. I also insisted that as many edges as possible were wrapped which caused him some grief. They had two guys on the car and it took seven hours to fully wrap the front bumper, the hood, the mirrors, and the front fenders. You really can't tell where it's been installed and where it wasn't (example = fender vs door). The finish, clarity, and shine of the Xpel is top notch.
seams on bottom front
seam between drl and headlight
seam on front/side
corner treatments had to be done like this to keep it from lifting up or bunching
the seams can't be seen from more than 2-3 feet away
ClubLexus Stories
Celebrating Lexus & Toyota from Around the Globe

Lexus NX 350h: A Fuel-Sipping Secret Hot Hatch???
Michael S. Palmer
5 Best & 5 Worst Lexus Daily Drivers
Joe Kucinski
Top 5 Hottest Lexus & Toyotas in 2026 (Hardest To Buy)
Brett Foote
2026 Lexus IS 350 F Sport Review: The Last of Its Kind Still Rocks
Michael S. Palmer
Top 10 Most Confusing Things Lexus Has Ever Done!
Joe Kucinski
2026 Lexus ES Review: Lexus Re-Embraces Founding Principles
Michael S. Palmer
10 Lexus Bargains That are Cheaper Than a New Toyota RAV4
Joe Kucinski
8 Weirdest Things Lexus Has Ever Built
Verdad Gallardo
10 Lexus Designs That Have Aged Like Fine Wine
Verdad GallardoPole Position
Joined: Jul 2013
Posts: 243
Likes: 0
From: NY
Thanks Alius! I was actually having the same concern as im getting my PPF done this coming Monday as well. it looks good and my guy is doing custom cutting as well. I was worried if I would like the gloss black on my roof but your picture just took away those concerns, it looks great! and as you already know, Im still jealous of you and your foglights

Driver
Joined: Oct 2002
Posts: 154
Likes: 0
From: California
Xpel Ultimate Clear Bra:
Bumper, full hood, full fenders, headlights, DRL, side mirrors, B-pillars, rear bumper (cargo area).
-Bumper, headlights, DRL, & side mirrors were part of Xpel's pre-cut pattern.
-Hood, fenders, & B-pillars were custom cut (to allow for wrapping around the edges to minimize visible seams).
Shop: Advance Auto Engineering (in Cerritos)
(Click on photos for detailed full-size images)
Overview: From a few steps back, the seams are not visible.

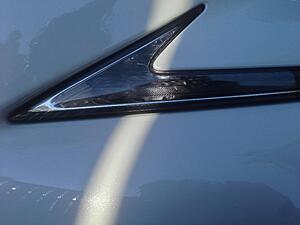
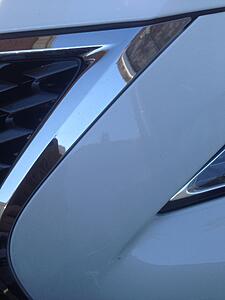
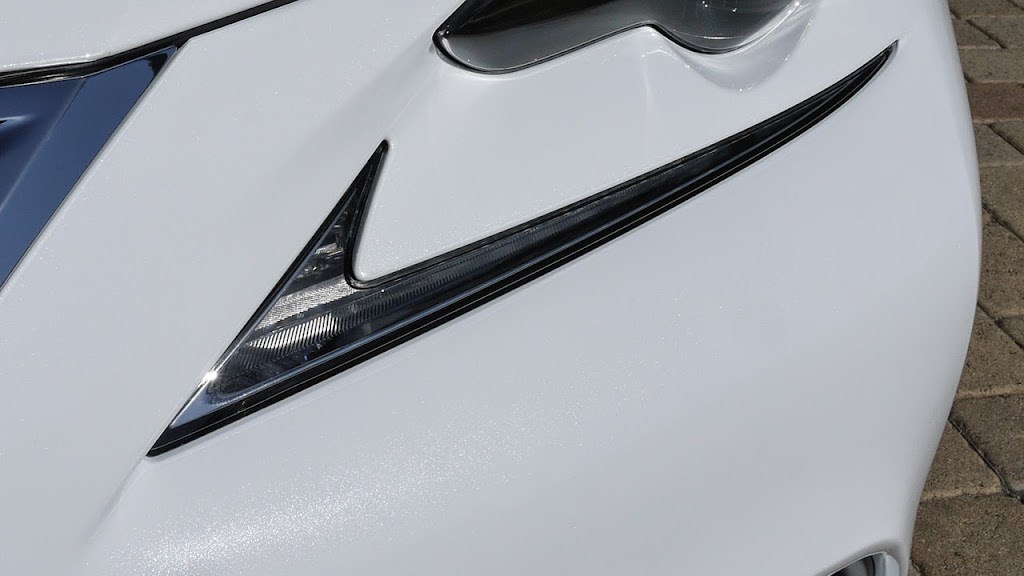
Headlight & DRL: Here you can see the seam that runs between the headlight & DRL, as well as the cut-out for the DRL.
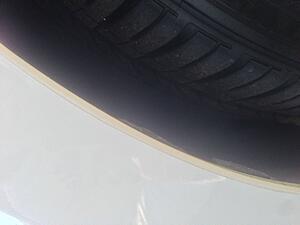
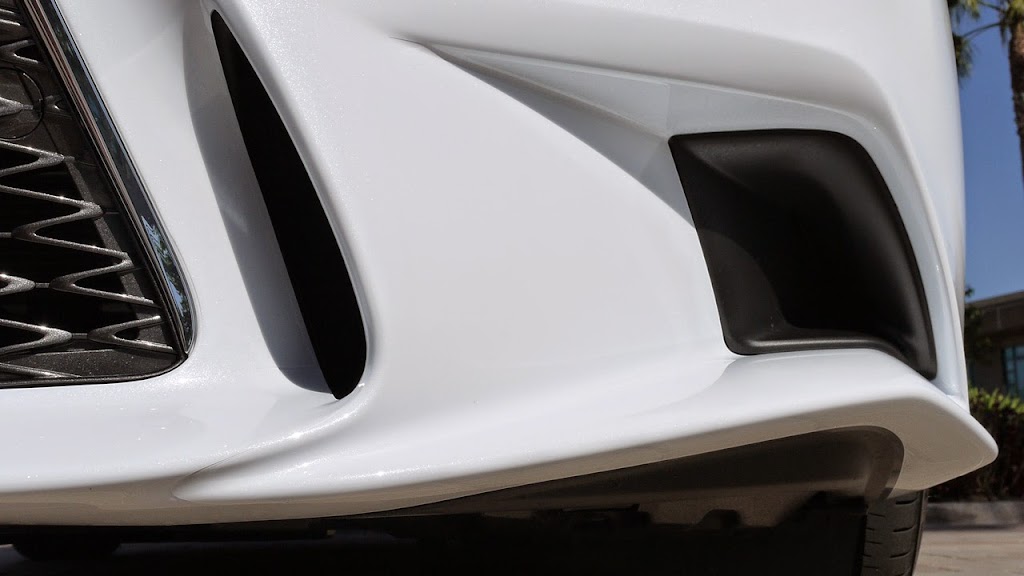
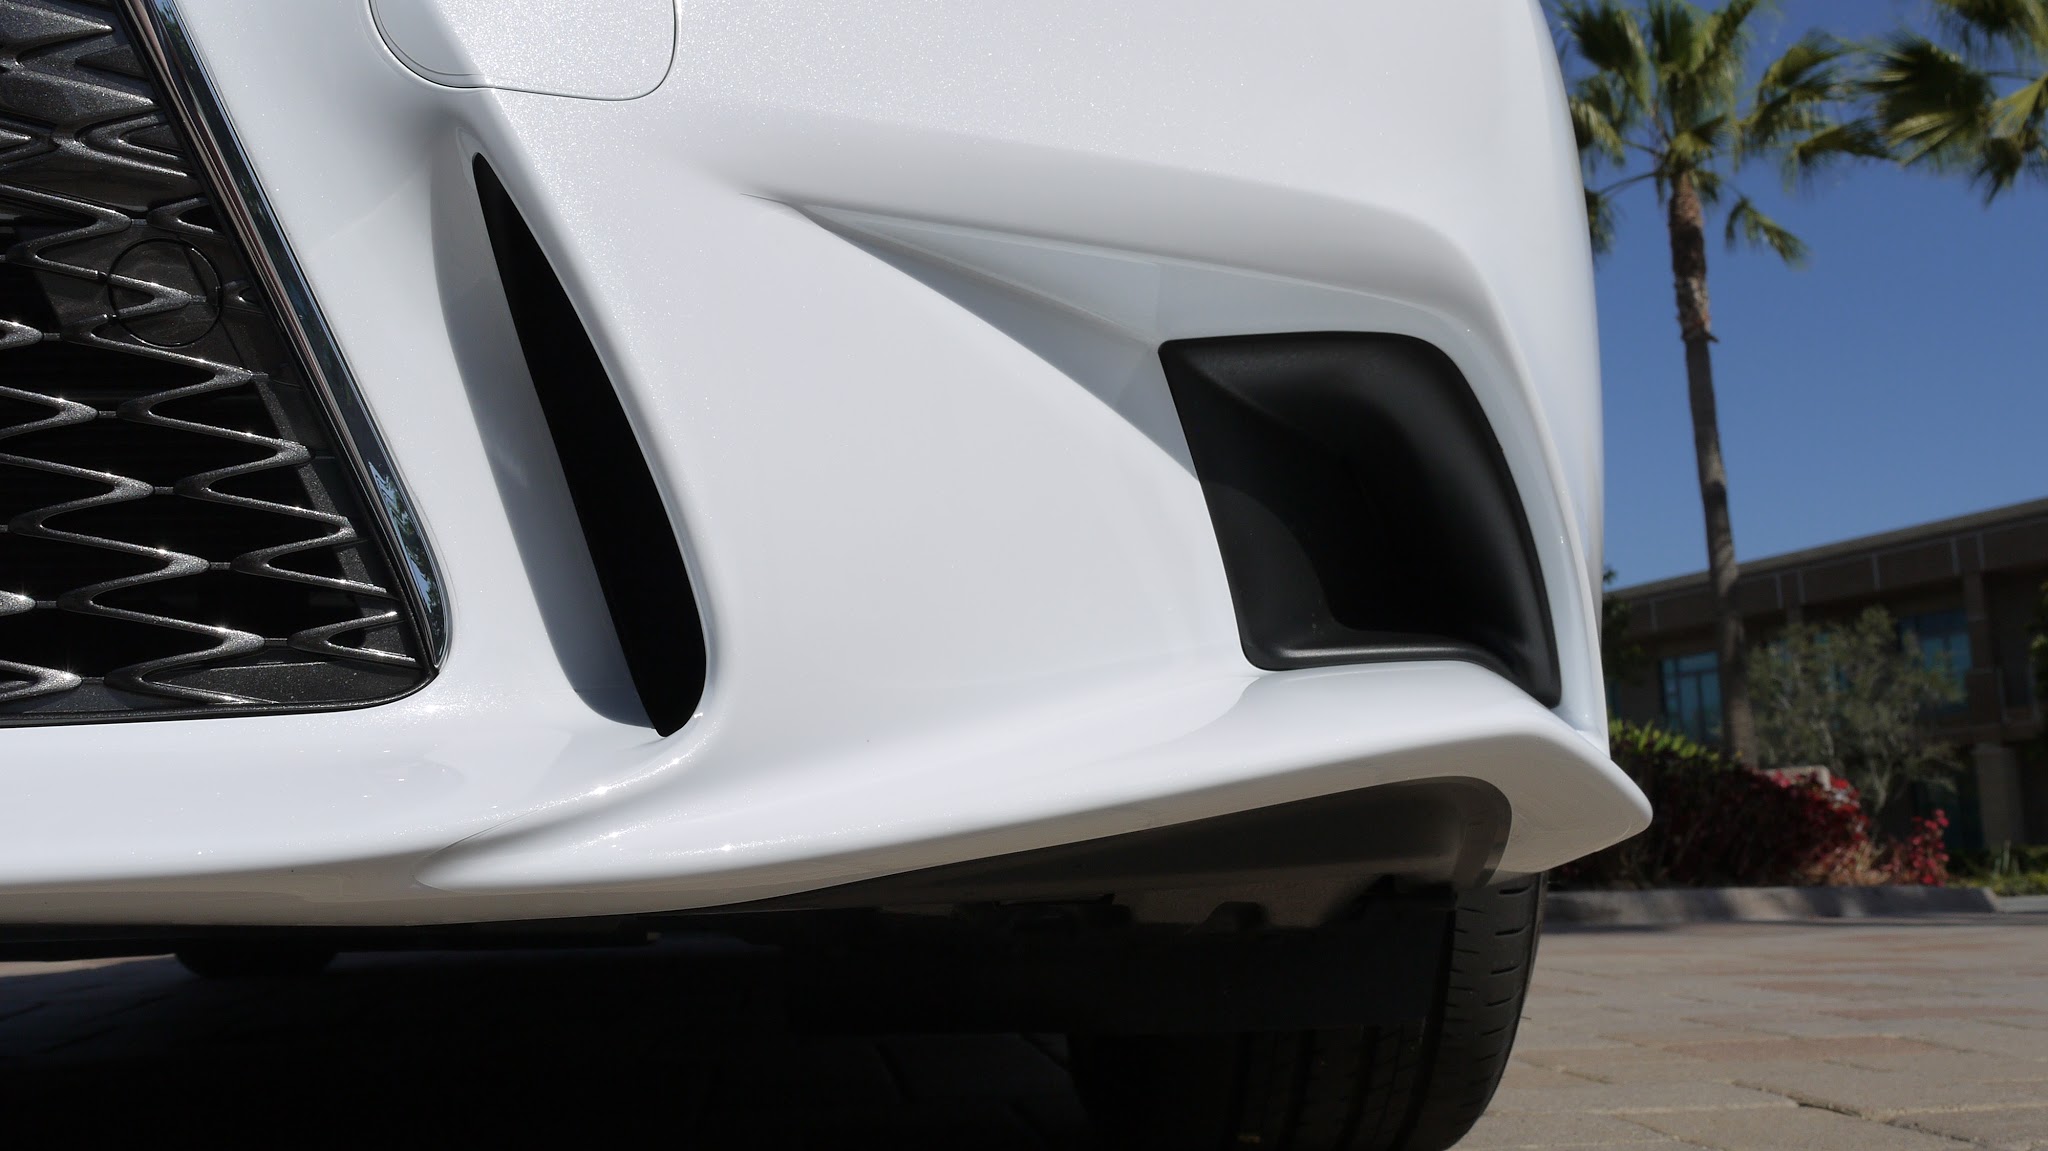
Lower bumper: Here you can see the cut-out for the tow hook cover, not the greatest cut, but it is part of the pre-cut kit from Xpel. Lower, you can barely see the seams along the curved edges leading into the middle brake cooling duct. You can also see a bit of the cut-out as the bumper tapers into the fake fog-light covers.

Lower bumper: Another close-up of the seams around the ducts. You can see how it wraps under the lip of the car so the edges are not visible from straight on view.
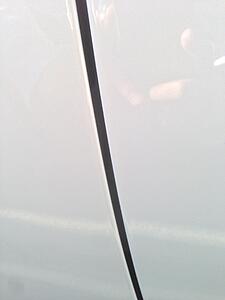
Bumper: The sides of the bumper are wrapped over the edge as much as possible, so you cannot really see a seam along the edge - the actual edge is on the wheel well side of the bumper. The same is true of the fender - it is wrapped into the wheel well so the edge is not visible from the side.

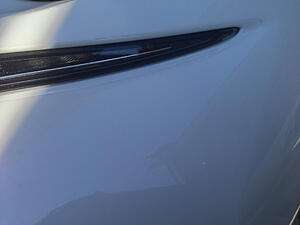
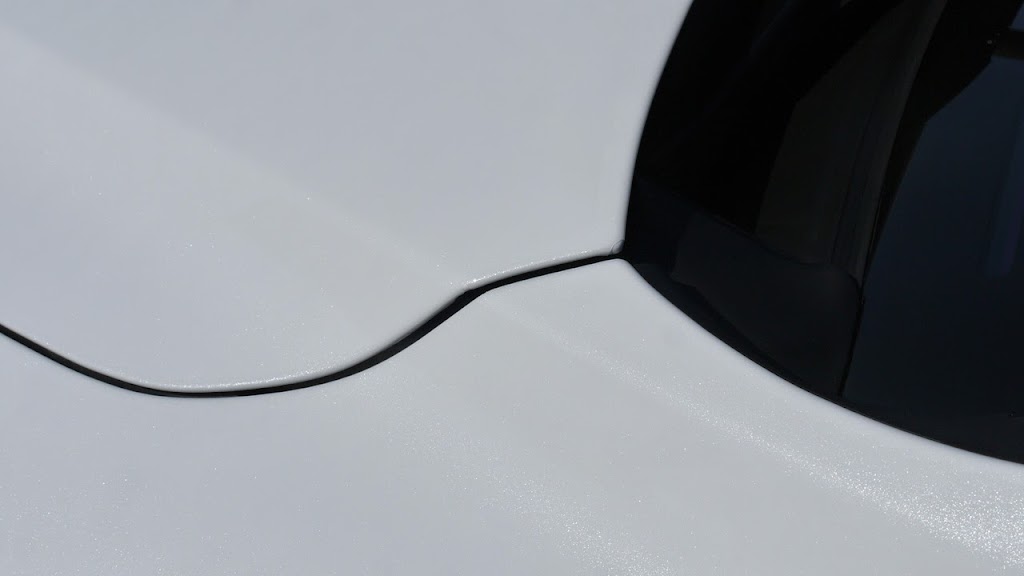
Fender, hood, bumper: The fender & hood are custom wrapped to go around the edges, so you do not see any exposed edges of film. The bumper is pre-cut, so the installer was not able to wrap the edges - you can see the seam below the fender line and headlight.

Fender: Again, the fender is wrapped around all the edges, so you do not see any seams at all.

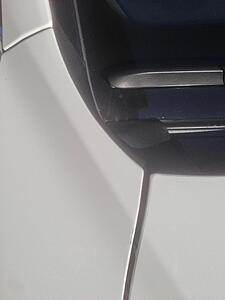
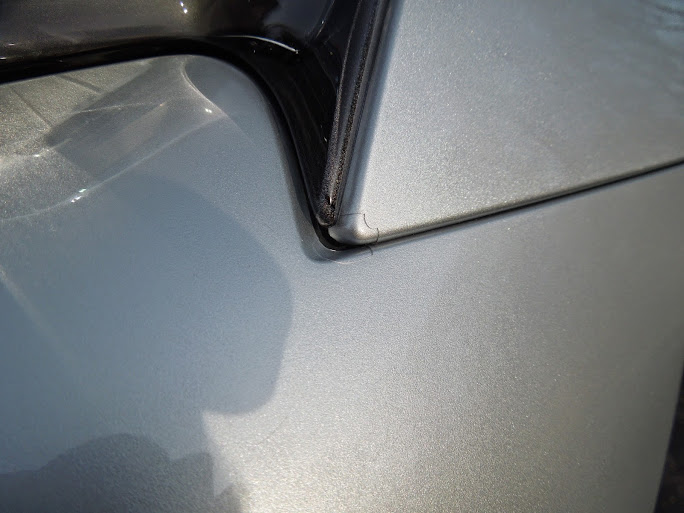
Hood (corner): This is what the back corners of the hood look like. There is a small gap in order to help fold the edges over properly, but it is not too noticeable.
Side mirrors: This is part of the pre-cut kit, it wraps well around the outer edge (LEFT PHOTO). It only covers the white part of the mirror - not the black piece, turn signal, or the white piece below. It does not wrap all the way to the inner side of the mirror (RIGHT PHOTO).

Additional high-resolution photos are in this album: https://plus.google.com/photos/10200...54412324249793
Bumper, full hood, full fenders, headlights, DRL, side mirrors, B-pillars, rear bumper (cargo area).
-Bumper, headlights, DRL, & side mirrors were part of Xpel's pre-cut pattern.
-Hood, fenders, & B-pillars were custom cut (to allow for wrapping around the edges to minimize visible seams).
Shop: Advance Auto Engineering (in Cerritos)
(Click on photos for detailed full-size images)
Overview: From a few steps back, the seams are not visible.

Headlight & DRL: Here you can see the seam that runs between the headlight & DRL, as well as the cut-out for the DRL.

Lower bumper: Here you can see the cut-out for the tow hook cover, not the greatest cut, but it is part of the pre-cut kit from Xpel. Lower, you can barely see the seams along the curved edges leading into the middle brake cooling duct. You can also see a bit of the cut-out as the bumper tapers into the fake fog-light covers.

Lower bumper: Another close-up of the seams around the ducts. You can see how it wraps under the lip of the car so the edges are not visible from straight on view.
Bumper: The sides of the bumper are wrapped over the edge as much as possible, so you cannot really see a seam along the edge - the actual edge is on the wheel well side of the bumper. The same is true of the fender - it is wrapped into the wheel well so the edge is not visible from the side.
Fender, hood, bumper: The fender & hood are custom wrapped to go around the edges, so you do not see any exposed edges of film. The bumper is pre-cut, so the installer was not able to wrap the edges - you can see the seam below the fender line and headlight.

Fender: Again, the fender is wrapped around all the edges, so you do not see any seams at all.

Hood (corner): This is what the back corners of the hood look like. There is a small gap in order to help fold the edges over properly, but it is not too noticeable.

Side mirrors: This is part of the pre-cut kit, it wraps well around the outer edge (LEFT PHOTO). It only covers the white part of the mirror - not the black piece, turn signal, or the white piece below. It does not wrap all the way to the inner side of the mirror (RIGHT PHOTO).

Additional high-resolution photos are in this album: https://plus.google.com/photos/10200...54412324249793
Thread Starter
Lead Lap
Joined: Dec 2013
Posts: 606
Likes: 2
From: VA
Thanks guys for all your help. Your cars look amazing! Lets talk numbers, would you guys mind giving me a rough figure of cost for your ppf? also, if you didn't state what body parts were done and what brand of ppf you used, please let me know when you also tell me your cost. i want to have a general idea of what to expect so i do not get ripped off.
jaznraz -- just out of curiosity, the installer took off your bumper and all, but why did they make so many cuts? i don't usually see that many i others?
WiLz -- they pre-cut looks pretty good! i'm really surprised, especially around the headlights, the cuts are so close to the headlights like its almost a custom job as oppose to pre-cut. were you able to convince your installer to tuck it behind the bumper and inside the fender well a little? or do they do it because it's just part of their business? this one installer i spoke with said he doesn't go beyond the edge of the bumper and tuck around. i'm wondering why the hell not?
The installer used the Xpel pre cut kit template, but extended all of the edges prior to cutting the ppf on his plotter. Due to that, my front bumper has the "normal" Xpel seams, but it's fully wrapped on all edges. I tried to get him to install the front bumper w/o a kit which would have eliminated all of the seams, but he said that he would never try to do this bumper w/o a pre cut kit. I wasn't going to persuade him to do something he didn't want to do, and he is the only Xpel authorized dealer/installer in my area, so I didn't have any other options. However, I am completely happy with the install/product - you can't see the seams from 2' away.
Sonyhome - Clear Bra Indy is an authorized Xpel dealer and installer. I also have an Xpel 10 year warranty card. Due to those reasons, I'm pretty confident that he didn't install something besides Xpel.
Did you get an Xpel warranty card from your installer?
I doubt that many on this forum are in my area, but if so, I highly recommend Clear Bra Indy. They will come to you and install the ppf in your garage.
http://clearbraindy.com/
Driver
Joined: Oct 2002
Posts: 154
Likes: 0
From: California
WiLz -- they pre-cut looks pretty good! i'm really surprised, especially around the headlights, the cuts are so close to the headlights like its almost a custom job as oppose to pre-cut. were you able to convince your installer to tuck it behind the bumper and inside the fender well a little? or do they do it because it's just part of their business? this one installer i spoke with said he doesn't go beyond the edge of the bumper and tuck around. i'm wondering why the hell not?
I don't know if the installer normally tucks the edges, but I did ask him to wrap as much as he could, and he said he'll do what he could. I wasn't expecting the pre-cut kit to look perfect, so whatever he was able to do was good enough for me.
Overall, the gaps are very minimal, most areas were less than 1mm, with the widest gaps still no more than 2 or 3mm.
The part that folded over into the wheel well did lift up a bit and accumulate some dirt from the tires right after installation. But I went back to the shop a week later (after all the moisture dried and the film was stuck on good), and he just cut a small strip off the edge. It doesn't wrap over as much now, but it looks much better. I'll get a few more close-up photos later if you want to see how it wraps over the edges.

I had 3M clear bra on my brand new IS 2012 2 years ago. It has been holding up strong and looks the same like day one. My front bumper has no rock chip whatover in 2 years. I highly recommend 3M clear bra.
One con on the clear bra is that, after many months, you will probably notice some small tiny black dust stick to it especially if you drive on highway at highspeed a lot. You will probably need to use some quick detailer to take it out with some rubbing.
For EXTRA layer of protection, I highly and highly recommend you all apply OPTICOAT on the entire car or at least on the clear bra. Opticoat has very good UV protection, chemical resistance, harder than OEM clear coat to prevent minor swirl, bead and sheet water as good or even better than wax.

Thread
Thread Starter
Forum
Replies
Last Post