When you click on links to various merchants on this site and make a purchase, this can result in this site earning a commission. Affiliate programs and affiliations include, but are not limited to, the eBay Partner Network.
I've spent the last half hour grinding down the ECU clips and can now feel the ECU freed from those points, but those two large wiring harnesses feel attached to the box as well.
Are there clips on those that haven't been identified in the thread?
Man, any help would be greatly appreciated. I have what looks like two cable lines running off the back of the alternator. One is at a right angle... When I look at the same spot on my denso replacement, this top one is actually screwed on... Wtf?
Ok, with a lot of patience....I was able to remove the ECU and the black box/housing. I was able to remove the pesky rear nut (luckily i can get my hand back there to actually feel it and put the socket directly on it). So, i have all bolts/nuts off, even the small 10mm on the right hand side of alt that holds the electrical wire, unplugged the electrical connection to the alt and disconnected the ground wire to the alt. Now, it will wiggle slightly with force, but I can't seem to get the damn thing out! Any tips?? This has been a major PITA, compared to every other DIY repair I've done....on ANY vehicle.
Hi, so my alternator took a crap on me with just 87K miles. I saw this post and found it easy enough for me to try and do this job myself to save some money. But I've come across a problem. I successfully remove the PITA nut the holds the alternator bracket, but I'm having trouble removing the top 14mm bolt in the alternator. it seems the nut that holds that 14mm bolt is moving. Ive tried holding that nut with a small vice grip so it wont move but there isn't much space there and I think I might strip it. Any suggestions?
Hi, so my alternator took a crap on me with just 87K miles. I saw this post and found it easy enough for me to try and do this job myself to save some money. But I've come across a problem. I successfully remove the PITA nut the holds the alternator bracket, but I'm having trouble removing the top 14mm bolt in the alternator. it seems the nut that holds that 14mm bolt is moving. Ive tried holding that nut with a small vice grip so it wont move but there isn't much space there and I think I might strip it. Any suggestions?
Nevermind, I was able to remove the alternator. Had to hold the nut in the back of the 14mm bolt with a 20mm monkey wrench. After that the installation was very simple thanks to this super helpful guide. Everyrhing seems to be running fine now. Thanks again for this post.
Thank you for the post! Very very helpful. I dont think i could have done it without it! much props! I did not remove the CPU, only the cover, seem to do the trick. Also, make sure to remove the back brace flange and stud. The reman alternator does not come with it.
Thanks to this I was able to get my alternator replaced. No more smoky, electrical burnt smell from the driver side engine. Real important to note: one major detail that was not mentioned on the OP’s post, DISCONNECT THE BATTERY!! I’ve done alternator change before but for some reason, in my rush to get this done, I too forgot to disconnect the battery. Sparks flew as I placed my socket wrench on the alternator’s ground wire. Which caused a blown fusible link. Which caused the car to not start at all.. Arrggghh. My mistake.��
So if for some reason this happened to you, click here to replace a fusible link. Replaced mine and all is well. Wish I hadn’t spent that extra dough for my silly mistake.��
And if you do re-connect the battery and you get a sluggish idle, perform an “idle re-learn”. YouTube has a how-to for Toyota/Lexus.
Last week I�ve started getting a very weak start. Barely turning over . At one point I had to push the start ten times for t to start. Thought it was the starter and almost replaced it . Realized battery is running low . Went to oreilt to check it and it said bad battery and voltage regular failed ..
would you guys change the whole alternator or try to just change the voltage regulator. ??
Originally Posted by idoke1
Excellent DIY! May I add that in the end, put everything back in reverse order.
If you're game for opening up the alternator one could replace voltage regulator.
I would steer away from fleebay knockoffs. It's not worth the labor. You might replace the diodes too. Just in case it was misdiagnosed and the diodes are bad too. When they fail, they send AC to a device meant to handle DC and kill it.
Well the dreaded Red Battery Light appeared on my dashboard. The battery is a year old and since this is not a daily driver, I have been using a Diehard charger-battery maintainer. I did the voltage test, car is running, I only get 11.8V across the battery, should have at least 13 to 14V across the terminals. The IS350 has 110k miles, pretty young to lose the Alternator but that’s what it appears to be. I have looked at a post of how to replace an alternator and I can probably tackle it. I will prefer to get somebody to replace it, a qualified shop or perhaps done by a Lexus tech, so it is done right. I know quite a few of the members have done it and have very detailed DIY’s and techniques which can prevent mis-assemblies.
Update: I had my alternator replaced by the Lexus dealer. Took an hour and he showed me the technique. I was in awe!
Just replaced the alternator on my '08 IS350, 178K miles.
Some tips:
- You DO NOT need to remove the air intake OR water reservoir as mentioned in the OP's DIY.
- The hell nut behind the alternator is 12mm
- When replacing any nuts, do yourself the favor and use painter's tape to tape the nut to the socket. It'll make life easier.
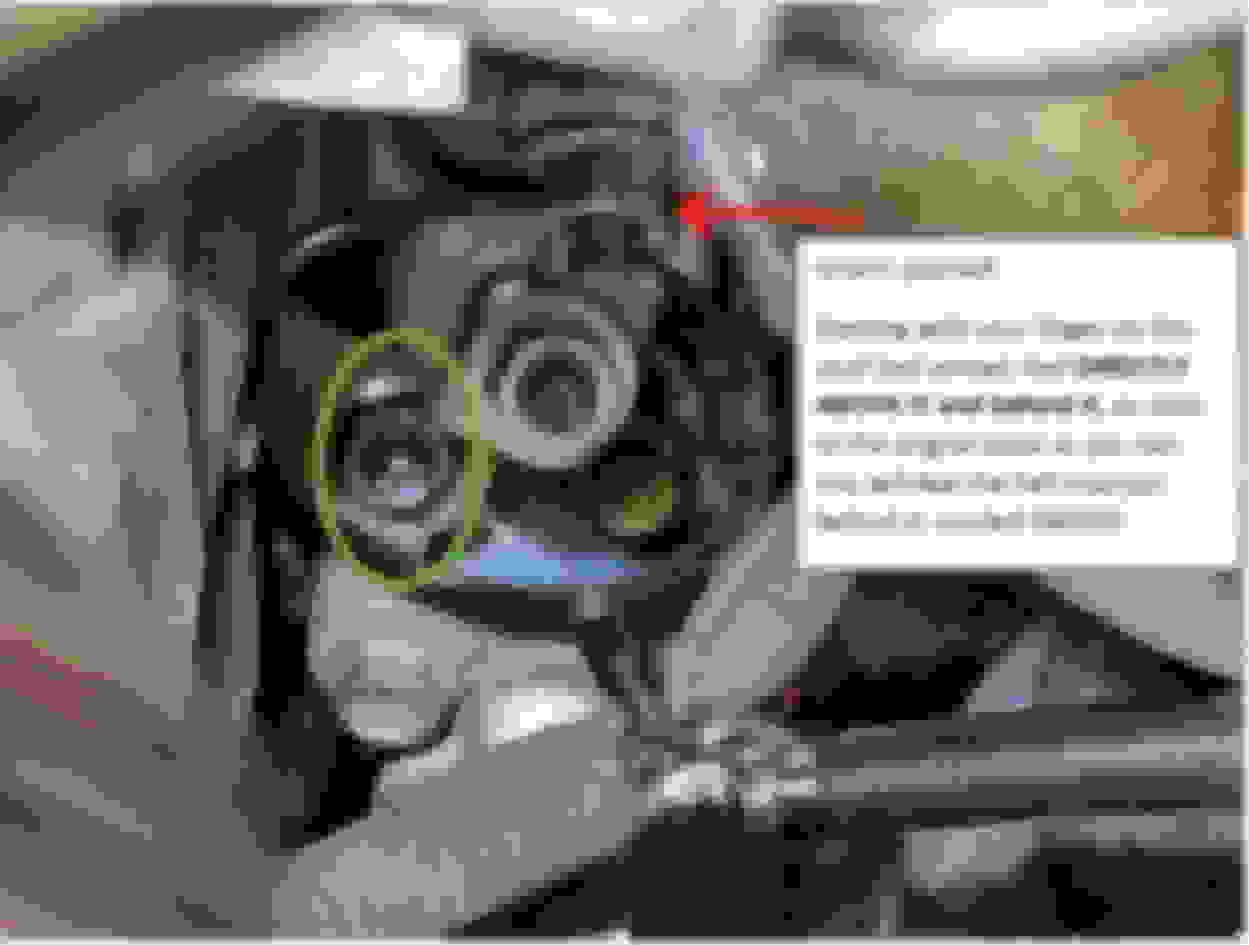
Tips for the hell nut:
- The trick to find the nut is the following:
1. get your finger on the stud as noted on the red arrow in the picture below.
2. then put your finger just above it, and go STRAIGHT BEHIND IT. This is the hell nut (as circled in green)
3. You know your touching the nut if you feel the bracket surrounding the nut.
Thanks a lot for this. But now I'm getting error P0348 with check check engine light on and traction control light on. Says camshaft sensor position on the code. I checked the connections no wires were loose. 2009 is250. Any assistance in tackling this would be appreciated. PS: I also changed the serpentine belt.
Thanks a lot for this. But now I'm getting error P0348 with check check engine light on and traction control light on. Says camshaft sensor position on the code. I checked the connections no wires were loose. 2009 is250. Any assistance in tackling this would be appreciated. PS: I also changed the serpentine belt.
You might have accidentally pulled a wire out of a connector to the camshaft position sensor. Unfortunately this happens often when folks replace their alternators and fail to remove all connectors and wiring harnesses from the alternator area and end up pulling on something they didn't intend to.
 01-23-18, 09:55 AM