
DIY video: GS350 Alternator Replacement

Thread Starter
Lexus Champion
Joined: Aug 2012
Posts: 1,729
Likes: 132
From: Toronto, Canada
To compliment the wonderful DIY photo - writeup of alternator replacement on the IS350 forum here:
https://www.clublexus.com/forums/is-...r-removal.html
I made a DIY tutorial YouTube video on the diagnostics and replacement of the alternator in my 2007 Lexus GS350:
Here are a few photos from the procedure:
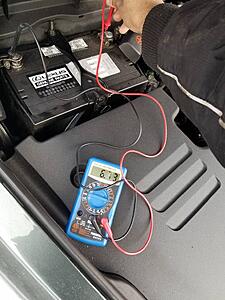
Symptoms for me included loss of power steering, no-start / slow crank, flickering lights, lack of electronic accessories, a whirring sound and burning noise coming from the alternator and a load voltage dropping down to 6-8V with the engine running and accessories turned on:
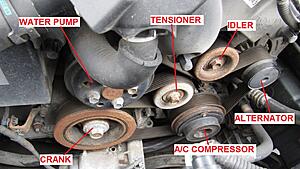
First step, remove everything that's in the way:

Turn the tensioner counter clockwise to remove the belt, noting how it winds around each pulley:
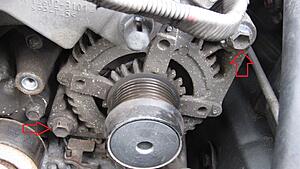
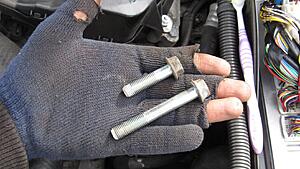
Remove two alternator bolts:
Between the fender side (where the ECU is) its a bit tight but you need to remove the 10mm nut that holds the positive cable to the alternator. I assume you've already disconnected the battery, right?
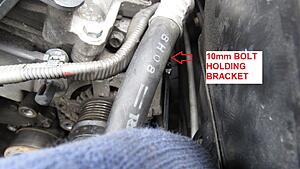
There's a hidden 10mm bolt holding a bracket to the wire that goes down to the A/C compressor. Use a ratcheting wrench to whip it off:
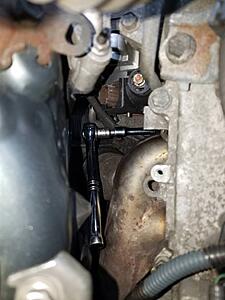
The hard part. The one nut that's on a bracket behind the alternator below the exhaust manifold. You do cannot see this bolt, so I used my phone to take a photo of it and then feeled around until I got my ratchet on it. On the GS350, you don't have to remove the ECU to get it, it seems like the IS350 you'd have to:
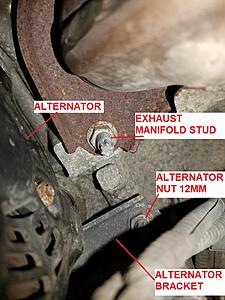
Its a 12mm nut, with a 3" and 1" extension on a 3/8" ratchet:
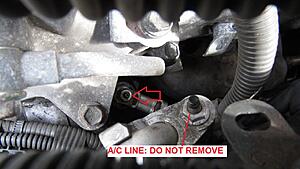
The manual calls for removing the A/C compressor. You don't need to, just wiggle the alternator off the rear stud, downward off its mounting "ears" and then outward around the A/C hose:
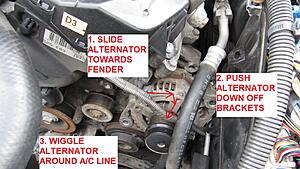
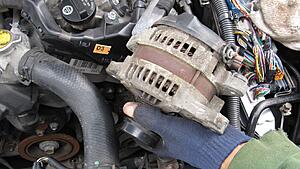
Alternator out:
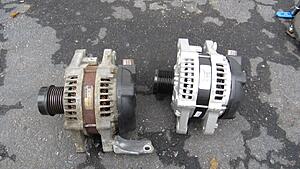
I put in a Remy rebuilt alternator, you have to transfer the stud and bracket:
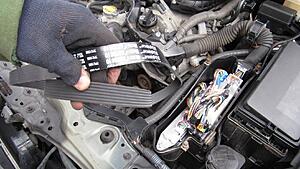
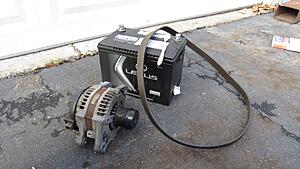
I also installed a new Gates belt and a Motomaster Eliminator battery:
And that's pretty much it, it seems like the alternator and the battery was original, the date code said 2005 and my car is a 2007!
Hope it helps!
https://www.clublexus.com/forums/is-...r-removal.html
I made a DIY tutorial YouTube video on the diagnostics and replacement of the alternator in my 2007 Lexus GS350:
Here are a few photos from the procedure:
Symptoms for me included loss of power steering, no-start / slow crank, flickering lights, lack of electronic accessories, a whirring sound and burning noise coming from the alternator and a load voltage dropping down to 6-8V with the engine running and accessories turned on:

First step, remove everything that's in the way:

Turn the tensioner counter clockwise to remove the belt, noting how it winds around each pulley:

Remove two alternator bolts:


Between the fender side (where the ECU is) its a bit tight but you need to remove the 10mm nut that holds the positive cable to the alternator. I assume you've already disconnected the battery, right?

There's a hidden 10mm bolt holding a bracket to the wire that goes down to the A/C compressor. Use a ratcheting wrench to whip it off:

The hard part. The one nut that's on a bracket behind the alternator below the exhaust manifold. You do cannot see this bolt, so I used my phone to take a photo of it and then feeled around until I got my ratchet on it. On the GS350, you don't have to remove the ECU to get it, it seems like the IS350 you'd have to:

Its a 12mm nut, with a 3" and 1" extension on a 3/8" ratchet:

The manual calls for removing the A/C compressor. You don't need to, just wiggle the alternator off the rear stud, downward off its mounting "ears" and then outward around the A/C hose:

Alternator out:

I put in a Remy rebuilt alternator, you have to transfer the stud and bracket:

I also installed a new Gates belt and a Motomaster Eliminator battery:

And that's pretty much it, it seems like the alternator and the battery was original, the date code said 2005 and my car is a 2007!

Hope it helps!


Thread Starter
Lexus Champion
Joined: Aug 2012
Posts: 1,729
Likes: 132
From: Toronto, Canada
Thanks! According to those in some other threads, you'd only need to loosen the A/C compressor bolts to get it off the engine and that should give you enough room to get at the alternator. No need to drain the refrigerant.
Driver School Candidate
Joined: Feb 2018
Posts: 1
Likes: 0
From: Ks
I actually just had to do this a few weeks ago. Same symptoms as described. It was actually pretty straight forward and I didn't have to remove the ac compressor, mine is awd. If I did it in one sitting, it would have taken probably 3 hours, but I did it a little at a time over 2 days span after work. I used my borescope to see that back bracket bolt and there was no way I was putting that back on afterwards. Mine went out at 95k.
Thread Starter
Lexus Champion
Joined: Aug 2012
Posts: 1,729
Likes: 132
From: Toronto, Canada
Mine had 242,000 kilometers.
Good to know on the AWD it can be done without the A/C compressor being removed. If you watched my video I showed a tip to put a tape on the nut to catch it on the stud if you want to replace it.
That nut is in a really stupid place, I don't see why the two front bolts can't hold the alternator on securely enough?
I actually just had to do this a few weeks ago. Same symptoms as described. It was actually pretty straight forward and I didn't have to remove the ac compressor, mine is awd. If I did it in one sitting, it would have taken probably 3 hours, but I did it a little at a time over 2 days span after work. I used my borescope to see that back bracket bolt and there was no way I was putting that back on afterwards. Mine went out at 95k.
That nut is in a really stupid place, I don't see why the two front bolts can't hold the alternator on securely enough?

Intermediate
Joined: Jan 2018
Posts: 470
Likes: 40
From: NY
Mine had 242,000 kilometers.
Good to know on the AWD it can be done without the A/C compressor being removed. If you watched my video I showed a tip to put a tape on the nut to catch it on the stud if you want to replace it.
That nut is in a really stupid place, I don't see why the two front bolts can't hold the alternator on securely enough?
Trending Topics


Helped a lot and saved money. Thanks. I didn�t remove the black cover like you did. It didn�t give me any extra room. I did remove the black wire that goes into the fuse box. That gave me a little more room. Thanks again.


10th Gear
Joined: Jul 2014
Posts: 11
Likes: 1
From: MA
I have an 07 with AWD and I didn't have to touch the AC in any way. Didn't loosen or remove any bolts on the compressor, nothing. The alternator came right out easily. Getting it back in was a bit more difficult, but only because of that stupid bracket in the back of the alternator that has to go over the stud. You can't see the stud, so it's a bit tricky to get the bracket over and onto it.
Before I began the installation process I thought about throwing that bracket in the trash where it belongs. I don't know why I didn't... but realistically it prob took 5 minutes of jockeying it around before success(!). It's just that 5 minutes feels like a long time when your jockeying something around trying to get it on an unseen & unreachable stud.
I also thought about cutting a slot from the hole to the end of the bracket, for two reasons. One, I could start the nut on the stud while the alternator was out of the car, which would make things easier. Two, I could just slide the alternator into place instead of have to get that bracket up over and onto the stud.
I did neither and just did it the right, and most difficult way. It really wasn't that hard.
Side note: I had a local starter/alternator rebuild shop do the rebuild. It only cost $95. The guy has been in business for nearly 4 decades, does top notch work, quick, and I like giving my business to locals. Plus it was less than half the price of the auto parts stores. You'd think for that price he'd have a line out the door, but I guess younger people maybe don't know that people even DO this work locally and for short money. They just go to Pep Boys or Advance and fork over the dough. But I digress.
Intermediate
Joined: Jan 2018
Posts: 470
Likes: 40
From: NY
Side note: I had a local starter/alternator rebuild shop do the rebuild. It only cost $95. The guy has been in business for nearly 4 decades, does top notch work, quick, and I like giving my business to locals. Plus it was less than half the price of the auto parts stores. You'd think for that price he'd have a line out the door, but I guess younger people maybe don't know that people even DO this work locally and for short money. They just go to Pep Boys or Advance and fork over the dough. But I digress.
One local shop that has exclusively 5 star reviews uses a local re-builder. He told me he NEVER had a comeback.He has some installed 20 years ago and customers use him for all service.
He said the cars should be tagged in the scrapyard for good alternators :lol:.