
DIY for you HALO fans *56k you're alright*
 01-01-08, 09:01 AM
#1
"Halo's are for BMW's"
"Why don't you rebadge IS335"
"It's like putting lamborghini doors on when you don't have a lamborghini"
etc.... etc....
I've always liked Halos since they first came out... unfortunately Lexus was not the one who thought of the idea... I don't want any problems guys... please just respect my thread, like the title says this is for the Halo fans. I appreciate it. Happy New Year.
Alright SO...
Due to some of the threads opened questioning about HALO's i decided to pull the trigger and have a "little" DIY thread.
I got a lot of great information on this site by searching and will link those sites in this thread to help some of you... this DIY is going to be brief and if you do EXACTLY as i say... you'll be fine... I think everyone will be able to do this DIY...it just takes ALOT of time and patience.
First i removed the bumper which thanks to DJ amtrax I didn't have any problems.... I linked his thread for pictures if you guys needed it
Link to DJ Amtrax bumper removal
https://www.clublexus.com/forums/sho...d.php?t=261379
Once you have the bumper off... and the headlight out I kept the harness and everything intact with the car because i was scared i was going to mess up the HID auto leveling system.
Remove all the bulbs, removable plastic and all screws that you can. There are two wires (BLUE) that go into the headlight with a rubber surrounding that prevents condensation. you can see clearly in these pictures
https://www.clublexus.com/gallery/da...0/DSC01809.JPG
https://www.clublexus.com/gallery/data//500/DSC01806.JPG
You will need to remove the two plastic low beam/high beam covering to see and remove the wires
covers are shown here clearly

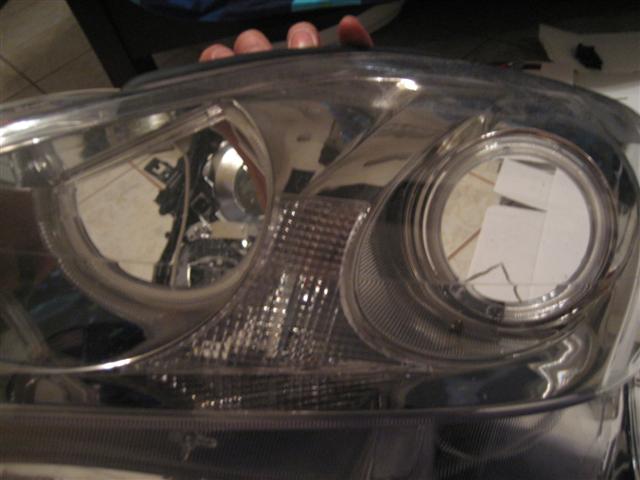
after everything is removed it will look like this

the wire that connects to the FACTORY HID BULB will remain in the headlight... it is connected to something that looks like a computer chip that is NOT removable I was scared putting this in the oven but i had no other way
It is located on the BOTTOM of the headlight and has warning signs ALL over it

Now i got great info from umnitza followed with photos here
http://www.umnitza.com/product_info....oducts_id=1123
http://www.umnitza.com/gallery/view_...e=is350install
Preheat the oven for 5 minutes at 200 degrees
Put it in
it's recommended to wait 20 minutes from umnitza but i was so scared of messing up that computer chip i only waited for 17 to be exact
take it out and PRY from one end to the other until you get it open... I started prying from the high beam "L" point to the amber plastic just in case anyone wanted to know
https://www.clublexus.com/gallery/data//500/halo_004_Small_.jpg
so now for the halos
I got them from EBAY
http://cgi.ebay.com/ebaymotors/ws/eB...170683466&rd=1
it comes with double sided 3M tape which fits perfectly in the headlights
I used half of the long strip on the top and on the bottom as shown in picture


align the headlights together as close to it's original fitment as you can, pull the wires to the back of the headlight so you can connect it later to another ballast which will stay INSIDE the headlight.
Put it back in the oven bake for 17 more minutes and once its out squeeze as hard as you can and try to align the headlights back to it's original form
Before

After

the kit comes with 2 small black ballasts with a power wire and a ground wire same concept as if you were installing HIDs to a non-HID car
https://www.clublexus.com/forums/sho...ht=hid+install
I had two options... connect it somewhere OUTSIDE of the headlight and risk condensation with the wires running through the plastic coverings or keep the ballast inside the headlight (which fits perfectly with room to spare) and connect the wire to a power source inside the headlight.
I went with option two of course
I chose to wire the HALOS through my parking light bulb (168/194 bulbs) I also wanted my parking light bulb to light up too so what i did was just simply slit the wires and connected the halos to the 168 bulb but if you didn't want to have both light up... you could simply stick the two prongs they give you into the socket and it WILL work.
PURPLE IS GROUND GREEN IS POWER

put everything back together and you are up and running
I would recommend removing and doing only one headlight at a time so when your putting back on screws you will have a model to compare.
any questions feel free to ask.
i'll have pictures of the headlight with the halos on once i put my custom eyelids back on
"Why don't you rebadge IS335"
"It's like putting lamborghini doors on when you don't have a lamborghini"
etc.... etc....
I've always liked Halos since they first came out... unfortunately Lexus was not the one who thought of the idea... I don't want any problems guys... please just respect my thread, like the title says this is for the Halo fans. I appreciate it. Happy New Year.
Alright SO...
Due to some of the threads opened questioning about HALO's i decided to pull the trigger and have a "little" DIY thread.
I got a lot of great information on this site by searching and will link those sites in this thread to help some of you... this DIY is going to be brief and if you do EXACTLY as i say... you'll be fine... I think everyone will be able to do this DIY...it just takes ALOT of time and patience.
First i removed the bumper which thanks to DJ amtrax I didn't have any problems.... I linked his thread for pictures if you guys needed it
Link to DJ Amtrax bumper removal
https://www.clublexus.com/forums/sho...d.php?t=261379
Once you have the bumper off... and the headlight out I kept the harness and everything intact with the car because i was scared i was going to mess up the HID auto leveling system.
Remove all the bulbs, removable plastic and all screws that you can. There are two wires (BLUE) that go into the headlight with a rubber surrounding that prevents condensation. you can see clearly in these pictures
https://www.clublexus.com/gallery/da...0/DSC01809.JPG
https://www.clublexus.com/gallery/data//500/DSC01806.JPG
You will need to remove the two plastic low beam/high beam covering to see and remove the wires
covers are shown here clearly
after everything is removed it will look like this
the wire that connects to the FACTORY HID BULB will remain in the headlight... it is connected to something that looks like a computer chip that is NOT removable I was scared putting this in the oven but i had no other way
It is located on the BOTTOM of the headlight and has warning signs ALL over it
Now i got great info from umnitza followed with photos here
http://www.umnitza.com/product_info....oducts_id=1123
http://www.umnitza.com/gallery/view_...e=is350install
Preheat the oven for 5 minutes at 200 degrees
Put it in
it's recommended to wait 20 minutes from umnitza but i was so scared of messing up that computer chip i only waited for 17 to be exact
take it out and PRY from one end to the other until you get it open... I started prying from the high beam "L" point to the amber plastic just in case anyone wanted to know
https://www.clublexus.com/gallery/data//500/halo_004_Small_.jpg
so now for the halos
I got them from EBAY
http://cgi.ebay.com/ebaymotors/ws/eB...170683466&rd=1
it comes with double sided 3M tape which fits perfectly in the headlights
I used half of the long strip on the top and on the bottom as shown in picture
align the headlights together as close to it's original fitment as you can, pull the wires to the back of the headlight so you can connect it later to another ballast which will stay INSIDE the headlight.
Put it back in the oven bake for 17 more minutes and once its out squeeze as hard as you can and try to align the headlights back to it's original form
Before
After
the kit comes with 2 small black ballasts with a power wire and a ground wire same concept as if you were installing HIDs to a non-HID car
https://www.clublexus.com/forums/sho...ht=hid+install
I had two options... connect it somewhere OUTSIDE of the headlight and risk condensation with the wires running through the plastic coverings or keep the ballast inside the headlight (which fits perfectly with room to spare) and connect the wire to a power source inside the headlight.
I went with option two of course
I chose to wire the HALOS through my parking light bulb (168/194 bulbs) I also wanted my parking light bulb to light up too so what i did was just simply slit the wires and connected the halos to the 168 bulb but if you didn't want to have both light up... you could simply stick the two prongs they give you into the socket and it WILL work.
PURPLE IS GROUND GREEN IS POWER
put everything back together and you are up and running
I would recommend removing and doing only one headlight at a time so when your putting back on screws you will have a model to compare.
any questions feel free to ask.
i'll have pictures of the headlight with the halos on once i put my custom eyelids back on
Last edited by Batmobile; 01-03-08 at 10:11 PM.


 01-01-08, 05:41 PM
#7
Pics are really hard to show... The Halo's are a nice white.... capturing the light is pretty hard but here's a snap shot and a little video for you guys.

You all probably already know my DRL's don't turn off because i just never took it out of park... Just realized the first video's bad but the second one should make up for it


Last edited by Batmobile; 01-01-08 at 06:23 PM.
Trending Topics
01-01-08, 05:55 PM
#10
Lexus Test Driver
You are the legend!! I couldn't imagine that I took off the headlight and put it into the oven bake...
What a great job you have done there! Please take some night shots and share them with us
What a great job you have done there! Please take some night shots and share them with us

 01-01-08, 06:05 PM
#13
Lexus Champion

