

 01-09-15, 10:53 AM
Last edit by: IB Advertising
See related guides and technical advice from our community experts:
Browse all: Lexus IS Lighting Guides
- Lexus: How to Replace Your Headlights and Fog Lights
Step by step instructions for do-it-yourself repairs
Browse all: Lexus IS Lighting Guides

DIY LED Foglight Install (NON-Fsport) with XB LED fog lights
10-13-14, 08:49 PM
#1
Advanced
Thread Starter
Hi everyone,
Got my Morimoto XB LED Type T Foglights from The Retrofit Source and decided to write an install DIY. This DIY should apply to any other LED fog's that directly replace the bulb/housing (OEM Lexus, another brand I saw for sale in the For Sale section, etc.) Anyways, the morimoto were the most affordable and with the best reviews, so I went with them. Any install is done at your own risk. If you don't believe you can handle the install, take it to a professional.
Install time was 2 hours, taking pictures. I would be able to get it done in an hour or so my second time.
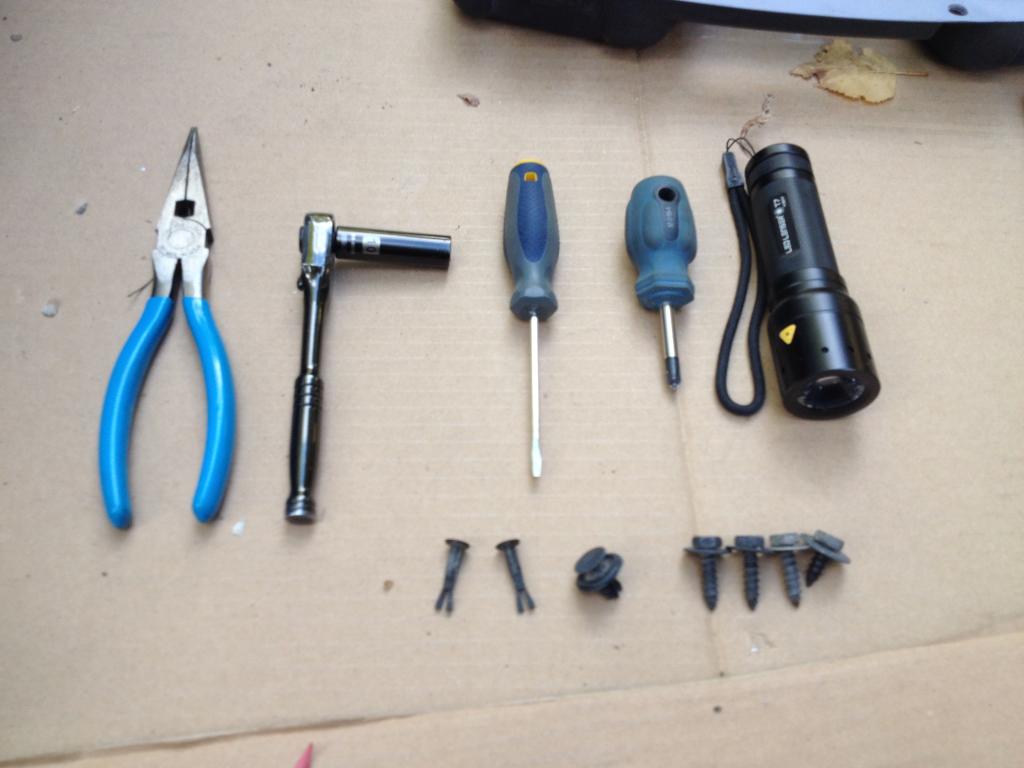
First, the tools you need, i used:
1x Needle nose pliers
1x Flashlight
1x Stubby Phillips screwdriver
1x Small flat screwdriver (for prying mostly)
1x 10mm 1/4" socket and wrench
The hardware i removed (per side), includes
4x 10mm screws (three from under the bumper, 1 from in the fenderwell)
1x pushclip (from under the bumper)
2x push-in clips (from the fender liner)
1x phillips screw (holds in the foglight itself)
I will write the install for the drivers side. The passenger side is exactly the same.
Lay some cardboard on the ground where you are working for your own comfort and not to damage anything (fog lenses) and to leave the parts (screws can be pressed into it to keep them from rolling away)
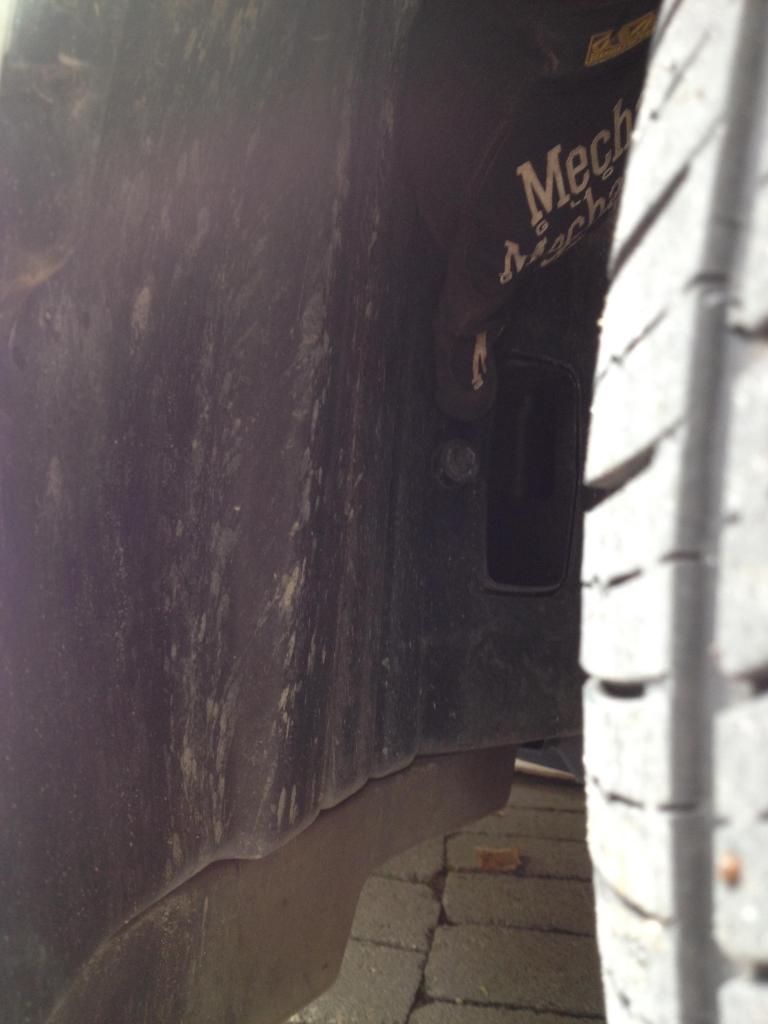
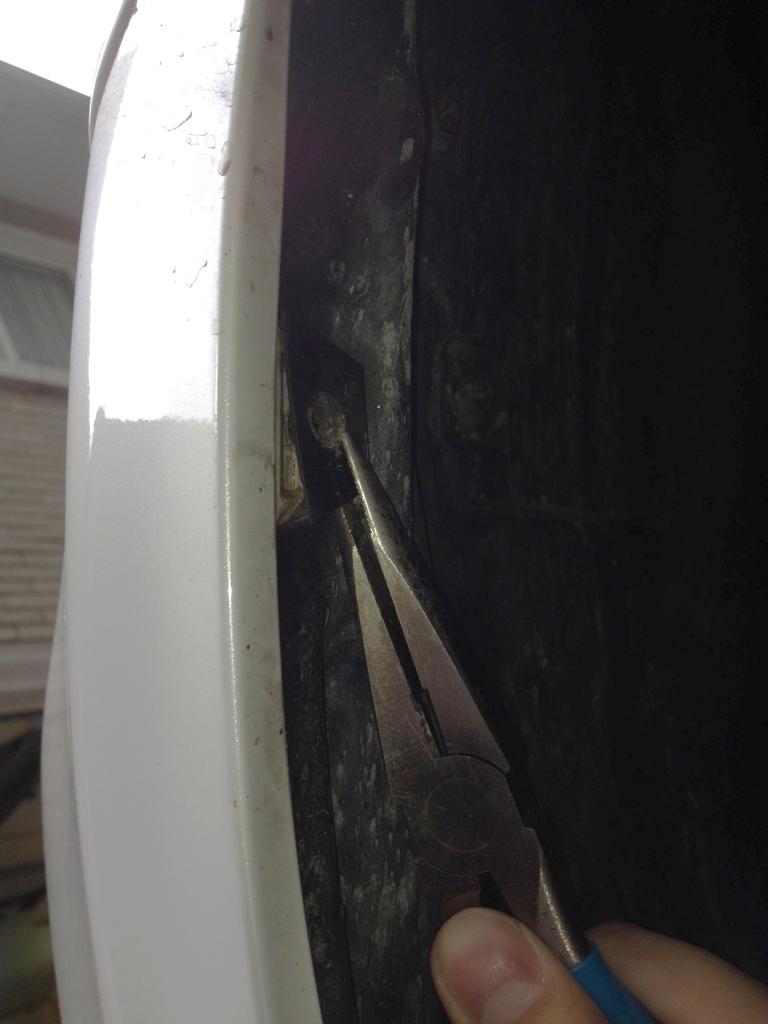
First, turn the wheel to the drivers side. Remove the 10mm screw shown here:
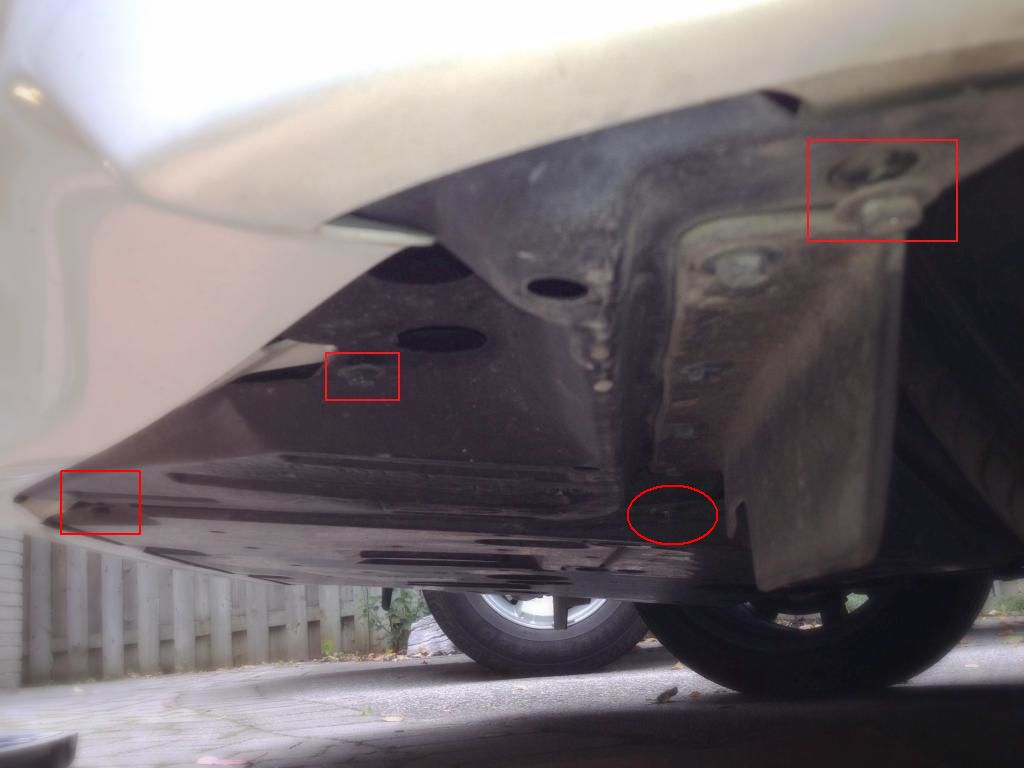
Next, turn the wheel to the passenger side. Here, first remove the 3x 10mm screws (square) and 1x pushclip (circle) from below the bumper as seen here (the 3 screws and the pushclip have been nearly removed to show which ones are applicable.
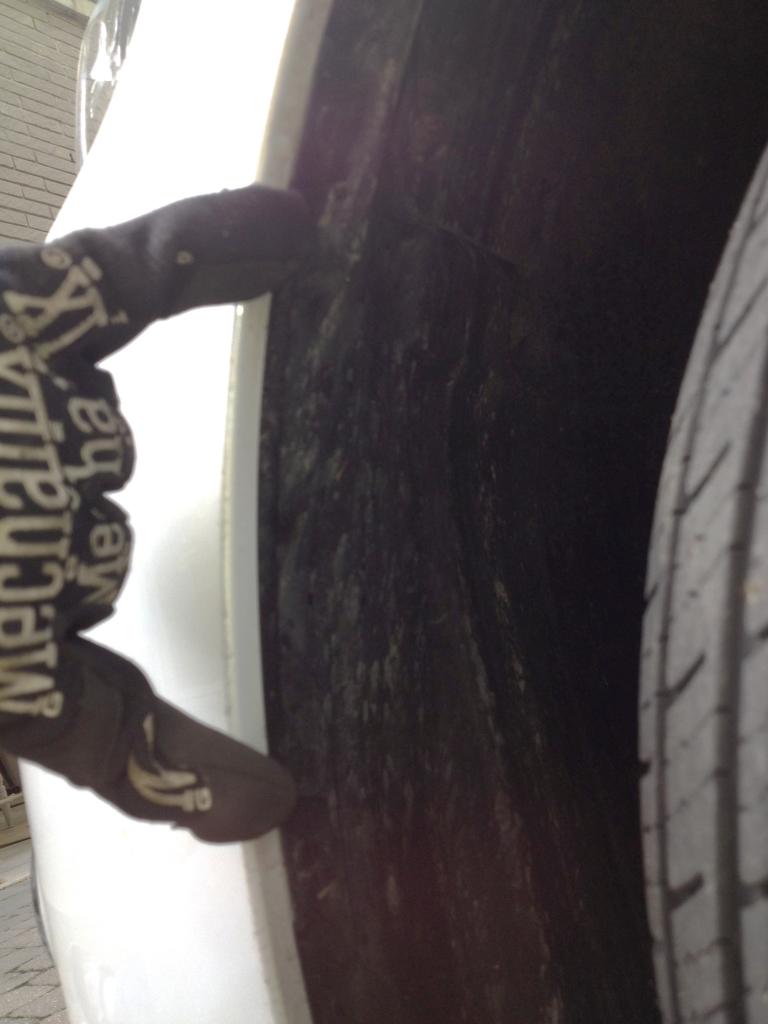
Once the screws and clip are removed, gently pull down the plastic liner and let it hang.
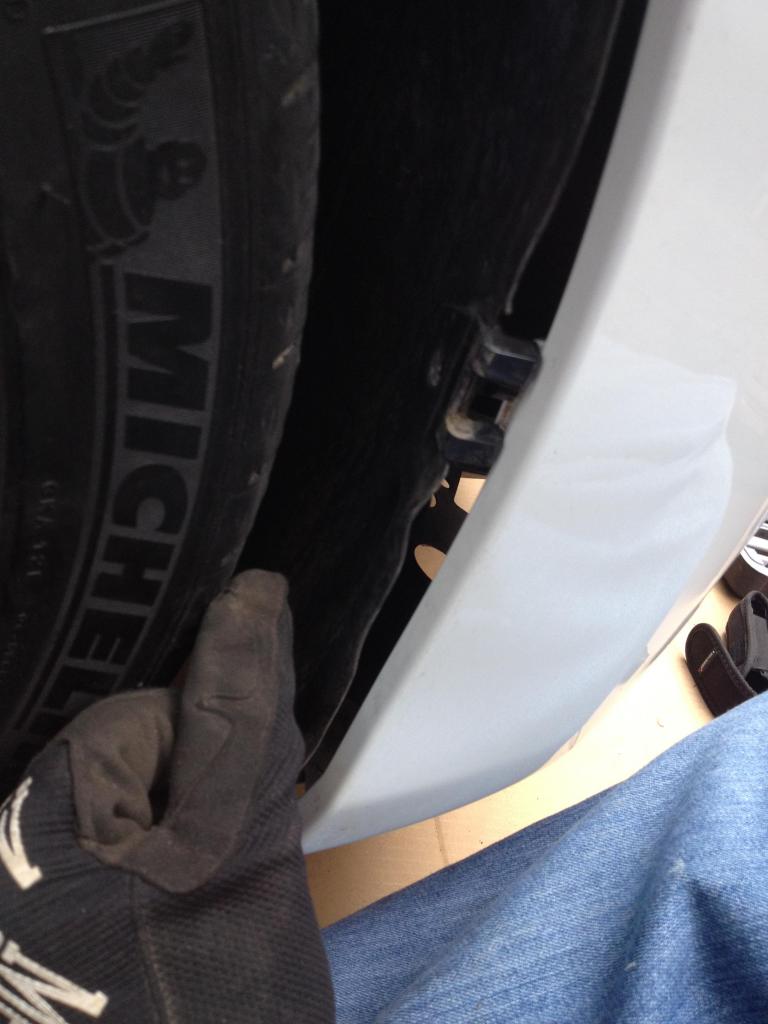
Next, remove the two push-in clips. What i did was turn the flat 90 degrees, then use the flat screwdriver to pry the pin out. If it doesn't come out easy, turn the opposite direction. They were quite easy to remove.
Next, i un-fastened the two clips that hold the fender liner on (after you have fully removed the two push-in clips. I found the way to unclip them without breaking anything, would be to grab them with the needlenose pliers and turn them 10-20 degrees to pop them out of the fender clip. again do not pry too hard on these. You only need to get them off the fender clip to let the liner move.
Here is what it should look like when removed (drivers side pic did not come out right)
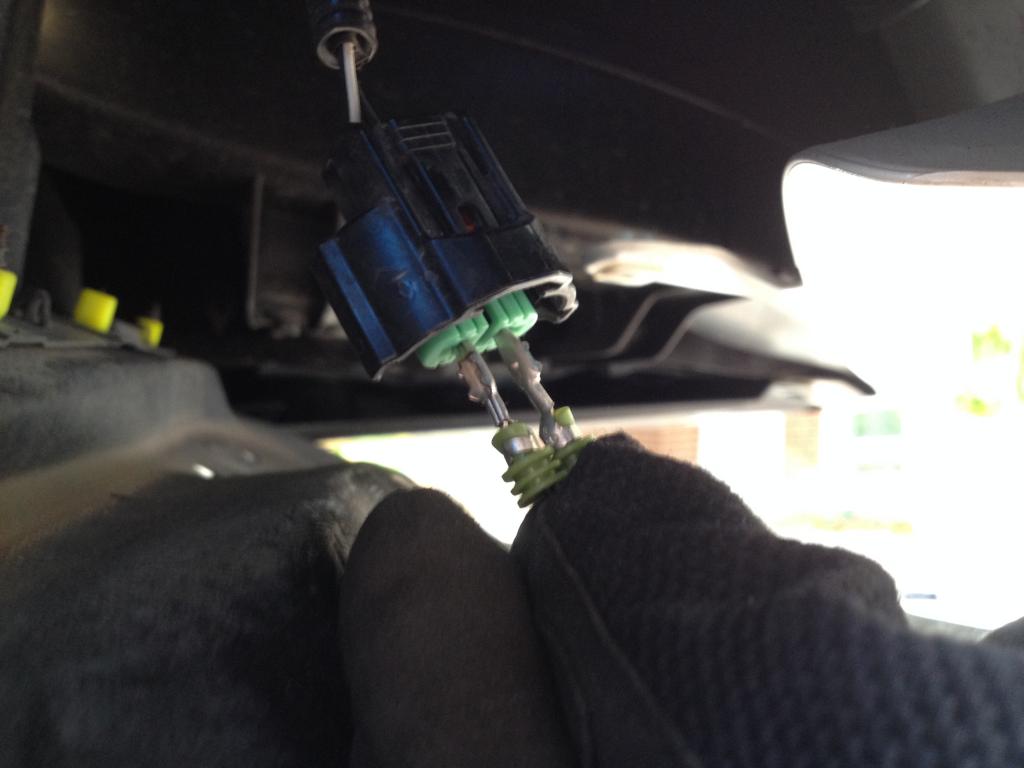
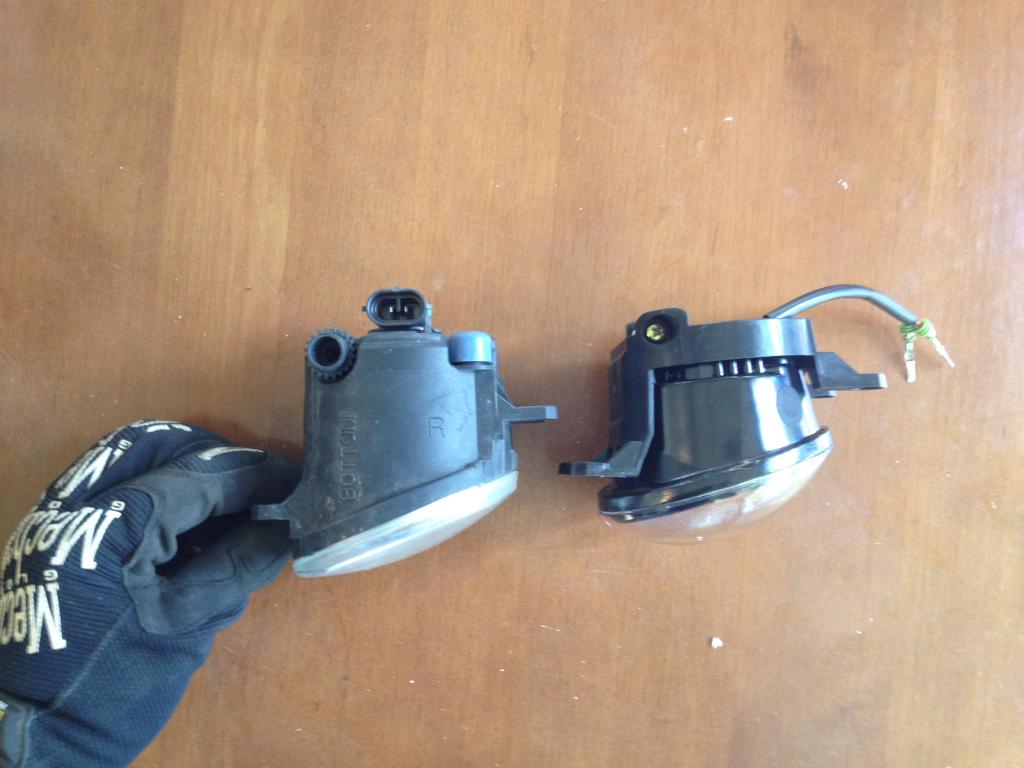
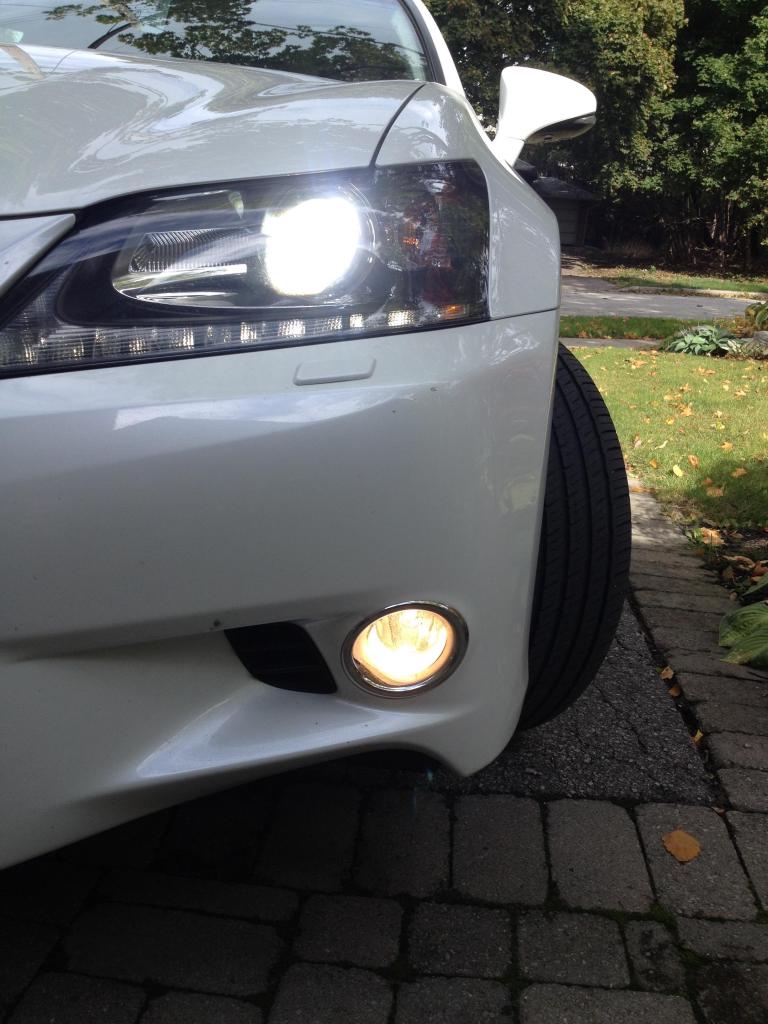
Once these two steps are complete, you should have access to the fog light. First, remove the wiring connection from the fog. Then, use the short phillips screw driver to get the fog out. The silver screw is the one to be removed. Once the screw is removed, the fog should come right out of it's "home". This is what it looks like on the inside (again another passenger side pic)

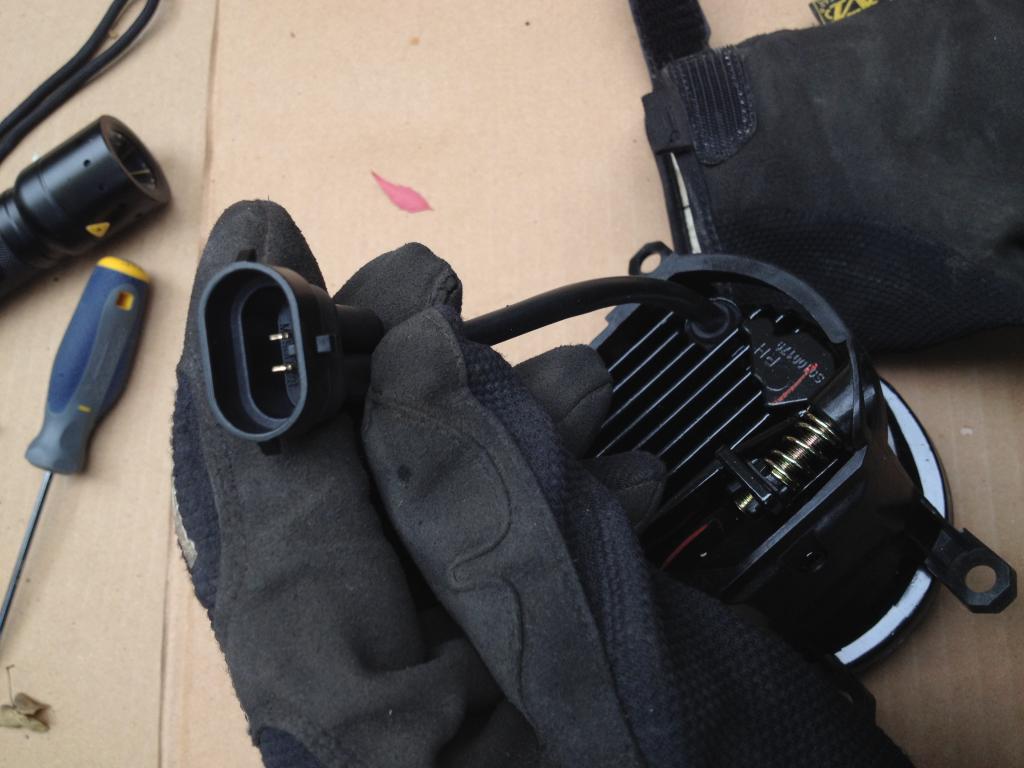
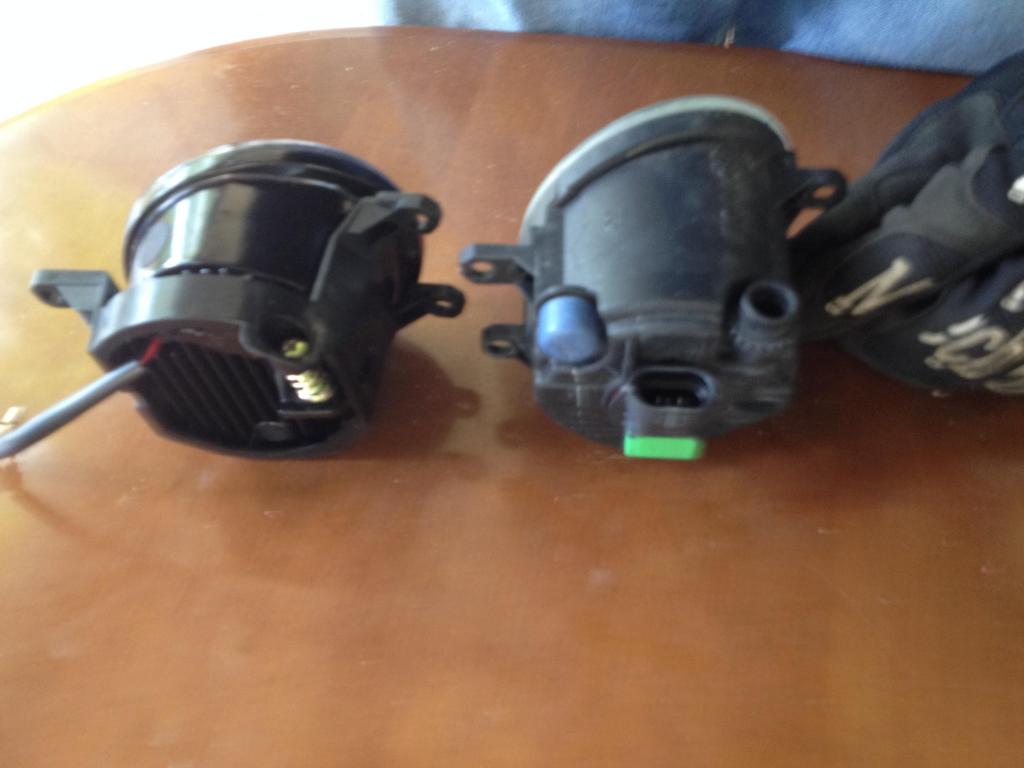
The new housing does not have the wiring plug installed. Some cars came with different polarity so you have to install the plug yourself. i plugged the fog into the stock wiring like so, and turned on the headlights and foglights to test for operation.
Once you have the wiring correct, install the leads into the plug: (you will see the detent on the leads, push them into the clip on the plug and push in the weather seal, you will understand when you go to install)
Next, install the foglights just as the originals were removed. Slide the fog housing into the two slots (towards the center of the car) then the hole over the post. Once it is in place, install the phillips screw. Next, plug in your wiring and test again. Then, re-install your fender lining and undercovers in reverse of the directions above. Avoid overtightening any screws as they screw into plastic which could easily strip. Complete the opposite side and enjoy the new fogs! You can also adjust the alignment of the fogs. There are a few threads on this so i wont go into it. Mine were aligned properly from the get-go.
Now, time for some comparison pics (stock on left, Morimoto on right)
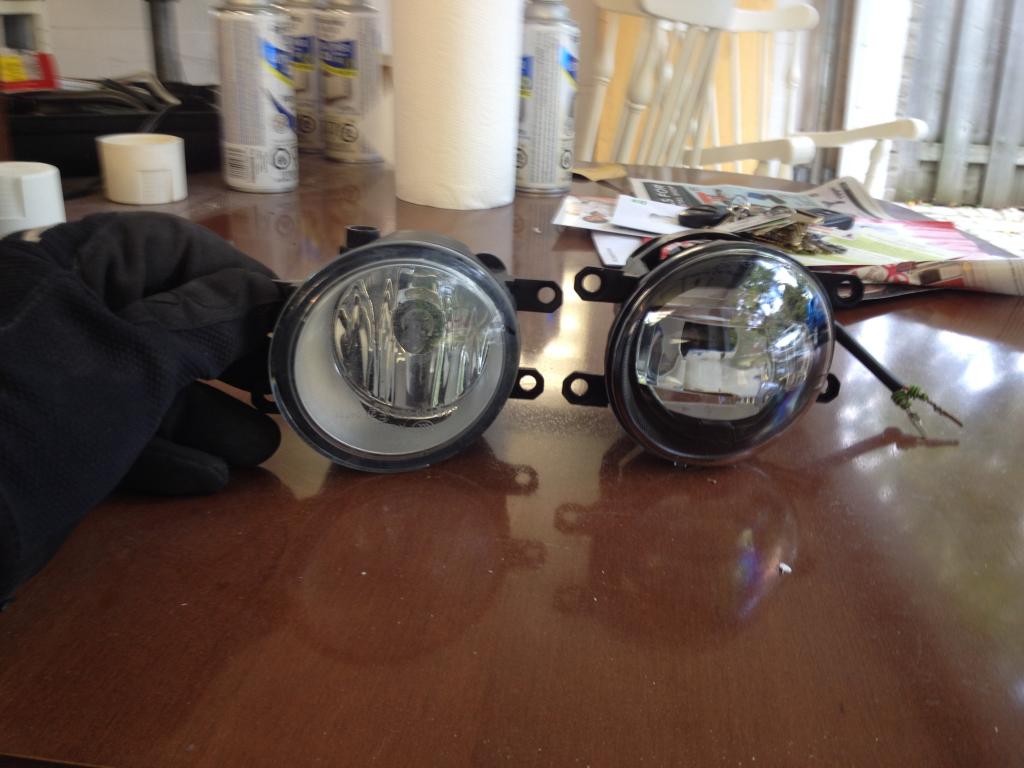
The Morimoto's are a quality piece. Heavy, solid, slightly smaller than OEM, and they look great.
Here is an installed pic, Morimoto LED on left, OEM on right
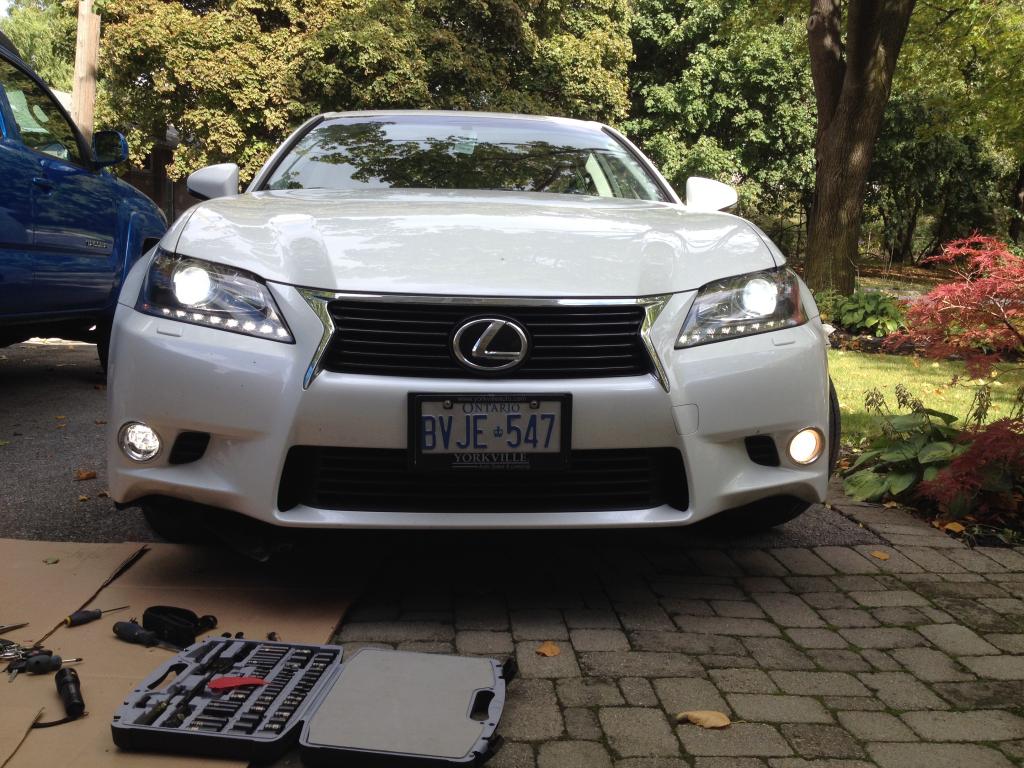
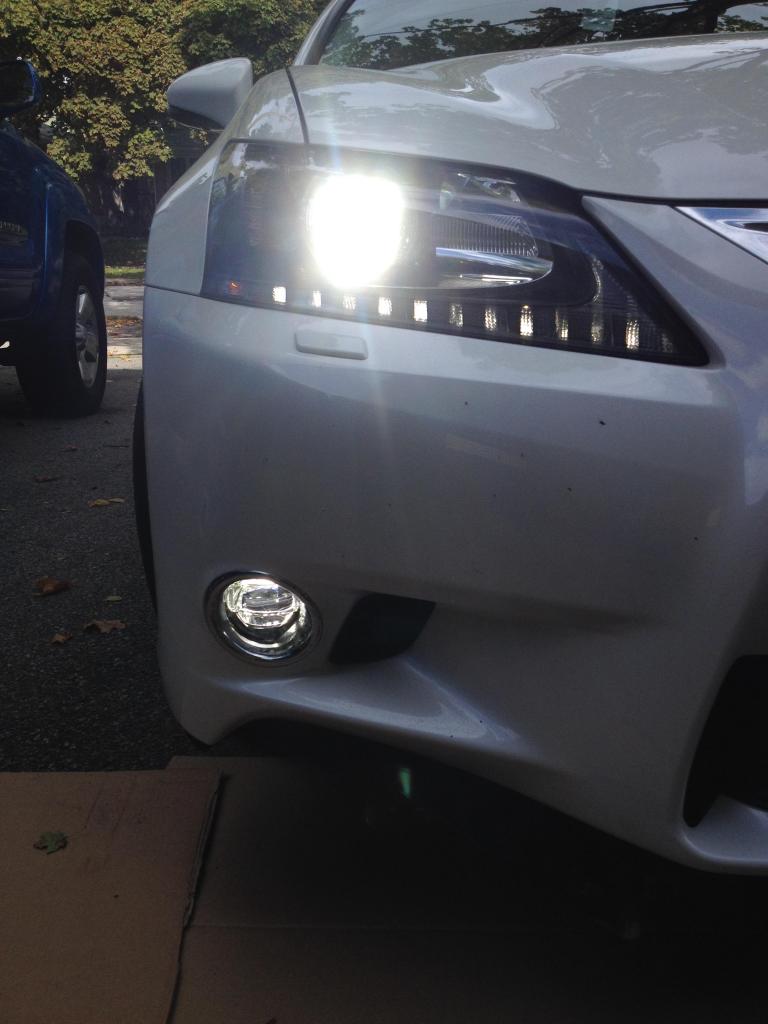
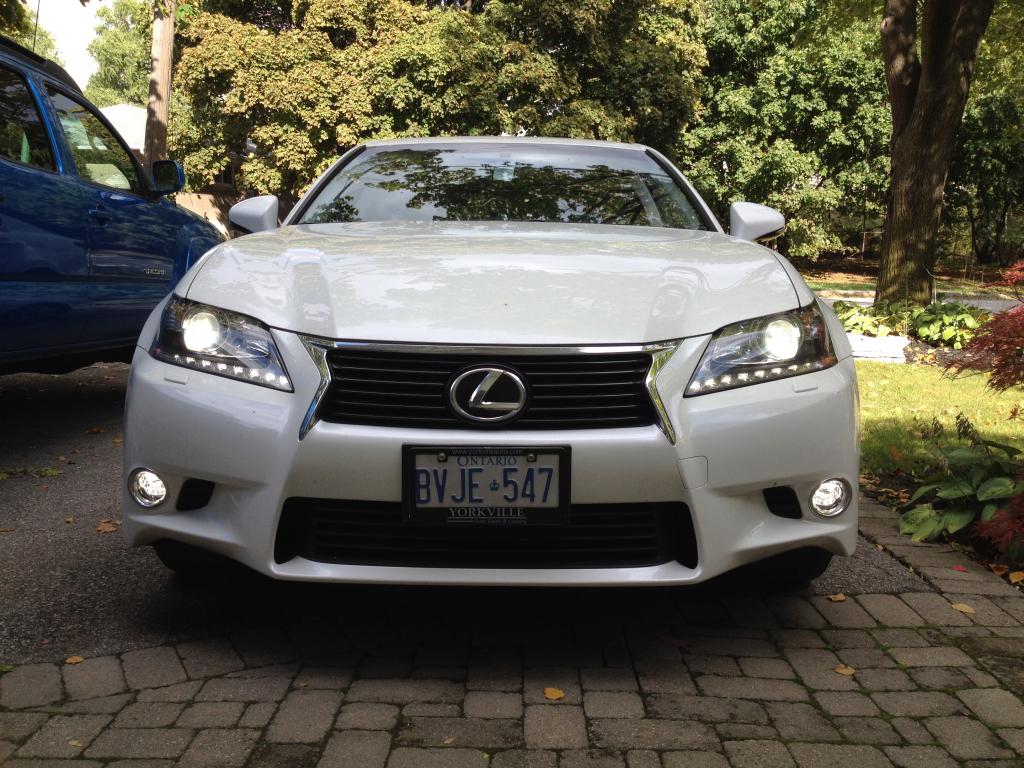
Both installed:
Night pics
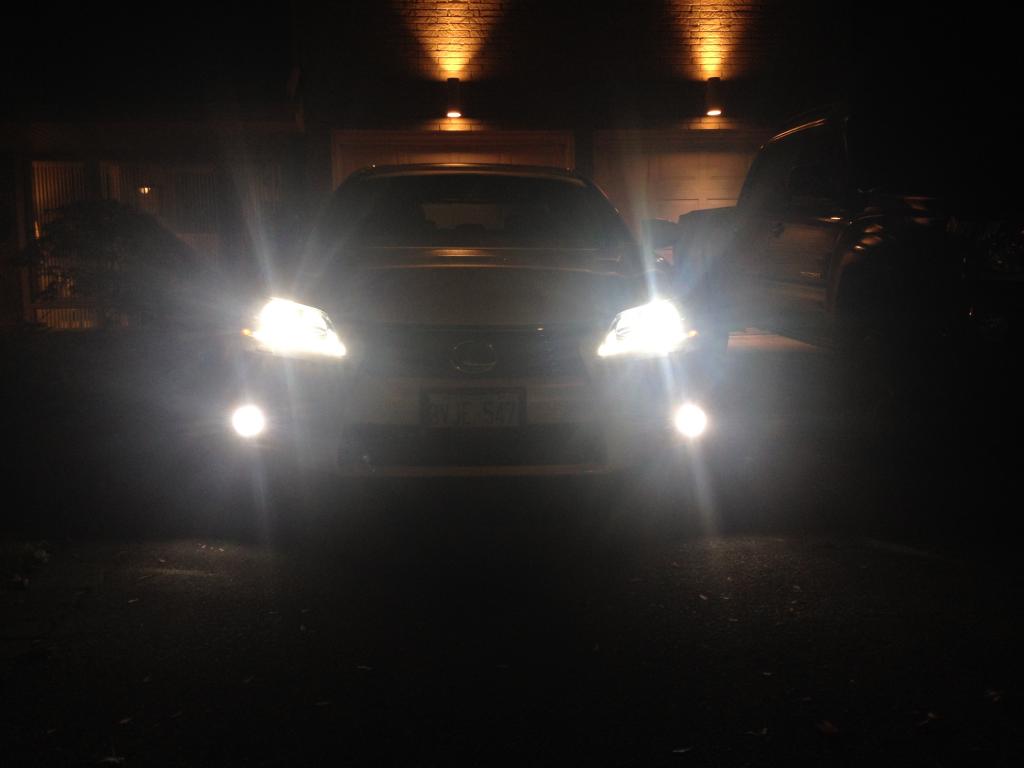
I have not taken any comparison shots, but you do notice them when you turn them on, where with the stock fogs, there was very little additional light throw onto the road. These work great, look great, and I would purchase again.
Hope this helps,
Greg
Got my Morimoto XB LED Type T Foglights from The Retrofit Source and decided to write an install DIY. This DIY should apply to any other LED fog's that directly replace the bulb/housing (OEM Lexus, another brand I saw for sale in the For Sale section, etc.) Anyways, the morimoto were the most affordable and with the best reviews, so I went with them. Any install is done at your own risk. If you don't believe you can handle the install, take it to a professional.
Install time was 2 hours, taking pictures. I would be able to get it done in an hour or so my second time.
First, the tools you need, i used:
1x Needle nose pliers
1x Flashlight
1x Stubby Phillips screwdriver
1x Small flat screwdriver (for prying mostly)
1x 10mm 1/4" socket and wrench
The hardware i removed (per side), includes
4x 10mm screws (three from under the bumper, 1 from in the fenderwell)
1x pushclip (from under the bumper)
2x push-in clips (from the fender liner)
1x phillips screw (holds in the foglight itself)
I will write the install for the drivers side. The passenger side is exactly the same.
Lay some cardboard on the ground where you are working for your own comfort and not to damage anything (fog lenses) and to leave the parts (screws can be pressed into it to keep them from rolling away)
First, turn the wheel to the drivers side. Remove the 10mm screw shown here:
Next, turn the wheel to the passenger side. Here, first remove the 3x 10mm screws (square) and 1x pushclip (circle) from below the bumper as seen here (the 3 screws and the pushclip have been nearly removed to show which ones are applicable.
Once the screws and clip are removed, gently pull down the plastic liner and let it hang.
Next, remove the two push-in clips. What i did was turn the flat 90 degrees, then use the flat screwdriver to pry the pin out. If it doesn't come out easy, turn the opposite direction. They were quite easy to remove.
Next, i un-fastened the two clips that hold the fender liner on (after you have fully removed the two push-in clips. I found the way to unclip them without breaking anything, would be to grab them with the needlenose pliers and turn them 10-20 degrees to pop them out of the fender clip. again do not pry too hard on these. You only need to get them off the fender clip to let the liner move.
Here is what it should look like when removed (drivers side pic did not come out right)
Once these two steps are complete, you should have access to the fog light. First, remove the wiring connection from the fog. Then, use the short phillips screw driver to get the fog out. The silver screw is the one to be removed. Once the screw is removed, the fog should come right out of it's "home". This is what it looks like on the inside (again another passenger side pic)
The new housing does not have the wiring plug installed. Some cars came with different polarity so you have to install the plug yourself. i plugged the fog into the stock wiring like so, and turned on the headlights and foglights to test for operation.
Once you have the wiring correct, install the leads into the plug: (you will see the detent on the leads, push them into the clip on the plug and push in the weather seal, you will understand when you go to install)
Next, install the foglights just as the originals were removed. Slide the fog housing into the two slots (towards the center of the car) then the hole over the post. Once it is in place, install the phillips screw. Next, plug in your wiring and test again. Then, re-install your fender lining and undercovers in reverse of the directions above. Avoid overtightening any screws as they screw into plastic which could easily strip. Complete the opposite side and enjoy the new fogs! You can also adjust the alignment of the fogs. There are a few threads on this so i wont go into it. Mine were aligned properly from the get-go.
Now, time for some comparison pics (stock on left, Morimoto on right)
The Morimoto's are a quality piece. Heavy, solid, slightly smaller than OEM, and they look great.
Here is an installed pic, Morimoto LED on left, OEM on right
Both installed:
Night pics
I have not taken any comparison shots, but you do notice them when you turn them on, where with the stock fogs, there was very little additional light throw onto the road. These work great, look great, and I would purchase again.
Hope this helps,
Greg
Last edited by GregCanada; 10-21-14 at 12:00 PM.

The following 3 users liked this post by GregCanada:
 10-20-14, 02:07 PM
#3
Advanced
Thread Starter
Thanks, i love the look / ouput of them compared to the OEM fog's. I'll try to get some good shots of them on, but there are not too many dark places in the city.
10-21-14, 01:32 PM
#4

Thank you for this guide Greg! Love the look of the LED's. Just wanted to thank you for the excellent/detailed guide and I also appreciate the quick follow-up on some basic questions via PM.
I'll be sure to let you know if I have any others when I attempt this in the future. All the best!
~ Im2bz2p345
I'll be sure to let you know if I have any others when I attempt this in the future. All the best!
~ Im2bz2p345
 02-11-17, 07:00 AM
#6

Thanks for posting the instructions. I just swapped the OEM LED fogs for my factory halogens. I was able to get the swap done by removing just the two clips along the fender as well as one screw from the bottom at the lower edge of the liner. Only took 15 min a side doing it this way.

Trending Topics


Thread
Thread Starter
Forum
Replies
Last Post
raerae1616
RC - 1st Gen (2015-present)
14
01-27-20 12:04 PM
minhael
IS - 3rd Gen (2014-present)
10
03-25-18 01:06 PM