
LS430 Retro DIY (Luxury Mods Bracket)

Thread Starter
Lexus Test Driver
iTrader: (8)
Joined: Aug 2008
Posts: 6,466
Likes: 91
From: California
Hello folx, well, I've had the LS430 retros for a while, but wanted to get new housings so they would look much better. So I bought a new set of housings to do a swap... Well, good chance to do a write up for you guys  There is a write up for the LS430 retro, but it doesnt have the how-to with the Luxury mod custom brackets. (hope there isnt one cause I went through the trouble
  ) Here you go
EDIT: For those who are afraid of melting your lenses... Very simple, just keep checking your lights every few minutes to make sure the lens isnt melting. The first time I did it, I mistakenly put them in at 350* LoL, and yea needless to say, I melted them. So this time I did just that, kept checking every minute with the first housing. After 10 minutes, I was confident enough to put the rest in for exactly 10 minutes without having to check
I started my DIY after i got the housings open, you can refer to this DIY to open up the lenses: Open your Headlight housings
In short, just put your headlights in the oven for 10 minutes at 250*. On my oven it had a setting for "preheat" amongst others. I dont know the difference between preheat and bake, but per the above link, it said put on preheat and I did. 10 minutes later the headlights came out and with a simple tug, they came apart with great ease! One thing not mentioned on the above link (which I recommend) have a heat gun with you. When you begin to pull the lens away (starting with the low beam side with the bigger housing) you begin to get the melted cheese on pizza effect. You get a long string of glue connecting from the lens to the rear housing. Instead of trying to remove it by hand or any other panicky way you can use the heat gun. The heat gun will melt it and will shrivel away to the edges. This will stop it from going on the chrome housing; once it does, you're screwed cause it wont come off without ruining something.
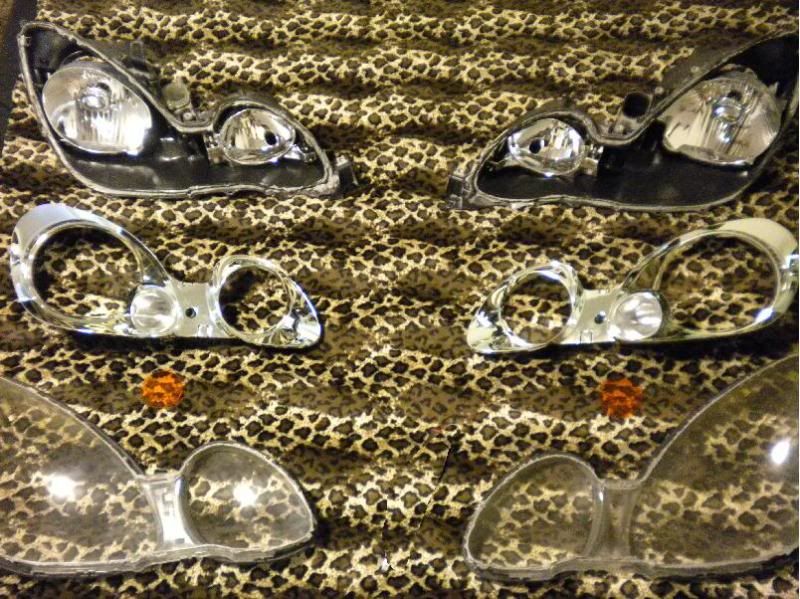
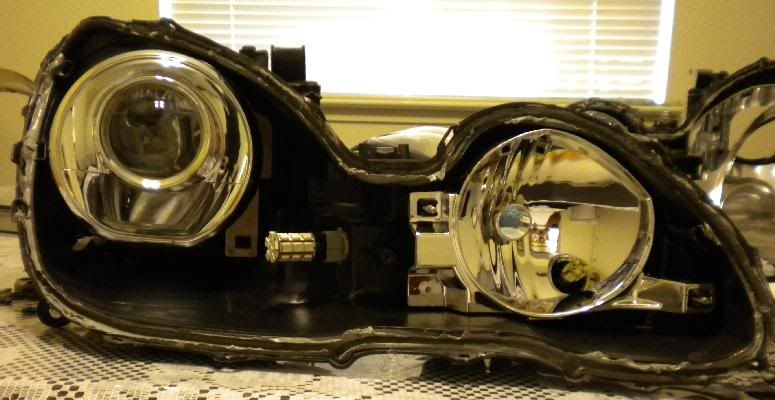
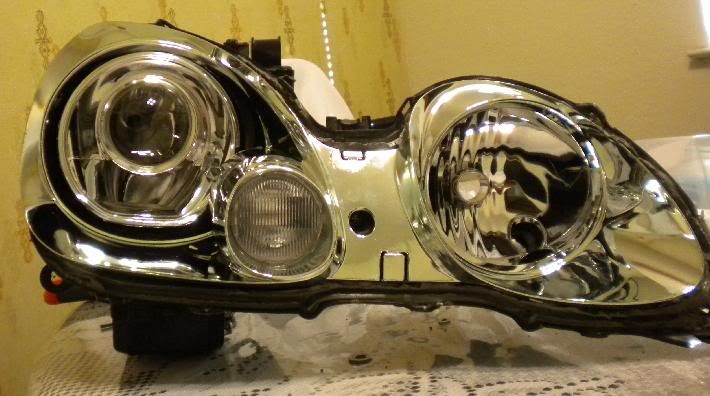
Here are my housings undone:
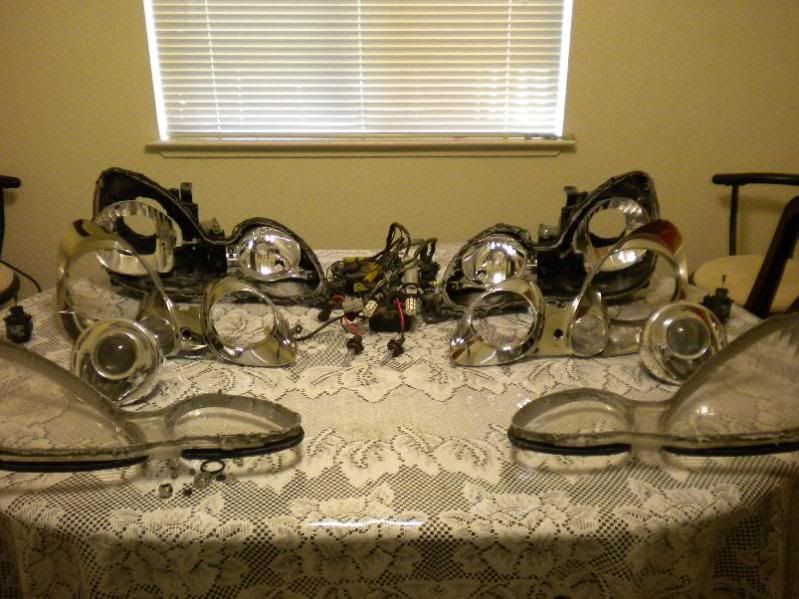
As you can see, I deleted the amber blinkers and am now using amber LED bulbs. Which I have another brand new set available in the classifieds. You can refer to the above link on how to remove the amber lens.
(Dont hate on the leopard print bed cover chicks dig it  )
)
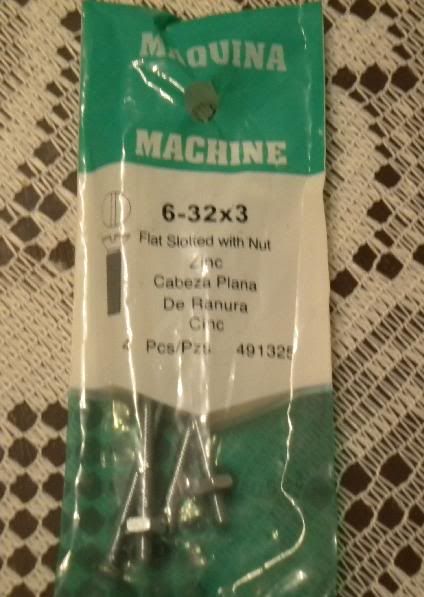
Now with these brackets from Luxury Mods, you will need to buy some 6-32x 3" bolts. These come with their own nuts, but you will need to buy more cause you will need 12 nuts total and 4 bolts. I bought this 4 pack from Lowes, I bought 2 of them and used the nuts from the second pack:
Now once you have the housings disassembled, remove the low beam bowl and removed the 3 black clips that are on there. I failed to take pictures of the removal, its a bit tedious, but simple. Heres a picture of the brackets from Luxury Mods with the clips already installed (please note the 2 small holes which will be used on the next step):
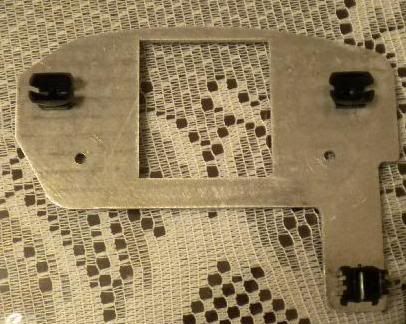
These brackets are surprisingly solid. There are 3 square holes predrilled that the black clips will snap into. However I had a problem with fitment on the one for the bottom; so I had to take a small file and file it a tad bigger. Other than that it was a perfect fit
Next, on the LS430 projector, it has 2 screw holes that you will put the bolts you bought through, they are located where the circles are:
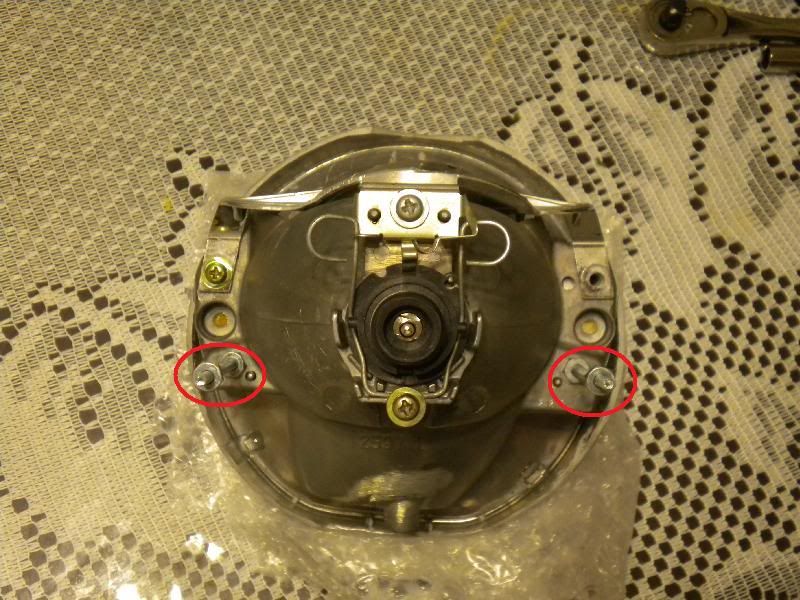
You will notice that I already installed them and used the supplied nuts to hold them to the projector housing. Next, put another set of nuts on each bolt and twist them down a ways:
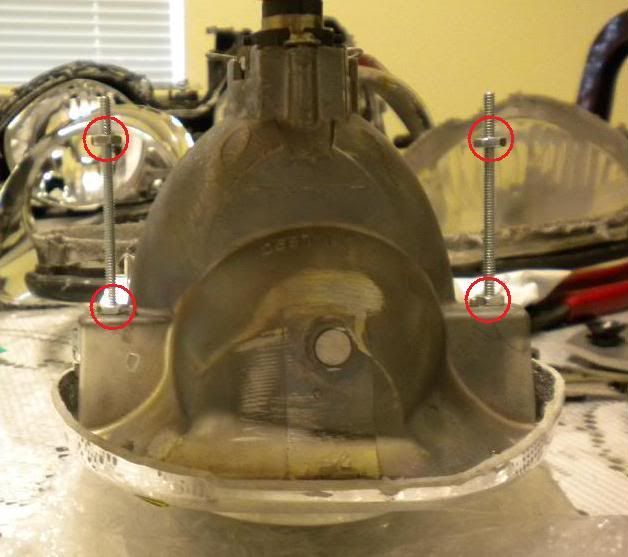
Then with the 2 holes on the bracket, place the bracket over the projector and the bolts will slide through the mentioned holes, use the 2 nuts that are already there and twist them up to the level where the bracket stops like so:
The reason for those nuts is that I noticed that even though these brackets are solid, they are still made of aluminum which is soft. During my initial tightening, I noticed the bracket beginning to buckle. I didnt like that, so with those 2 nuts, it will stabilize the bracket during tightening and keep it flat (which I'm sure is needed during aiming)
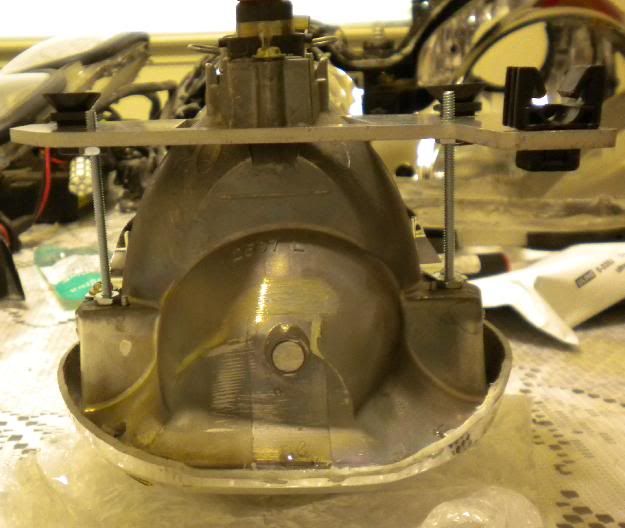
Now that you have leveled the bracket off, you can now install a set of nuts on top to sandwich the bracket in place. I like this idea cause with vibrations of the car, the sandwich will also help from it getting lose. I went ahead and put a little epoxy over the bolts as a safety measure so just in case it still got loose:
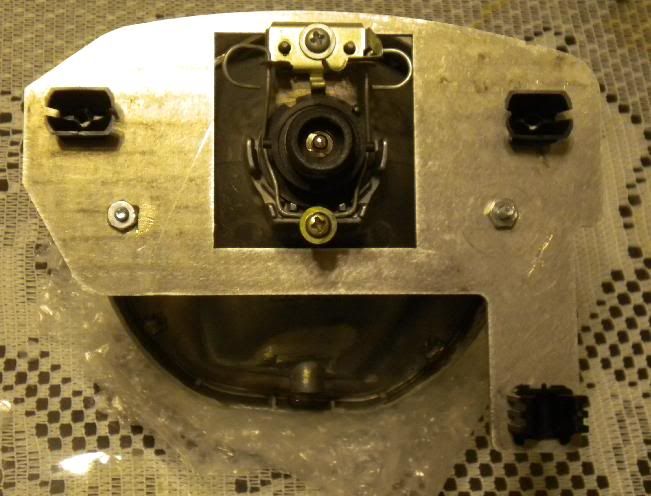
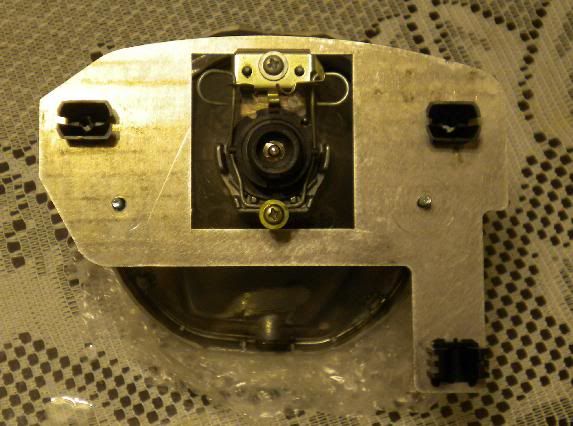
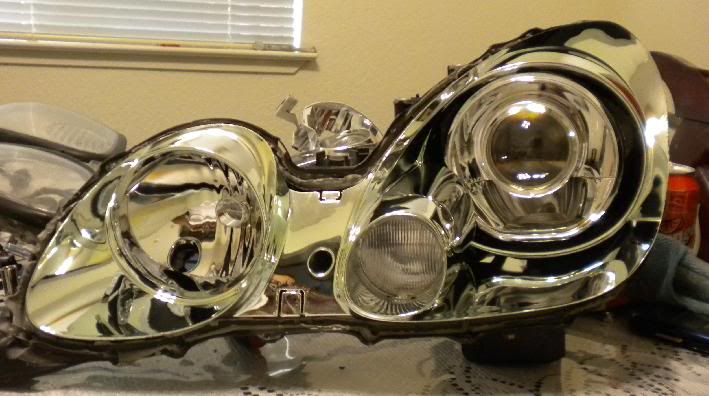
Now the assembly of the projectors and brackets have been done, now just install to your housing and that part is done:
(once I find a decent pair of bi-xenon projectors, I will also be doing a write up for the high beam retro)
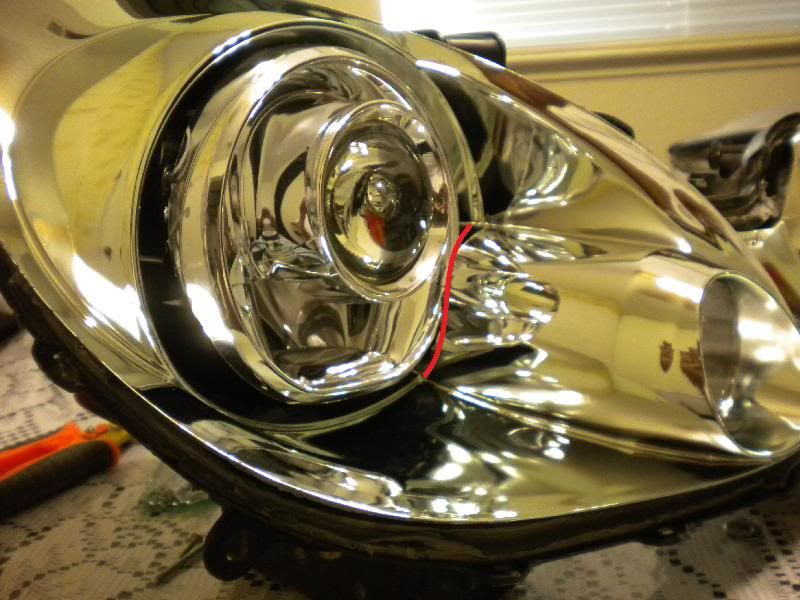
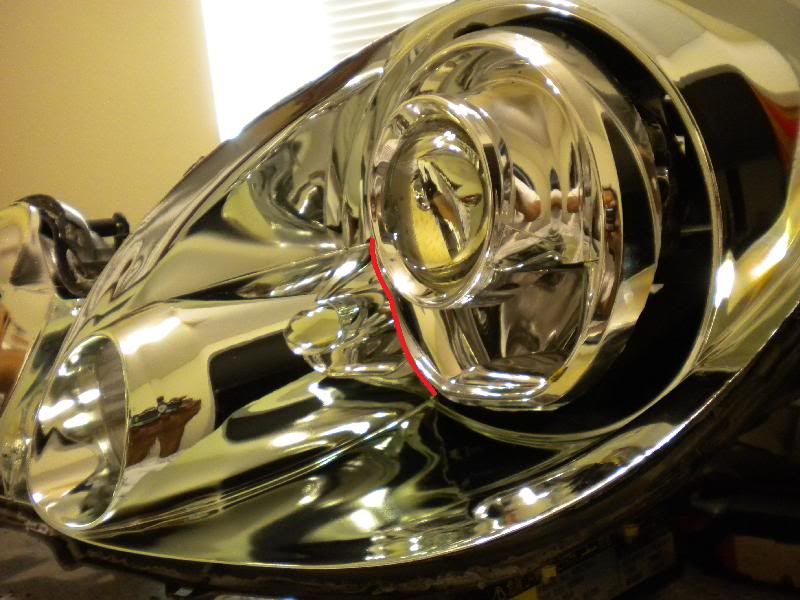
I failed to take before and after pictures of the chrome housings, but you will be doing some scary cutting! the long tubular looking part which is for the blinker (as you will see on yours) extends about an inch and a half behind the housing. You will have to cut that down in order for it to clear the LS430 shroud. The best way to do this is going little by little. I cut to far on one side (doesnt look bad) but I know its there Best thing to do is follow the round outline of the housing for the low beam and cut the tubular piece flush to it. Install back on to the black housing (with retro already installed) and mark off the area that needs to be trimmed down. You will be cutting off another 1/2 inch to clear the shroud. After I screwed up one side, I learned that its better to taper off the edge and it will look cleaner. You'll see in both pictures a red line showing where it was cut. The first picture, look on the top part of the line. Right in front of the line, you will see a black triangle, thats where I cut too much off. If you look at the second picture in the same place, you will see how it goes all the way back and looks clean:
wont be noticeable unless you're looking, but I notice it and dont like it
Well, thats it folx. Just need to reverse the process and seal the housings back up and you're done. If you have any questions, let me know, I'm more than willing to help out. If you need anymore pictures of something, let me know cause the housings should still be open for another week
There is a write up for the LS430 retro, but it doesnt have the how-to with the Luxury mod custom brackets. (hope there isnt one cause I went through the trouble ) Here you go EDIT: For those who are afraid of melting your lenses... Very simple, just keep checking your lights every few minutes to make sure the lens isnt melting. The first time I did it, I mistakenly put them in at 350* LoL, and yea needless to say, I melted them. So this time I did just that, kept checking every minute with the first housing. After 10 minutes, I was confident enough to put the rest in for exactly 10 minutes without having to check
I started my DIY after i got the housings open, you can refer to this DIY to open up the lenses: Open your Headlight housings
In short, just put your headlights in the oven for 10 minutes at 250*. On my oven it had a setting for "preheat" amongst others. I dont know the difference between preheat and bake, but per the above link, it said put on preheat and I did. 10 minutes later the headlights came out and with a simple tug, they came apart with great ease! One thing not mentioned on the above link (which I recommend) have a heat gun with you. When you begin to pull the lens away (starting with the low beam side with the bigger housing) you begin to get the melted cheese on pizza effect. You get a long string of glue connecting from the lens to the rear housing. Instead of trying to remove it by hand or any other panicky way
you can use the heat gun. The heat gun will melt it and will shrivel away to the edges. This will stop it from going on the chrome housing; once it does, you're screwed cause it wont come off without ruining something. Here are my housings undone:
As you can see, I deleted the amber blinkers and am now using amber LED bulbs. Which I have another brand new set available in the classifieds. You can refer to the above link on how to remove the amber lens.
(Dont hate on the leopard print bed cover
chicks dig it )Now with these brackets from Luxury Mods, you will need to buy some 6-32x 3" bolts. These come with their own nuts, but you will need to buy more cause you will need 12 nuts total and 4 bolts. I bought this 4 pack from Lowes, I bought 2 of them and used the nuts from the second pack:
Now once you have the housings disassembled, remove the low beam bowl and removed the 3 black clips that are on there. I failed to take pictures of the removal, its a bit tedious, but simple. Heres a picture of the brackets from Luxury Mods with the clips already installed (please note the 2 small holes which will be used on the next step):
These brackets are surprisingly solid. There are 3 square holes predrilled that the black clips will snap into. However I had a problem with fitment on the one for the bottom; so I had to take a small file and file it a tad bigger. Other than that it was a perfect fit
Next, on the LS430 projector, it has 2 screw holes that you will put the bolts you bought through, they are located where the circles are:
You will notice that I already installed them and used the supplied nuts to hold them to the projector housing. Next, put another set of nuts on each bolt and twist them down a ways:
Then with the 2 holes on the bracket, place the bracket over the projector and the bolts will slide through the mentioned holes, use the 2 nuts that are already there and twist them up to the level where the bracket stops like so:
The reason for those nuts is that I noticed that even though these brackets are solid, they are still made of aluminum which is soft. During my initial tightening, I noticed the bracket beginning to buckle. I didnt like that, so with those 2 nuts, it will stabilize the bracket during tightening and keep it flat (which I'm sure is needed during aiming)
Now that you have leveled the bracket off, you can now install a set of nuts on top to sandwich the bracket in place. I like this idea cause with vibrations of the car, the sandwich will also help from it getting lose. I went ahead and put a little epoxy over the bolts as a safety measure so just in case it still got loose:
Now the assembly of the projectors and brackets have been done, now just install to your housing and that part is done:
(once I find a decent pair of bi-xenon projectors, I will also be doing a write up for the high beam retro)
I failed to take before and after pictures of the chrome housings, but you will be doing some scary cutting! the long tubular looking part which is for the blinker (as you will see on yours) extends about an inch and a half behind the housing. You will have to cut that down in order for it to clear the LS430 shroud. The best way to do this is going little by little. I cut to far on one side (doesnt look bad) but I know its there
Best thing to do is follow the round outline of the housing for the low beam and cut the tubular piece flush to it. Install back on to the black housing (with retro already installed) and mark off the area that needs to be trimmed down. You will be cutting off another 1/2 inch to clear the shroud. After I screwed up one side, I learned that its better to taper off the edge and it will look cleaner. You'll see in both pictures a red line showing where it was cut. The first picture, look on the top part of the line. Right in front of the line, you will see a black triangle, thats where I cut too much off. If you look at the second picture in the same place, you will see how it goes all the way back and looks clean:wont be noticeable unless you're looking, but I notice it and dont like it
Well, thats it folx. Just need to reverse the process and seal the housings back up and you're done. If you have any questions, let me know, I'm more than willing to help out. If you need anymore pictures of something, let me know cause the housings should still be open for another week
Last edited by Mr Jokster; Dec 17, 2015 at 05:54 PM.
I have seen many people do this mod leaving a nasty gap between the projector and the lens, making it look horrible.
Yours looks good. I have contemplated this mod, but the sheer thought of doing this work, and potential breakage, makes me not want to do it.
I hope you took before and then after shots of the light output. I am curious. Bi curious. DUN DUN DUUUUN.
Yours looks good. I have contemplated this mod, but the sheer thought of doing this work, and potential breakage, makes me not want to do it.
I hope you took before and then after shots of the light output. I am curious. Bi curious. DUN DUN DUUUUN.


wish my oven even works for me to do this! yea i know its ghetto but wth. great job! that little mark is barely noticeable. if youre so unhappy sell me those and call it a day ;]

Thread Starter
Lexus Test Driver
iTrader: (8)
Joined: Aug 2008
Posts: 6,466
Likes: 91
From: California
 You got any pics of the back of the LS460? I might be able to modify the one Luxury Mods has BTW, thought you got rid of those? Wish i would have known, I would have used them for my high beams
Trending Topics


good write up nathaniel....i didnt know you were looking for new housings...i been trying to sell some lol
this is one of the next mods i wanna do....and i dont think the LS460's will fit into the high beams. i think they way to big for that
this is one of the next mods i wanna do....and i dont think the LS460's will fit into the high beams. i think they way to big for that
unfortunately i dont... wish i did to c if it was possible though. those was actually my 2nd set of ls460 that i got rid of lol. ls460 in your high beams might be a little to big but no impossible hahah
Thread Starter
Lexus Test Driver
iTrader: (8)
Joined: Aug 2008
Posts: 6,466
Likes: 91
From: California
Sucks I dont have the $$ to get a pair of bi-xenon projectors
 gonna have reverse the whole damn process I got lucky once with no problems, I dont like to gamble! However, I had contemplated removing the ones I have on my drag car to put them in here but then I remember the hell I went through to get them in that housing!
Thread Starter
Lexus Test Driver
iTrader: (8)
Joined: Aug 2008
Posts: 6,466
Likes: 91
From: California
but that's the only part of the chrome housing that you have to cut right? i'm not sure if i read it wrong or what but just wanted to make sure
Thread Starter
Lexus Test Driver
iTrader: (8)
Joined: Aug 2008
Posts: 6,466
Likes: 91
From: California
That is correct. Only trim that piece, everything else clears pretty well. You gotta make sure you use the levelers behind to move the projector in right position or it will hit the top of the housing (does not effect 'aiming')
I'm stuck here on my ls460 retrofit.
I can't seem to get a good cut because the ls460 extends out and touching the side (red). I've been cutting that part and failed to do it nicely... I need more practice I guess.
I can't seem to get a good cut because the ls460 extends out and touching the side (red). I've been cutting that part and failed to do it nicely... I need more practice I guess.