
DIY: Overhead console illumination...
 02-10-15, 06:06 PM
#16
Lead Lap
Thread Starter
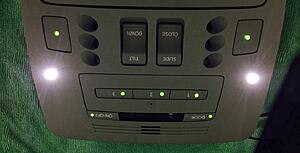
Look what I just did:


 02-10-15, 07:56 PM
#19
Lead Lap
Thread Starter
No, they will be on all the time just like the green lights, they will illuminate the front seats, cup holders...not too much, just a little bit.
02-11-15, 05:20 AM
#21
Lead Lap
Thread Starter
That's correct. But that one under the rear view mirror is so weak.
02-19-15, 06:49 AM
#22
I took apart my overhead console last night, just to assess the amount of work involved.
The disassembly was very easy and I now know how to do it all. It is quite straight forward per your pictures (thank you).
A couple of questions.
- Where did you get the thin gauge wires? I was thinking that I could get some from a cat5e cable.
- It seems that you had tied all the LEDs via a parallel connection, rather than series. Did you encounter differences in LED brightness that way?
- A LED resistor calculator suggests about 100 ohms for 5 LEDs - is that roughly what you used?
Thanks.
02-19-15, 08:33 AM
#23
Lead Lap
Thread Starter
Gauge wires are from HDMI cable, but you can use LAN cable too.
Parallel. No difference.
Tht's what I used.
I can give you my iMessage number/Viber if you need any help.
Parallel. No difference.
Tht's what I used.
I can give you my iMessage number/Viber if you need any help.
02-22-15, 06:08 AM
#25
Lead Lap
Thread Starter
Any updates?
02-22-15, 06:09 PM
#26
update coming soon! 
I have been working on it, off and on, and should complete soon.
Some thoughts and progress so far.
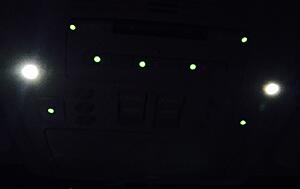
1) You do need to use the clear silicone as a "lens", otherwise the light from the LED is not diffused enough and would look too weak.
2) I have dremeled a notch into the button housing to allow clearance to the wires.
3) I dremeled flat the "nib" on button 2, and then drilled through it. That allowed the LED lights to be more centered on the buttons.
4) I am spending a lot of time to reduce the amount of wiring running to the LEDs. (Just my preference, not really necessary)
5) more updates to come,


I have been working on it, off and on, and should complete soon.
Some thoughts and progress so far.
1) You do need to use the clear silicone as a "lens", otherwise the light from the LED is not diffused enough and would look too weak.
2) I have dremeled a notch into the button housing to allow clearance to the wires.
3) I dremeled flat the "nib" on button 2, and then drilled through it. That allowed the LED lights to be more centered on the buttons.
4) I am spending a lot of time to reduce the amount of wiring running to the LEDs. (Just my preference, not really necessary)
5) more updates to come,


 02-22-15, 06:30 PM
#27
Lead Lap
Thread Starter
That looks brilliant.
Can't wait for more pics...
Can't wait for more pics...
02-22-15, 10:55 PM
#28
More pictures... I still need to glue the LEDs into place, reassemble the module, and then add a resistor (outside of the assembled module) Having the resistor on the outside will allow me to quickly change the resistor value to adjust the LED brightness, if required.

Picture of the LED wiring in series (positive to negative to positive to negative, etc.).<br/>

Wiring layout

Picture of the LED wiring in series (positive to negative to positive to negative, etc.).<br/>

Wiring layout
02-22-15, 11:48 PM
#29
Lead Lap
Thread Starter
That looks clean.
02-23-15, 06:56 AM
#30
Thanks.
The other thing that I did was to drill the holes slightly smaller for the Homelink buttons (~1.5 mm) versus the Reading light buttons (2 mm). It will help to differentiate the buttons slightly. Although I know which buttons are which, this will help my wife who drives my car less frequently.
The main thing with having the illumination is to prevent me from accidentally hitting the sunroof buttons when I'm trying to open the gate. This has happened a couple of times, when I was tired heading home. Luckily, it wasn't raining.
Being able to quickly hit the Reading buttons is also a big plus.