


where can i git these lights


 these rear taiils arre the hotness i want them for my 95 mines all red an goofy lookin. an whats up with the eyebrows????


 Diy Writeup Clear Tails
BEFORE
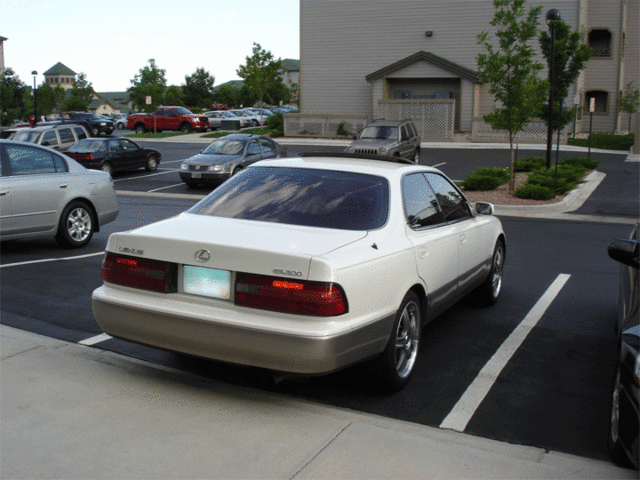
AFTER
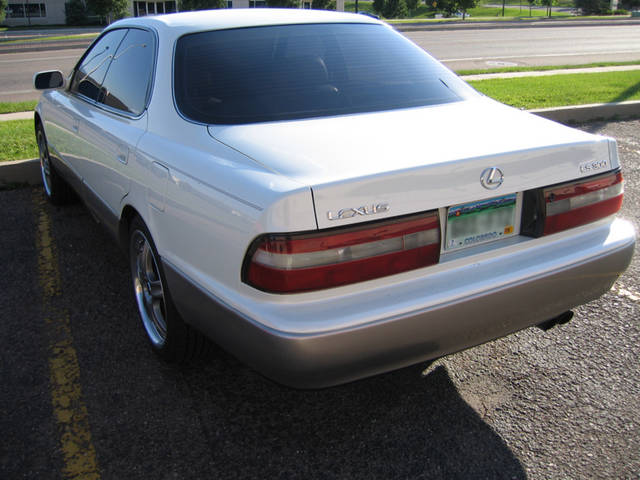
1.) pull the tails off your car
2.) put them in your oven on the lowest setting possible and be patient
3.) check on them every 7 min and try and pull the black body off the red/orange lense
4.) remove the black silica glue that has been loosened by the heat
5.) pay attention to the corners of the lense with heat they get brittle
6.) once the glue is loose enough you can pull the 2 parts of the tail light appart
7.) this reveals the inner lense assembly(which holds the orange lense
8) remove the orange part and replace with a piece of lighting cover you can buy from home depot(its the stuff you can see on office florescent lighting
9.) spray paint the orange lense housing(without the orange part) Silver
10.) use silicone again in all the edges, any part that might let moisture in during a rain storm
11.) keep heating and pushing the tail light body(black) and the lense(red and white) back together.
12.) Replace clear blinker bulbs with orange ones.....this way you stay legal
The front lense clearing is suprisingly the same....a little easier in my opinon

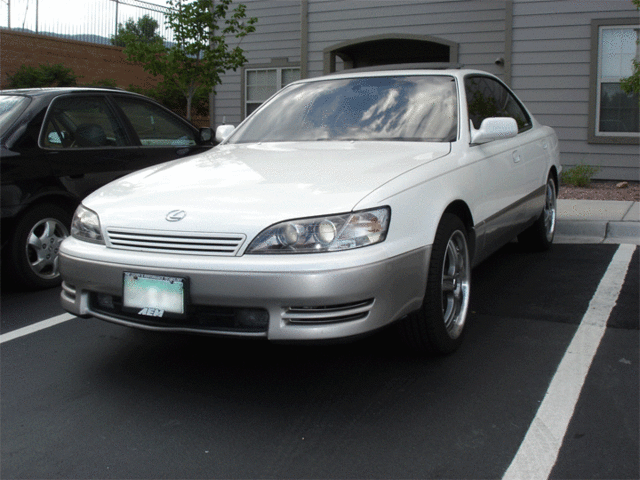
AFTER
1.) pull the tails off your car
2.) put them in your oven on the lowest setting possible and be patient
3.) check on them every 7 min and try and pull the black body off the red/orange lense
4.) remove the black silica glue that has been loosened by the heat
5.) pay attention to the corners of the lense with heat they get brittle
6.) once the glue is loose enough you can pull the 2 parts of the tail light appart
7.) this reveals the inner lense assembly(which holds the orange lense
8) remove the orange part and replace with a piece of lighting cover you can buy from home depot(its the stuff you can see on office florescent lighting
9.) spray paint the orange lense housing(without the orange part) Silver
10.) use silicone again in all the edges, any part that might let moisture in during a rain storm
11.) keep heating and pushing the tail light body(black) and the lense(red and white) back together.
12.) Replace clear blinker bulbs with orange ones.....this way you stay legal
The front lense clearing is suprisingly the same....a little easier in my opinon
Last edited by 3rdelement; Sep 5, 2005 at 11:17 AM.
Trending Topics


Lexus Champion
Joined: May 2006
Posts: 2,819
Likes: 1
From: CA
LOL..Thread back from the dead
So..I tried clearing the tail lights out today....BEFORE reading this thread
Kinda broke off the ends..and the only part i got off was the top part. everything else is not moving easily I broke off a square inch in the corner What 'technique' did you use to take apart the light? top first, then pull, or bottom first?
I'm gonna take a break..I'm afraid I might break somthing else...
So..I tried clearing the tail lights out today....BEFORE reading this thread
Kinda broke off the ends..and the only part i got off was the top part. everything else is not moving easily
I broke off a square inch in the corner What 'technique' did you use to take apart the light? top first, then pull, or bottom first?I'm gonna take a break..I'm afraid I might break somthing else...
you have to just take it easy. if you do break any of the red lense....keep it. and super glue it back on just be careful with the amount of glue used. if you get right you wont seen any crack and the finish will be glossy.
dont really have any other tips. good luck!
dont really have any other tips. good luck!

Lexus Champion
Joined: May 2006
Posts: 2,819
Likes: 1
From: CA
 I set the oven to 250 degrees and put it in there for about 10 minutes. Then I began prying the top open. The bottom part wouldn't move so i gave up, and when i pushed the two lenses back together after heating it some more, I found that the black plastic trim peice on top was warped as well as the two tabs on the lense
 They don't fit together properly now. I don't know if I should try it again tommorrow...(my fog lights were very easy to take apart).
O yeah..I kept the broken off part and super glued it back on, and wetsanded the excess glue.
you have to just take it easy. if you do break any of the red lense....keep it. and super glue it back on just be careful with the amount of glue used. if you get right you wont seen any crack and the finish will be glossy.
dont really have any other tips. good luck!
dont really have any other tips. good luck!
did you pry it with a puttyknife? Or opened it up by hand?
Also, how did you manage to get the corner of the light separated?


Rookie
Joined: Sep 2006
Posts: 75
Likes: 0
From: ma
you use a knife or flat head screwdriver. you are suppose to put them in for 5 minutes not 10. and after you take them out youll only get a few inches seperated by the time they need to go back in the oven for 5more minutes
Lexus Champion
Joined: May 2006
Posts: 2,819
Likes: 1
From: CA
Yay! I finally finished (after melting one of them)
Took Me about 3 hours for both lights
Things I did wrong the first time/Corrected
Set the oven at the lowest temperature about 200 degrees.
Place lens-side down on a towel so the plastic doesn't melt. If you put it ano other way, the light doesn't heat up evenly, and the part closest to the heating element will melt
5 minutes Each cycle.
Take a flathead screw driver/putty knife and
WORK ON BOTTOM FIRST! Lift up all the clips starting from the inner clips to outer. You will need to re heat the light for 5 minutes when the glue starts to harden/cool down which is about every 5 min. (I went through this cycle at least 15 times
When you have about 1 cm open on the bottom, carefully, use yor finger to seperate the area where your license plate light would go, and work your way up to the top. Pull enough apart to fit the putty knife on top making sure not to pry the black plastic trim up B/c it will warp and won't close back together right. DON'T PRY NEAR THE CORNERS. They WILL break.
Pull everything apart, and remove a screw holding the orange lens in.
Remove the frame holding the orange lens and paint it silver to match everything else.
Assemble everything and put back in oven or 5 min. Press everything back in.
**You don't really need to seal the lights with silicone since there is more than enough glue to seal.
Pics..

Took Me about 3 hours for both lights
Things I did wrong the first time/Corrected
Set the oven at the lowest temperature about 200 degrees.
Place lens-side down on a towel so the plastic doesn't melt. If you put it ano other way, the light doesn't heat up evenly, and the part closest to the heating element will melt
5 minutes Each cycle.
Take a flathead screw driver/putty knife and
WORK ON BOTTOM FIRST! Lift up all the clips starting from the inner clips to outer. You will need to re heat the light for 5 minutes when the glue starts to harden/cool down which is about every 5 min. (I went through this cycle at least 15 times
When you have about 1 cm open on the bottom, carefully, use yor finger to seperate the area where your license plate light would go, and work your way up to the top. Pull enough apart to fit the putty knife on top making sure not to pry the black plastic trim up B/c it will warp and won't close back together right. DON'T PRY NEAR THE CORNERS. They WILL break.
Pull everything apart, and remove a screw holding the orange lens in.
Remove the frame holding the orange lens and paint it silver to match everything else.
Assemble everything and put back in oven or 5 min. Press everything back in.
**You don't really need to seal the lights with silicone since there is more than enough glue to seal.
Pics..