


Build Log
Tigerhair is a long strand fiberglass reinforced body filler made by Evercoat. Bondo makes a similair version that you can buy at walmart just look for bodyfiller and look for one that is reinforced with fiberglass strands.
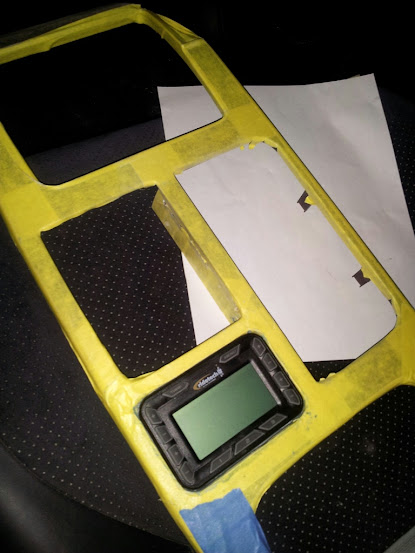
Did some interior modifications to make my controller sit like it belonged in the car. Took the wood trim on the center console out. the controller looked right at home behind the shifter plate. There were no clearance issues etc under it so taped the wood trim up, drew an outline of the controller and started cutting real slow. After everything was cut out, I taped up the controller, sprayed some wd40 on it and created a base with fiberglass and tiger hair.. looked pretty good.

Painted the holder black for a more oem look.

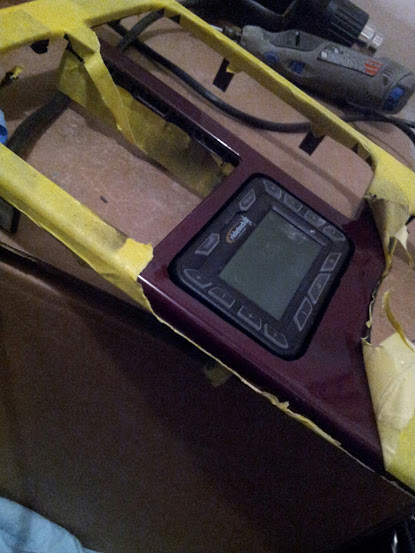
Everything looked good I drilled a hole for the micro usb plug to come through the base to plug into the controller and then realized that the controller might rattle in the holder and that would drive me crazy. Got some felt liner tape and lined the bottom and sides with it. Controller fits like a glove and is fully removable and no cracks on the wood trim!!!! Very happy with this mod.

Painted the holder black for a more oem look.
Everything looked good I drilled a hole for the micro usb plug to come through the base to plug into the controller and then realized that the controller might rattle in the holder and that would drive me crazy. Got some felt liner tape and lined the bottom and sides with it. Controller fits like a glove and is fully removable and no cracks on the wood trim!!!! Very happy with this mod.

Sorry for the delay. Specs are 19x9 -5 and 19x10 -8.
lol.. thanks man.
lol.. thanks man.
ClubLexus Stories
Celebrating Lexus & Toyota from Around the Globe

Lexus NX 350h: A Fuel-Sipping Secret Hot Hatch???
Michael S. Palmer
5 Best & 5 Worst Lexus Daily Drivers
Joe Kucinski
Top 5 Hottest Lexus & Toyotas in 2026 (Hardest To Buy)
Brett Foote
2026 Lexus IS 350 F Sport Review: The Last of Its Kind Still Rocks
Michael S. Palmer
Top 10 Most Confusing Things Lexus Has Ever Done!
Joe Kucinski
2026 Lexus ES Review: Lexus Re-Embraces Founding Principles
Michael S. Palmer
10 Lexus Bargains That are Cheaper Than a New Toyota RAV4
Joe Kucinski
8 Weirdest Things Lexus Has Ever Built
Verdad Gallardo
10 Lexus Designs That Have Aged Like Fine Wine
Verdad Gallardo
Thanks Paul, been a little tied up but yeah did do some mods to the engine bay. I've been honestly slacking on these for awhile but was going to go to PA for Tuner Evolution/Black 4 meet and that kinda motivated me to finish up my engine bay really. This is a design that I thought of last year which is why I started painting my valve covers etc gold when I was doing my maintenance.

All the side panels were sanded, primed, sanded and color matched. The center engine cover I wrapped in wood grain. I bought quite a bit of this last year actually and eventually want to wrap my interior with the wood grain as well to bring it all together.. but I want to do other interior mods before I do that.


Each of the clips were wrapped as well for that little detail and a swarovski was added for that little bling detail.
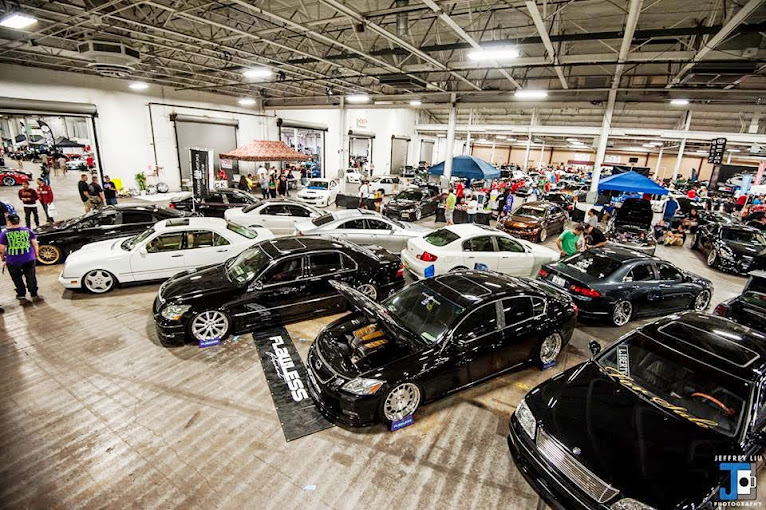
The cars at the Black 4 meet! Proud to say that we went with two cars, the LS430 and the GS430 and both won. LS came first in the LS class and the GS came second in the GS class.

Also finally figured out how to get my stickers in the front to flow with a little personalization

All the side panels were sanded, primed, sanded and color matched. The center engine cover I wrapped in wood grain. I bought quite a bit of this last year actually and eventually want to wrap my interior with the wood grain as well to bring it all together.. but I want to do other interior mods before I do that.
Each of the clips were wrapped as well for that little detail and a swarovski was added for that little bling detail.
The cars at the Black 4 meet! Proud to say that we went with two cars, the LS430 and the GS430 and both won. LS came first in the LS class and the GS came second in the GS class.
Also finally figured out how to get my stickers in the front to flow with a little personalization
Last edited by kuWuPt; Oct 18, 2013 at 11:30 PM.

Apart from setting the pod that I made earlier in the build in the trunk, haven't had a chance to do anything else. I think I'm going to change it up though, I'm thinking mount the compressors in the wheel well to quieten it down some along with the everything else and just have the tank showing. Can't really fit the tank in the wheel well or else I would put it there too.. anyone have any other suggestions?

hmm.. you think two 2 Gallon tanks will fit in the wheel well? Do you have any tanks in mind? Air runner has a pancake tank that is 7" tall but I don't think that will fit in there..