
DIY: Add auto folding mirror to 2010 RX350
 08-12-13, 11:11 PM
#1
Driver School Candidate
Thread Starter

Join Date: Jun 2013
Location: BC
Posts: 14
Likes: 0
Received 0 Likes
on
0 Posts
Me and my wife just purchased a used 2010 RX350 couple months ago. It has Canadian touring package which includes Navigation and backup camera, but no HUD, parking sensors, auto folding mirror and ML sound system etc....
I have done some search in the forum and found that one of the member has done the auto folding mirror and parking assist mod. After few weeks of research I have decided to do it by myself.
The auto folding mirror swap is quite straight forward, pretty much plug and play. But parking assist is whole other story, I will share that later.
Here is for the auto folding mirror swap,
Tools I used:
1. Wrench socket set.
2. Screw driver.
3. Trim removal tool set. (I just purchased the 5 pieces plastic set, you should be able to find it in local auto parts store, ebay or amazon. It might not be the best trim removal tool, but it does the trick.)
Auto folding Mirror part #s:
87910‑0E021-?? RH mirror with auto folding
87910‑0E041-?? RH mirror with auto folding and camera (This is what I got as I am gonna add parking assist to my car)
87940‑0E021‑?? LH mirror with auto folding
84040‑0E020 Mirror switch with auto folding function button.
(The question mark above is for car's color)
The cost:
I got both mirrors and switch from oversea wreck yard. The parts cost me only about US$650, and I have to repaint the mirror, done it here in Canada, cost me CAD$150 for both side.
So the total roughly is US$800.
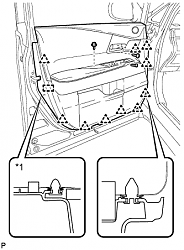
Below shows the cover you need to remove from the door panel to get access to the screws to be removed later.
I have done some search in the forum and found that one of the member has done the auto folding mirror and parking assist mod. After few weeks of research I have decided to do it by myself.
The auto folding mirror swap is quite straight forward, pretty much plug and play. But parking assist is whole other story, I will share that later.
Here is for the auto folding mirror swap,
Tools I used:
1. Wrench socket set.
2. Screw driver.
3. Trim removal tool set. (I just purchased the 5 pieces plastic set, you should be able to find it in local auto parts store, ebay or amazon. It might not be the best trim removal tool, but it does the trick.)
Auto folding Mirror part #s:
87910‑0E021-?? RH mirror with auto folding
87910‑0E041-?? RH mirror with auto folding and camera (This is what I got as I am gonna add parking assist to my car)
87940‑0E021‑?? LH mirror with auto folding
84040‑0E020 Mirror switch with auto folding function button.
(The question mark above is for car's color)
The cost:
I got both mirrors and switch from oversea wreck yard. The parts cost me only about US$650, and I have to repaint the mirror, done it here in Canada, cost me CAD$150 for both side.
So the total roughly is US$800.
Below shows the cover you need to remove from the door panel to get access to the screws to be removed later.
Last edited by foreverjoj; 08-12-13 at 11:57 PM.
 08-12-13, 11:13 PM
#2
Driver School Candidate
Thread Starter
Join Date: Jun 2013
Location: BC
Posts: 14
Likes: 0
Received 0 Likes
on
0 Posts
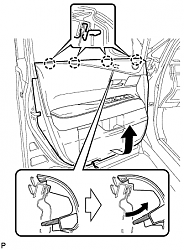
Here shows the screws to be removed from the door panel. (Total 4 screws only)
In the 5th picture shows removing the light cover, after the cover is removed you can unplug connector to the light. You don't really need to do this, but it will be easier when removing and installing the door panel.
In the 5th picture shows removing the light cover, after the cover is removed you can unplug connector to the light. You don't really need to do this, but it will be easier when removing and installing the door panel.
Last edited by foreverjoj; 08-12-13 at 11:17 PM.
08-12-13, 11:42 PM
#3
Driver School Candidate
Thread Starter
Join Date: Jun 2013
Location: BC
Posts: 14
Likes: 0
Received 0 Likes
on
0 Posts
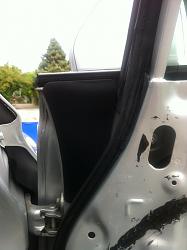
After all 4 screws are removed from the door panel, you can use trim remover tool to loose the clip starting from the bottom, and then pull the door panel from the bottom towards you to remove it.
See picture.
After the door panel taken down, remove all the connectors, most important 2 connector are the front door lock remote control cable and front door inside locking cable.
Try to remember which goes where, you don't want to remove the panel again just because of these 2 cables.
After the door panel is off, remove the black retainer show in the picture below.
(The black sticky glue thing in the picture is what bonds the plastic cover and the door. I peeled the plastic cover off to install the Dynamat tho.)
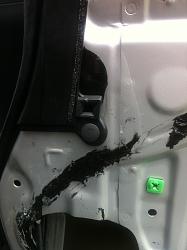
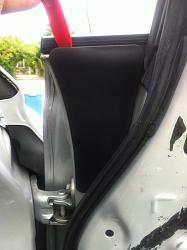
After the retainer is removed, remove a small plastic cover behind it.
(Although the workshop manual says that it is not reusable, but I did stick that cover back on. You can place it some where carefully and stick it back up later.)
And below is the picture after you remove that small plastic cover, you can see there are 2 bolts behind it.
See picture.


After the door panel taken down, remove all the connectors, most important 2 connector are the front door lock remote control cable and front door inside locking cable.
Try to remember which goes where, you don't want to remove the panel again just because of these 2 cables.
After the door panel is off, remove the black retainer show in the picture below.
(The black sticky glue thing in the picture is what bonds the plastic cover and the door. I peeled the plastic cover off to install the Dynamat tho.)

After the retainer is removed, remove a small plastic cover behind it.
(Although the workshop manual says that it is not reusable, but I did stick that cover back on. You can place it some where carefully and stick it back up later.)
And below is the picture after you remove that small plastic cover, you can see there are 2 bolts behind it.
 08-12-13, 11:51 PM
#4
Driver School Candidate
Thread Starter
Join Date: Jun 2013
Location: BC
Posts: 14
Likes: 0
Received 0 Likes
on
0 Posts
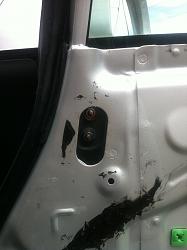
The third bolt is behind the cover shows in picture below, use the trim remover to remover the cover and you can see it.
After remove all 3 bolts, now you can take off the mirror. There is one clip on the mirror, try to be careful not to break it tho.
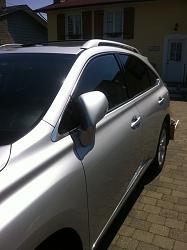
After the mirror is off, put your power folding mirror on and reverse the whole process. Same thing goes to both side, then swap is done.
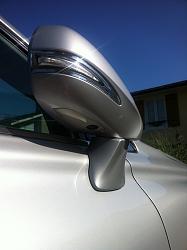
Below are pictures I took after the swap.
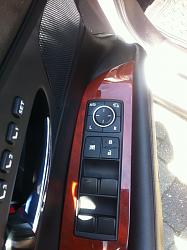
Driver side mirror
Switch
Passenger side mirror with camera


After remove all 3 bolts, now you can take off the mirror. There is one clip on the mirror, try to be careful not to break it tho.
After the mirror is off, put your power folding mirror on and reverse the whole process. Same thing goes to both side, then swap is done.
Below are pictures I took after the swap.
Driver side mirror

Switch

Passenger side mirror with camera
 08-13-13, 12:09 AM
#5
Driver School Candidate
Thread Starter
Join Date: Jun 2013
Location: BC
Posts: 14
Likes: 0
Received 0 Likes
on
0 Posts
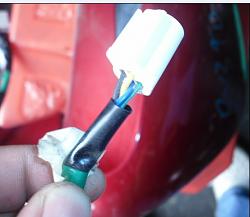
Here is the picture of the mirror connectors. The connector is the same, only that there are 16 wires with power folding mirror instead of 14 wires originally.
Original one, only 14 wires
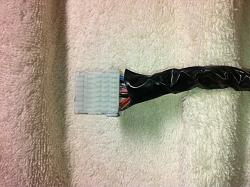
Power folding mirror, 16 wires

This connector is for side mirror camera
Original one, only 14 wires

Power folding mirror, 16 wires

This connector is for side mirror camera
 08-13-13, 12:35 AM
#6
Pit Crew


Very nice job and a great write up! I'm so happy someones went out and tried this. I too have been wanting to install this. Just to clarify, they do fold when the doors are locked, right?
08-13-13, 11:55 AM
#7
Driver School Candidate
Thread Starter
Join Date: Jun 2013
Location: BC
Posts: 14
Likes: 0
Received 0 Likes
on
0 Posts
Yes, you can see there is a auto button on the switch, enable it and the mirrors will auto fold when you lock the door.
Trending Topics
08-13-13, 02:08 PM
#8
Lexus Champion
Nice effort.... but how do you enable the side camera? Or is it just ignored? There is a switch on the lower left of the steering as it comes from the factory so perhaps it is non functional on the swap you did.
We have the folding mirrors which we only use when on vacation, the side camera is very seldomly used.
We have the folding mirrors which we only use when on vacation, the side camera is very seldomly used.
Last edited by Evitzee; 08-13-13 at 02:41 PM.
08-13-13, 09:01 PM
#9
Driver School Candidate
Thread Starter
Join Date: Jun 2013
Location: BC
Posts: 14
Likes: 0
Received 0 Likes
on
0 Posts
Nice effort.... but how do you enable the side camera? Or is it just ignored? There is a switch on the lower left of the steering as it comes from the factory so perhaps it is non functional on the swap you did.
We have the folding mirrors which we only use when on vacation, the side camera is very seldomly used.
We have the folding mirrors which we only use when on vacation, the side camera is very seldomly used.
08-14-13, 11:39 PM
#10

Where overseas did you get the parts? I'm looking for the Mirrors. I already got the new door switch. Thanks for the great writeup.
Me and my wife just purchased a used 2010 RX350 couple months ago. It has Canadian touring package which includes Navigation and backup camera, but no HUD, parking sensors, auto folding mirror and ML sound system etc....
I have done some search in the forum and found that one of the member has done the auto folding mirror and parking assist mod. After few weeks of research I have decided to do it by myself.
The auto folding mirror swap is quite straight forward, pretty much plug and play. But parking assist is whole other story, I will share that later.
Here is for the auto folding mirror swap,
Tools I used:
1. Wrench socket set.
2. Screw driver.
3. Trim removal tool set. (I just purchased the 5 pieces plastic set, you should be able to find it in local auto parts store, ebay or amazon. It might not be the best trim removal tool, but it does the trick.)
Auto folding Mirror part #s:
87910‑0E021-?? RH mirror with auto folding
87910‑0E041-?? RH mirror with auto folding and camera (This is what I got as I am gonna add parking assist to my car)
87940‑0E021‑?? LH mirror with auto folding
84040‑0E020 Mirror switch with auto folding function button.
(The question mark above is for car's color)
The cost:
I got both mirrors and switch from oversea wreck yard. The parts cost me only about US$650, and I have to repaint the mirror, done it here in Canada, cost me CAD$150 for both side.
So the total roughly is US$800.
Below shows the cover you need to remove from the door panel to get access to the screws to be removed later.
08-15-13, 01:03 PM
#11
Driver School Candidate
Thread Starter
Join Date: Jun 2013
Location: BC
Posts: 14
Likes: 0
Received 0 Likes
on
0 Posts
 08-15-13, 01:07 PM
#12
Rookie

Join Date: May 2006
Location: Bayarea, CA
Posts: 78
Likes: 0
Received 0 Likes
on
0 Posts
Me and my wife just purchased a used 2010 RX350 couple months ago. It has Canadian touring package which includes Navigation and backup camera, but no HUD, parking sensors, auto folding mirror and ML sound system etc....
I have done some search in the forum and found that one of the member has done the auto folding mirror and parking assist mod. After few weeks of research I have decided to do it by myself.
I have done some search in the forum and found that one of the member has done the auto folding mirror and parking assist mod. After few weeks of research I have decided to do it by myself.
I want to add the factory parking senors as well. In your research do you remember the site you found information regarding installing senors? Thanks for your help.
08-16-13, 12:44 AM
#13
Driver School Candidate
Thread Starter
Join Date: Jun 2013
Location: BC
Posts: 14
Likes: 0
Received 0 Likes
on
0 Posts
The only information I got before I did the installation is from this thread https://www.clublexus.com/forums/rx-...-my-lover.html and RX350 workshop manual.
164287356 provided some useful information in that thread that really helped me. You can check it out first. I will share some photos later too tho.