
Air flow stuck in front position
 11-05-10, 11:33 PM
#16
Lexus Champion

Once again MASSMINI has provided the correct info. Be careful with the little locking tabs though because they are easy to break and there are several of them. Also, be sure to LUBE the contact strips with a little DIALECTRIC grease after you've cleaned them.
 11-06-10, 01:07 PM
#17
Driver School Candidate

Thanks, this helped a ton and allowed me to remove the old blower control module. the bolt on the bottom closest to the driver was a little of a pain.
11-07-10, 08:08 AM
#18
Lexus Champion
Thread Starter
Well, I am at a standstill now.
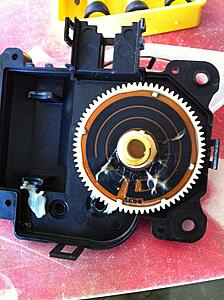
I removed the air mode servo, opened it up (will post pictures in a while), cleaned the inside contacts and just hooked it up to the connector for testing (not screwed back).
No luck. The servo does not move at all. No humm, no buzz. WTF.
And By the way, when I run the diagnostic mode, it keeps on going like the energizer bunny. How much time does it take to finish it? I left it on for 10 minutes and it is still flipping through the modes.
The only saving grace is that with the servo removed, the default position of the gate is "feet + defrost". So for the winter I am OK


Last edited by chikoo; 11-07-10 at 08:36 AM.
11-07-10, 09:30 AM
#19
Lexus Champion
Thread Starter
Hip Hip Hooray
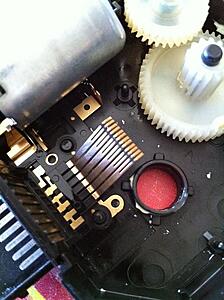
Fixed it. The bad boy were the contacts to the Motor. They were loose. I pressed them tight and re-installed the motor into the tighter contacts.
Now it works like a charm.
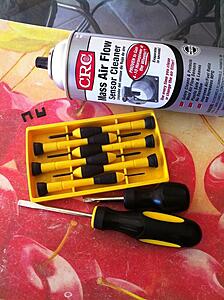
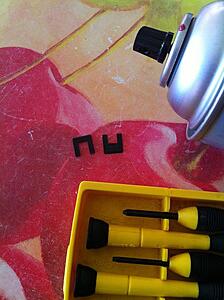
Here are my tools
and here is my damage
Fixed it. The bad boy were the contacts to the Motor. They were loose. I pressed them tight and re-installed the motor into the tighter contacts.
Now it works like a charm.
Here are my tools

and here is my damage
 11-09-10, 06:06 PM
#20
Lexus Champion
Thread Starter
and yes, in case you wonder how to calibrate the settings, simply plug the servo, but do not screw it in. Then start the car and run it through the modes. The servo will move and stop at the right position corresponding to the mode chosen. Then simply screw the servo in place.
11-11-10, 12:59 AM
#21
Lexus Champion
and yes, in case you wonder how to calibrate the settings, simply plug the servo, but do not screw it in. Then start the car and run it through the modes. The servo will move and stop at the right position corresponding to the mode chosen. Then simply screw the servo in place.
11-13-10, 10:48 AM
#22
Lexus Champion
Thread Starter
My golden rule for electronics: 99% of the time it is contacts to blame. Learnt it a long time ago when my first CD player started acting up. Opened it up and tightened the cables that connected to the optical eye. Bingo!
I also trouble shot a multi million dollar 3 axis horizontal CNC machine that the factory tech had trouble. That machine used to jerk while moving on the x axis. He spent 2 days analyzing data. I then walked up to him and told him to clean the contacts of the connector cables that send the signal from the ECU to the servo motors. Voila...He was shocked and impressed, and I made a friend that day!
I also trouble shot a multi million dollar 3 axis horizontal CNC machine that the factory tech had trouble. That machine used to jerk while moving on the x axis. He spent 2 days analyzing data. I then walked up to him and told him to clean the contacts of the connector cables that send the signal from the ECU to the servo motors. Voila...He was shocked and impressed, and I made a friend that day!
01-23-12, 07:35 PM
#23
Driver School Candidate

Join Date: May 2010
Location: TX
Posts: 12
Likes: 0
Received 0 Likes
on
0 Posts
Massmini - I have an 2001 RX300 that is causing the same noises. I have narrowed it down to the Mode Servo (thx to this forum). Do you have pictures of the motor? I want to try to go on the cheap route and just find/replace the motors.
01-23-12, 11:24 PM
#24
Moderator
 01-24-12, 08:17 AM
#25
Moderator
I got a PM and I am replying here as it may benefit all.
I opened up the recirc servo and based on marking on the motor I searched the web. Visually it is the best match but to confirm I need to have one in hand. There are bumps on the shell of the motor and that must match to be bumps in the shell of the servo.
The motor comes in a 3v version and for RX it should be 12v (that info is imbedded in the part number I posted).
Please keep in mind, this is a hunch and not a guaranteed replacement.
Salim
01-28-12, 10:33 AM
#26
Driver School Candidate

Join Date: Jan 2012
Location: Florida
Posts: 11
Likes: 0
Received 0 Likes
on
0 Posts
01-28-12, 04:58 PM
#27
Driver School Candidate
Join Date: May 2010
Location: TX
Posts: 12
Likes: 0
Received 0 Likes
on
0 Posts
Hi - can you please take some photos of the entire motor showing the terminals, markings, etc.? I really think these cheap motors just weaken over time and don't have enough force to move the gears and the arms that open/close the vents, modes, etc. The issue is just finding these motors...any motor idendification everyone on this forum can provide can assist locating these things. Thx!
02-04-12, 05:56 PM
#29
Driver School Candidate
Join Date: May 2010
Location: TX
Posts: 12
Likes: 0
Received 0 Likes
on
0 Posts
mindful...great post!
I believe I found a better way to fix this vs. using glue. I was concerned glue would not hold on the polished shaft.
All that needs to be done is to move the brass collar up a little bit on the shaft to close the gap. I used a hobby gear puller (had this to fix my door lock actuators) to move it to the position needed. Now the worm gear set properly on the brass collar with little movement between the servo case and the motor.
For now, it appears this may have worked (without having to buy extra servos). I will post an update later to confirm this indeed fixes the problem
06-30-12, 10:50 AM
#30
Driver School Candidate

Join Date: Jun 2012
Location: OK
Posts: 1
Likes: 0
Received 0 Likes
on
0 Posts
I tried your solution but had no glue so prying with a screwdriver, slid the post out of the motor just enough to get the worm gear close to the edge of the housing.
Works great, m wife had called the shop yesterday and they quotes 9 hours of work and $700. My son and I did this in less than 3 hours.
Thanks and really appreciate this form.
Works great, m wife had called the shop yesterday and they quotes 9 hours of work and $700. My son and I did this in less than 3 hours.
Thanks and really appreciate this form.

Thread
Thread Starter
Forum
Replies
Last Post