
Removing center vent when taking out radio
 06-28-14, 09:53 AM
#1
Advanced
Thread Starter

Have you ever noticed that tutorials on this sort of thing give you just enough information to be dangerous? The information I got was to press the two side clips inward and firmly finagle the vent out. This will practically guarantee that you will break the vent. Mine is now broken in four places and has turned into a nice superglue project.
This project should come with a warning: this vent has a very delicate plastic structure that will break easily with anything except the touch of a surgeon operating on a hummingbird heart.
If you undo those clips and it doesn't immediately come free... STOP! Do not work the vent back and forth. The correct technique is to undo the clips and gently pull one side forward slightly while pressing the clip inward, then repeat the technique on the other side. You should only have to move the vent forward a fraction of an inch on each side, then it will be free to pull out. I wish I knew this before I started the project. Hopefully this will stop someone else from making the same mistake I did.
 06-28-14, 11:13 AM
#3
Advanced
Thread Starter
Show me one. For example, the tutorial here: http://www.lexls.com/tutorials/audio/headunit.html
is completely useless for my car. There's no link in the sticky FAQ section that links a proper technique. I did a google search on the subject and got a variety of links, none of which was particularly helpful. I actually found the right result by reading several threads on the subject, but I had to dig to find it. And none of them actually described the delicate nature of the vent, which is critical information.
is completely useless for my car. There's no link in the sticky FAQ section that links a proper technique. I did a google search on the subject and got a variety of links, none of which was particularly helpful. I actually found the right result by reading several threads on the subject, but I had to dig to find it. And none of them actually described the delicate nature of the vent, which is critical information.
06-28-14, 02:15 PM
#4

I've took mine out many times,the last time earlier today and have never caused any damage in doing so.
I use a "wall paper scraper" and simply slide the thin blade between the top of the vent and the dash and prize the vent out slightly then repeat at the bottom of the vent,they do take a bit of juggling to fully remove and the Hazard warning switch plug is a bit tight.
I did brake one once but that was by fitting one of those clip on air fresners to the vent.
06-28-14, 03:03 PM
#6
Advanced
Thread Starter
I've took mine out many times,the last time earlier today and have never caused any damage in doing so.
I use a "wall paper scraper" and simply slide the thin blade between the top of the vent and the dash and prize the vent out slightly then repeat at the bottom of the vent,they do take a bit of juggling to fully remove and the Hazard warning switch plug is a bit tight.
I did brake one once but that was by fitting one of those clip on air fresners to the vent.
I use a "wall paper scraper" and simply slide the thin blade between the top of the vent and the dash and prize the vent out slightly then repeat at the bottom of the vent,they do take a bit of juggling to fully remove and the Hazard warning switch plug is a bit tight.
I did brake one once but that was by fitting one of those clip on air fresners to the vent.
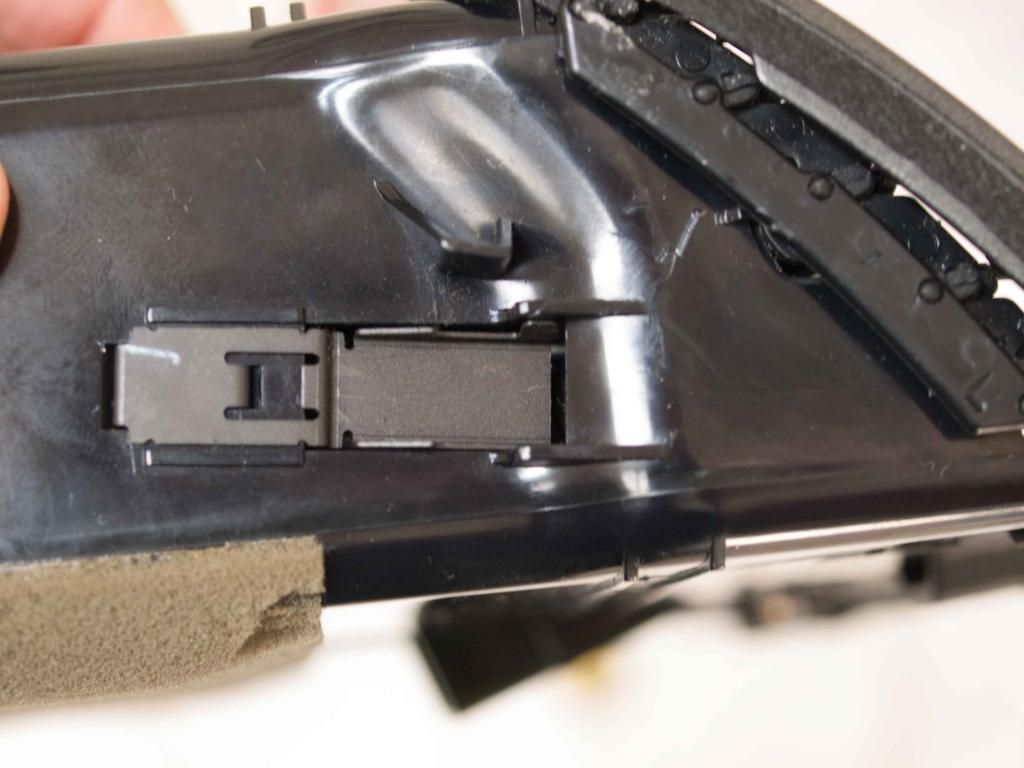
On the right side you will see the vulnerable vent structure--the daisy chain of thin plastic links that make the vents operate in unison. They will break like a pretzel if you're not careful. Then there is the clip on the side. It is spring loaded so that you must keep pressure on it with a screwdriver while moving the vent forward in order to release the clip.
Last edited by aptoslexus; 06-28-14 at 03:16 PM.
06-28-14, 04:57 PM
#7
Show me one. For example, the tutorial here: http://www.lexls.com/tutorials/audio/headunit.html
is completely useless for my car. There's no link in the sticky FAQ section that links a proper technique. I did a google search on the subject and got a variety of links, none of which was particularly helpful. I actually found the right result by reading several threads on the subject, but I had to dig to find it. And none of them actually described the delicate nature of the vent, which is critical information.
is completely useless for my car. There's no link in the sticky FAQ section that links a proper technique. I did a google search on the subject and got a variety of links, none of which was particularly helpful. I actually found the right result by reading several threads on the subject, but I had to dig to find it. And none of them actually described the delicate nature of the vent, which is critical information.
https://www.clublexus.com/forums/ls4...ns-needed.html
I'm tempted to tell you to do a search of past threads since your question has been asked and answered many times.
I have no idea what the "Theft Deterrent Design" on the cassette tape door means. I've removed the radio in my similar 2000 LS400, sent it out for repair, and reinstalled it with no problems. I don't think there are are any security codes -- none are mentioned in the owners manual like there was for my 90 LS.
I've never bothered to disconnect the battery before removing the radio but that is probably a good idea.
EDIT 10/20/2002: There are small clips on each outer side of the center vents that you should be able to see if you shine a flashlight into the vents. Stick a very small blade screw driver through the vent slats and pull each clip inward towards the center. The center vent assembly will easily slide right out although it may take a tiny bit of GENTLE prying with a plastic trim removal tool. Do it this way and the vent assembly "should" not fall apart. Thank forum member Billypowel for this information.
Disconnect the seat heater, VSC and ashtray connections as you remove the wood console garnish.
Lay a towel on the center console to prevent scratching before you pull out the radio/HVAC controls.
Remove the lower two 10 mm bolts that hold the radio/HVAC control assembly in place and then the upper two 10 mm bolts.
Pull the radio/HVAC control assembly out of the center stack far enough to unplug all the connectors.
Carefully pull the radio/HVAC control assembly completely out of the center stack and take the assembly to a workbench to separate the HVAC control portion of the assembly from the radio.
Mainly, be very careful to prevent scratching the front of the HVAC control and radio assemblies.
Warning: when removing the center vents be gentle but firm. They break easily and cost hundreds $$$ to replace. If they fall apart (mine always do), keep track of all the parts so you can put the vent assembly back together.
Trending Topics
06-28-14, 05:35 PM
#8
Advanced
Thread Starter
Since your so adamant that your experience is representative of everyone elses here you go. I have removed my center vent a number of times and though it is fragile and can fall apart even if you do it the RIGHT way there are pretty good instructions of how to do it.
https://www.clublexus.com/forums/ls4...ns-needed.html
https://www.clublexus.com/forums/ls4...ns-needed.html
I find the instructions you posted ok, but incomplete. I actually read this prior to my attempt and thought that pressing the clips inward would just release them, so I did that and found the vent was still hung up. Of course the key detail is that the clips are spring-loaded and won't release until you pull the vent forward WHILE pressing the clip. It's all so clear after it's been done once, but someone approaching it for the first time doesn't know exactly what they're dealing with unless they are given all the details beforehand.
06-28-14, 06:39 PM
#9
Driver School Candidate

Join Date: Oct 2008
Location: florida
Posts: 47
Likes: 0
Received 0 Likes
on
0 Posts
Hey, he's only trying to provide a warning to those of us who don't realize our own strength 
On a side note, does anyone have any clue on how the A/c vent louvre things at the ends of the dash on gen 1 models come out? Or does one have to take off the entire dash to fix those? The passenger side vent on my '92LS400 freewheels and does not stay put, almost as if it has a mind of its own. I know it is supposed to be moveable, but it should stay more or less reasonably tight in there.
TIA
06-29-14, 05:12 AM
#10
I get it that it's not clear and plenty ppl break the vents and then have to glue them back together if possible. I actually almost broke mine the first time but stopped immediately when I felt the resistance and reread the lexls tutorial again since that was the only one I could find at the time.
06-29-14, 03:09 PM
#11
It HELPS everyone to identify the year of your Lexus before blogging warnings. I have removed my 99's a few times and it came apart the first time but we was able to put it back together. and then I found the push in clips and have posted this with photos....... more than once.... you just didnt look very good,
06-29-14, 05:22 PM
#12
Advanced
Thread Starter
It HELPS everyone to identify the year of your Lexus before blogging warnings. I have removed my 99's a few times and it came apart the first time but we was able to put it back together. and then I found the push in clips and have posted this with photos....... more than once.... you just didnt look very good,
I just found the best answer after I tried a couple that weren't.
06-29-14, 07:54 PM
#13
If only your perfect answer was the only result that pops up. Unfortunately, there's a variety, many of which are not terribly helpful. And since I found the answer, you can't say I didn't look "very good."
I just found the best answer after I tried a couple that weren't.
I just found the best answer after I tried a couple that weren't.

Thread
Thread Starter
Forum
Replies
Last Post
Dimjer
RX - 3rd Gen (2010-2015)
12
11-17-11 04:42 PM