Newbie here- '93 and possible ECU and cluster problems.
 07-25-13, 09:55 AM
#1
Driver School Candidate
Thread Starter

Join Date: Jul 2013
Location: Florida
Posts: 12
Likes: 0
Received 0 Likes
on
0 Posts
Hello all, new to the forum.. Just got a 1993 LS400. It's having the hesitation when stepping hard on the gas to increase speed. Also, the speedo doesn't work right away, it usually kicks in around 40mph or so, and the O/D OFF light keeps flashing. I've been digging and digging for the cause, which could be either the Vehicle Speed Sensors OR the ECM. Judging by how many others had this exact problem and all signs point to the ecm, that's what I'm going with.. There's no heated seats, no trac, and no air suspension. So my question is, can I use an ECM for a 50140 to replace my 50141? I'm assuming the major difference is the 50140 has trac, heated seats, etc.
I did search and search and found no real definitive answer to my question. I know I can pull apart the ECM and replace the capacitors myself, but I'm not nearly comfortable with soldering electronics such as an ECM. Any help would be greatly appreciated, especially since Autozone has a deal going and I can get a reman ECM from them for $300.
I did search and search and found no real definitive answer to my question. I know I can pull apart the ECM and replace the capacitors myself, but I'm not nearly comfortable with soldering electronics such as an ECM. Any help would be greatly appreciated, especially since Autozone has a deal going and I can get a reman ECM from them for $300.
Last edited by RA40; 07-25-13 at 10:13 AM. Reason: descriptive title
 07-25-13, 10:07 AM
#2
It's been suggested that you pay a few dollars for the parts and take them and the directions to an electronics repair place and have them do the soldering. Not everyone is good at all things. I'd recommend that as much cheaper...and there's no guarantee that the reman ECM wouldn't have the same problems later. If it was me, I'd repair mine and put it back in. Cheaper and when you open it up you might see the tell tale signs that it was indeed the problem.
Good luck.
Good luck.
 07-25-13, 10:36 AM
#4
Driver School Candidate
Thread Starter
Join Date: Jul 2013
Location: Florida
Posts: 12
Likes: 0
Received 0 Likes
on
0 Posts
Even if the reman ECM doesn't work, I can still return it to Autozone. There's quite literally no electronics shop anywhere around here, that I can find, for repairing anything. Let alone something delicate like the board of an ECM. I just wanna know if I can replace the 50141 ECM that's in my car with the 50140 ECM.
Also, thanks for the welcome! Took awhile to find one that was in decent condition both mechanically and cosmetically. Never seen a car so clean with 226k miles.
Also, thanks for the welcome! Took awhile to find one that was in decent condition both mechanically and cosmetically. Never seen a car so clean with 226k miles.
07-25-13, 11:43 AM
#5
Driver School Candidate
Thread Starter
Join Date: Jul 2013
Location: Florida
Posts: 12
Likes: 0
Received 0 Likes
on
0 Posts
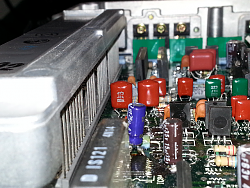
Quick update. I think I found the problem. Based on the info from LsCowboyLs' thread. Went through each capacitor to match the correct ones he had listed. Low and behold, there's an odd one out. Someone replaced one of the 15uf 35v with a 47uf 25v!
You can see little odd one here. And this is the only spot that shows any sign of leakage and being bad. I feel THIS is my problem. I'll probably go ahead and order all the correct caps to replace them and go get me some new soldering goodies. I have experience with soldering, just not on circuit boards.
You can see little odd one here. And this is the only spot that shows any sign of leakage and being bad. I feel THIS is my problem. I'll probably go ahead and order all the correct caps to replace them and go get me some new soldering goodies. I have experience with soldering, just not on circuit boards.
 07-25-13, 02:13 PM
#6
Lexus Champion

Quick update. I think I found the problem. Based on the info from LsCowboyLs' thread. Went through each capacitor to match the correct ones he had listed. Low and behold, there's an odd one out. Someone replaced one of the 15uf 35v with a 47uf 25v!
You can see little odd one here. And this is the only spot that shows any sign of leakage and being bad. I feel THIS is my problem. I'll probably go ahead and order all the correct caps to replace them and go get me some new soldering goodies. I have experience with soldering, just not on circuit boards.
Attachment 291703
also, it appears that your other capacitors are the defective PF (M) series that were original to the car, so in short, ALL of you capacitors need to be replaced anyway!
as far as doing it yourself, I am a big proponent of DIY, however, if you have never soldered and desoldered on a circuit board, I highly suggest you go to your local electronics surplus shop and buy some cheap surplus circuit boards that contain a lot of this size capacitor in this densely populated of a board and practice, practice, practice! - or else order the right capacitor and find someone that you know personally who is a soldering pro (not just some random place that claims to know what they are doing) - if you contract out the soldering, when they get done, thoroughly inspect the work and double check that YOUR capacitors were used, that the placement and polarities are correct (make a diagram beforehand) and that they left no stray solder.
This repair is NOT a good one to "learn" on!
I recommend a desoldering tip temp of 725� F and a soldering temp of 700� F and massive amounts of the flux cited in my recommended tools section. (keep the flux off of the component side of the board as much as you can, but it will be necessary even on the component side on connections that have had the corrosive effects of leaking electrolyte) - you may even need to slightly sand the connection with a 1500-2000 grit sandpaper until shiny to get a good solder flow - use 91% or higher alcohol to remove rosin flux when you are done on the backside.
07-25-13, 02:45 PM
#7
Driver School Candidate
Thread Starter
Join Date: Jul 2013
Location: Florida
Posts: 12
Likes: 0
Received 0 Likes
on
0 Posts
Yes, a 47uf where a 15uf belongs is a BIG problem, so is 25V where 35V is required, not to mention the fact that it does not appear to be a low ESR capacitor nor does it appear to be a premium big 4 Japanese brand.
also, it appears that your other capacitors are the defective PF (M) series that were original to the car, so in short, ALL of you capacitors need to be replaced anyway!
as far as doing it yourself, I am a big proponent of DIY, however, if you have never soldered and desoldered on a circuit board, I highly suggest you go to your local electronics surplus shop and buy some cheap surplus circuit boards that contain a lot of this size capacitor in this densely populated of a board and practice, practice, practice! - or else order the right capacitor and find someone that you know personally who is a soldering pro (not just some random place that claims to know what they are doing) - if you contract out the soldering, when they get done, thoroughly inspect the work and double check that YOUR capacitors were used, that the placement and polarities are correct (make a diagram beforehand) and that they left no stray solder.
This repair is NOT a good one to "learn" on!
I recommend a desoldering tip temp of 725� F and a soldering temp of 700� F and massive amounts of the flux cited in my recommended tools section. (keep the flux off of the component side of the board as much as you can, but it will be necessary even on the component side on connections that have had the corrosive effects of leaking electrolyte) - you may even need to slightly sand the connection with a 1500-2000 grit sandpaper until shiny to get a good solder flow - use 91% or higher alcohol to remove rosin flux when you are done on the backside.
Trending Topics
07-25-13, 04:11 PM
#8
Lexus Champion
I use a chisel tip - Weller model ETA - size is .062 in./1.57 mm
I use a Weller WES51 soldering station, but would be equally happy or perhaps even more happy with a Japanese Hakko FX-888 soldering station
solder should be around 0.022 inches - 0.56 mm
07-26-13, 08:55 AM
#10
Driver School Candidate
Thread Starter
Join Date: Jul 2013
Location: Florida
Posts: 12
Likes: 0
Received 0 Likes
on
0 Posts
The reason I suspect the ECM is because I've got three of the issues LsCowboy pointed out in his DIY thread, that would be the ECM. Forgot to mention cruise control doesn't work either. Foegot about that since our old car didn't have it working either. But as you can see in the pic I posted, previous owner replaced ONE bad capacitor with the wrong capacitor.
07-28-13, 10:26 AM
#12
Driver School Candidate
Thread Starter
Join Date: Jul 2013
Location: Florida
Posts: 12
Likes: 0
Received 0 Likes
on
0 Posts
New issue! The gauge cluster is completey out now. Tried to come back on after going over a bump. But only the speedo and fuel gauge stopped working. The RPM and temp gauge work fine, but nothing is lit up.
Edit: Fixed that issue. The orange plug on the back of the cluster was barely connected.
Edit take 2: That fixed the issue temporarily. Went back out to double check and the gauge cluster won't light up now. Same still applies, the temp gauge needle and tach gauge needle still function, the speedo and fuel gauge don't, and none of the gauges light up.
Last edited by JaxBchBum; 07-28-13 at 04:56 PM.
07-28-13, 05:00 PM
#13
Lexus Champion
the capacitor in your pic that is beside the replaced wrong capacitor, (the other 15uF - the original one) looks to be leaking really badly and is almost to the point that the board may not be fixable - there is a limited window from when they start leaking to address it before the board gets ruined from the corrosive effects
07-28-13, 05:13 PM
#14
Driver School Candidate
Thread Starter
Join Date: Jul 2013
Location: Florida
Posts: 12
Likes: 0
Received 0 Likes
on
0 Posts
the capacitor in your pic that is beside the replaced wrong capacitor, (the other 15uF - the original one) looks to be leaking really badly and is almost to the point that the board may not be fixable - there is a limited window from when they start leaking to address it before the board gets ruined from the corrosive effects

Thread
Thread Starter
Forum
Replies
Last Post
DrAtomica
Performance & Maintenance
5
12-29-16 11:36 PM