
Manual Shifting Logic How to reverse? (Now with pics!)
 07-29-06, 02:33 PM
#16
To me it's pointless since the transmission only offers "highest gear allowed" shifting...it's not like it responds to upshifts as soon as you hit the lever.
And why would you use that instead of the paddles anyway?
And why would you use that instead of the paddles anyway?
 07-29-06, 04:01 PM
#17
The Reverse logic is actually better its used in Racing for a while and if you think about it... a person / cars momentum is already traveling in that direction so under braking you lean forward and thats when you need to downshift hence you push forward on the lever. And reverse for Accelrating...
Last edited by lobuxracer; 03-09-08 at 10:53 PM.
07-29-06, 08:40 PM
#18
Lead Lap
Thread Starter

Join Date: Apr 2006
Location: CA
Posts: 673
Likes: 0
Received 0 Likes
on
0 Posts
Originally Posted by GOBUCS
Using that logic, if you had a manual, going up into 3rd and 5th gears would not be ideal because you have to reach forward instead of pulling back??
Manual is a whole differnt story, this car doenst have a clutch and nether does SMG. Its a personal choice and I think the reverse logic is better and I've noted that I have a BMW 545i SMG and I would like them both to be the same. I like push downshift and pull upshift more so you choice... my choice.
Last edited by EBMCS03; 07-29-06 at 08:44 PM.
07-29-06, 08:43 PM
#19
Lead Lap
Thread Starter
Join Date: Apr 2006
Location: CA
Posts: 673
Likes: 0
Received 0 Likes
on
0 Posts
Originally Posted by conekiller
To me it's pointless since the transmission only offers "highest gear allowed" shifting...it's not like it responds to upshifts as soon as you hit the lever.
And why would you use that instead of the paddles anyway?
And why would you use that instead of the paddles anyway?
I like to be able to use both... I dont always have my hands on the 3 and 9 o clock position. And when Both my hands are not on the steering wheel the next best thing is to use is the shifter.
No I havent had a chance to look at it again yet. But then again sounds like 99% of the people here dont like the BMW logic anyways besides me and Tuxlex so.....
07-29-06, 09:14 PM
#20
Lexus Champion
don't racers have their hands in the 3 and 9 positions? i thought you were a race car driver that's why you needed the reverse. the paddle must be useless to you then lol. 
j/k
j/k
07-29-06, 09:25 PM
#21
Lead Lap
Thread Starter
Join Date: Apr 2006
Location: CA
Posts: 673
Likes: 0
Received 0 Likes
on
0 Posts
Originally Posted by kensteele
don't racers have their hands in the 3 and 9 positions? i thought you were a race car driver that's why you needed the reverse. the paddle must be useless to you then lol.
j/k
j/k
When I race yes, when I drive to work no.
 04-15-07, 10:43 AM
#23
Looks like Tom's has done it:
http://www.tomsracing.co.jp/e/comp/l...702-ts001.html
For $32??? I want this. Hello, Carson? How much can you get this for? If you need a test fit car, I'm first in line.
Javier
http://www.tomsracing.co.jp/e/comp/l...702-ts001.html
For $32??? I want this. Hello, Carson? How much can you get this for? If you need a test fit car, I'm first in line.
Javier
04-15-07, 12:33 PM
#24
Lead Lap
Thread Starter
Join Date: Apr 2006
Location: CA
Posts: 673
Likes: 0
Received 0 Likes
on
0 Posts
Thats cool... ya that thing just crosses 2 wires.. I forget which color... I would have to open up the shifter again to remember... but I swapped it since July of 06. The logic is sooooo much better for me.
04-15-07, 04:19 PM
#26
Lexus Champion
Thats a crazy idea! I never thought of reversing those! huh.... Toms kit looks pretty good though. Anyone pick one of those up yet?
Last edited by ben_r_; 04-15-07 at 04:22 PM.
04-16-07, 10:43 PM
#28
Tech Info Resource

iTrader: (2)
All you have to do is remove two wires from the connector, and replace them in the opposite positions. Connector J43 on the right side of the shifter assembly has a pink (pin 1) and a violet (pin 2) wire. Remove from the connector, remove both pins from the connector, swap them around, and you will have opposite shifting on the console shifter.
07-29-07, 05:40 PM
#29
Tech Info Resource
iTrader: (2)
OK, since no one else seems to have documented this, I thought I'd do it this afternoon for S&G.

If you don't know how to get to this point of console disassembly, check the nav hack thread for guidance.

The connector is a tad buried, but you can get your hand in there, really! The release is on the front, so it isn't hard to squeeze it and get it disconnected. When you do, it will look like this:
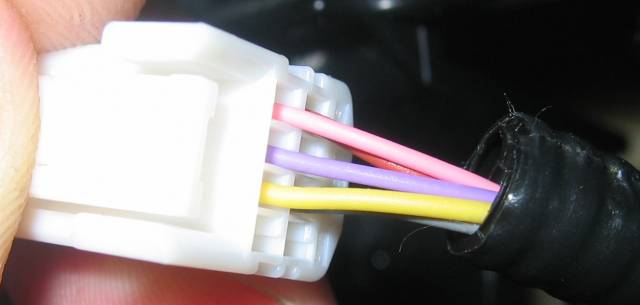
Note the position of the pink and violet wires. They are going to be reversed when we are done. I recommend removing the electrical tape from the end of the condulet and removing the rest of the tape from the wire bundle so you can easily pull the individual wires. Note how it is taped so you can duplicate this when you tape it back up if you want to retain your basic wiring reliability.

This connector has a secondary lock. I thought it was too small to have one, so I hacked up the connector a bit before I realised my stupidity, and there are some ugly marks on the connector now. Avoid my mistake and release the secondary catch by gently prying the small screwdriver slot in the middle of the secondary catch. It will only raise a little bit - about 2mm as you can see in the picture - but it makes all the difference in the world. AMHIK.

Since some have complained about the difficulty of getting pins released, I included a close up of what you are trying to accomplish. The tabs shown in the picture are easy to lift once the secondary catch is released. If you are really ****, you can do what I did and make the tool Toyco recommends for this, or you can just use a 1mm wide tip jeweler's screwdriver to lift the tab.

Here's the tool I made in action. I used a 1.4mm round stainless steel needle from a turkey lacing kit and filed it down to a 1mm x 1mm square, then filed off the point, squared it up and beveled the end as directed in the Toyco documentation. I just inserted it, levered up gently and effortlessly pulled the pins out the back of the connector.

This is the finished product. Note the pink and violet wires are reversed. Put the tape back on the wire bundle and condulet, plug the connector back into the shifter and reassemble the console. The job is finished.
I tested it, and it does indeed work like a charm to reverse the stick's shifting action. As always, I can't be responsible for any damage you might do through ham fisted problem solving (and you can see a bit of mine in the pics if you look close). The saving grace to this is the connector is available from Toyco or Tyco (the original manufacturer) if you really bugger it up.
If you don't know how to get to this point of console disassembly, check the nav hack thread for guidance.
The connector is a tad buried, but you can get your hand in there, really! The release is on the front, so it isn't hard to squeeze it and get it disconnected. When you do, it will look like this:
Note the position of the pink and violet wires. They are going to be reversed when we are done. I recommend removing the electrical tape from the end of the condulet and removing the rest of the tape from the wire bundle so you can easily pull the individual wires. Note how it is taped so you can duplicate this when you tape it back up if you want to retain your basic wiring reliability.
This connector has a secondary lock. I thought it was too small to have one, so I hacked up the connector a bit before I realised my stupidity, and there are some ugly marks on the connector now. Avoid my mistake and release the secondary catch by gently prying the small screwdriver slot in the middle of the secondary catch. It will only raise a little bit - about 2mm as you can see in the picture - but it makes all the difference in the world. AMHIK.
Since some have complained about the difficulty of getting pins released, I included a close up of what you are trying to accomplish. The tabs shown in the picture are easy to lift once the secondary catch is released. If you are really ****, you can do what I did and make the tool Toyco recommends for this, or you can just use a 1mm wide tip jeweler's screwdriver to lift the tab.
Here's the tool I made in action. I used a 1.4mm round stainless steel needle from a turkey lacing kit and filed it down to a 1mm x 1mm square, then filed off the point, squared it up and beveled the end as directed in the Toyco documentation. I just inserted it, levered up gently and effortlessly pulled the pins out the back of the connector.
This is the finished product. Note the pink and violet wires are reversed. Put the tape back on the wire bundle and condulet, plug the connector back into the shifter and reassemble the console. The job is finished.
I tested it, and it does indeed work like a charm to reverse the stick's shifting action. As always, I can't be responsible for any damage you might do through ham fisted problem solving (and you can see a bit of mine in the pics if you look close). The saving grace to this is the connector is available from Toyco or Tyco (the original manufacturer) if you really bugger it up.
The following 4 users liked this post by lobuxracer: