2nd Gen GS300 Seatbelt Removal & Winding How To
 02-24-16, 07:47 PM
#1

Maybe I missed it, but I couldn't find a good tutorial on removing, cleaning & re-winding the seatbelts on the GS300. I got some good informatoin, but also found some that wasn't so helpful. I posted the initial driver belt fix in my build thread ( https://www.clublexus.com/forums/bui...-reboot-3.html ) , but I've since done the passenger's side and so here is a reflection on both:
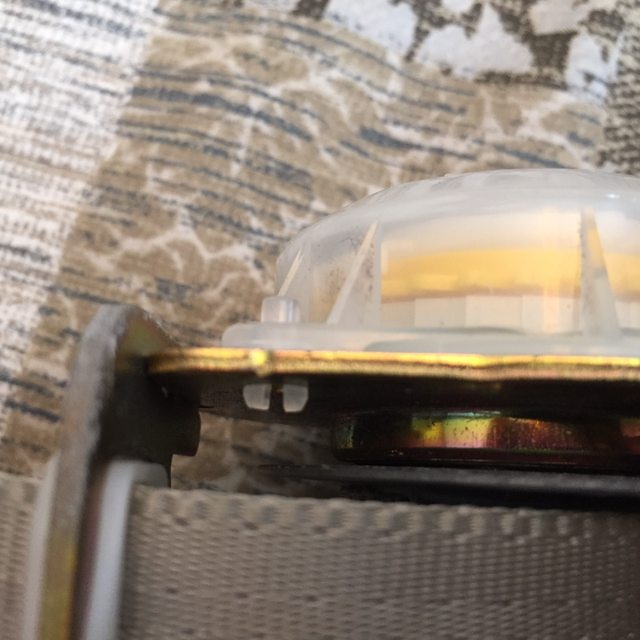
Attachment 493100
I'd read a bit about removing, cleaning, and re-winding the seat belts to make them function more like when the car was new, so I figured it was worth a shot, particularly after the wife gave me a look when hers didn't retract when exiting the car. Maybe it was my lousy search skills, but the information I found on the process was less than stellar. That combined with my uncanny ability to make things more difficult than they are left me without a seatbelt until I could acquire a new tensioner mechanism.
So here's a quick tutorial:
1) Move seat fully forward and raised
2) Disconnect battery terminal
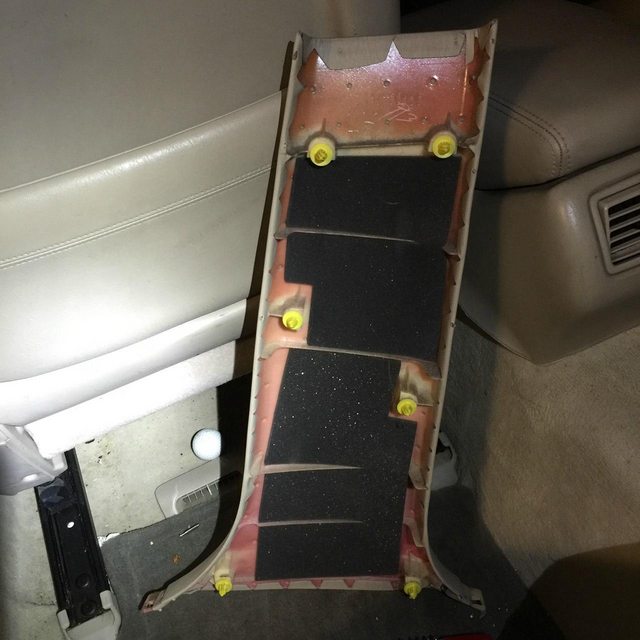
3) Pop lower portion of pillar off. It uses clips up and down and about an inch sits under the trim on each side. Removing it will leave this: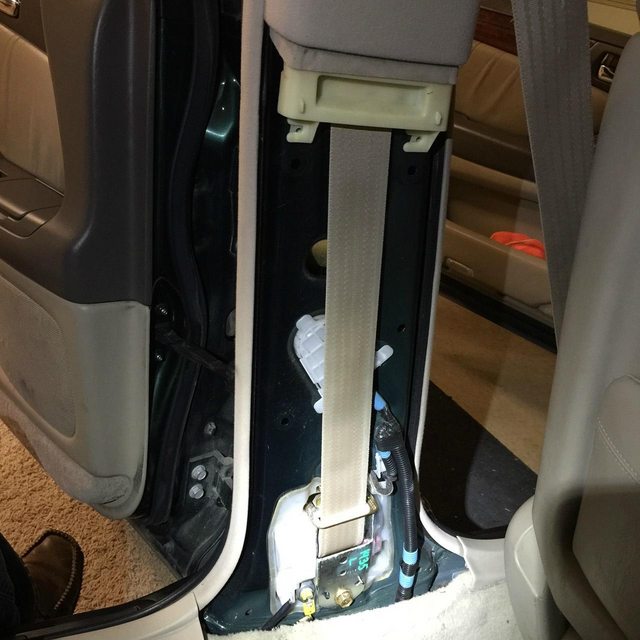
Here's what the back side of the panel looks like:
4) Unscrew the 2 screws that are on the lower side of the upper panel and then pop it off.
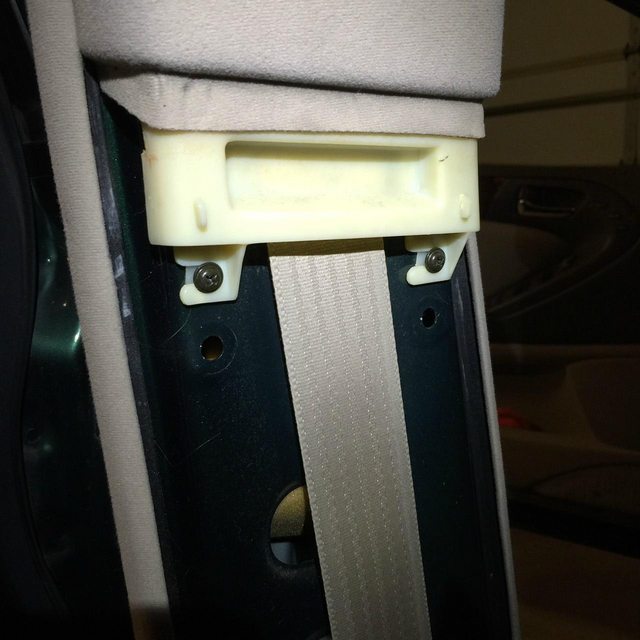
5) Remove the bolt that anchors the belt to the upper side of the pillar.
6) Pop the square cover for access to and remove the bolt that attaches the belt to the seat:

7) Thread the end of the seatbelt that was attached to the seat back up and through the upper panel. Set this panel out of your way.
--Now your seat belt should be fully exposed and accessible--
8) Remove the clips from the retractor mechanism. One is white one is yellow. The white clips comes off easily. The yellow is a little confusing. It has a metal clip around the back of it. Lift up on this clip to rotate it off the back of the plug and then you can pull the plug out.
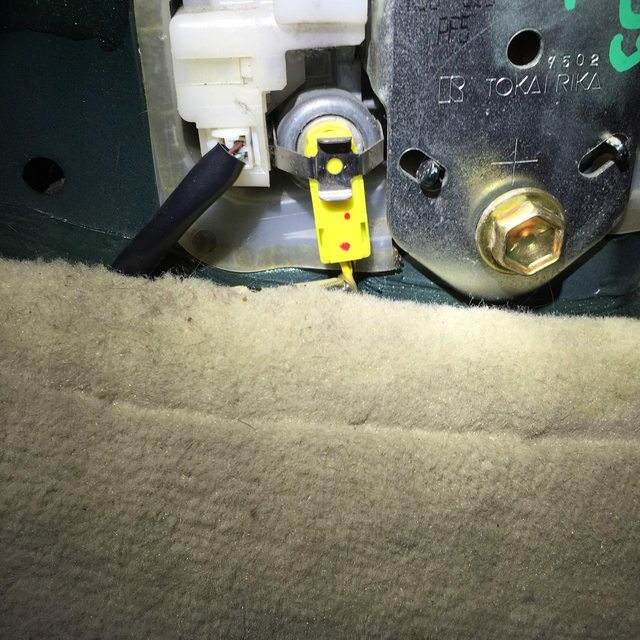
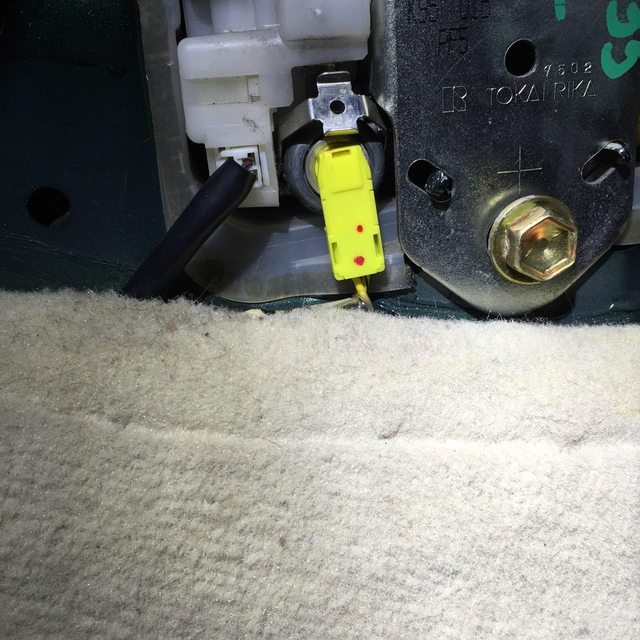
9) Remove the 2 bolts holding the mechanism to the pillar. 10mm & 14mm bolts
Now you should have the belt and mechanism free. DO NOT remove any of the plastic covers on the side. There's no reason to do so. Some tutorials say to. I did and removed the wrong one. Ever wonder what the spring inside looks like when it's not inside anymore?
Attachment 493107
Now to remove your belt from the retractor:
What you do at this point is you pull the belt all the way out, unwinding the retractor. You'll have to hold the unit completely vertical to avoid the catch from locking as you pull the belt out. Don't worry, you won't pull the belt off the spindle.
Once the belt is all the way unwound, you'll see it sticking out of a slit in the spindle. You need to use something to pry it out of spindle. I used the can opener tool from my Swiss Army knife. You'll need an extra hand or a tool to keep the spindle from spinning under the force of the spring while you work at digging the belt out. Once you pry it out, you can see there is a steel pin through the belt that keeps it from slipping inside the spindle.
Attachment 493108
Remove this pin. And then you can pull the belt out of the spindle. NOTE - DO NOT LET THE SPINDLE / SPRING RELEASE. I've read bad things happen. Also, take note of the way the belt threads in so you don't put it in backward and have to rethread it. Now for those of you who have a seatbelt that isn't retracting as well as it should, now is the time you can wind the spindle. Wind it until you meet resistance. For the particular replacement unit I received off ebay, this was about 3-4 turns of the spindle. Your results may vary.
Now wash that dirty belt. I let mine soak for about 30 minutes in purple power and water the used a brush and a rag to clean it up and nice-like. Attachment 493109
I've read some folks like to throw the in the washing machines. I didn't really care to have all those bits rattling around in the washing machine.
Before:
Attachment 493100
After: (dark areas are shadows)
Attachment 493110
FOLLOW UP: For Passenger & Rear Seatbelts -
When I got to the passenger's side, I noticed that there was some extra parts in the retractor gear/casing. You know how you can pull the belt all the way out and then it will lock such that you can retract it to whatever point you want and it will be locked there? It's useful when you are locking in car seats or as I have done in the past, transporting bulky cargo you don't want loose.
This is the side you'll be taking apart. The reason you have to do this is because you will not be able to re-wind the spring unless you do so. If you're only here to get the seat belt out so you can wash it, removal the following is not necessary. NOTE, before proceeding, it's probably easier if you have removed the seat belt from the tensioner already.
So, this is the side you'll need to remove:

You do so by taking a small flathead screw driver and pushing the center plastic pins out (from the back side) so that the ears can fold in and allow the case to pop off.
The tab, before you push them though:

The tab, pushed out:

Now pop all tabs (I think 3) out and CAREFULLY pry it off with a flathead.
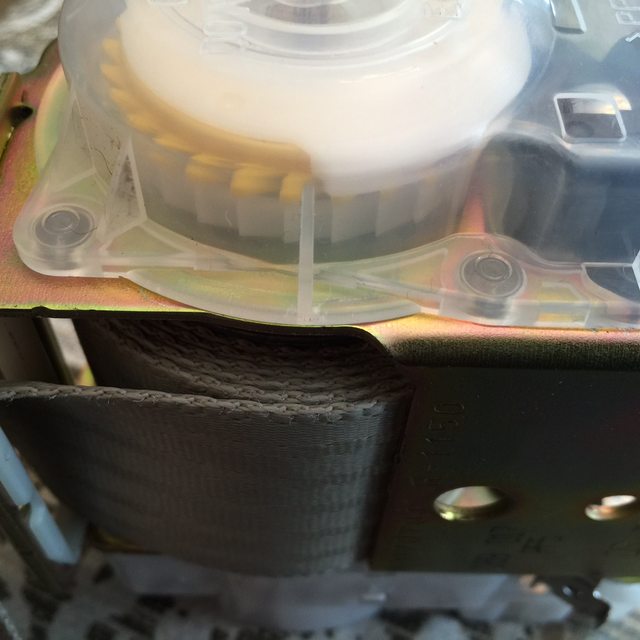
The little gear on the outside should sit on the shaft on the cover itself. If it falls off, just put it back on and keep track of it.
The larger cover/gear that has the raised ridges sits loosely and may fall off. Not a big deal at the moment. Set it aside. Your objective at this point is simply to wind the spindle to tighten up your spring.
Once you have done this, re-insert the belt into the spindle.
Now comes the part that might take a few tries to get right, but I found pretty straight forward. What you need to do is set the locking mechanism such that it locks just before the seatbelt is fully extended, such as it was when you removed the belt initially. The difference now is, your spindle is wound a little tighter than before. I didn't take before and after pictures, so I can't say if you could visually put it back where it was before and be just fine. Here's how I set mine up:
The white large gear insiide with the raised ridges turns counter clock-wise as your seat belt unwinds. It eventually will make contact with the black little "trigger" that will instigate the locking of the seatbelt. See picture - in this case, the ridge is almost reaching the trigger (circled in red):
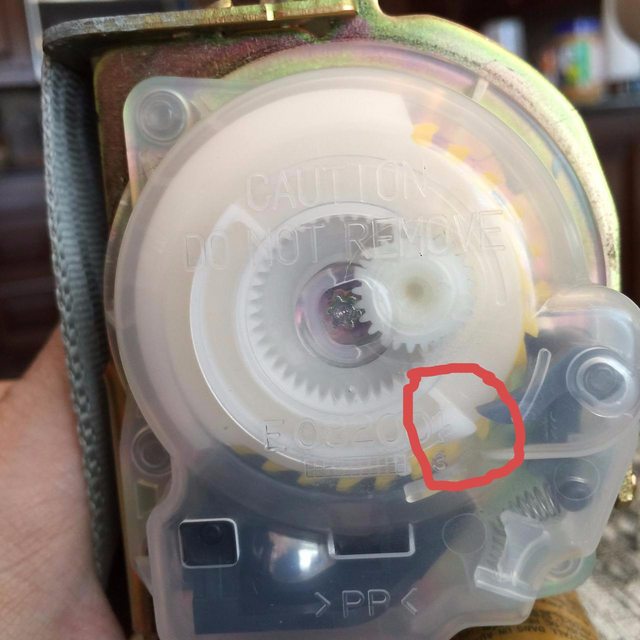
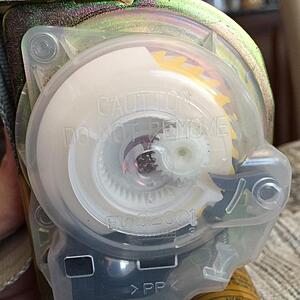
Now in this picture below, notice how the trigger has been activated by the gear and has rotated. This action has locked the seatbelt, and it will no longer allow the seatbelt to be unwound:
Your objective when you put this together is to have the gear activate this trigger just before you get to the point where the spindle is completely unwound. I think it took me a couple of tries to get the gear set at the right point. When you put the cover on, don't push the tabs down until you have verified your gear is in the right orientation.
When you have it set correctly, ensure the belt locks when you fully extend it, and that the ratcheting sound (locking) stops at some point as the spool gets the majority of the belt wound around it.
Attachment 493100
I'd read a bit about removing, cleaning, and re-winding the seat belts to make them function more like when the car was new, so I figured it was worth a shot, particularly after the wife gave me a look when hers didn't retract when exiting the car. Maybe it was my lousy search skills, but the information I found on the process was less than stellar. That combined with my uncanny ability to make things more difficult than they are left me without a seatbelt until I could acquire a new tensioner mechanism.
So here's a quick tutorial:
1) Move seat fully forward and raised
2) Disconnect battery terminal
3) Pop lower portion of pillar off. It uses clips up and down and about an inch sits under the trim on each side. Removing it will leave this:
Here's what the back side of the panel looks like:
4) Unscrew the 2 screws that are on the lower side of the upper panel and then pop it off.
5) Remove the bolt that anchors the belt to the upper side of the pillar.
6) Pop the square cover for access to and remove the bolt that attaches the belt to the seat:
7) Thread the end of the seatbelt that was attached to the seat back up and through the upper panel. Set this panel out of your way.
--Now your seat belt should be fully exposed and accessible--
8) Remove the clips from the retractor mechanism. One is white one is yellow. The white clips comes off easily. The yellow is a little confusing. It has a metal clip around the back of it. Lift up on this clip to rotate it off the back of the plug and then you can pull the plug out.
9) Remove the 2 bolts holding the mechanism to the pillar. 10mm & 14mm bolts
Now you should have the belt and mechanism free. DO NOT remove any of the plastic covers on the side. There's no reason to do so. Some tutorials say to. I did and removed the wrong one. Ever wonder what the spring inside looks like when it's not inside anymore?
Attachment 493107
Now to remove your belt from the retractor:
What you do at this point is you pull the belt all the way out, unwinding the retractor. You'll have to hold the unit completely vertical to avoid the catch from locking as you pull the belt out. Don't worry, you won't pull the belt off the spindle.
Once the belt is all the way unwound, you'll see it sticking out of a slit in the spindle. You need to use something to pry it out of spindle. I used the can opener tool from my Swiss Army knife. You'll need an extra hand or a tool to keep the spindle from spinning under the force of the spring while you work at digging the belt out. Once you pry it out, you can see there is a steel pin through the belt that keeps it from slipping inside the spindle.
Attachment 493108
Remove this pin. And then you can pull the belt out of the spindle. NOTE - DO NOT LET THE SPINDLE / SPRING RELEASE. I've read bad things happen. Also, take note of the way the belt threads in so you don't put it in backward and have to rethread it. Now for those of you who have a seatbelt that isn't retracting as well as it should, now is the time you can wind the spindle. Wind it until you meet resistance. For the particular replacement unit I received off ebay, this was about 3-4 turns of the spindle. Your results may vary.
Now wash that dirty belt. I let mine soak for about 30 minutes in purple power and water the used a brush and a rag to clean it up and nice-like. Attachment 493109
I've read some folks like to throw the in the washing machines. I didn't really care to have all those bits rattling around in the washing machine.
Before:
Attachment 493100
After: (dark areas are shadows)
Attachment 493110
FOLLOW UP: For Passenger & Rear Seatbelts -
When I got to the passenger's side, I noticed that there was some extra parts in the retractor gear/casing. You know how you can pull the belt all the way out and then it will lock such that you can retract it to whatever point you want and it will be locked there? It's useful when you are locking in car seats or as I have done in the past, transporting bulky cargo you don't want loose.
This is the side you'll be taking apart. The reason you have to do this is because you will not be able to re-wind the spring unless you do so. If you're only here to get the seat belt out so you can wash it, removal the following is not necessary. NOTE, before proceeding, it's probably easier if you have removed the seat belt from the tensioner already.
So, this is the side you'll need to remove:
You do so by taking a small flathead screw driver and pushing the center plastic pins out (from the back side) so that the ears can fold in and allow the case to pop off.
The tab, before you push them though:

The tab, pushed out:
Now pop all tabs (I think 3) out and CAREFULLY pry it off with a flathead.
The little gear on the outside should sit on the shaft on the cover itself. If it falls off, just put it back on and keep track of it.
The larger cover/gear that has the raised ridges sits loosely and may fall off. Not a big deal at the moment. Set it aside. Your objective at this point is simply to wind the spindle to tighten up your spring.
Once you have done this, re-insert the belt into the spindle.
Now comes the part that might take a few tries to get right, but I found pretty straight forward. What you need to do is set the locking mechanism such that it locks just before the seatbelt is fully extended, such as it was when you removed the belt initially. The difference now is, your spindle is wound a little tighter than before. I didn't take before and after pictures, so I can't say if you could visually put it back where it was before and be just fine. Here's how I set mine up:
The white large gear insiide with the raised ridges turns counter clock-wise as your seat belt unwinds. It eventually will make contact with the black little "trigger" that will instigate the locking of the seatbelt. See picture - in this case, the ridge is almost reaching the trigger (circled in red):
Now in this picture below, notice how the trigger has been activated by the gear and has rotated. This action has locked the seatbelt, and it will no longer allow the seatbelt to be unwound:

Your objective when you put this together is to have the gear activate this trigger just before you get to the point where the spindle is completely unwound. I think it took me a couple of tries to get the gear set at the right point. When you put the cover on, don't push the tabs down until you have verified your gear is in the right orientation.
When you have it set correctly, ensure the belt locks when you fully extend it, and that the ratcheting sound (locking) stops at some point as the spool gets the majority of the belt wound around it.

 02-26-21, 12:29 PM
#4
Lexus Champion
Images work for me. Here's a local copy.
 11-15-21, 02:41 AM
#6
Pit Crew

Excellent DIY the belt is retracting far better than it used to and is looking much cleaner too. But it still need a little help at the end do you guys know if Iit is possible to buy a stiffer spring ?


Thread
Thread Starter
Forum
Replies
Last Post
Dailyboyz
GS - 1st Gen (1993-1997)
19
03-01-12 09:15 PM
1stgenGSb
Lexus Audio, Video, Security & Electronics
1
10-31-06 09:05 AM