
DIY: Headlights Adjustment


 09-02-10, 04:49 AM
#20
Driver School Candidate

Join Date: Jul 2010
Location: NY
Posts: 4
Likes: 0
Received 0 Likes
on
0 Posts
Well, nothing is more useful than studying your manual. Adjustment of low beams is indeed described in the user manual. Look in "Do-it-yourself maintenance" section. I have to admit that it is written up in pretty awkward English and pictures are not illustrative at all.
Turns out there are two screws to adjust for each bulb. Makes sense because by lifting or lowering one side you would tilt it sideways. The swivel function would then move the light in a plane that is not parallel to the ground.
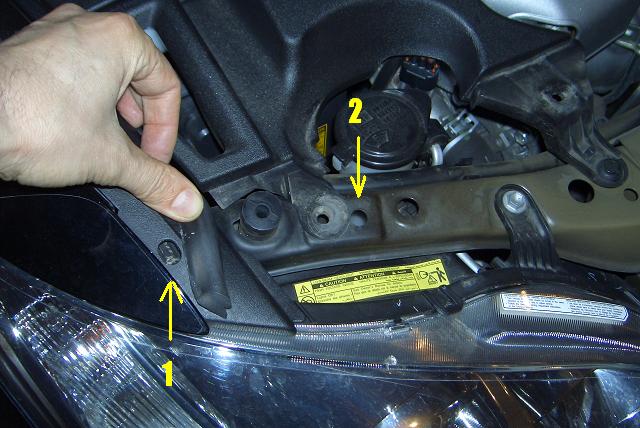
First adjustment screw is indeed under the rubber gasket on the edge of engine bay (arrow 1 in the picture), the other one is under the front plastic cover, which you would need to remove. This is described pretty well in the manual. Under the cover you will see a few holes on the crossbar, the one pointed with arrow 2 is the one we need. If you look down the hole you will see that the adjustment is not actually a screw but something like a toothed wheel, so it is important to have a right screwdriver, to match the teeth. Mine was Phillipps #2.
According to the manual you first turn the screwdriver in the first hole counterclockwise to get the light where you want it. Then you put the screwdriver in the second hole and turn it in the same fashion exactly the same number of times. The only problem is that you would not see much change when you do the second adjustment - light does not go up much, just slightly tilts. For me the adjustment was 5 full turns of the screwdriver, which I did on all four "screws". Below is the picture with hole locations.
Turns out there are two screws to adjust for each bulb. Makes sense because by lifting or lowering one side you would tilt it sideways. The swivel function would then move the light in a plane that is not parallel to the ground.
First adjustment screw is indeed under the rubber gasket on the edge of engine bay (arrow 1 in the picture), the other one is under the front plastic cover, which you would need to remove. This is described pretty well in the manual. Under the cover you will see a few holes on the crossbar, the one pointed with arrow 2 is the one we need. If you look down the hole you will see that the adjustment is not actually a screw but something like a toothed wheel, so it is important to have a right screwdriver, to match the teeth. Mine was Phillipps #2.
According to the manual you first turn the screwdriver in the first hole counterclockwise to get the light where you want it. Then you put the screwdriver in the second hole and turn it in the same fashion exactly the same number of times. The only problem is that you would not see much change when you do the second adjustment - light does not go up much, just slightly tilts. For me the adjustment was 5 full turns of the screwdriver, which I did on all four "screws". Below is the picture with hole locations.
In the manual there is a section title "Headlight aim (vehicles with discharge headlights" and it show the two adjusting wheels. But the manual doesn't have a section for halogen headlight.
I have a 09 with halogen headlight and I can only find the adjusting wheel at location 2 and there is nothing down the hole at location 1. Is it possible that for halogen you only adjust the only adjusting wheel at location 2. Can anyone confirm.
09-04-10, 10:20 AM
#21

In the manual there is a section title "Headlight aim (vehicles with discharge headlights" and it show the two adjusting wheels. But the manual doesn't have a section for halogen headlight.
I have a 09 with halogen headlight and I can only find the adjusting wheel at location 2 and there is nothing down the hole at location 1. Is it possible that for halogen you only adjust the only adjusting wheel at location 2. Can anyone confirm.
I have a 09 with halogen headlight and I can only find the adjusting wheel at location 2 and there is nothing down the hole at location 1. Is it possible that for halogen you only adjust the only adjusting wheel at location 2. Can anyone confirm.


Thread
Thread Starter
Forum
Replies
Last Post
Curated Content Editor
Automotive Care & Detailing
0
07-24-18 09:01 AM