


DIY: Headlights Adjustment


Thread Starter
Driver
Joined: Sep 2005
Posts: 129
Likes: 0
From: KW
 DIY: Headlights Adjustment
Hi all,
Like many others, the headlights are too low in my ES350.. It's very easy to adjust the headlights and you don't have to remove a single trim.. All what you need is a phillips screwdriver... The one in my trunk was little short... You need a phillips screwdriver that is at least an 1" longer (see the picture)...
After you park your car next to a wall, open your hood and then you will find a rubber seal along the front fenders.. All what you have to do is push the rubber toward the engine and then you will find a hole.. Put the "long" screwdriver and then you have to trun in counter clockwise to rais them up, or clockwise to lower them.... Adjust them to whatever level that makes you happy but make sure NO to raise them too much and blind other drivers...
Pics are for the driver side.. Passenger side is exactly the same...
Good luck
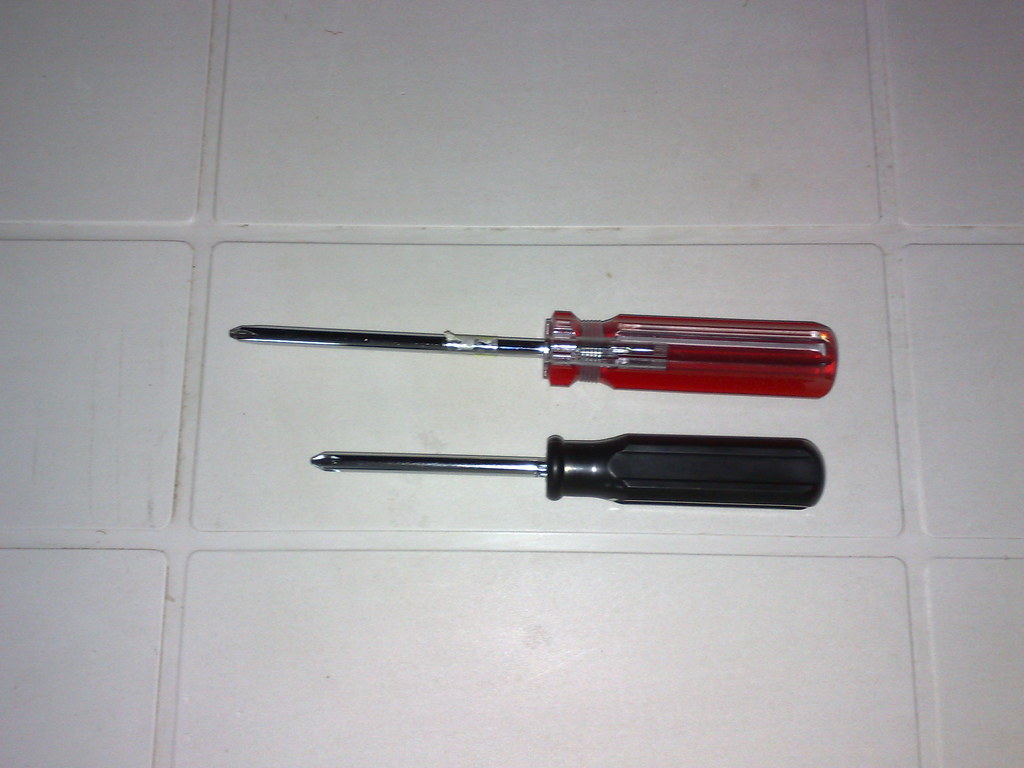
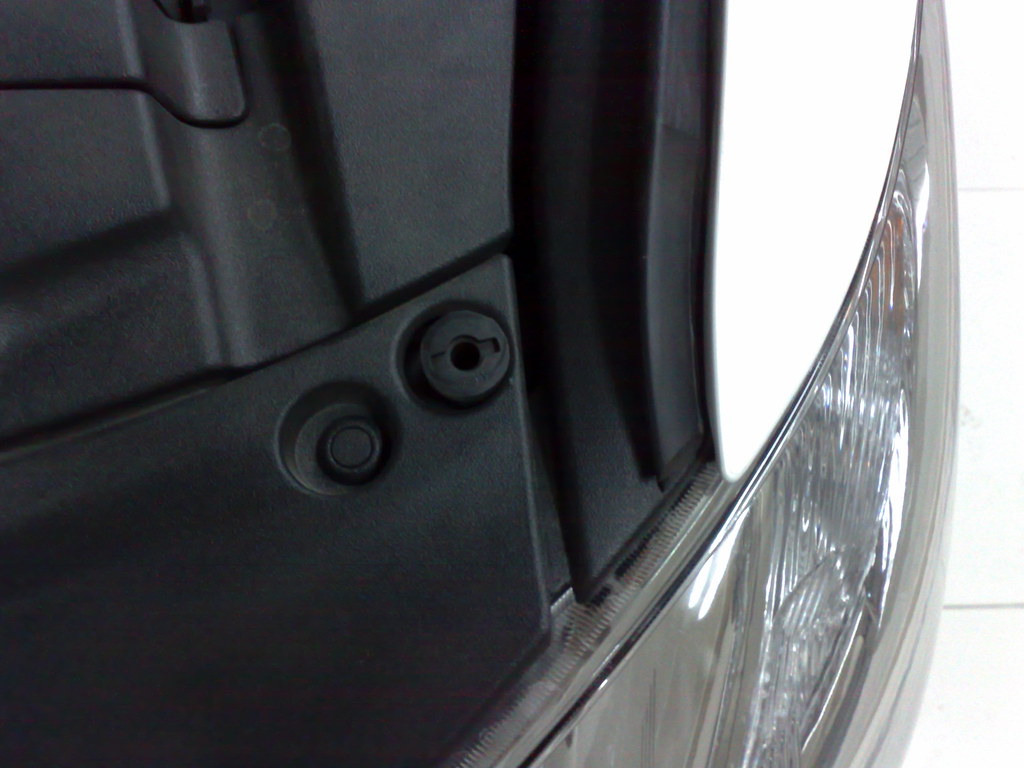
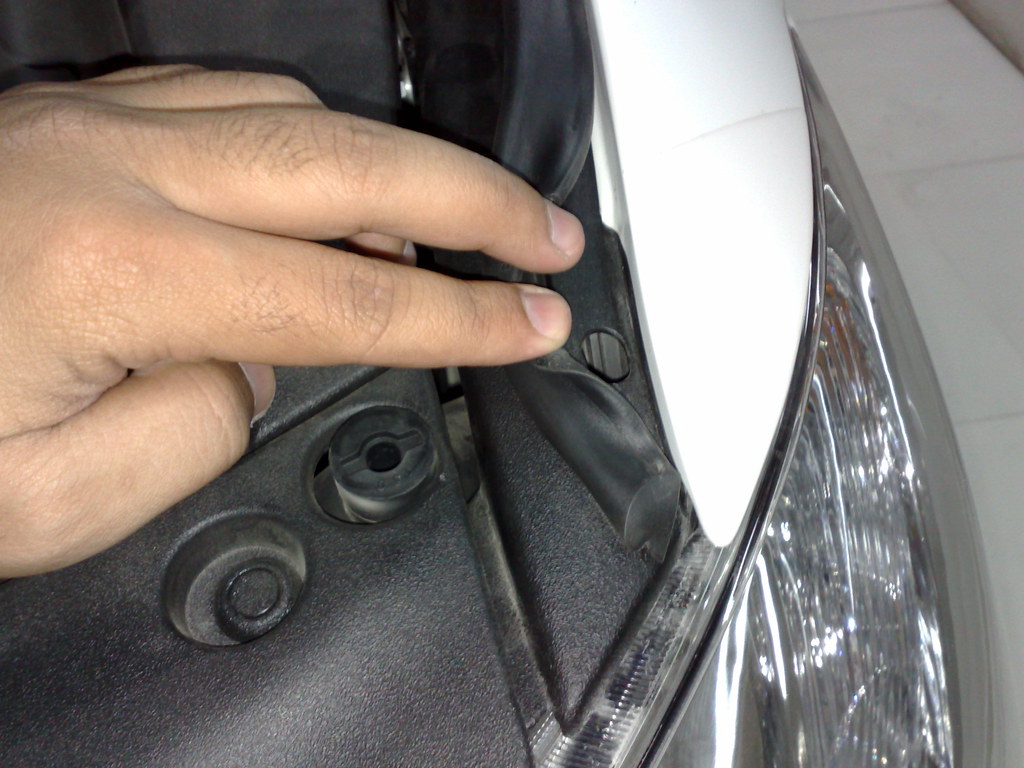
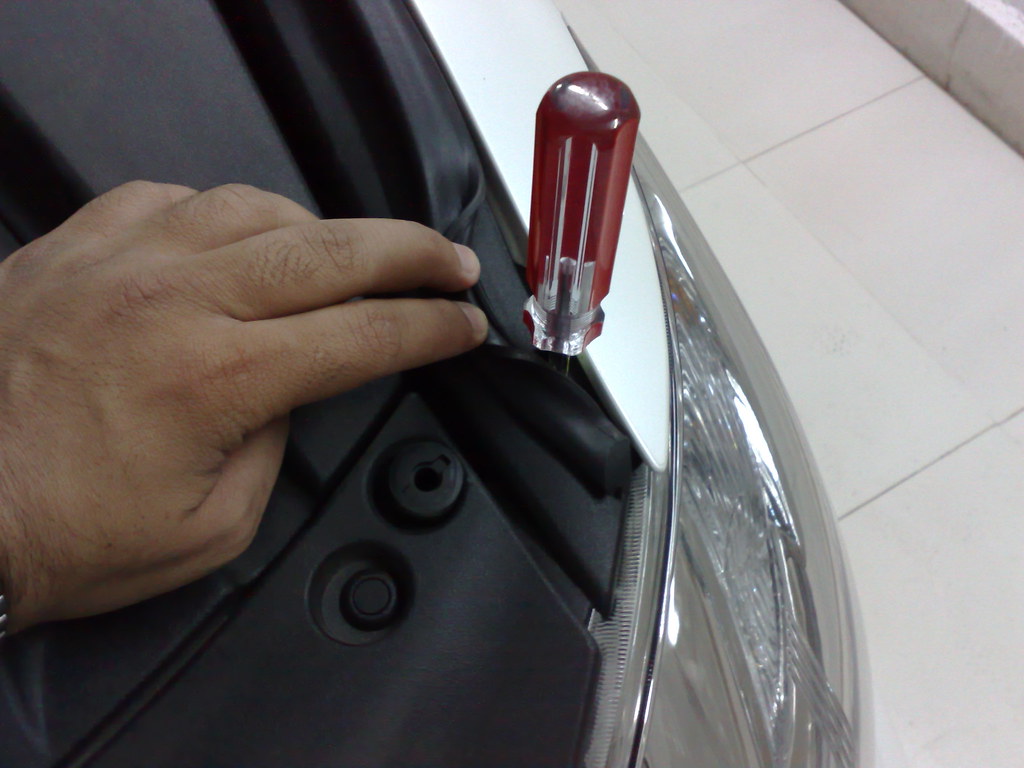
Like many others, the headlights are too low in my ES350.. It's very easy to adjust the headlights and you don't have to remove a single trim.. All what you need is a phillips screwdriver... The one in my trunk was little short... You need a phillips screwdriver that is at least an 1" longer (see the picture)...
After you park your car next to a wall, open your hood and then you will find a rubber seal along the front fenders.. All what you have to do is push the rubber toward the engine and then you will find a hole.. Put the "long" screwdriver and then you have to trun in counter clockwise to rais them up, or clockwise to lower them.... Adjust them to whatever level that makes you happy but make sure NO to raise them too much and blind other drivers...
Pics are for the driver side.. Passenger side is exactly the same...
Good luck

Rookie
Joined: Oct 2001
Posts: 99
Likes: 0
From: New York
Adding to your adj. proceedure.
I fine it helpful to turn on the headlights and mark on the garage wall the headlight cutoff point for both sides. This is very pronounced. Also, cover the light you are not adjusting with a towel.
The hardest part of the adjustment proceedure is finding the adjusters.
Good luck.
The hardest part of the adjustment proceedure is finding the adjusters.
Good luck.


Rookie
Joined: Aug 2006
Posts: 67
Likes: 0
From: NC
Bizarre, really bizarre. I was going to try this this morning as I also feel that the lights are a little too low. I found that hole, moved the rubber trim a little, just as you point out. When you put in the screwdriver into that specific hole (which is the same as what the manual says to do) it hits a dead end. When I removed some of the plastic trim in the front of the engine to get a better look, I could see that the screwdriver hits some plastic around the headlight, but there is no screw to adjust. That hole is, essentially in my car, a dummy hole. Im not sure if they changed the headlight design a little or what. I have an 3/07 build. There is another hole a few over that I was able to put the screw driver in and adjust the headlight up however. Im guessing they just changed the design. I have also been toying with the idea of putting HID or upgraded halogen's into my car but after seeing what I saw I am not too sure. There does not seem to be (IMO ) much room to work with, without removing a bunch of stuff. Oh well.

Advanced
Joined: Dec 2001
Posts: 575
Likes: 1
From: California
Bizarre, really bizarre. I was going to try this this morning as I also feel that the lights are a little too low. I found that hole, moved the rubber trim a little, just as you point out. When you put in the screwdriver into that specific hole (which is the same as what the manual says to do) it hits a dead end. When I removed some of the plastic trim in the front of the engine to get a better look, I could see that the screwdriver hits some plastic around the headlight, but there is no screw to adjust. That hole is, essentially in my car, a dummy hole. Im not sure if they changed the headlight design a little or what. I have an 3/07 build. There is another hole a few over that I was able to put the screw driver in and adjust the headlight up however. Im guessing they just changed the design. I have also been toying with the idea of putting HID or upgraded halogen's into my car but after seeing what I saw I am not too sure. There does not seem to be (IMO ) much room to work with, without removing a bunch of stuff. Oh well.
Could you elaborate on which hole you went through to adjust the lights? I have the regular halogen lights (no AFS), and also encounter no screw to adjust when following OP's directions.

Trending Topics

Driver
Joined: Nov 2009
Posts: 134
Likes: 0
From: CO
I just adjusted my HID low beams as described here. Thanks a lot for heads-up. And photos are always helpful.
I used pretty thick Philipps screwdriver, probably 1/4 inch shaft or so. It did not go down too deep (~3 in) and found the screw very easily.
When doing this, make sure you do not raise the lights to high, or you'll tick off a lot of oncoming drivers, and they would be flashing their high beams at you.
Ideally, you should park on level ground ~25 ft away from a wall. I have a tandem garage with an empty bay ahead of the car - makes for a perfect setup.
Then adjust the top edge of the light spot on the wall to the same height as the center of the light bulb (~28-29 inches high). Make a mark on the wall with masking tape where you want the light edge to be and then adjust to that mark. Adjust each bulb separately by covering the other one with something. I raised the light cutoff line on the wall by about 3 inches for each light.
You will notice that the light pattern from both bulbs is similar - lower on the driver's side by a couple inches. I think now that this is intentional - not to blind oncoming traffic, but give better lighting to the side of the road.
I used pretty thick Philipps screwdriver, probably 1/4 inch shaft or so. It did not go down too deep (~3 in) and found the screw very easily.
When doing this, make sure you do not raise the lights to high, or you'll tick off a lot of oncoming drivers, and they would be flashing their high beams at you.
Ideally, you should park on level ground ~25 ft away from a wall. I have a tandem garage with an empty bay ahead of the car - makes for a perfect setup.
Then adjust the top edge of the light spot on the wall to the same height as the center of the light bulb (~28-29 inches high). Make a mark on the wall with masking tape where you want the light edge to be and then adjust to that mark. Adjust each bulb separately by covering the other one with something. I raised the light cutoff line on the wall by about 3 inches for each light.
You will notice that the light pattern from both bulbs is similar - lower on the driver's side by a couple inches. I think now that this is intentional - not to blind oncoming traffic, but give better lighting to the side of the road.
Driver
Joined: Nov 2009
Posts: 134
Likes: 0
From: CO
Well, nothing is more useful than studying your manual. Adjustment of low beams is indeed described in the user manual. Look in "Do-it-yourself maintenance" section. I have to admit that it is written up in pretty awkward English and pictures are not illustrative at all.
Turns out there are two screws to adjust for each bulb. Makes sense because by lifting or lowering one side you would tilt it sideways. The swivel function would then move the light in a plane that is not parallel to the ground.
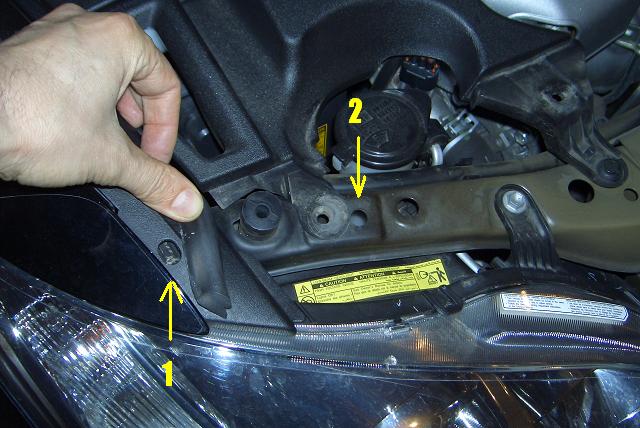
First adjustment screw is indeed under the rubber gasket on the edge of engine bay (arrow 1 in the picture), the other one is under the front plastic cover, which you would need to remove. This is described pretty well in the manual. Under the cover you will see a few holes on the crossbar, the one pointed with arrow 2 is the one we need. If you look down the hole you will see that the adjustment is not actually a screw but something like a toothed wheel, so it is important to have a right screwdriver, to match the teeth. Mine was Phillipps #2.
According to the manual you first turn the screwdriver in the first hole counterclockwise to get the light where you want it. Then you put the screwdriver in the second hole and turn it in the same fashion exactly the same number of times. The only problem is that you would not see much change when you do the second adjustment - light does not go up much, just slightly tilts. For me the adjustment was 5 full turns of the screwdriver, which I did on all four "screws". Below is the picture with hole locations.
Turns out there are two screws to adjust for each bulb. Makes sense because by lifting or lowering one side you would tilt it sideways. The swivel function would then move the light in a plane that is not parallel to the ground.
First adjustment screw is indeed under the rubber gasket on the edge of engine bay (arrow 1 in the picture), the other one is under the front plastic cover, which you would need to remove. This is described pretty well in the manual. Under the cover you will see a few holes on the crossbar, the one pointed with arrow 2 is the one we need. If you look down the hole you will see that the adjustment is not actually a screw but something like a toothed wheel, so it is important to have a right screwdriver, to match the teeth. Mine was Phillipps #2.
According to the manual you first turn the screwdriver in the first hole counterclockwise to get the light where you want it. Then you put the screwdriver in the second hole and turn it in the same fashion exactly the same number of times. The only problem is that you would not see much change when you do the second adjustment - light does not go up much, just slightly tilts. For me the adjustment was 5 full turns of the screwdriver, which I did on all four "screws". Below is the picture with hole locations.
Last edited by zhivuyatut; Sep 1, 2010 at 02:39 PM.

Driver School Candidate
Joined: Jul 2009
Posts: 41
Likes: 0
From: NY
Well, nothing is more useful that studying your manual. Adjustment of low beams is indeed described in the user manual. Look in "Do-it-yourself maintenance" section. I have to admit that it is written up in pretty awkward English and pictures are not illustrative at all.
Turns out there are two screws to adjust for each bulb. Makes sense because by lifting or lowering one side you would tilt it sideways. The swivel function would then move the light in a plane that is not parallel to the ground.
First adjustment screw is indeed under the rubber gasket on the edge of engine bay (arrow 1 in the picture), the other one is under the front plastic cover, which you would need to remove. This is described pretty well in the manual. Under the cover you will see a few holes on the crossbar, the one pointed with arrow 2 is the one we need. If you look down the hole you will see that the adjustment is not actually a screw but something like a toothed wheel, so it is important to have a right screwdriver, to match the teeth. Mine was Phillipps #2.
According to the manual you first turn the screwdriver in the first hole counterclockwise to get the light where you want it. Then you put the screwdriver in the second hole and turn it in the same fashion exactly the same number of times. The only problem is that you would not see much change when you do the second adjustment - light does not go up much, just slightly tilts. For me the adjustment was 5 full turns of the screwdriver, which I did on all four "screws". Below is the picture with hole locations.
Turns out there are two screws to adjust for each bulb. Makes sense because by lifting or lowering one side you would tilt it sideways. The swivel function would then move the light in a plane that is not parallel to the ground.
First adjustment screw is indeed under the rubber gasket on the edge of engine bay (arrow 1 in the picture), the other one is under the front plastic cover, which you would need to remove. This is described pretty well in the manual. Under the cover you will see a few holes on the crossbar, the one pointed with arrow 2 is the one we need. If you look down the hole you will see that the adjustment is not actually a screw but something like a toothed wheel, so it is important to have a right screwdriver, to match the teeth. Mine was Phillipps #2.
According to the manual you first turn the screwdriver in the first hole counterclockwise to get the light where you want it. Then you put the screwdriver in the second hole and turn it in the same fashion exactly the same number of times. The only problem is that you would not see much change when you do the second adjustment - light does not go up much, just slightly tilts. For me the adjustment was 5 full turns of the screwdriver, which I did on all four "screws". Below is the picture with hole locations.

Driver
Joined: Nov 2009
Posts: 134
Likes: 0
From: CO
Then you are shining your lights no higher than the hoods of the oncoming traffic.
As ES350 drivers know the beam by default is actually pointing downwards to the ground about 200 feet ahead.
So adjusting the lights is perfectly legal and kosher in respect to other drivers on the road, as long as you do it right.
After all, if it was not a routine adjustment, Lexus would not put it in the end user manual as DIY.

Driver
Joined: Feb 2007
Posts: 129
Likes: 1
From: CA
Bump.....
Are the non-HID headlight adjustable ?
The owners manual seems to be referring to the HID where 2 adjusting screws are on each side, however on the non-HID I can only see one screw, and I believe it is a dummy screw because it doenst adjust anything no matter how much you turn.
Are the non-HID headlight adjustable ?
The owners manual seems to be referring to the HID where 2 adjusting screws are on each side, however on the non-HID I can only see one screw, and I believe it is a dummy screw because it doenst adjust anything no matter how much you turn.

Intermediate

Joined: Dec 2009
Posts: 364
Likes: 94
From: Ct
Is it possible to just put in a different bulb to get a non-HID head light beam? I really don't like the sharp upper cut off of the HID's. Plus then I could adjust them much higher without blinding other drivers.