When you click on links to various merchants on this site and make a purchase, this can result in this site earning a commission. Affiliate programs and affiliations include, but are not limited to, the eBay Partner Network.
I am attempting to switch out my navigation system and put in a non-nav console in my 2007 ES350. I've already have the non-nav console, but can't find a wiring diagram. I know that the harnesses are not the same. I have been all over TIS (Toyota Information Services), but can't find the wiring diagram for the non-nav climate control/hazard/clock console. I do have the wiring diagrams for the navigation/radio/multi-display unit.
(I am doing this because I want to replace the factory radio and it's too integrated to just switch it out. I am going to put in a double-din Pioneer and maybe add the nav unit later. Once I get everything in and working I will be selling the nav unit and factory amp.)
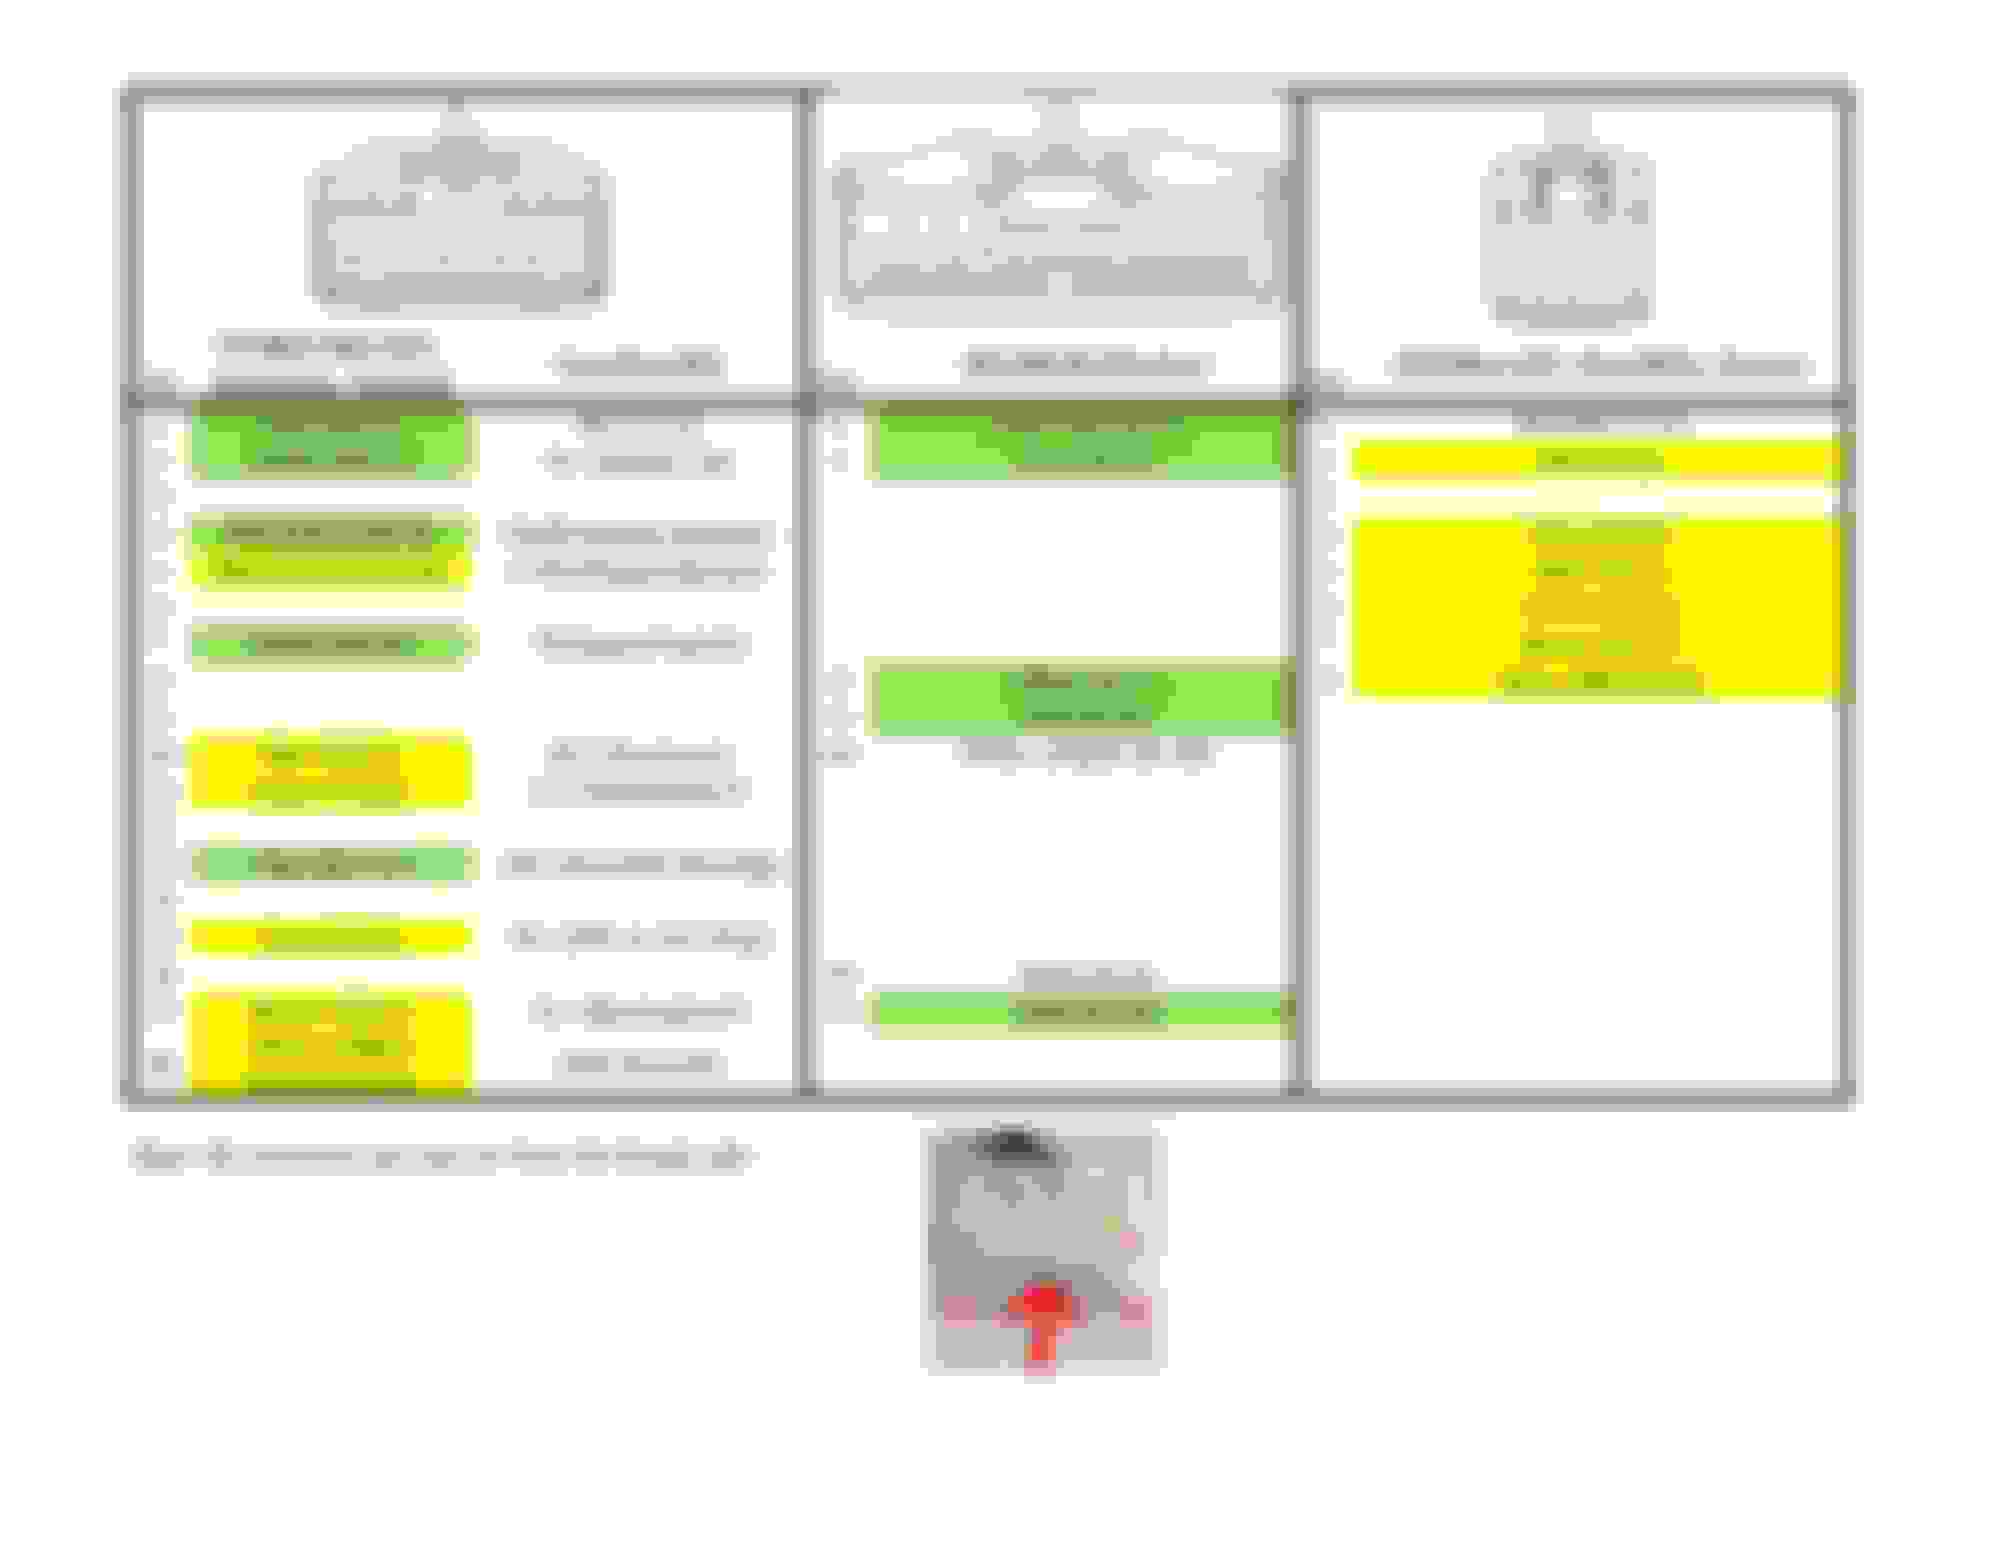
The wiring colors on the non-nav console are as follows. (Note: EWD = Electrical Wiring Diagram. Each line shows the pin number, color, function and mapping)
Harness Identifier:
E3 (White Harness)
E3 Non-Nav (18pin harness) to Other Harnesses:
1 - Gray - BAT (+12V) -- maps to EA1 [A/C EWD]
2 - Purple - IG+ (Ignition On) -- maps to 3T pin 1 [A/C, Seat Belt Warning EWD]
3 -
4 - Red - PAON -- maps to 3T pin 5 and/or E62 pin 9 [SRS EWD]
5 - Black - P-AB -- maps to 3T pin 4 and/or E62 pin 20 [SRS EWD]
6 -
7 - White - TB (Hazard Switch) -- maps to 3T pin 6 and/or E62 pin 8 (Multi-Display) [Turn Signal & Hazard Warning Lights EWD]
8 -
9 -
10 - Blue - ACC (Accessory) -- maps to 3T pin 2 [A/C EWD]
11 - Green - ILL+ (Illumination?) -- maps to 3T pin 10 [Body-Illumination EWD] and/or E18 pin 6 (Clock Assembly)
12 -
13 - Pink - LB/L (Seat Belt Warning) -- maps to 3T pin 11 [Restraints-Seat Belt Warning EWD]
14 -
15 - Gray - TX+ (LIN1 on A/C Amp) -- maps to 3T pin 9 [A/C EWD]
16 -
17 - Brown - ILL- (Illumination?) -- maps to 3T pin 10 [Body-Illumination EWD] and/or E18 pin 7 (Clock Assembly)
18 - White w/Black stripe (Ground) -- maps to 3T pin 12 [A/C EWD] and/or E62 pin 10 [Turn Signal & Hazard Warning Lights EWD]
But looking at the attachment nothing on the wiring diagram jumps out to me to match what you described here.
Can you post more details? I am assuming the ones your left out are no connection? It still seems like a short list to get all the speakers and everything hooked up.
That's a good find, but it doesn't show the wiring for the non-audio components (teThat's a good find, but it doesn't show the wiring for the non-audio components (temperate, A/C, hazards, clock) wiring.
Yes, you are correct -- the numbers without any information are empty pins.
I should have been more clear in my original post. I am trying to find the wiring for the non-nav console only -- no radio. The console piece only contains the temperature up/down for driver/passenger, A/C, fan controls, hazards etc.mperate, A/C, hazards, clock) wiring.
Yes, you are correct -- the numbers without any information are empty pins.
I should have been more clear in my original post. I am trying to find the wiring for the non-nav console only -- no radio. The console piece only contains the temperature up/down for driver/passenger, A/C, fan controls, hazards etc.
Here is the back of the console:
Here is a close up of the wiring harness:
I'm afraid I'm going to have to resort to looking at all 8 (or so) wiring harnesses of my nav console and eliminate all wires used by the mutli-display unit and radio. I also plan to take a multi-meter/continuity checker against the non-nav console and figure out which sets of wires are associated with the different "switches". However, if someone has the actually nav-to-non-nav wiring figured out, it would be a HUGE timesaver!
I was finally able to locate all the pins/wires on TIS. I totally didn't expect to find stuff from the Seat Belts and SRS systems, but it makes sense! TIS was a lifesaver.
BTW, in TIS you can search for a wiring harness and it will show the relevant documents. I did a search for "E3 harness" and it brought up all the correct documents! (I know, I shouldn't be amazed, it's called a "Search Engine," but so many of them are broken or useless)
So now that I've lived with the downgrade for about 2 weeks, I've discovered that the dash gauge that shows MPG/Tank MPG/Mile to Empty is "stuck" because the "DISP" button on the steering wheel does not work.
I'm pretty sure I know how to fix it (wiring) and if it works, I will update the wiring diagram.
Hello, it has been almost two years since u made the change. How is it working for you? I am planning on doing this for my 2007 ES350 and would like to know if there are any major problems i should be aware of. Thanks in Advance.
I also am thinking about doing this. I bought my 07 es350 with an unresponsive touch screen .I read up on possible fixes and found that many people simply replaced the digitizer and the screen worked. I did that but unfortunately the screen still doesn't work . so I am thinking about installing a cheap double din mp5 screen because I can't afford to pay 500-3000 for a new (or used) OEM head unit .
I already have the aftermarket stereo that I want to install and I have found some used non nav head units online for pretty cheap. I wish that there was a way to install the aftermarket stereo straight in to the mark Levinson touch screen spot but it seems like everyone online is saying that it is impossible .If anyone has any suggestions I would really appreciate it .
I've been searching all over the internet, and unless you want to pay 400+ for an 11 year old stereo, this is the best option, the ac controls are about 75$ the dash kit is like $30 and the amp turn on module and steering wheel control adaptor are about $100. that puts you at $200, for another 200-300 dollars you can get the latest model name brand stereo i.e. kenwood/pioneer with built in android auto or apple carplay and basically have the latest nav and a great sounding stereo.
I ordered the climate control piece online and will also post pics of the install and final job, hopefully it works well.
Be warned... replacing a navigation unit with the non-nav unit is not for the faint of heart! As you can seen in the wiring diagrams and stuff that I posted above, you will have to rework about half a dozen wiring harnesses and splice about 40-50 wires! However, I have no had a single problem. (But I'm pretty detail oriented - I soldered all connections and ensured everything was well taped afterwards.)
I orginally put in a Pioneer head unit, but I ended up replacing it with an Android-based unit ("Joying" brand, but there are probably at least half a dozen similar ones on Amazon). I am MUCH happier with it than the Pioneer... and it was cheaper. Nav is built in (not an extra $300 like Pioneer wanted) and everything just works. I can even play videos and the 7" screen is just as good, if not better, than the Pioneer. And, you don't even need a special steering wheel control adapter - the Android based units have a very simple and effective tool to program the controls. It's roughly 1,000,000 times better than the adapter that I had for the Pioneer (haha). The adapter for the Pioneer was a pain to program, not reliable, and definitely nowhere near as configurable. The Android program is so easy to use!
My only complaint is that the voltage level outputs on the Android unit are only 2V whereas the Pioneer had 4 or 5V (can't recall exactly) - this introduces a little bit of noise, but honestly, I can only tell when the vehicle is not running down the road (sitting still) or when I have the volume way up and it hits a very quiet part. For all the positves, I can live with this negative.
I am considering upgrading the Android head unit to a new, more powerful model (quad-core processor) because the lag to start playing music from my 128GB sdcard can take a couple of minutes. (No problem, I just switch it over to radio while waiting!) I am also planning on putting in a DSP near the head unit - probably in the center console under the dash. This will raise the output voltage up to 6V to feed to my amps in the trunk.
Also, the backup camera is much better than a stock unit, including other vehicle brands. The Android backup camera comes on instantly! No lag. Just as soon as I put it into reverse. My wifes Mazda takes about 30 seconds after starting the vehicle before it can engage the backup camera. However the stock camera will NOT work! (It's some stupid 6V piece of crap) You will need to buy a new backup camera and wire it in. Cameras are cheap, about $25 or so on Amazon. By far, the hardest part was crafting something to hold the camera if you want it in the stock location. A far easier option is to use on of the ones that attach to the license plate.
Overall....I am EXTREMELY happy with my project! I would do it again, but the wife would defintely vote no... it took several weekends to complete! Of course, that doesn't even include the time to completely dynamat the entire trunk and doors! By the way, I went up with JBL 6x9's in the front doors, 6.5" in the back doors, and replaced the dash tweets with some JBLs also. First JBLs I've ever had and I LOVE them! By far, the best value for the buck, even into price ranges several times as high. I've never ran the really premiere speakers, but I can't imagine that they could be much better.
ziggy> I just saw that you decided to go with a Kenwood/Pioneer. Not a bad option, but save yourself some $$$ and go with the Chinese android unit. The only real fault is that it won't fit perfectly into a dual-din adapter - you will need to dremel about 1/16" off of the platic "hole" in the adapter. I couldn't be happier with my "Joying" unit!
ziggy> I just saw that you decided to go with a Kenwood/Pioneer. Not a bad option, but save yourself some $$$ and go with the Chinese android unit. The only real fault is that it won't fit perfectly into a dual-din adapter - you will need to dremel about 1/16" off of the platic "hole" in the adapter. I couldn't be happier with my "Joying" unit!
Thanks for replying. I did the install today and am about 90% complete. the only thing left is to fix the audio by adding 4 new speakers a 5 ch amp and a subwoofer for the reaer deck. i will be going with JL Audio 5ch XD700/5 c2 6.5" seperates for the front and 6.5" coaxials for the rear doors, the rear deck i'll throw in an 8" W3 subwoofer. The fader/Balance is so out of whack with the module i used. Also, i was not able to turn on the Back Up Cam because i couldn't find the wires, the module i have has specific GND and 6V for the camera, If only i knew where the wires were. I'd really appreciate if you could post them. Again, thanks for the reply and a huge thanks for all the work you did, it really made it like a semi-simple radio swap for me. I salute you, sir!
Last edited by ziggy77345; 04-03-18 at 07:30 PM.
Reason: To ask about back up can wires.
Impressive! Nice choices - I know JL Audio makes quality equipment. Are you replacing the stock sub with the JL in the rear deck? Seems like you would be getting a lot of flex as well as poor sealing that would hurt performance.... please post how it works out. (I ended up putting 2 10" Earthquakes in a box - sounds great!). By the way, the 6x9s in the front doors don't require any modifications to the doors. I don't recall even having to use an adapter. Depth-wise the 6x9s worked without any problems also.
Sorry, I don't have the wiring for the stock backup camera. I do remember seeing it, but after testing, I was unable to get it working. I actually tried putting an RCA end on the wire, but it wasn't functioning. It was after additional probing that I discovered that it was 6V. It's really easy to get to - just pull the interior off the truck door. Then you could use a test probe to figure out the wires.
I realized this morning that I never answered your questions about the "Disp" button on the steering wheel. I recall having issues when using the (Metra?) adapter for the Pioneer. However, using the Android unit, I got all the steering wheel controls working very easily.
Yes the JL w3 8" will replace the factory sub, we will put sealant and dynamat on it to make sure it has the cleanest sound, and the w3 has an "infinite baffle" design, meaning it can be placed without a box and still sound great.
Last night i looked at that link jfall posted to another thread and it shows all the wires i could need for the nav unit, i will probably be using the factory mic and factory back up cam. I will install a front facing bullet type camera in the front bumper as well, just to have another toy haha.
Yeah, the RP4.2TY11 Amp integration/Steering wheel control adaptor PAC Audio makes worked perfect, I just had to set the dip switches to the brand of the stereo i was using then it was plug and play after that. DISP works and all the other buttons work and can be customized. it even has 6V Output for the backup camera, so i dont even need to use one of my adaptors. I'll hopefully get the rest of the stereo stuff done today, and the audio system in the next two-three weeks, i need to order all the JL stuff.
 06-25-16, 03:25 PM