


DIY:Painting your chrome window trim


Thread Starter
Driver
Joined: Jun 2010
Posts: 121
Likes: 0
From: fl
 DIY:Painting your chrome window trim
The other day I decided to paint my chrome window trim and was really pleased of the outcome. And some of you guys had some questions. So here is what i did. I not a pro at painting so please dont bash me to hard.
Please be careful when removing panel because the plastic can be brittle. Stick your pry tool as close as possible to the panel clip when pry. Take your time. I might have missed some screws so look around before pulling panel. I had some missing. Took about 10min to get the chrome trim off.
BE CAREFUL YOU CAN BREAK PIECES.
Roll the window all the way down.
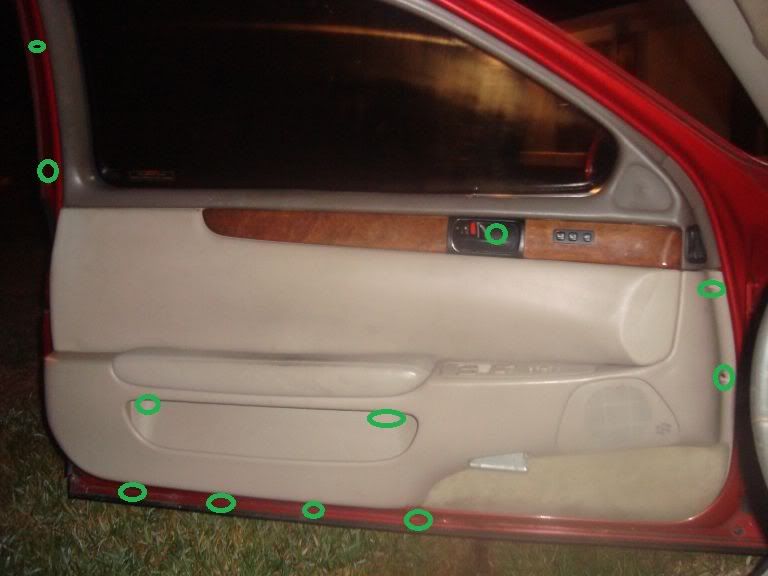
First you have to remove the door panel.
-two screw under the arm rest
-four screw at the bottom of door panel
-two screw at the front of the door panel
-one screw in the door handle behind plastic cover
-pop window switches and disconnect plugs
-there are two small screws on the right side of the door behind to small plastic cover( these help hold the chrome trim)
-disconnect door handle
-double check for anything plugs or screws still holding
Then remove the inner window trim and outer trim and mirror
-four screws at the bottom of inner trim(green)
and the panel should pop of with a little pressure
-three screws that hold mirror and unplug(yellow)
-six nuts up top that hold chrome trim(red) dont forget the two small screws on the edge of the door covered by two small rub pieces.
- the panel should pop right out.

Disassemble trim by removing six screws holding bottom weather stripping be careful the anchor nut rivets can break off because they will be rusted like mine and just pull off the rest of the weather stripping try not to stretch it to much. When reassembling upper weather strip take your time when pressing it back in to get that perfect seal.
You should be left with the black and chrome metal trim with just a little rubber around the edges. I didn't pull that off because I did have any adhesive to glue it back.
Now prep for painting:
-lightly sand just to rough the surface
-wash and let dry
-and apply paint in coats 30mins apart. Take your time.
-for paint I used Rust-oleum universal all surface.
-allow a 24hrs to fully dry.
I haven't did the back window yet because I ran out of paint, but im just gonna tape it off and paint it. I started to remove the inside panel and found that its a pain to remove the inside panels and that the window was only bolted in by four nuts, but the window sealant was holding it pretty good and didn't want to break that.


Please be careful when removing panel because the plastic can be brittle. Stick your pry tool as close as possible to the panel clip when pry. Take your time. I might have missed some screws so look around before pulling panel. I had some missing. Took about 10min to get the chrome trim off.
BE CAREFUL YOU CAN BREAK PIECES.
Roll the window all the way down.
First you have to remove the door panel.
-two screw under the arm rest
-four screw at the bottom of door panel
-two screw at the front of the door panel
-one screw in the door handle behind plastic cover
-pop window switches and disconnect plugs
-there are two small screws on the right side of the door behind to small plastic cover( these help hold the chrome trim)
-disconnect door handle
-double check for anything plugs or screws still holding
Then remove the inner window trim and outer trim and mirror
-four screws at the bottom of inner trim(green)
and the panel should pop of with a little pressure
-three screws that hold mirror and unplug(yellow)
-six nuts up top that hold chrome trim(red) dont forget the two small screws on the edge of the door covered by two small rub pieces.
- the panel should pop right out.
Disassemble trim by removing six screws holding bottom weather stripping be careful the anchor nut rivets can break off because they will be rusted like mine and just pull off the rest of the weather stripping try not to stretch it to much. When reassembling upper weather strip take your time when pressing it back in to get that perfect seal.
You should be left with the black and chrome metal trim with just a little rubber around the edges. I didn't pull that off because I did have any adhesive to glue it back.
Now prep for painting:
-lightly sand just to rough the surface
-wash and let dry
-and apply paint in coats 30mins apart. Take your time.
-for paint I used Rust-oleum universal all surface.
-allow a 24hrs to fully dry.
I haven't did the back window yet because I ran out of paint, but im just gonna tape it off and paint it. I started to remove the inside panel and found that its a pain to remove the inside panels and that the window was only bolted in by four nuts, but the window sealant was holding it pretty good and didn't want to break that.
Last edited by Sc4Jr24; Nov 20, 2010 at 06:52 PM.






 this is the best thread EVER lmfao


