


DIY: How to install NAV Controller /Video-in-Motion on a 2010-Present RX350,RX450h


Thread Starter
Former Sponsor
Joined: Jun 2011
Posts: 700
Likes: 43
From: CA
 DIY: How to install NAV Controller /Video-in-Motion on a 2010-Present RX350,RX450h
How to install a NAV Controller /Video in Motion Module on a 2010-Present Lexus RX350,450h
Important Information:
The following instructions were created using Japanese DIY from our affiliate in Japan and translating them to English. The pictures were also flipped horizontally to mimic a left hand drive car instead of the original right hand drive car. The following pictures and information are being used with the original owner’s permission.
Disclaimer:
The following is for information purpose only and we are not responsible to damage, loss or injury caused from attempting or performing the DIY. Further, the navigation and DVD lock while in motion was originally installed for safety reasons. By unlocking the navigation and DVD lock, we are assuming that the navigation and DVD will be controlled and enjoyed by the passenger and not by the driver. As such, are not responsible to damage, loss or injury from using the bypass modules. Please be responsible drivers!
For additional information, contact: info@beatsonicusa.com
About the Beat-Sonic NAV/DVD Bypass Module:
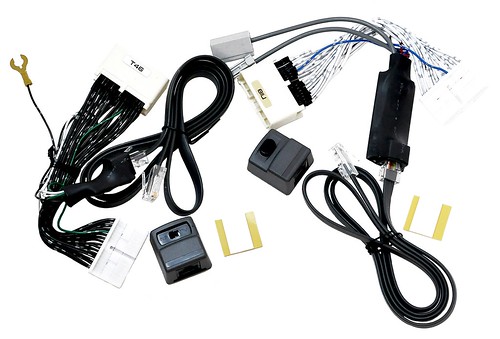
System: 100% Plug and play kit from Beat-Sonic for allowing use of factory features that would be locked out during vehicle movement.
These plug and play module kits allow override of the lock out system equipped in your factory TV or Navigation/DVD system when the vehicle is in motion. Due to the fact that no modification is needed on the factory harness and this is 100% plug and play, it is easily reversible to the original factory specs without showing any signs that this modification was ever made.
The NVK modules are equipped with manual functionality button where the override of the navigation lock out may be enabled simply by pressing the button included in with the kit. Once the button is engaged, the module tricks the factory navigation system to thinking that it is at a stop and enables the use of all the controls including the navigation address input, POI, blue-tooth contacts, mp3 music select, etc. When the button is depressed, the vehicle will return to its normal state and will take couple of seconds to refresh the correct vehicle location on the map. This module will not bypass the DVD during vehicle movement. See TVK module below for the DVD bypass:
The TVK modules are also equipped with manual functionality switch where the override of the DVD lockout may be enabled simply by toggling the switch to "TV". Once the switch is engaged, the module tricks the factory DVD system to thinking that the vehicle is in "park" with its parking brake on. The factory screen will switch to backup camera mode automatically when in R gear and will not affect any other factory controls. As such, the user have the option of enabling the DVD bypass permanently and hiding the switch behind the dash for a cleaner installation.
The NT modules kit include both NVK and TVK modules as mentioned above.
The DIY Installation Starts Here:
Tools needed: Socket wrench with a 10mm socket, panel removers, and towels
Product needed: Beat-Sonic NT4618, TVK-46 or NVK-18. Go to www.beatsonicusa.com for the product.
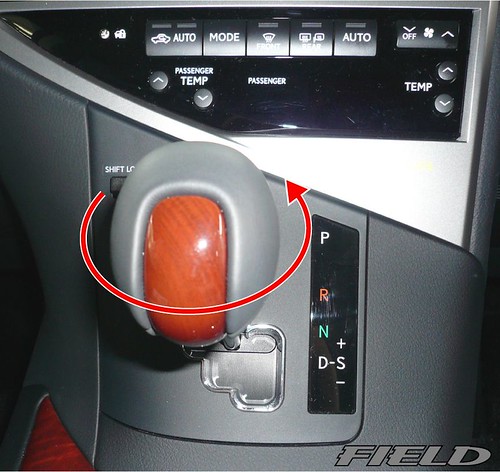
1. Move the position of the shift **** to “Neutral” and then remove the shift **** turning counter clockwise.
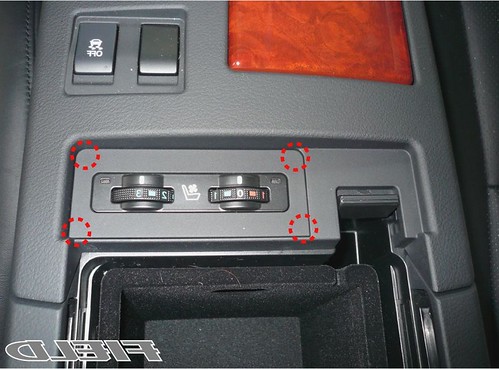
2. Remove the panel as shown above. There are clips being held at these 4 red spots.
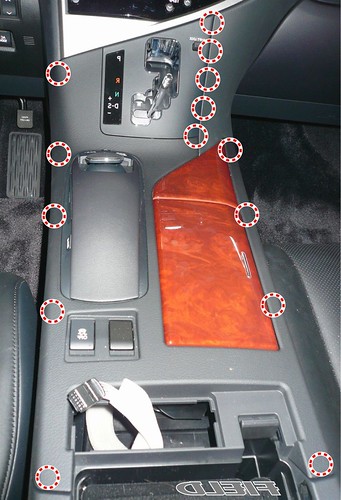
3. Remove the panel by gently pulling on the center panel. The circled spots above indicate the location of clips holding the panel together. Disconnect all the wire connectors between the panel and the center console.
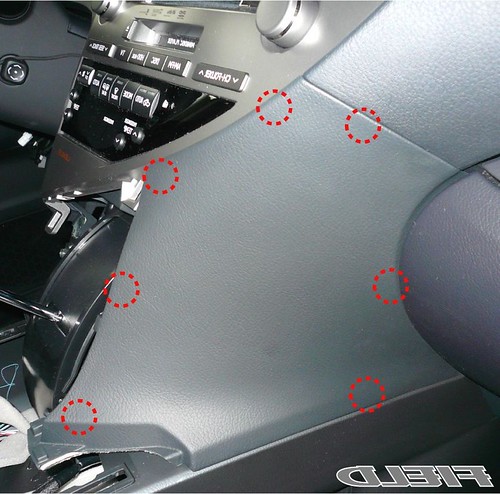
4. Remove the panel shown above (passenger’s side). The red spots indicate the locations of the clips holding the panel.
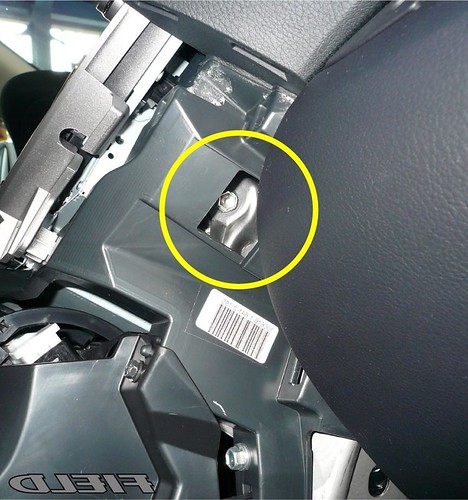
5. From the passenger’s side, the hole to access the bolts that you need to remove is exposed.
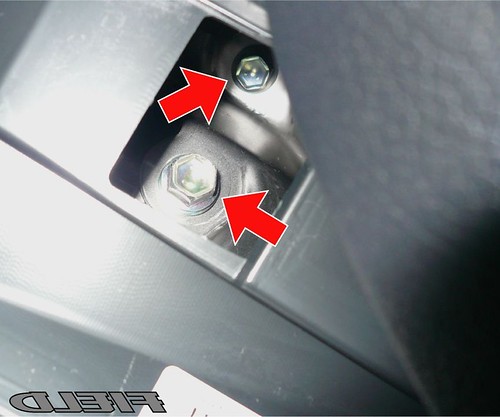
6. From the passenger’s side, remove the two bolts as shown above.
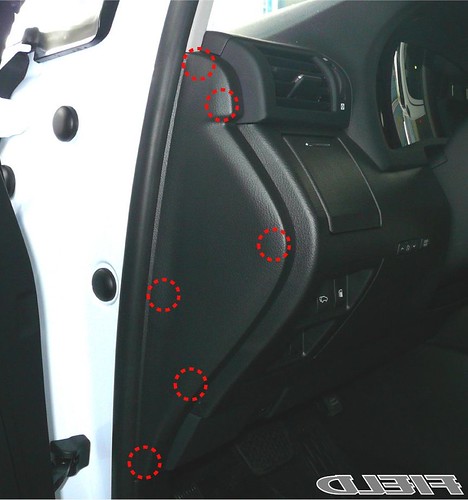
7. From the driver’s side, remove the side panel. The red spots indicate the locations of the clips holding the panel.

8. Remove the above control panel. It is easily removed by pushing out with your hands through the panel that you removed in step #7

9. Open the lid in the direction of the arrow shown above.
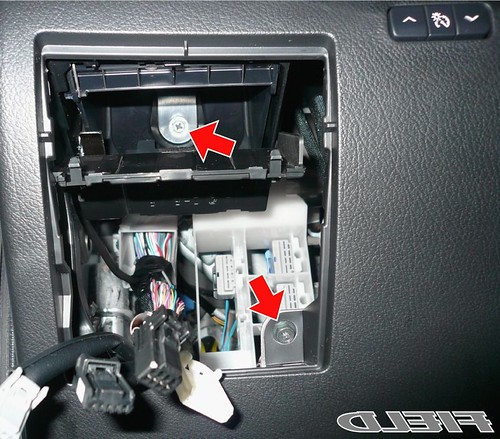
10. Remove the two bolts as shown above.
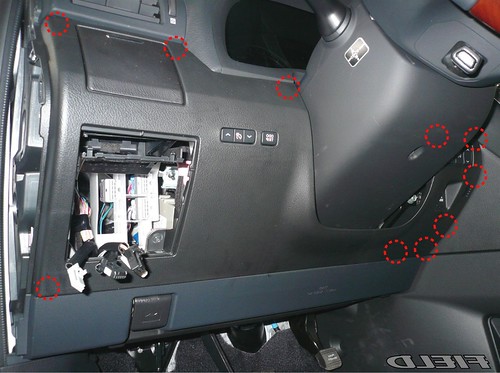
11. Remove the panel as shown above. The red circles indicate location of clips. Remove all the wire connectors after the panel is removed.
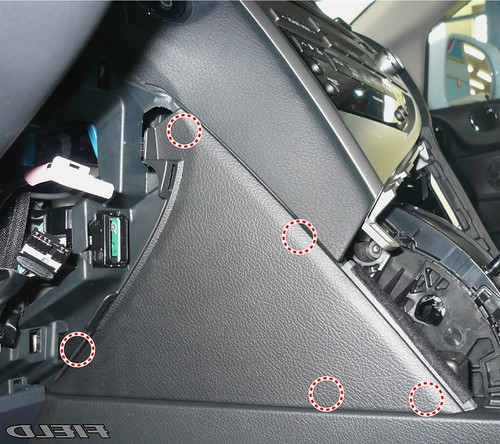
12. From the driver’s seat, remove the panel as shown above. Red circle points indicate location of the clips.
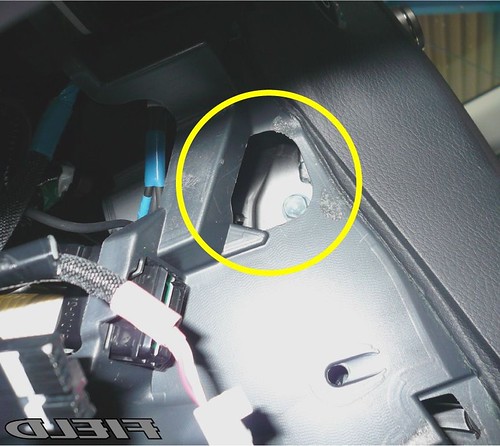
13. From the driver’s seat, the hole to access the bolts that you need to remove is exposed.
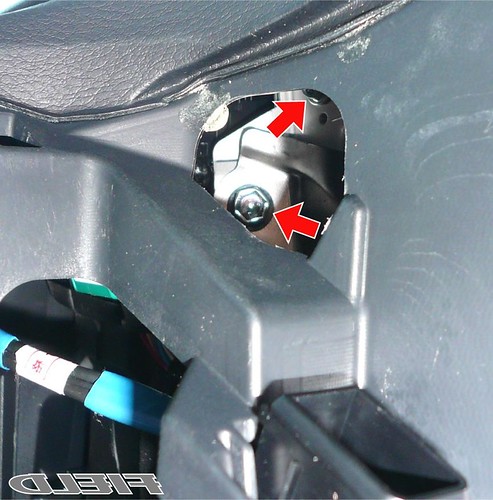
14. From the driver’s seat, remove the two bolts as shown above.
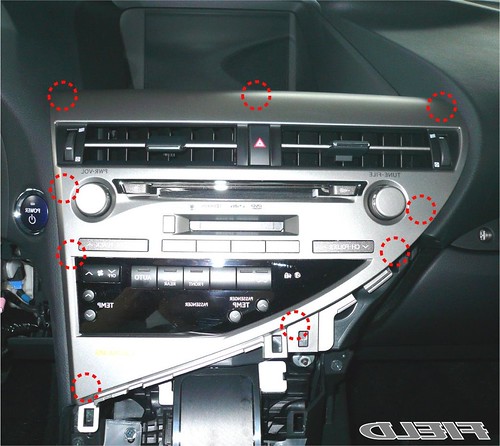
15. Start from the bottom and pull out the unit by pulling the unit toward you. Note the red circles where the clips are located. Remove the head unit and all the connectors. Place it on the side and be careful not to scratch it on the way.
16. Once you are behind the head unit, locate the silver box, which is the navigation unit. Behind the navigation unit are the connectors identical to the NT4618 Beat-Sonic module connectors that you will connect to. Remove those connectors from the navigation unit. Please note that there is a large connector above the connector that you need to access (all on the left side). As such, remove the connector above to access the connector below it.
17. Now, connect the Beat-Sonic TVK46, NVK18, or the NT4618 to the connector that you pulled out on the previous step. If connecting the NT4618, first connect the TVK-46 and NVK18 to each other and then connect to the vehicle’s harness and behind the head unit (Daisy-Chain the two modules). Also, ground the harness to the vehicle’s chassis.
TEST THE UNIT AND REVERSE PROCESS:
Test the unit to make sure it is working well and then perform the above steps in reverse to put everything back to normal and you are done!
Important Information:
The following instructions were created using Japanese DIY from our affiliate in Japan and translating them to English. The pictures were also flipped horizontally to mimic a left hand drive car instead of the original right hand drive car. The following pictures and information are being used with the original owner’s permission.
Disclaimer:
The following is for information purpose only and we are not responsible to damage, loss or injury caused from attempting or performing the DIY. Further, the navigation and DVD lock while in motion was originally installed for safety reasons. By unlocking the navigation and DVD lock, we are assuming that the navigation and DVD will be controlled and enjoyed by the passenger and not by the driver. As such, are not responsible to damage, loss or injury from using the bypass modules. Please be responsible drivers!
For additional information, contact: info@beatsonicusa.com
About the Beat-Sonic NAV/DVD Bypass Module:
System: 100% Plug and play kit from Beat-Sonic for allowing use of factory features that would be locked out during vehicle movement.
These plug and play module kits allow override of the lock out system equipped in your factory TV or Navigation/DVD system when the vehicle is in motion. Due to the fact that no modification is needed on the factory harness and this is 100% plug and play, it is easily reversible to the original factory specs without showing any signs that this modification was ever made.
The NVK modules are equipped with manual functionality button where the override of the navigation lock out may be enabled simply by pressing the button included in with the kit. Once the button is engaged, the module tricks the factory navigation system to thinking that it is at a stop and enables the use of all the controls including the navigation address input, POI, blue-tooth contacts, mp3 music select, etc. When the button is depressed, the vehicle will return to its normal state and will take couple of seconds to refresh the correct vehicle location on the map. This module will not bypass the DVD during vehicle movement. See TVK module below for the DVD bypass:
The TVK modules are also equipped with manual functionality switch where the override of the DVD lockout may be enabled simply by toggling the switch to "TV". Once the switch is engaged, the module tricks the factory DVD system to thinking that the vehicle is in "park" with its parking brake on. The factory screen will switch to backup camera mode automatically when in R gear and will not affect any other factory controls. As such, the user have the option of enabling the DVD bypass permanently and hiding the switch behind the dash for a cleaner installation.
The NT modules kit include both NVK and TVK modules as mentioned above.
The DIY Installation Starts Here:
Tools needed: Socket wrench with a 10mm socket, panel removers, and towels
Product needed: Beat-Sonic NT4618, TVK-46 or NVK-18. Go to www.beatsonicusa.com for the product.
1. Move the position of the shift **** to “Neutral” and then remove the shift **** turning counter clockwise.
2. Remove the panel as shown above. There are clips being held at these 4 red spots.
3. Remove the panel by gently pulling on the center panel. The circled spots above indicate the location of clips holding the panel together. Disconnect all the wire connectors between the panel and the center console.
4. Remove the panel shown above (passenger’s side). The red spots indicate the locations of the clips holding the panel.
5. From the passenger’s side, the hole to access the bolts that you need to remove is exposed.
6. From the passenger’s side, remove the two bolts as shown above.
7. From the driver’s side, remove the side panel. The red spots indicate the locations of the clips holding the panel.
8. Remove the above control panel. It is easily removed by pushing out with your hands through the panel that you removed in step #7
9. Open the lid in the direction of the arrow shown above.
10. Remove the two bolts as shown above.
11. Remove the panel as shown above. The red circles indicate location of clips. Remove all the wire connectors after the panel is removed.
12. From the driver’s seat, remove the panel as shown above. Red circle points indicate location of the clips.
13. From the driver’s seat, the hole to access the bolts that you need to remove is exposed.
14. From the driver’s seat, remove the two bolts as shown above.
15. Start from the bottom and pull out the unit by pulling the unit toward you. Note the red circles where the clips are located. Remove the head unit and all the connectors. Place it on the side and be careful not to scratch it on the way.
16. Once you are behind the head unit, locate the silver box, which is the navigation unit. Behind the navigation unit are the connectors identical to the NT4618 Beat-Sonic module connectors that you will connect to. Remove those connectors from the navigation unit. Please note that there is a large connector above the connector that you need to access (all on the left side). As such, remove the connector above to access the connector below it.
17. Now, connect the Beat-Sonic TVK46, NVK18, or the NT4618 to the connector that you pulled out on the previous step. If connecting the NT4618, first connect the TVK-46 and NVK18 to each other and then connect to the vehicle’s harness and behind the head unit (Daisy-Chain the two modules). Also, ground the harness to the vehicle’s chassis.
TEST THE UNIT AND REVERSE PROCESS:
Test the unit to make sure it is working well and then perform the above steps in reverse to put everything back to normal and you are done!

Thread Starter
Former Sponsor
Joined: Jun 2011
Posts: 700
Likes: 43
From: CA

You are absolutely correct. This will allow to watch a movie while the vehicle is in motion. Please let me know if you have any questions.
Thread Starter
Former Sponsor
Joined: Jun 2011
Posts: 700
Likes: 43
From: CA
For anyone who is interested, we have a group buy going on valid until the end of the month!
https://www.clublexus.com/forums/clu...31-2011-a.html
https://www.clublexus.com/forums/clu...31-2011-a.html

Driver
Joined: Nov 2011
Posts: 112
Likes: 0
From: Fl
an amazing post, I appreciate the effort you made. do you know if you sacrafice any features/functionality by doing this? and to play video, do you have to put a dvd in the navigation slot... so in other words, you give up navigation in order to watch movies?

Lead Lap
Joined: Oct 2011
Posts: 580
Likes: 3
From: manitoba
Yes your GPS is in suspended animation once you activate the override. Its not really about playing dvd's but in navigating folders on ipod, usb stick for music, adding destinations and poi's in nav and more and more I am discovering as time goes on.
Trending Topics
Driver
Joined: Nov 2011
Posts: 112
Likes: 0
From: Fl
theres no way im taking all that apart and disconnecting wires... ill neer get it back looking new again... ill drop a bolt behind the dash or something,,, not worth the risk.. ill just do all that with my iPad and bring it in the car
Lead Lap
Joined: Oct 2011
Posts: 580
Likes: 3
From: manitoba
TampaOwner, it is very simple. The Pestige Society override I installed has factory connections. You unplug from the nav and plug into the override module then plug the overide back into the nav. You are just putting it in line. No splicing, cutting or anything. I could do it now in about 45 min with no worries at all.
The end result is definately worth it in my opinion. You can not tell its there unless you took it all apart and saw the 1/2" thick 1x2 box.
The end result is definately worth it in my opinion. You can not tell its there unless you took it all apart and saw the 1/2" thick 1x2 box.

Pole Position
Joined: Aug 2011
Posts: 219
Likes: 4
From: Haute Savoie, ANNECY
For anyone who is interested, we have a group buy going on valid until the end of the month!
https://www.clublexus.com/forums/clu...31-2011-a.html
https://www.clublexus.com/forums/clu...31-2011-a.html
Can we use the nav system despite the installation under normal conditions?
Can we switch from DVD (using BeatSonic system) to other current Lexus functions and vice versa while moving/driving?
Is there any constraint for european rx450h (France) nav system?
Thanks a lot for constructive replies and price (including shipping to France)
Al
Pole Position
Joined: Aug 2011
Posts: 219
Likes: 4
From: Haute Savoie, ANNECY
TampaOwner, it is very simple. The Pestige Society override I installed has factory connections. You unplug from the nav and plug into the override module then plug the overide back into the nav. You are just putting it in line. No splicing, cutting or anything. I could do it now in about 45 min with no worries at all.
The end result is definately worth it in my opinion. You can not tell its there unless you took it all apart and saw the 1/2" thick 1x2 box.
The end result is definately worth it in my opinion. You can not tell its there unless you took it all apart and saw the 1/2" thick 1x2 box.
Any picture?
Thx
Al

Thread Starter
Former Sponsor
Joined: Jun 2011
Posts: 700
Likes: 43
From: CA
We have a group buy going on for anyone who is interested:
For 2010-2012 models:
https://www.clublexus.com/forums/clu...xus-100-a.html
2013-Present:
https://www.clublexus.com/forums/clu...xus-100-a.html
For 2010-2012 models:
https://www.clublexus.com/forums/clu...xus-100-a.html
2013-Present:
https://www.clublexus.com/forums/clu...xus-100-a.html

Driver School Candidate
Joined: Jun 2015
Posts: 1
Likes: 0
From: Alberta
I ran the cables under the Center console and drilled a small hole so I could mount them inside the area close to where the USB and 12V power outlets are.
Fairly straight forward install except the connectors that came with the kit that attacked to the small single connector on the back of the head unit didn't fit 100% and ended a little shaving with a utility knife to fit perfectly
Worked like a charm!
Fairly straight forward install except the connectors that came with the kit that attacked to the small single connector on the back of the head unit didn't fit 100% and ended a little shaving with a utility knife to fit perfectly
Worked like a charm!

Driver School Candidate

Joined: Feb 2016
Posts: 23
Likes: 14
From: NA
http://club-lexus.ru/forum/viewtopic...809833#3809833
Russian forum suggests that you ground the pin 59.
Russian forum suggests that you ground the pin 59.