
License Plate Lamp Replacement

Thread Starter
Driver School Candidate
Joined: Aug 2008
Posts: 20
Likes: 1
From: California
The purpose of this post is to possibly help others that may have run into a problem. Seriously this looked easy. Maybe it was at some time before the sun got to the plastic license plate housing.
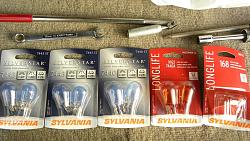
The 7440A bulbs I selected were the wrong base type for my 2001 RX300. For some reason I had to use the 1156A Bayonet type.
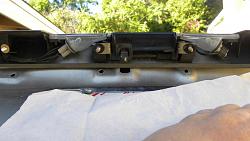
I had to to remove the license plate lamp housing to get the lamp assemblies out. For some reason just they would not just slide right out after removing their retaining screw. I could have forced it out but would have scratched paint. The Left came out easier.
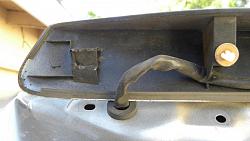
Looks like someone tried to pry the license plate housing off at one time and broke this retainer. Whatever was there was not when I took this apart.
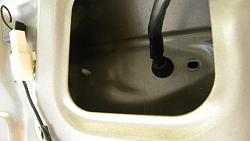
Here is a shot looking up at the missing retainer's hole. Also notice the nylon retainer that I had to pinch its locking wings to remove license plate housing.
Last edited by Vockroth; Jul 18, 2013 at 03:38 AM.
Pit Crew
Joined: Oct 2013
Posts: 157
Likes: 0
From: California
that is what I tried, I removed the 1 screw however the clear plastic cover doesn't seem to have enough clearance to remove it and I am afraid I will break it removing it, or won't be able to get it back in.
The procedure in this thread has the inner hatch panel being removed to access it from the backside, that is what makes it seem harder than it should be.
The procedure in this thread has the inner hatch panel being removed to access it from the backside, that is what makes it seem harder than it should be.
Driver
Joined: Jun 2014
Posts: 68
Likes: 12
From: Wisconsin
that is what I tried, I removed the 1 screw however the clear plastic cover doesn't seem to have enough clearance to remove it and I am afraid I will break it removing it, or won't be able to get it back in.
The procedure in this thread has the inner hatch panel being removed to access it from the backside, that is what makes it seem harder than it should be.
The procedure in this thread has the inner hatch panel being removed to access it from the backside, that is what makes it seem harder than it should be.
Cheers


Thread
Thread Starter
Forum
Replies
Last Post