
DIY: Tap 2JZGE Valvecovers for fittings
 08-30-13, 10:58 AM
#1

There are lots of reasons to tap your valve covers and since there is not a good write-up on it I figured I would do one with a lot of pictures.
First I will show the drivers side because this is the side that is restricted with the PCV from factory, and is what needs to be addressed first as there is already a free flowing 90 degree barb on the passenger side, but in post 2 I will show you how to remove that one and tap that valve cover as well. If the drivers valve cover comes off on my motors I just tap it for the future.
I cannot stress the importance of taking the valve cover off to do this because of the shavings generated from tapping, so I actually took a picture showing shavings collecting at the bottom, and this was only 1/3 way through the tapping.
You must remove the valve covers or you will get shavings through out your engine!!
Also I usually go ahead and do this on all my driver valve covers, because even though you have tapped it, you can still put the rubber grommet and pcv back in there if you need to later on to go back to stock, the threads being there do not affect that just let you swap to a fitting with ease later.
Tools: 1/2 NPT tap, 7mm socket to remove baffle, large pliers to pull PCV out, little screw driver or needle nose pliers to get the rubber grommet out (try not to damage it if you want to reuse, and if it breaks apart and falls in that fine we will remove it when the baffle is off).

standard dirty GE valve cover, this one has a TT pcv in it but its the same as the GE one just is metal instead of plastic and doesn't do the 90 degree bend. otherwise they work the exact same so don't sweat it you can use whichever I just happened to have this one around.

Remove the PCV, carefull not to crush the purple GE one if you want to ever use it again.
TT one is metal and is not going to really break.

Now remove the grommet, it can help to oil it down a little if it is really dry rotted or stuck.

The bottom of the valve cover for those who haven't seen it with the 2 baffles.

We want to remove the rear baffle, notice the rtv on the sides also. 7mm is what you need.

Lift out the baffle from the part sticking up in the back and now we have full access.

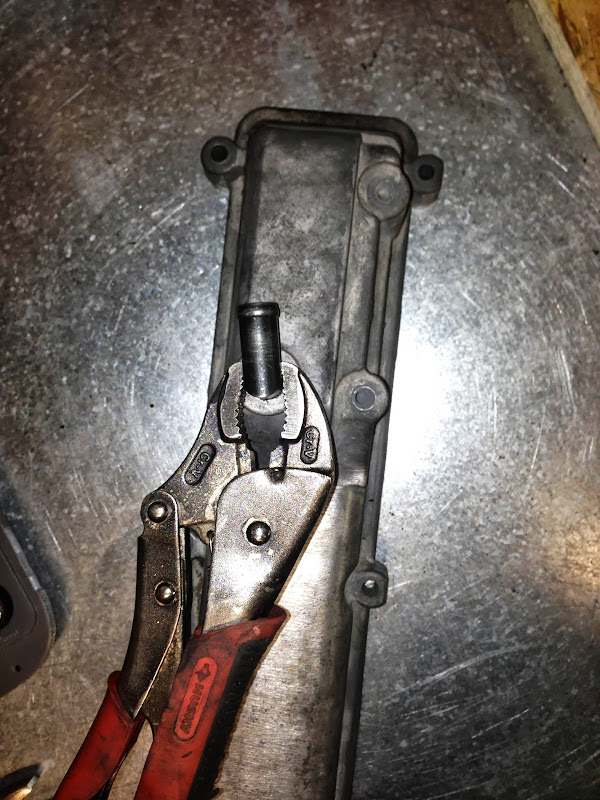
1/2 Tap will just sit in the hole pretty nicely. you can probably do a better job of tapping it straight than me.

Start by dipping your finger in some oil and lightly coat the opening in the valve cover,.
Lightly coat the tap also with some oil, and start working that tap in there!!

check out the shavings from just a few turns, you are going to want to go 3/4 up the tap generally.
Also collect all the shavings and dispose of it properly, do not have a fire or heat source around these shavings.
The GE valve covers are magnesium and these are highly flammable and cannot be put out with conventional fire extinguishers.
If something does happen do not pour water on it or anything even remotely damp it becomes much worse, call for help immediately.

Check out those shiny threads, not to shabby!!

Insert whatever fitting you want now, you can get 1/2 npt to -10 or -12 AN for pro lines, or you can just use a simple barb like I had laying around shown and put a breather or hose on it.
Get creative with it you can go from 1/2 npt to almost anything with the right fittings.

View from underneath

Side view

I always re-install the baffle plate, good practice is to use new rtv on the edges and loctite on the screws.
Some people skip this step and if you do, you better have a catch can to act as a baffle as much more oil will blow by without it.

Finished product now you can run a fitting or the stock grommet and PCV even.

stay tuned for part 2 on the passenger side, even though I don't normally do that one I will do it on this set to be complete.
First I will show the drivers side because this is the side that is restricted with the PCV from factory, and is what needs to be addressed first as there is already a free flowing 90 degree barb on the passenger side, but in post 2 I will show you how to remove that one and tap that valve cover as well. If the drivers valve cover comes off on my motors I just tap it for the future.
I cannot stress the importance of taking the valve cover off to do this because of the shavings generated from tapping, so I actually took a picture showing shavings collecting at the bottom, and this was only 1/3 way through the tapping.
You must remove the valve covers or you will get shavings through out your engine!!
Also I usually go ahead and do this on all my driver valve covers, because even though you have tapped it, you can still put the rubber grommet and pcv back in there if you need to later on to go back to stock, the threads being there do not affect that just let you swap to a fitting with ease later.
Tools: 1/2 NPT tap, 7mm socket to remove baffle, large pliers to pull PCV out, little screw driver or needle nose pliers to get the rubber grommet out (try not to damage it if you want to reuse, and if it breaks apart and falls in that fine we will remove it when the baffle is off).
standard dirty GE valve cover, this one has a TT pcv in it but its the same as the GE one just is metal instead of plastic and doesn't do the 90 degree bend. otherwise they work the exact same so don't sweat it you can use whichever I just happened to have this one around.
Remove the PCV, carefull not to crush the purple GE one if you want to ever use it again.
TT one is metal and is not going to really break.
Now remove the grommet, it can help to oil it down a little if it is really dry rotted or stuck.
The bottom of the valve cover for those who haven't seen it with the 2 baffles.
We want to remove the rear baffle, notice the rtv on the sides also. 7mm is what you need.
Lift out the baffle from the part sticking up in the back and now we have full access.
1/2 Tap will just sit in the hole pretty nicely. you can probably do a better job of tapping it straight than me.
Start by dipping your finger in some oil and lightly coat the opening in the valve cover,.
Lightly coat the tap also with some oil, and start working that tap in there!!
check out the shavings from just a few turns, you are going to want to go 3/4 up the tap generally.
Also collect all the shavings and dispose of it properly, do not have a fire or heat source around these shavings.
The GE valve covers are magnesium and these are highly flammable and cannot be put out with conventional fire extinguishers.
If something does happen do not pour water on it or anything even remotely damp it becomes much worse, call for help immediately.
Check out those shiny threads, not to shabby!!
Insert whatever fitting you want now, you can get 1/2 npt to -10 or -12 AN for pro lines, or you can just use a simple barb like I had laying around shown and put a breather or hose on it.
Get creative with it you can go from 1/2 npt to almost anything with the right fittings.
View from underneath
Side view
I always re-install the baffle plate, good practice is to use new rtv on the edges and loctite on the screws.
Some people skip this step and if you do, you better have a catch can to act as a baffle as much more oil will blow by without it.
Finished product
now you can run a fitting or the stock grommet and PCV even.stay tuned for part 2 on the passenger side, even though I don't normally do that one I will do it on this set to be complete.
Last edited by Ali SC3; 08-30-13 at 11:22 AM.

The following users liked this post:
Goopi (11-20-23)
08-30-13, 10:58 AM
#2
Passenger valve cover has basically a 3/8 barb stock, so on this one it is not as simple of just tapping the existing hole unless you want to use a 3/8 npt tap and even then it is a tight fit, I recommend drilling it out to make the hole bigger and then use the 1/2 npt tap like on the drivers side.

Baffle underneath

Baffle removed

The way I remove the stock fitting is with some pressure pliers, clamp it on nice and tight.

With a little bit of force you can turn the barb to various angles
Keep turning it back and forth till it becomes nice and easy and then start lifting as you turn it

Stock barb is out and with no damage!!
(you can also use this same trick for most coolant nipples on throttle bodies, idle valves, etc, they are also just pressed in)

I don't have the right size drill bit for the 1/2 NPT tap, so that will have to wait a little bit, but you get the idea, drill out the hole slowly, and then tap it and use some oil to keep things cool and lubricated.
Also the kind of drill bit you want is one with a "3/8 reduced shank" so it will fit in a normal drill, as if you just get the normal drill bit for a 1/2 npt tap it is very large and does not fit in a regular drill.
Baffle underneath
Baffle removed
The way I remove the stock fitting is with some pressure pliers, clamp it on nice and tight.
With a little bit of force you can turn the barb to various angles
Keep turning it back and forth till it becomes nice and easy and then start lifting as you turn it
Stock barb is out and with no damage!!
(you can also use this same trick for most coolant nipples on throttle bodies, idle valves, etc, they are also just pressed in)
I don't have the right size drill bit for the 1/2 NPT tap, so that will have to wait a little bit, but you get the idea, drill out the hole slowly, and then tap it and use some oil to keep things cool and lubricated.
Also the kind of drill bit you want is one with a "3/8 reduced shank" so it will fit in a normal drill, as if you just get the normal drill bit for a 1/2 npt tap it is very large and does not fit in a regular drill.
Last edited by Ali SC3; 09-04-13 at 09:26 AM.
The following users liked this post:
Goopi (11-20-23)

The following users liked this post:
Goopi (11-20-23)
08-30-13, 12:33 PM
#4
I wouldn't grind anything down around these shavings or even grind the valve cover itself, I have read a few horror stories online and they sometimes result in the operator getting burned very badly.
The GTE valve covers are aluminum so they do not have the same issue so you will see people tig welding those up all the time.
08-30-13, 05:58 PM
#5
1JZ Single SC400
iTrader: (59)
Join Date: Jan 2009
Location: Alabama, Roll Tide!
Posts: 8,518
Likes: 0
Received 15 Likes
on
12 Posts
Ali, what a great write up. Simple but nice way to do it. Glad you mentioned the magnesium fire. Those are highly flammable and we normally use dirt to cover it up and extinguish. They are a pain to put out and while burning, will out off a nice white flame. It will kill your eyes if you look directly into it also. I know from experience!
08-31-13, 09:27 AM
#6
Thanks, yeah I wanted to keep it simple no need to complicate valve cover fittings and I have seen some wierd setups so I figures if there were pics of the right way more people would do it this way.
I couldn't imagine having to deal with a sudden magnesium fire, hopefully you were alright and your eyes are better now. With these things it is def better to know about it before it happens since its so dangerous.
I couldn't imagine having to deal with a sudden magnesium fire, hopefully you were alright and your eyes are better now. With these things it is def better to know about it before it happens since its so dangerous.
Trending Topics
 09-04-13, 12:20 PM
#9
1JZ Single SC400
iTrader: (59)
Join Date: Jan 2009
Location: Alabama, Roll Tide!
Posts: 8,518
Likes: 0
Received 15 Likes
on
12 Posts
Ali, I have a question for you. I have both of my valve covers done this way. Both tapped and have a AN fitting welded on. They both go to a wye before going into the oil catch can. I sometimes smell this through my interior and while having the windows down. My question is, is this because the oil catch can is breathing with a single k and n filter on top or should I run another fitting from the oil catch can to the intake side? I have seen both ways. I would like to get rid of my smell forever. I dont know if tapping another fitting will help. If you say yes, then do I need to still keep the k an n filter on top or close it off also??? Kinda need some 101 guidance on an oil catch can.
Thanks man.
Thanks man.
09-05-13, 10:49 AM
#10
some of them fall apart, and some of them fall in, if that happens on the car, you can get it out still with needle nose pliers, its happened to me before.
yes, I think I mentioned it above, loctite is a good idea on those screws but just get them tight don't over torque or they will strip out.
Ali, I have a question for you. I have both of my valve covers done this way. Both tapped and have a AN fitting welded on. They both go to a wye before going into the oil catch can. I sometimes smell this through my interior and while having the windows down. My question is, is this because the oil catch can is breathing with a single k and n filter on top or should I run another fitting from the oil catch can to the intake side? I have seen both ways. I would like to get rid of my smell forever. I don't know if tapping another fitting will help. If you say yes, then do I need to still keep the k an n filter on top or close it off also??? Kinda need some 101 guidance on an oil catch can.
Thanks man.
Thanks man.
this could get oil in your turbo and intercooler piping, intake, etc.. but if you have a baffled can or don't get alot of oil building up in the can generally, it may be worth it to not have the oil smell and route to the intake.
Also, remember the amount of pressure you can let out in boost, is only going to be as much as the smallest line, so right now its either the size of the line after the Y, or the K&N. If the lines going into your Y are the same size as the one going out, you are getting the same evacuation as just running 1 line, and you would be better off running just the 1 lines from 1 side and leaving the factory PCV in place.
options:
Run 2 lines straight to the can, and have the breather on the top(smells but recommended)
Or run 2 lines straight to the can, and a larger single line to the intake pipe (no smell and recommended).
Or run 2 lines straight to the can, have a line going to the intake along with the K&N (you will still get smell and not increase evacuation so not much of a point to it).
Or run the 2 lines into the T, with the line running to the can being much larger, like two -10 feeding one -12, and from the can you can do any of the above like a K&N or runa -12 to the intake pipe. I am not a fan of the Tee method for the reasons above I see them all the time with the same size hoses, and its not helping evacuation. If one was to run just one line and leave the pcv on the other side you would at least get better crank case sealing in vacuum, and the same amount of evacuation under boost.
09-05-13, 03:20 PM
#11
1JZ Single SC400
iTrader: (59)
Join Date: Jan 2009
Location: Alabama, Roll Tide!
Posts: 8,518
Likes: 0
Received 15 Likes
on
12 Posts
or option 3...........
Keep the two lines I have now, size AN -10, and at the Y, use another AN -10 line screwed into the Y, and have that line routed into the intake... Take the $80 catch can out of the equation all together. Does this make sense? It is like extended the original lines into the intake while still utilizing the existing welds and fittings. The only thing I would have to buy is the length of the new AN line, two fittings. Would this method work, or should the line to the intake be size -12??? I am tired of the smell, due to the oil catch and filter being right by the intake cabin filter. If you have the air on fresh at all, it will kill you inside the car..... Its terrible. I usually dont have the fresh air on normally, due to the dust coming in. I hate dust. LMK, so I can order a new line and a couple of fittings.
Thanks,
Ali.....
09-05-13, 03:25 PM
#12
1JZ Single SC400
iTrader: (59)
Join Date: Jan 2009
Location: Alabama, Roll Tide!
Posts: 8,518
Likes: 0
Received 15 Likes
on
12 Posts
Now that you speak of the PVC, is this method the reason why I keep blowing out rear main seals? I have gone through two main seals, OEM replacements, and it is leaking again. Someone mentioned the PVC not working correctly, or the way I have the AN lines. Bottom line, I am also tired of this oil leaking... Maybe I am installing it wrong, but doubtful.
09-05-13, 05:37 PM
#13
yeah tell me about the smell I currently have just 2 breathers sitting on the valve covers so my a/c is usually on recirculate. you could bypass the catch can, the amount of oil that will end up in your intercooler will depend on how much blowby you are getting but I would recommend keeping it if you have it since I will guess you do get blowby because of the pressure issues.
Now on to the pressure issue, it is actually because of the Tee you have in there. Right now your setup is basically one -10 line from the valve cover to the intake. your tee and the second line literally do nothing as the both valve covers are connected together anyways. together they evacuate the equivalent of just a -10 line.
Now if you run 2 separate -10 lines to the intake pipe, the valvecovers will actually be able to evacuate double the scenario above, but most don't do this due to blowby, so they either just run both the -10 lines to a vented can and call it a day (nothing wrong with the and would solve your issues but the smell will be there).
To avoid the smell you could in a perfect world run 2 more -10 lines from your catch can to your intake pipe, but most just run a -12 line or basically one size larger than the other lines. And a -12 does not flow enough for two -10's even, but 12 is a common size its hard to find a -14 and -16 is huge.
At the least I would recommend running the 2 lines straight to the can to stop blowing seals.
you could try reusing a -10 line to the intake in addition to the breather, but I haven't done that and not sure it will rid of the smell completely, but maybe enough to be bearable.
Last edited by Ali SC3; 09-05-13 at 05:41 PM.
09-05-13, 07:22 PM
#14
1JZ Single SC400
iTrader: (59)
Join Date: Jan 2009
Location: Alabama, Roll Tide!
Posts: 8,518
Likes: 0
Received 15 Likes
on
12 Posts
Option #4.....
I could just relocate the oil catch can away from the fresh air intake. This means extended some new lines from the welded fittings currently. I do have some blow by, but I didn't think it was an issue. I emptied my catch can only once since I had it, and to me it was a lot in there. This was over a year of boosting with the same setup. I say that's pretty good.
Whats the farthest the can be placed with doing its job?
Thanks for your help...
09-05-13, 07:27 PM
#15
1JZ Single SC400
iTrader: (59)
Join Date: Jan 2009
Location: Alabama, Roll Tide!
Posts: 8,518
Likes: 0
Received 15 Likes
on
12 Posts
or Option #5.......
Remove the catch can and have another -10 fitting welded on and BAMMMMMM.... Have one line on one and the other line on the second fitting, but as you said, the smell would be there, but this would fix the pressure issue. Keep me from blowing the rear main.. I don't know if I want to pull the trans yet again..... Getting kinda old with jack stands and floor jacks. LOL
Remove the catch can and have another -10 fitting welded on and BAMMMMMM.... Have one line on one and the other line on the second fitting, but as you said, the smell would be there, but this would fix the pressure issue. Keep me from blowing the rear main.. I don't know if I want to pull the trans yet again..... Getting kinda old with jack stands and floor jacks. LOL