
CarPC, Complete plugNplay Kit w\7" Indash Enclosure
 07-02-07, 08:41 AM
#1
Lead Lap
Thread Starter

Join Date: Feb 2002
Location: New York
Posts: 489
Likes: 0
Received 0 Likes
on
0 Posts
Well as some of you already know, my GS went back and im almost done selling all my parts. I had this on my car for almost 3yrs. Installed it myself, took about 11hrs total(7hrs one day, 4hrs the next) to install...the hardest part was running the cables and soldering each speaker wire to the metra kit, plus getting all my wire diagrams ready on to whats going where, what factory wires do what, etc..
This System is meant to have the PC located in the stock CD changer location, AMP is located in the trunk..you can change it around, but then you would have to rerun all the connections urself, like i had to... all the runs are perfect size with extra slack..its just how i had it in my car..hence plugNplay kit....dam i wish i had something like this when i was installing mine, but anyways
This is whats included:
PC Specs:
-VIA EPIA M10000 (17cmx17cm)
-1Gig of Ram
-spare 256MB of ram
-120Gig notebook HD
-c134 case, (about the size of a cereal box)
-Panasonic DVD slot loading drive (never used, just throwing it in)
-Carnetix Power startup\shutdown controller(CNX-P1260), this is already wired up..ALL wiring is soldered on, even when making extensions
-7" Xenarc Touchscreen, with video inputs(can add a backup camera)
-Custom plug and play enclosure, matches 100% to the AC unit..screen is already built into it...just plug in the VGA and power cord...witch that is already wired up to the startup\down controller (J2 Plugs, look at diagram below)
-25 Foot USB extension
-USB GPS unit (place it in the rear)
-Speaker wire already soldered, just run it to the amp, also each wire is labeled to whats going where(Driver Front speaker, etc)so when u get the run to the AMP you will know
-25 Foot RCA's (bundled with the speaker wire, for the run to the trunk, perfect lenght)
-4 Port USB Hub (one front USB on the front of the MB is not workin, due to it fitting in the glovebox)
-2Gig Mini portable Hardrive, (to transfer your MP3's to your car)
-House AC adaptor,w\MB plug\
-Jenson streering wheel remote...(you just need to get a USB-UIRT, its $50 bucks) I need mine for my HTPC - the config file will work once you plug in the uirt..so again no setup required
-5CH AMP, with RCA inputs (required with a carPC setup)
$600 + shipping for everything..
Last edited by CaMsGS3; 07-01-08 at 06:20 AM. Reason: Update the status
 07-02-07, 08:42 AM
#2
Lead Lap
Thread Starter
Join Date: Feb 2002
Location: New York
Posts: 489
Likes: 0
Received 0 Likes
on
0 Posts
So when I removed this kit 2 weeks(took me 1/2hr) i left all my cable runs, startup\shutdown controller, metra kits all intacted..already wired and ready to install in another GS...you would need to ONLY run 4 wires urself,
First take a look at my Wire Diagram that i made when i was in the planning stages to get a better over all look,
The CNX-P1260 will be located to the right on the PC, its where the factory AMP was located
Wires you will have to run:
[1] 12v - from the battery to the PC(startup\shutdown controller,CNX-P1260) + ground
[2] 12v - from the battery to the AMP + ground
[3] Ground the startup\shutdown controller,CNX-P1260
[4] Dlyon (blue) Wire to the AMP - this is so you dont here a "thump"(the speakers poppin) when u start you car
More info, so you guys get a better idea :
look at [J1] - ACC wire is already plugged into a metra kits(these kits hoook up to the factory wiring, and u splice from there, rather then using the factory wiring)
[J1] the red line is your 12v that you will have to run to your battery, and also your ground...i used a spot right above the placement of the carnetix
[J2] - 12v for the screen and MB are already connected, just plug in to device..
[J2] - (not in pic) is a green and black wire, these are also already connected, these plug into the Jumpers spot on your MB
the green(speaker wire) & gray(RCA) lines are..this was the longest part of the install..
BUT for u all speaker lines are soldered onto the metra kits...so all you do is plug in the metra kit to the factory harness, then run these to the back to your AMP
Last edited by CaMsGS3; 07-02-07 at 08:51 AM.
 07-02-07, 08:44 AM
#4
Lead Lap
Thread Starter
Join Date: Feb 2002
Location: New York
Posts: 489
Likes: 0
Received 0 Likes
on
0 Posts
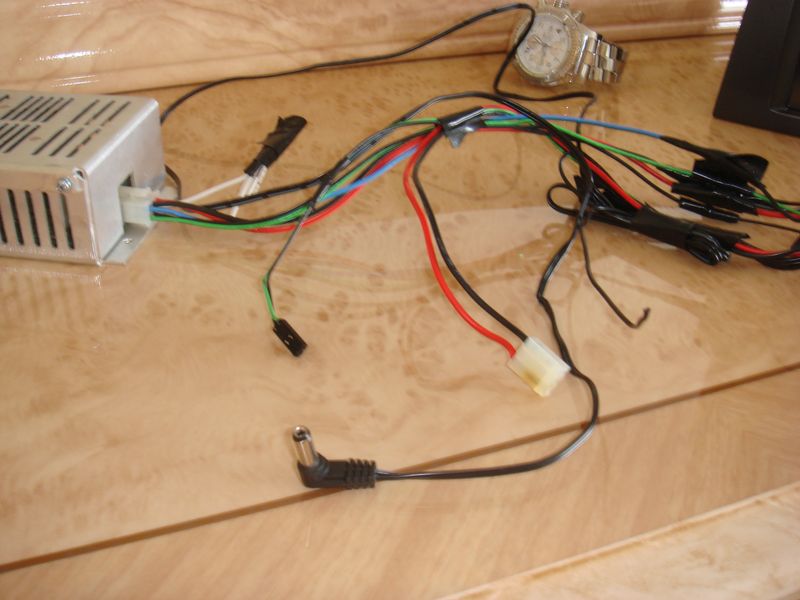
Here is the speaker wire and RCA runs that will go to the trunk

Close up

Here is the metra plugs connecting to the speaker wire...these metra plugs plug right in to the factory wire harness...all these are already soldered on..and labled

Close up
Here is the metra plugs connecting to the speaker wire...these metra plugs plug right in to the factory wire harness...all these are already soldered on..and labled
Last edited by CaMsGS3; 07-04-07 at 10:19 AM.
07-02-07, 08:44 AM
#5
Lead Lap
Thread Starter
Join Date: Feb 2002
Location: New York
Posts: 489
Likes: 0
Received 0 Likes
on
0 Posts
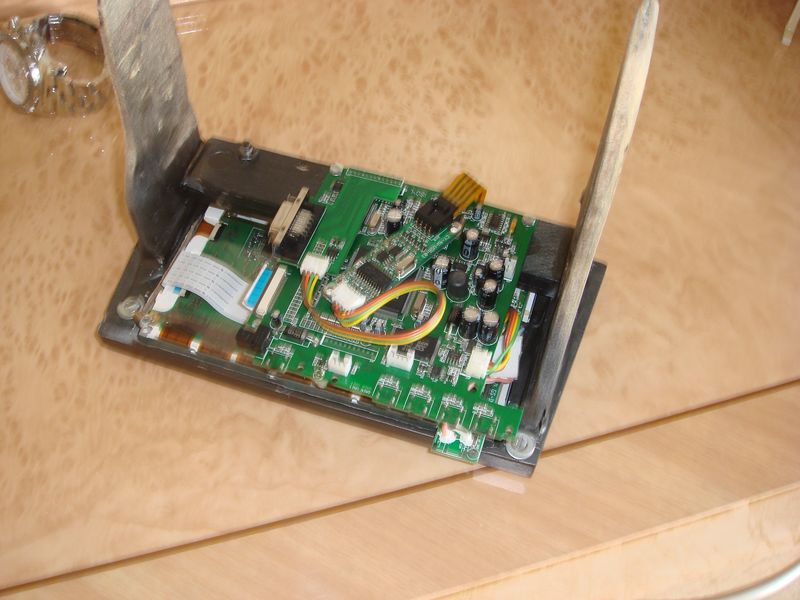
These pics are showing the CNX-P1260, this is the J1 plug (refer to my wire diagram above)

J2 plug again all wires are already soldered, just plug in
J2 plug again all wires are already soldered, just plug in
Last edited by CaMsGS3; 07-04-07 at 10:20 AM.
07-04-07, 10:12 AM
#7
Lead Lap
Thread Starter
Join Date: Feb 2002
Location: New York
Posts: 489
Likes: 0
Received 0 Likes
on
0 Posts
im trying to located some, i think i may have.... I meant to take some nice pics right before i removed this system....but when i signed the papers for my new truck..i rushed home to remove it and totally forgot to take pics..i remembered when my car looked like this...


Trending Topics


 07-05-07, 08:08 PM
#11
Lead Lap
Thread Starter
Join Date: Feb 2002
Location: New York
Posts: 489
Likes: 0
Received 0 Likes
on
0 Posts

 07-11-07, 06:02 PM
#14
Lexus Fanatic

Hey whats goin on... Did you pick up your new ride?
If you ever decide to part out the screen let me know. you can consider it sold
Either way GL on the sale.
Bump for a good seller
If you ever decide to part out the screen let me know. you can consider it sold
Either way GL on the sale.
Bump for a good seller