
Datasystem Controller Writeup with Pix
 03-23-08, 09:48 AM
#1
Racer

Thread Starter
All right here it is. The installation of the Datasystem Controller. I can only attest this install for my 2004 LS430 using the ASC680 with N-078E harness.
Step 1:
move both front seat as far back as you can to give yourself some wiggle room
Step 2:
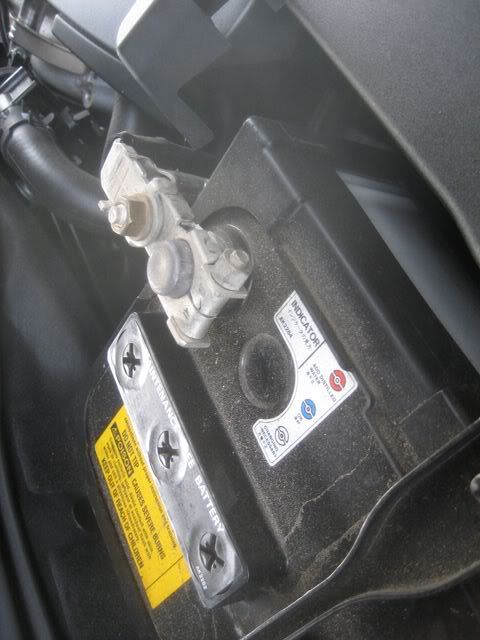
unhook the battery terminal. I always do this just in case of any shorts.
Step 3:
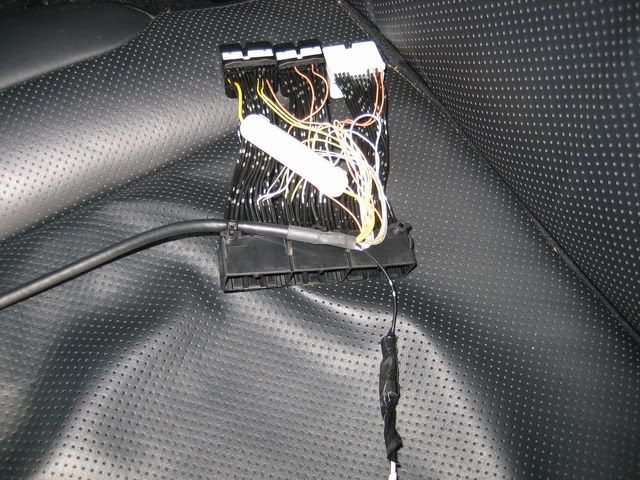
you will need to extend one of the wire about 4 to 5 feet depending on how you route it from one side to the other. I used insulated alarm wiring. Do this for the blue color socket on the harness. See my ugly black tape job
Step 4:
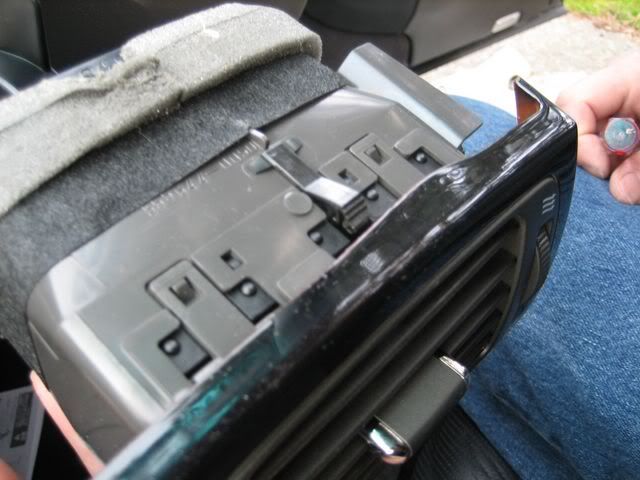
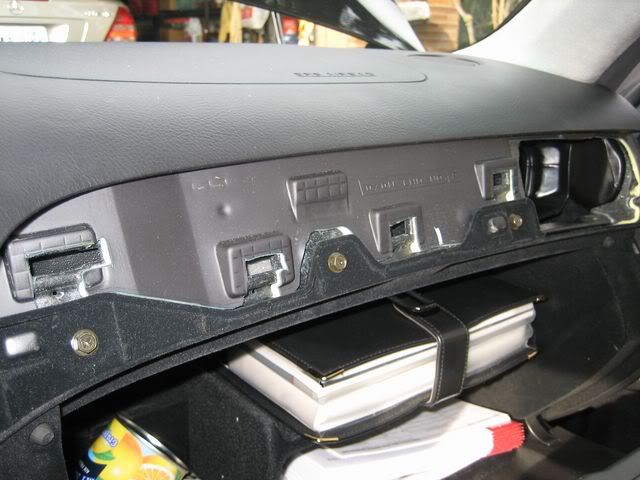
This is the step most people dread. But it wasn't too bad for my buddy who regularly works on car installs. The trick is to understand how the passenger vent clip works. We've tried different tools but the best is to use a flat head screw driver to flip the ratcheting clip in the close position.
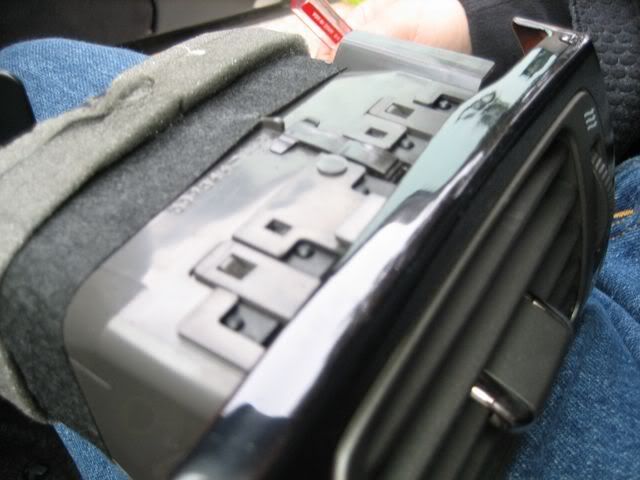
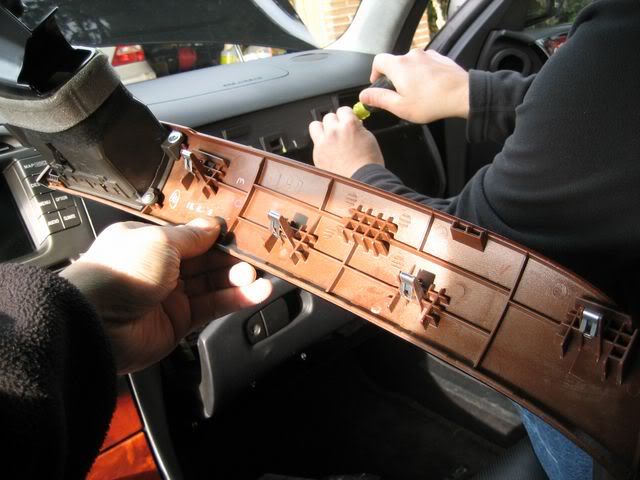
First image shows it in the lock position. See middle of the vent, how the clip stick up. Second image show what you want it to do to remove. See how the clip is drawn in. The clip is in the top and bottom so do both.

Step 1:
move both front seat as far back as you can to give yourself some wiggle room
Step 2:
unhook the battery terminal. I always do this just in case of any shorts.
Step 3:
you will need to extend one of the wire about 4 to 5 feet depending on how you route it from one side to the other. I used insulated alarm wiring. Do this for the blue color socket on the harness. See my ugly black tape job
Step 4:
This is the step most people dread. But it wasn't too bad for my buddy who regularly works on car installs. The trick is to understand how the passenger vent clip works. We've tried different tools but the best is to use a flat head screw driver to flip the ratcheting clip in the close position.
First image shows it in the lock position. See middle of the vent, how the clip stick up. Second image show what you want it to do to remove. See how the clip is drawn in. The clip is in the top and bottom so do both.
Last edited by airtime; 03-23-08 at 12:30 PM.

The following users liked this post:
Mikey80 (09-11-19)
03-23-08, 09:49 AM
#2
Racer
Thread Starter
Step 5:
Once the clips are loosen, its time to remove the wood dash strip. It is held onto with 4 clips. Using a scraper with black tape on it to prevent scratching up your dash, carefully pry. See the image of where the clips are so you can pry at that location.

Step 6:
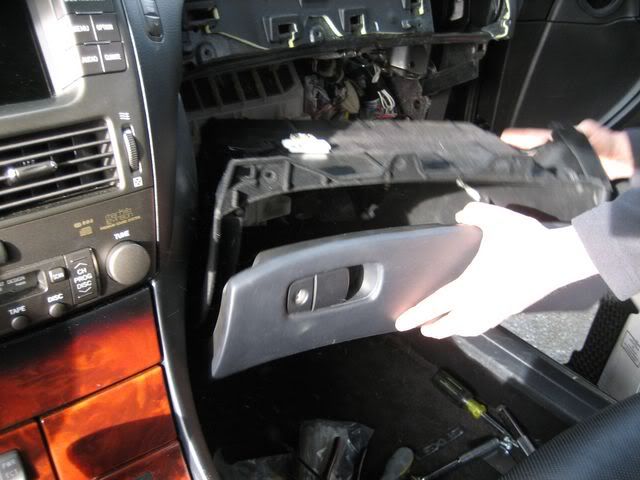
Removal of the glove box. Just pull out the shelfs in the glove box buy yanking a bit, it'll just snap out. Inside bottom there is a long flap, removing that will reveal the 2 10mm mounting bolt. There are some more mounting bolt under the glove box. Remove those also. Now your should be able to remove the complete glove box.

Step 6.1
While you are here, might as well clean out the in cabin air filter. remove the clip and out slide the filter. Either replace or blow out with compressed air.
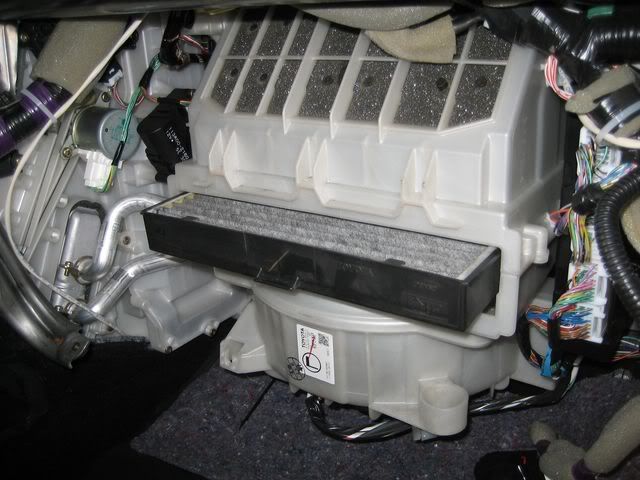
Once the clips are loosen, its time to remove the wood dash strip. It is held onto with 4 clips. Using a scraper with black tape on it to prevent scratching up your dash, carefully pry. See the image of where the clips are so you can pry at that location.
Step 6:
Removal of the glove box. Just pull out the shelfs in the glove box buy yanking a bit, it'll just snap out. Inside bottom there is a long flap, removing that will reveal the 2 10mm mounting bolt. There are some more mounting bolt under the glove box. Remove those also. Now your should be able to remove the complete glove box.
Step 6.1
While you are here, might as well clean out the in cabin air filter. remove the clip and out slide the filter. Either replace or blow out with compressed air.
Last edited by airtime; 03-23-08 at 12:30 PM.
03-23-08, 09:49 AM
#3
Racer
Thread Starter
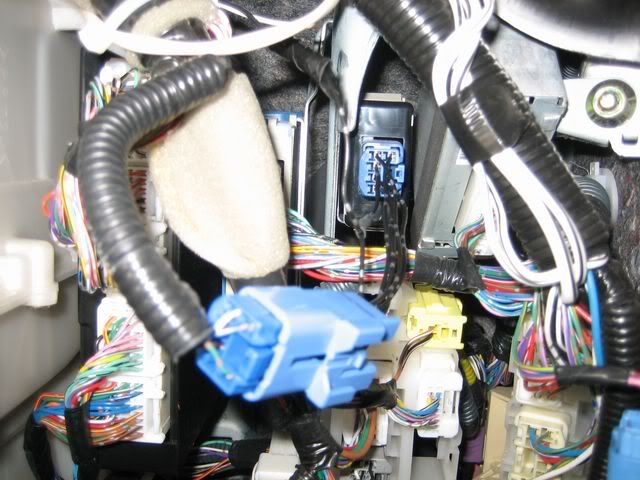
Step 7:
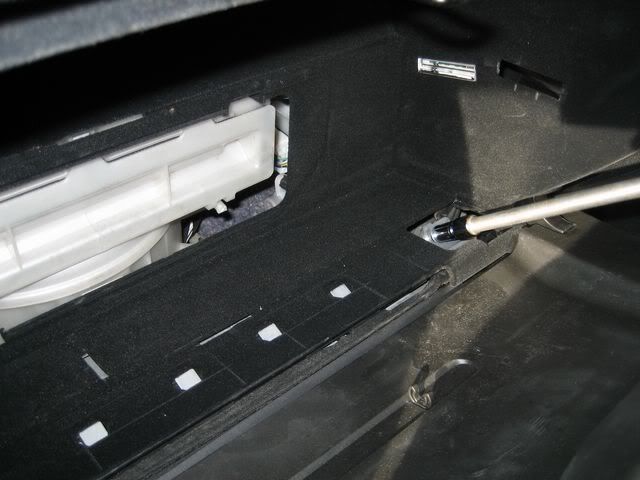
With the glove box removed, you should now see where the inline plug should go. After plugging it in, run the 4 to 5 foot extended wire to the driver side. I chose to go right behind the white color heater core (I think thats the heater core).
Step 8:
Time to get under the steering wheel. Remove two philips screws under the dash so you can get the ECU. Unplug all 3 plugs, plug in the new inline wiring, then plug the control cable to the ASC680 head.

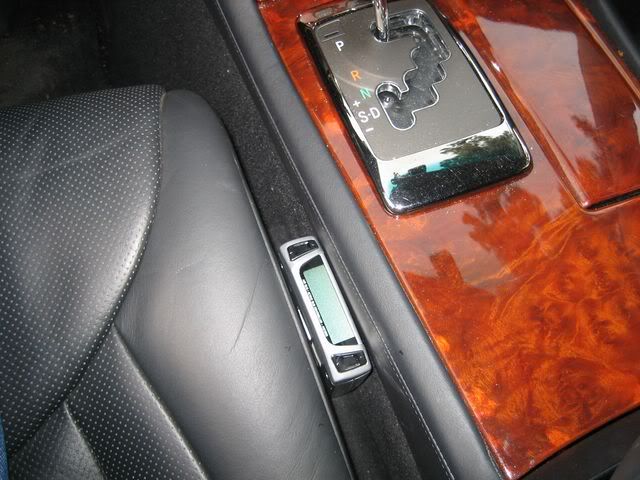
Step 9:
Where to mount the head unit. Before reinstalling everything back, I started the car and play with some of the settings to make sure it works. I originally wanted the head unit in the glove box but instead chose to mount it next to my seat. There was enough room so that the seat would not rub against it at all, and it was close by and fairly discreet.
Step 10:
The car drops faster than I had anticipated. It starts lowering as soon as the button was pressed. My friend stood outside the car monitoring it and could see visual differences immediately. Raising the car took a minute or more.
Step11:
Enjoy
Control unit settings:
Turning it on for the first time, you will see a bunch of Japanese characters.
I pressed the right hand side buttons to scroll through the list of cars so I can get it to display UFC31. However, there is two version of the UFC31 to choose from. I chose the one that displayed a revered letter "C".
Now for the memory setups.
You will see a M1 through M5 for save memory settings.
If you see M1, press the lower left button to choose, then you will see flashing numbers on all for corners on the screen. If you are in "Normal mode", the number ranges are B, A, 0 to 5 (5 being the lowest). In "Extra Down mode", the ranges are F, E, D, C, B, A, 0 to 9, L (L being the lowest). Thanks to rominl's advise, to get to the "Extra Down mode", when you start your car, keep your finger on the lower left hand button, a Mode screen will appear and just click the right side up or down to change the screen to show "Extra Down mode". Then you will have a fresh set of M1 through M5 for save memory.
For the settings, you can select the front height independently. The rears are locked together.
TEMS settings not availible on the UCF31 (Toyota Electronic Modulated Suspension).
Speed setting is only for warning purpose. It does not lower at your specified speed. Will always lower at factory setting speed of around 60mph.
Thanks for all those who have answered my questions and contributed before I purchased my controller. This is a great community
NEW: Video of the car lowering
http://www.youtube.com/v/0z7QlMorgQE
With the glove box removed, you should now see where the inline plug should go. After plugging it in, run the 4 to 5 foot extended wire to the driver side. I chose to go right behind the white color heater core (I think thats the heater core).
Step 8:
Time to get under the steering wheel. Remove two philips screws under the dash so you can get the ECU. Unplug all 3 plugs, plug in the new inline wiring, then plug the control cable to the ASC680 head.
Step 9:
Where to mount the head unit. Before reinstalling everything back, I started the car and play with some of the settings to make sure it works. I originally wanted the head unit in the glove box but instead chose to mount it next to my seat. There was enough room so that the seat would not rub against it at all, and it was close by and fairly discreet.
Step 10:
The car drops faster than I had anticipated. It starts lowering as soon as the button was pressed. My friend stood outside the car monitoring it and could see visual differences immediately. Raising the car took a minute or more.
Step11:
Enjoy
Control unit settings:
Turning it on for the first time, you will see a bunch of Japanese characters.
I pressed the right hand side buttons to scroll through the list of cars so I can get it to display UFC31. However, there is two version of the UFC31 to choose from. I chose the one that displayed a revered letter "C".
Now for the memory setups.
You will see a M1 through M5 for save memory settings.
If you see M1, press the lower left button to choose, then you will see flashing numbers on all for corners on the screen. If you are in "Normal mode", the number ranges are B, A, 0 to 5 (5 being the lowest). In "Extra Down mode", the ranges are F, E, D, C, B, A, 0 to 9, L (L being the lowest). Thanks to rominl's advise, to get to the "Extra Down mode", when you start your car, keep your finger on the lower left hand button, a Mode screen will appear and just click the right side up or down to change the screen to show "Extra Down mode". Then you will have a fresh set of M1 through M5 for save memory.
For the settings, you can select the front height independently. The rears are locked together.
TEMS settings not availible on the UCF31 (Toyota Electronic Modulated Suspension).
Speed setting is only for warning purpose. It does not lower at your specified speed. Will always lower at factory setting speed of around 60mph.
Thanks for all those who have answered my questions and contributed before I purchased my controller. This is a great community
NEW: Video of the car lowering
http://www.youtube.com/v/0z7QlMorgQE
Last edited by airtime; 04-08-08 at 06:44 PM. Reason: video link added.
The following 3 users liked this post by airtime:
03-23-08, 10:03 AM
#4

i don't have enough knowledge on the ls430ul, i wonder what is the plug behind the glove box? speed sensor? wonder if you can get away with not plugging that in. on the ls460l, i just tap into the air suspension ecu, and not behind the nav to the speed sensors so i can drive at any height (if i want)
nice write up though, i have replied your pm
nice write up though, i have replied your pm
 03-23-08, 11:43 AM
#6
Racer
Thread Starter
i don't have enough knowledge on the ls430ul, i wonder what is the plug behind the glove box? speed sensor? wonder if you can get away with not plugging that in. on the ls460l, i just tap into the air suspension ecu, and not behind the nav to the speed sensors so i can drive at any height (if i want)
nice write up though, i have replied your pm
nice write up though, i have replied your pm
Trending Topics
 03-23-08, 05:27 PM
#9
Racer
Thread Starter
You can replace the air filter without removing the complete glove box. Just open the glovebox, remove the shelf, and there is a panel you can pop off to reveal the air filter.
03-23-08, 06:05 PM
#10
Lexus Test Driver


 03-24-08, 04:03 AM
#12
Added note: Whenever you disconnect the battery on a modern Lexus, be sure to run the sunroof, and each window (at the door switch respectively for each door) fully open, then close one or twice to reset the body control ECU. This also applies to all power seat switches too..
By doing so, the memory position for each seats and mirrors will be properly set and selnoids for the power equipment is protected again.
Great write up on the Datasystem Controller!! Cheers!
By doing so, the memory position for each seats and mirrors will be properly set and selnoids for the power equipment is protected again.
Great write up on the Datasystem Controller!! Cheers!
03-24-08, 06:26 AM
#13
Lexus Champion
Dave,
Great write-up especially on the how to take things off part. This was my greatest fear with doing this install. I like the spot you picked for the controller and my wife suggested making a black sleeve cover to put over top of the controller for the stealth look. She is the sewing genius in the family so I will post up what she comes up with for me.
Many thanks once again!!
Ken
03-24-08, 07:42 AM
#15
Forum Administrator

iTrader: (2)
Don't have an answer for you (sorry) but great writeup.
I need to figure out if I'm going to install mine now or take my LS back to stock and sell wheels & controller.
I need to figure out if I'm going to install mine now or take my LS back to stock and sell wheels & controller.