
TUTORIAL: DIY Front Rotor Change on UCF20/21 (95-00) LS400


Hola folks, hadda change the front rotors because both were warped to hell. Worst part of this is making sure u have everything u need before u start.
Vehicle is a 2000 LS400 and this guide applies to ALL LS400 made between 1995-2000 Chassis UCF20/21
Materials List
Tools List
STEP1-
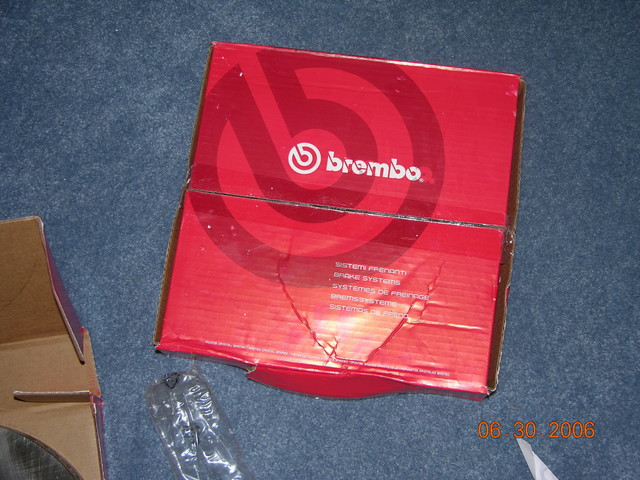
Start off by buying some good quality rotors. I picked up a pair of these Brembo OEM replacements for $68 per rotor from TireRack (thanks again Brandon !!)
STEP2-
While the car is on the ground, use the Lexus Wheel iron to loosen the front wheels. Then Jack the car up and put it on jackstands. Remove Wheels.
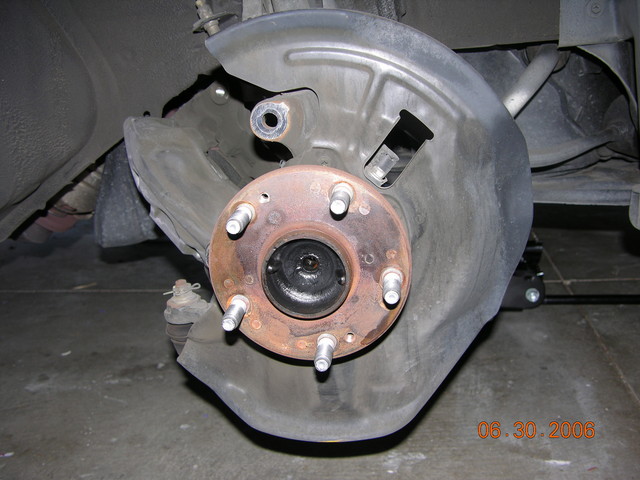
STEP3-
REMOVE BRAKE SENSOR WIRE FIRST!! Then, Spray some WD40 on the 2 17mm bolts holding the caliper on the bracket. then take ur wrench (its easier with a socket) and ur
favorite breaker bar and push/pull HARD until it comes off. (NOTE: dont push/pull so hard u hit the fender with the breaker bar, just pull hard enough that the bolt loosens.
(big version HERE)
STEP4-
Remove caliper and tie it to the UCA or balance it between the LCA and the steering arm. (this is to keep stress off the brake line)
STEP5-
Using Phillips Screwdriver, remove the 2 screws on the face of the rotor.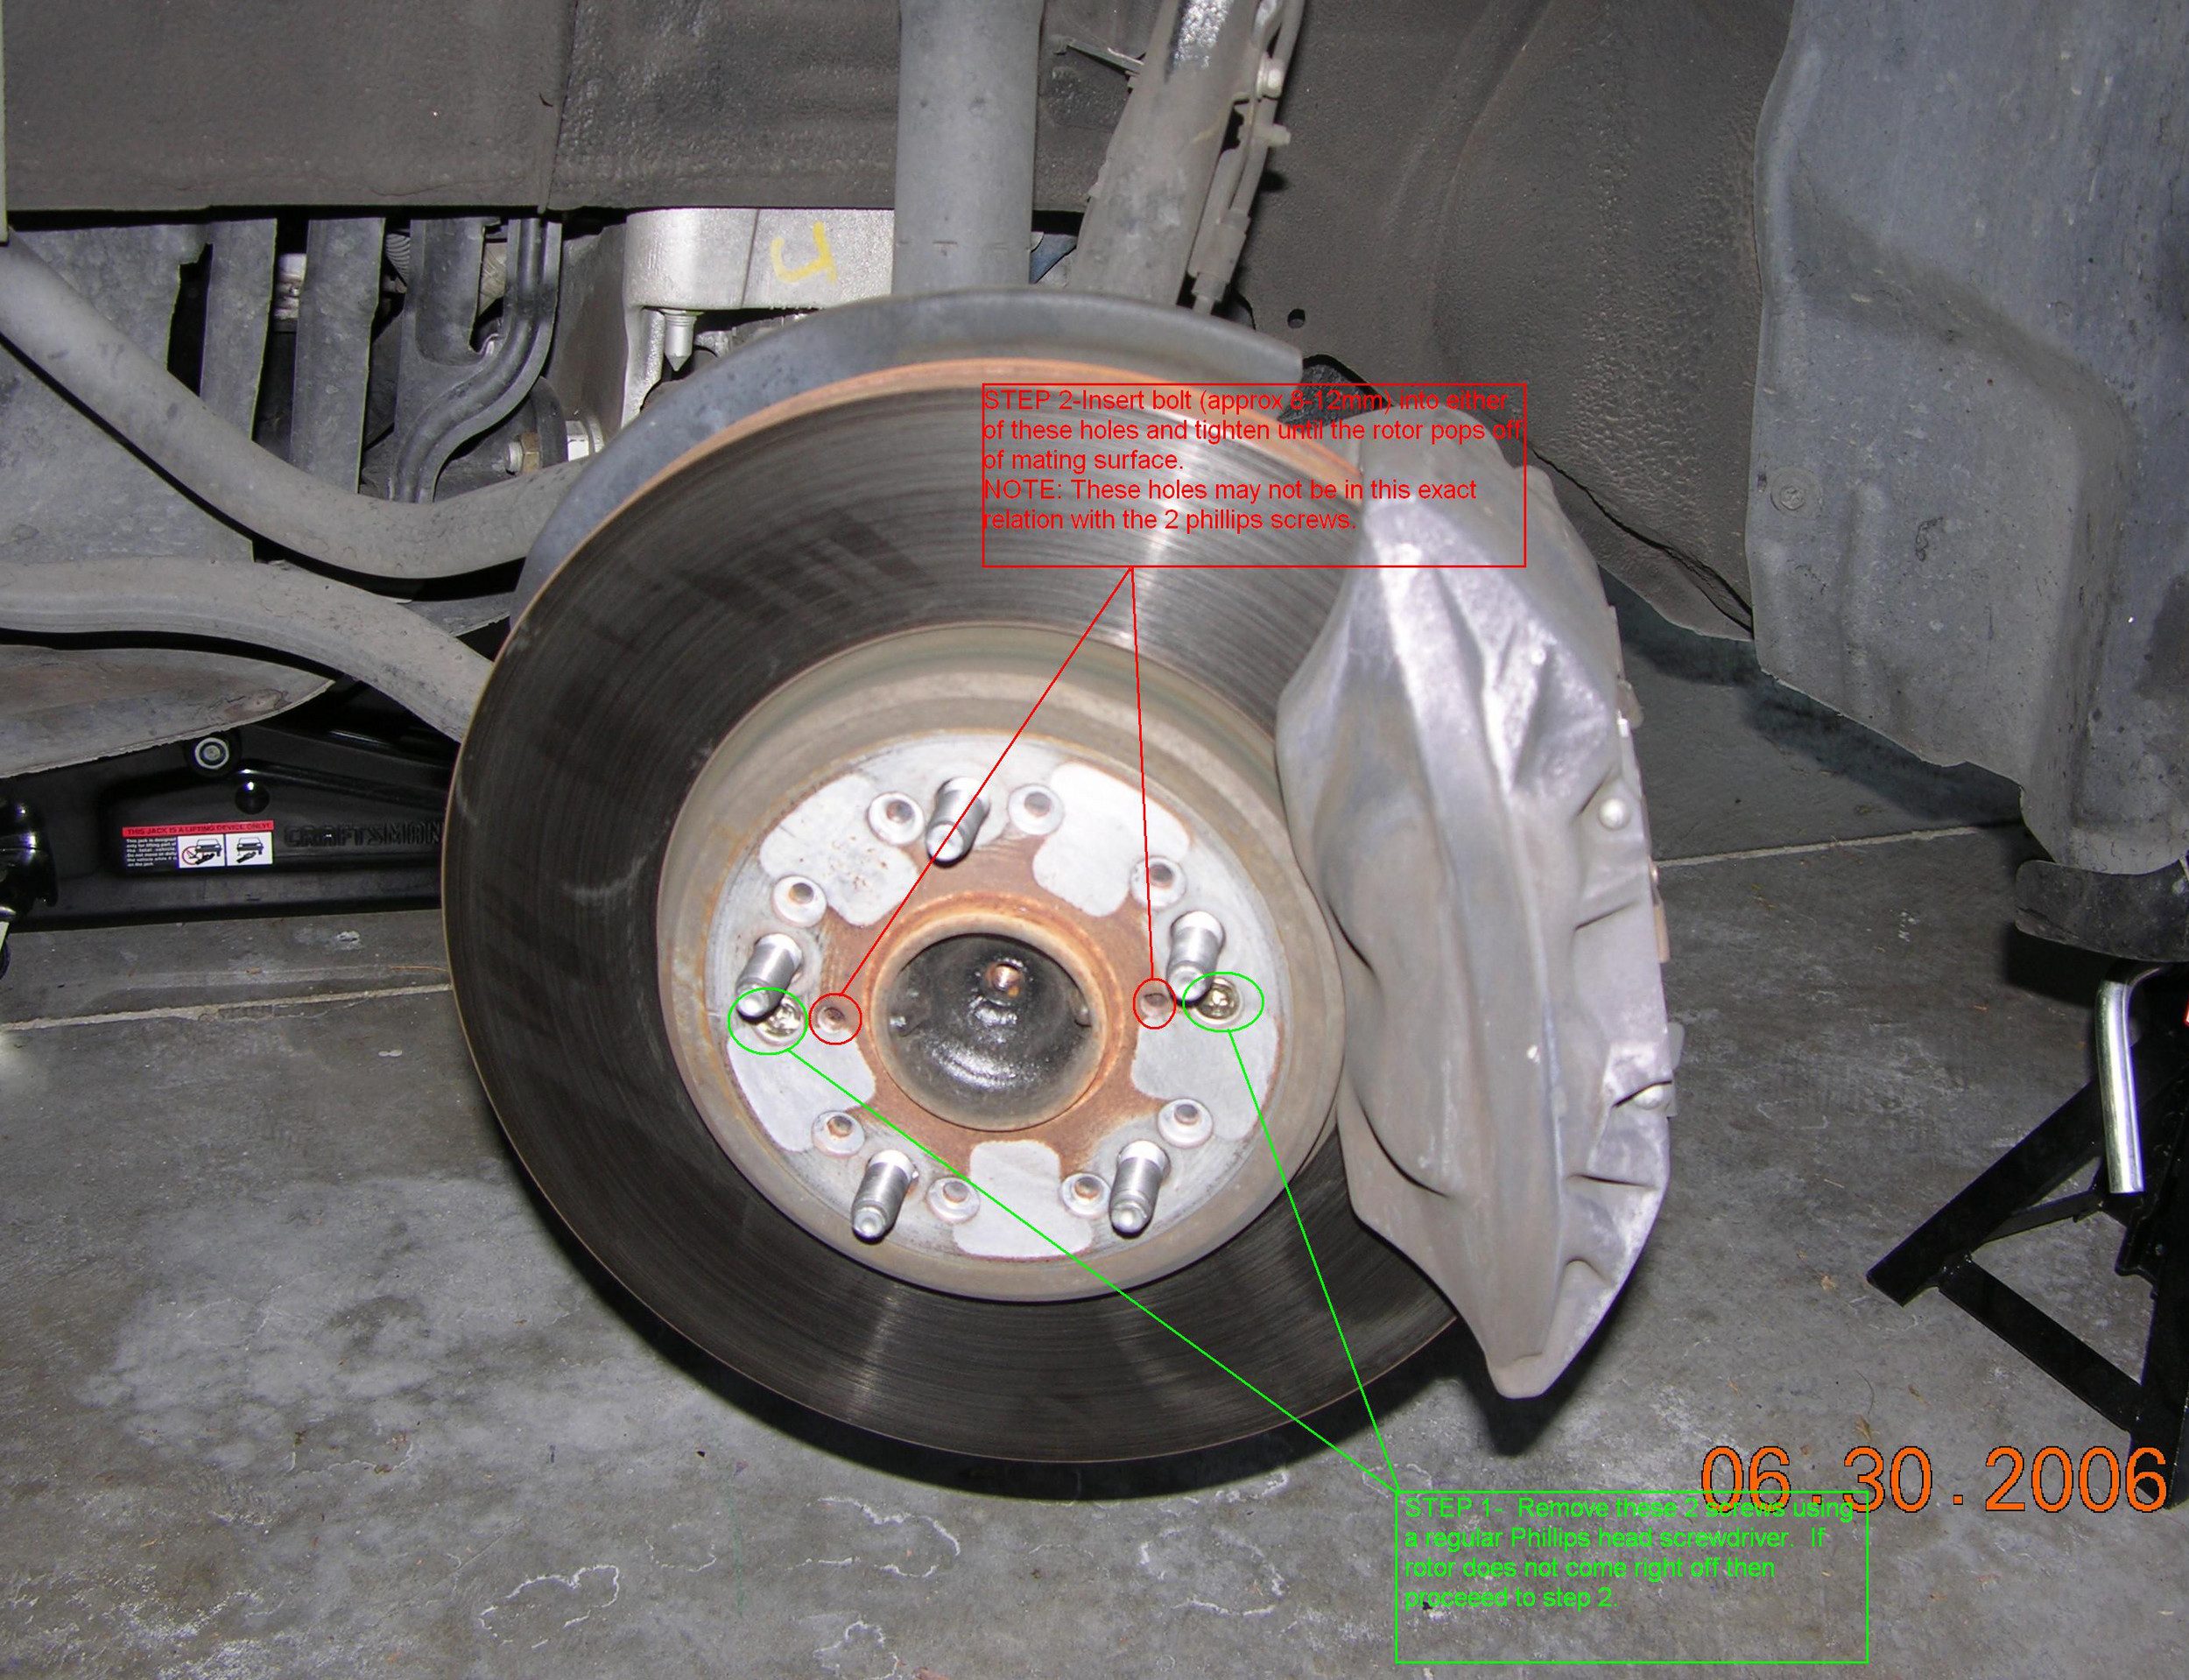
STEP6-
Take your 8mm bolt and insert it into one of the 2 holes CLOSEST to the center of the rotor. Tighten this until the rotor pops off the
mounting face.
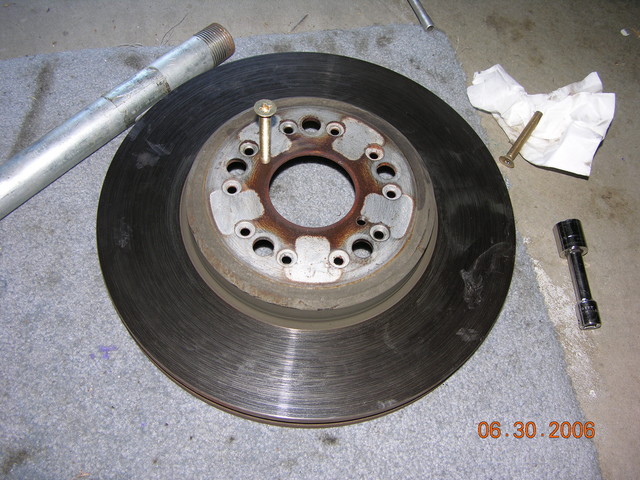
Now you are left with This. (yes i know its the opposite side.)
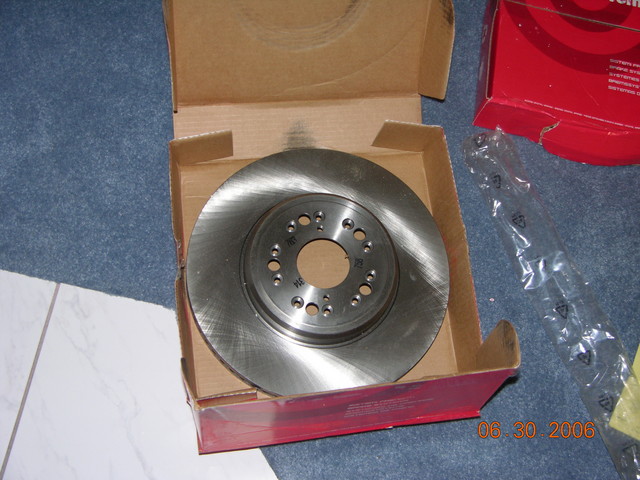
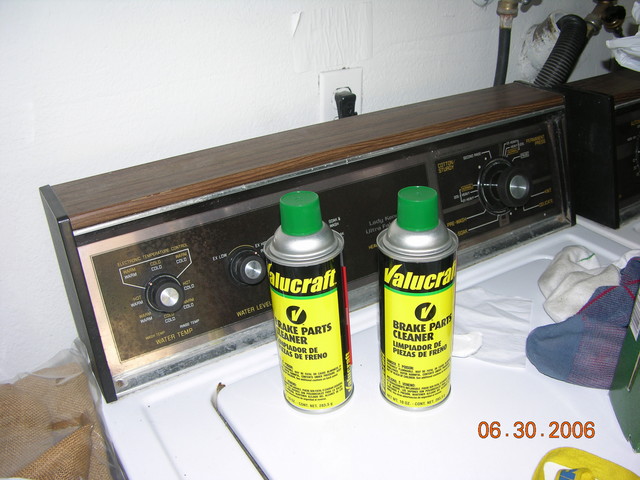
STEP7-
Open up your Rotor box and proceed to wipe down the braking surface with lots of brake cleaner and a scrubby sponge. (this is to clean off the chemicals and other crap
that gets on the rotor during the manufacturing/handling/shipping process.)
STEP8-
Mount new Rotor (WEAR GLOVES SO U DONT CONTAMINATE ROTOR!!!) and screw the 2 screws back into respective holes. If the rotor doesnt want to sit right on the
mounting face then use a lugnut to hold it flat while u screw it in.
STEP9-
Mount Caliper using reversal of removal. Torque to 87 ft/lbs. Remember to connect the wear sensor wire.
(NOTE: Be VERY VERY CAREFUL with the crush washers on the mounting tabs of the calipers, its VERY easy to twist/bend these when carelessly lining up the brackets. They are
a royal PITA to bend back into shape.)
STEP10-
Mount wheels back on car and hand tighten lugnuts.
STEP11-
Lower car from jackstands and torque Lugnuts to 65 ft/lbs.
STEP12-
Test drive car SLOWLY to make sure everything is tight and it all works (ie-brake light will come up if u didnt plug in the sensor wire.)
(NOTE: do NOT be alarmed by a decent bit of smoke for the first 10-20miles of driving. this is the chemicals on the rotors from the manufacturing/shipping/handling
process and the brake cleaner we used earlier to somewhat clean the rotor all burning off.)
STEP13-
Open cold (hot depending on weather) Beverage and enjoy the fact that you are done.
Now that thats all done, i would reccomend that you break in the rotors with gentle braking from 30-15mph. 60-30mph, and eventually 60-(5-10)mph.
DO NOT STOP COMPLETELY: this will imprint brake material onto the rotor and put a wobble in it. Make sure to do this on an empty road/lot so u dont kill
yourself, me, or mess up your car.
lemme know if i missed something. im still new to this tutorial stuff.
Edit 7-10-06:
replaced unknown bolt size w/8mm bolt.
Vehicle is a 2000 LS400 and this guide applies to ALL LS400 made between 1995-2000 Chassis UCF20/21
Materials List
- Brake Cleaner
- New Rotors
- Paper Towels
- Small (8mm) bolt
- Gloves (latex. etc)
Tools List
- Lexus TireIron/21mm Socket
- Jack
- Jackstands (2)
- 17mm Socket
- Phillips Screwdriver
- Favorite Breaker Bar for ur wrench/rachet
- Torque Wrench
- Socket/wrench to match 8mm bolt
- WD40/Favorite Lubricant (for cars guys
 )
) - Flathead Screwdriver (OPTIONAL)
- Hammer(OPTIONAL)
STEP1-
Start off by buying some good quality rotors. I picked up a pair of these Brembo OEM replacements for $68 per rotor from TireRack (thanks again Brandon !!)
STEP2-
While the car is on the ground, use the Lexus Wheel iron to loosen the front wheels. Then Jack the car up and put it on jackstands. Remove Wheels.
STEP3-
REMOVE BRAKE SENSOR WIRE FIRST!! Then, Spray some WD40 on the 2 17mm bolts holding the caliper on the bracket. then take ur wrench (its easier with a socket) and ur
favorite breaker bar and push/pull HARD until it comes off. (NOTE: dont push/pull so hard u hit the fender with the breaker bar, just pull hard enough that the bolt loosens.
(big version HERE)
STEP4-
Remove caliper and tie it to the UCA or balance it between the LCA and the steering arm. (this is to keep stress off the brake line)
STEP5-
Using Phillips Screwdriver, remove the 2 screws on the face of the rotor.
STEP6-
Take your 8mm bolt and insert it into one of the 2 holes CLOSEST to the center of the rotor. Tighten this until the rotor pops off the
mounting face.
Now you are left with This. (yes i know its the opposite side.)
STEP7-
Open up your Rotor box and proceed to wipe down the braking surface with lots of brake cleaner and a scrubby sponge. (this is to clean off the chemicals and other crap
that gets on the rotor during the manufacturing/handling/shipping process.)
STEP8-
Mount new Rotor (WEAR GLOVES SO U DONT CONTAMINATE ROTOR!!!) and screw the 2 screws back into respective holes. If the rotor doesnt want to sit right on the
mounting face then use a lugnut to hold it flat while u screw it in.
STEP9-
Mount Caliper using reversal of removal. Torque to 87 ft/lbs. Remember to connect the wear sensor wire.
(NOTE: Be VERY VERY CAREFUL with the crush washers on the mounting tabs of the calipers, its VERY easy to twist/bend these when carelessly lining up the brackets. They are
a royal PITA to bend back into shape.)
STEP10-
Mount wheels back on car and hand tighten lugnuts.
STEP11-
Lower car from jackstands and torque Lugnuts to 65 ft/lbs.
STEP12-
Test drive car SLOWLY to make sure everything is tight and it all works (ie-brake light will come up if u didnt plug in the sensor wire.)
(NOTE: do NOT be alarmed by a decent bit of smoke for the first 10-20miles of driving. this is the chemicals on the rotors from the manufacturing/shipping/handling
process and the brake cleaner we used earlier to somewhat clean the rotor all burning off.)
STEP13-
Open cold (hot depending on weather) Beverage and enjoy the fact that you are done.
Now that thats all done, i would reccomend that you break in the rotors with gentle braking from 30-15mph. 60-30mph, and eventually 60-(5-10)mph.
DO NOT STOP COMPLETELY: this will imprint brake material onto the rotor and put a wobble in it. Make sure to do this on an empty road/lot so u dont kill
yourself, me, or mess up your car.
lemme know if i missed something. im still new to this tutorial stuff.
Edit 7-10-06:
replaced unknown bolt size w/8mm bolt.
Last edited by PureDrifter; Jul 10, 2006 at 02:33 PM.
Lexus Test Driver
Joined: Nov 2005
Posts: 1,209
Likes: 3
From: IL
Great tutorial with great photos/info.  Correct me if I'm wrong, but isn't it generally a good idea to replace your brake pads when you replace the rotors, especially if they are warped?
All I know is if I was going through that much trouble, I'd put new pads in there while I had it all apart.
Question about the rotor removal - were those two phillips screws easy to remove? Usually they are a beeeyotch to get out because they're usually rusted up pretty bad or the head strips out. I've seen screws in that location on other cars and I'm pretty sure they are used during the assembly process to hold the rotors in place. If mine weren't boogered up when removing them, I'd probably re-use them, but I bet it isn't necessary to replace them if you didn't want to.
Correct me if I'm wrong, but isn't it generally a good idea to replace your brake pads when you replace the rotors, especially if they are warped?All I know is if I was going through that much trouble, I'd put new pads in there while I had it all apart.
Question about the rotor removal - were those two phillips screws easy to remove? Usually they are a beeeyotch to get out because they're usually rusted up pretty bad or the head strips out. I've seen screws in that location on other cars and I'm pretty sure they are used during the assembly process to hold the rotors in place. If mine weren't boogered up when removing them, I'd probably re-use them, but I bet it isn't necessary to replace them if you didn't want to.

Lead Lap
Joined: Apr 2004
Posts: 414
Likes: 4
From: Alabama
I have two bolts that I have used over the years to remove the rotors on an Acura Legend and my two Lexus vehicles, a 93 LS and a 94 ES. They are 8 millimeter.
I would suspect that the 95 and later Lexus models use the same size.
I would suspect that the 95 and later Lexus models use the same size.

Trending Topics
im not really sure bout the rotor procedure. i was using the brake pad bedding in procedure since i figured they serve the same purpose. its safe to make a full stop after the 2nd time so that the rotor has at least some form of a regular pattern on the pad. basicallly u dont want to come to a full stop while the rotors are HOT since thats what will cause glazing and deposits.
i use this procedure w/e i bed in new pads/rotors
http://www.zeckhausen.com/bedding_in_brakes.htm
i use this procedure w/e i bed in new pads/rotors
http://www.zeckhausen.com/bedding_in_brakes.htm

Originally Posted by skperformance
Strange........
I thought that brembo did not make a rotor blank for a 95-2000 LS only previous ones and every other car .
Got any part numbers?
I thought that brembo did not make a rotor blank for a 95-2000 LS only previous ones and every other car .
Got any part numbers?
THey should be on tirerack.com
They are on tire rack but not the part numbers.
Well i found them on Brembo's website.
Of course 2 months after i change mine they now sell replacements for it.
damn POS ! . ........
Oh well atleast the ones i have re holding up well.
Well i found them on Brembo's website.
Of course 2 months after i change mine they now sell replacements for it.
damn POS ! . ........
Oh well atleast the ones i have re holding up well.

it is honestly easier to take off the calipers than the rotors.
look at Step 3, see those 2 bolts coming off the caliper, remove those with your trusty 17mm wrench or socket and pull the caliper off gently. on the passenger side make sure u unclip the brake wear sensor before loosening the bolts.
if they'r seized on then just spray some wd40 on them, let it sit from 10-15mins, and try again.