
How to remove/replace the IS F upper grille [pictorial]
 04-14-19, 04:45 PM
#1
Driver School Candidate
Thread Starter

Recently, I swapped out my upper grille for a spare one I had painted matte black black (to match the lower grille). The pictorial I found on here didn't show pics anymore, so I decided to document my swap and maybe help out others looking for pointers.
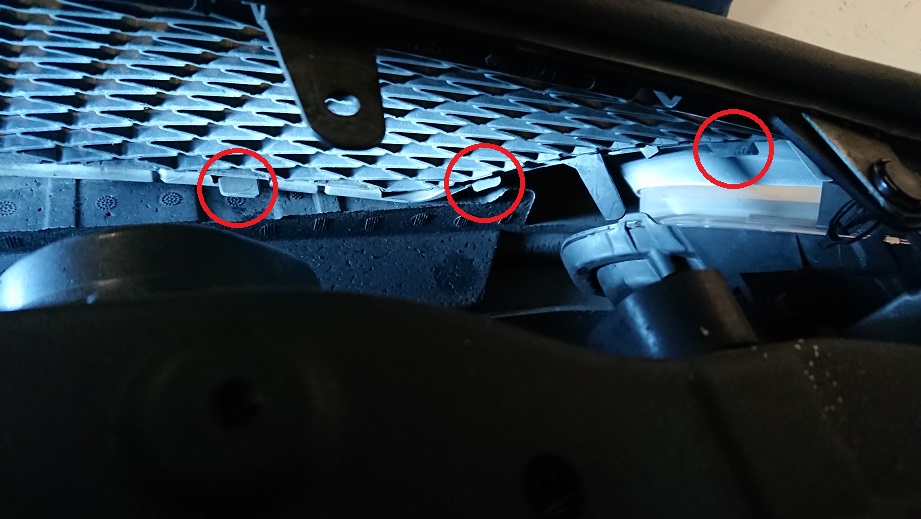
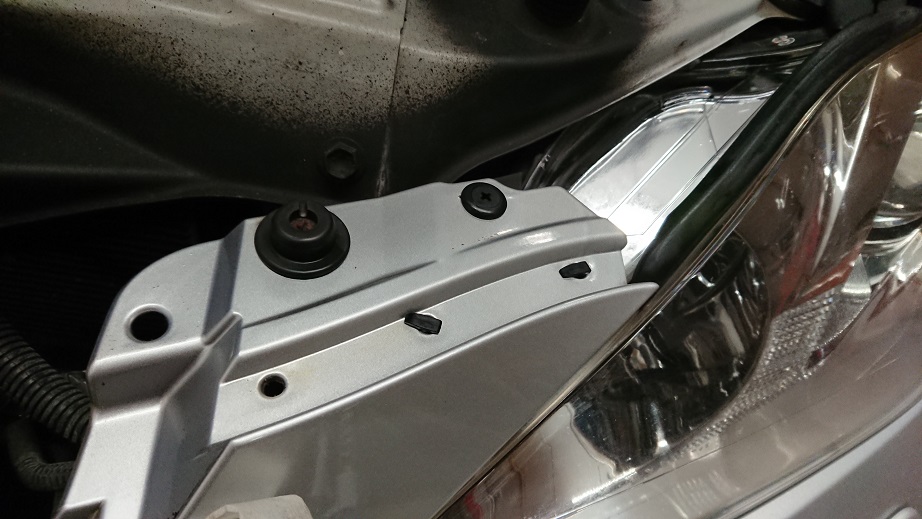
Remove the 9 clips holding the front engine bay cover circled in red:
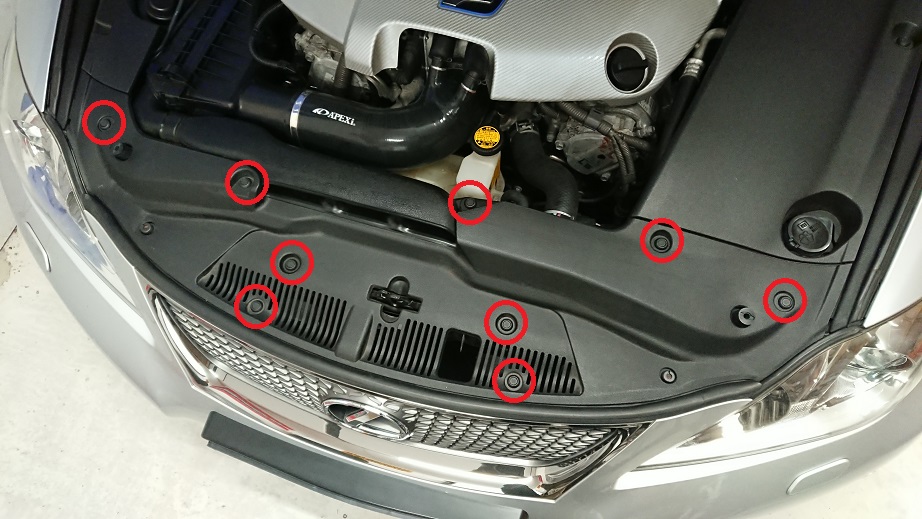
With a small flathead screwdriver you can pop the center pin up. Then wiggle the entire clip out.
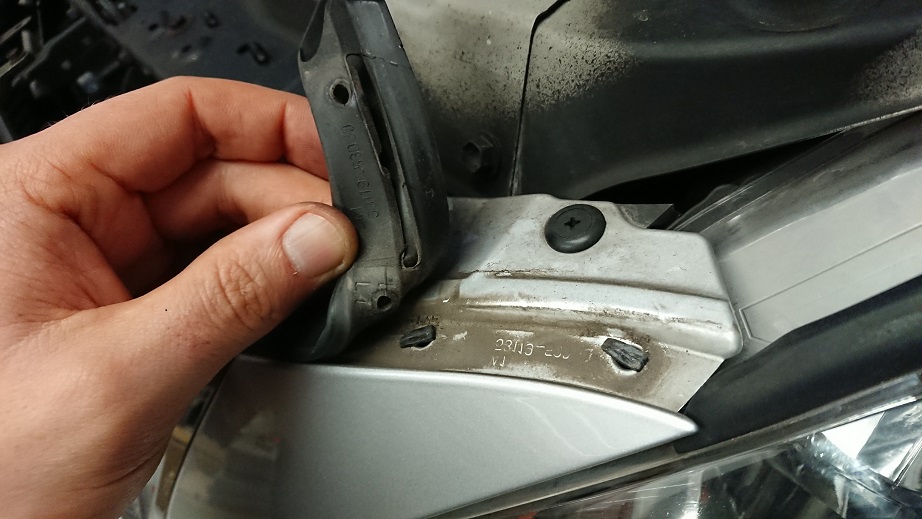
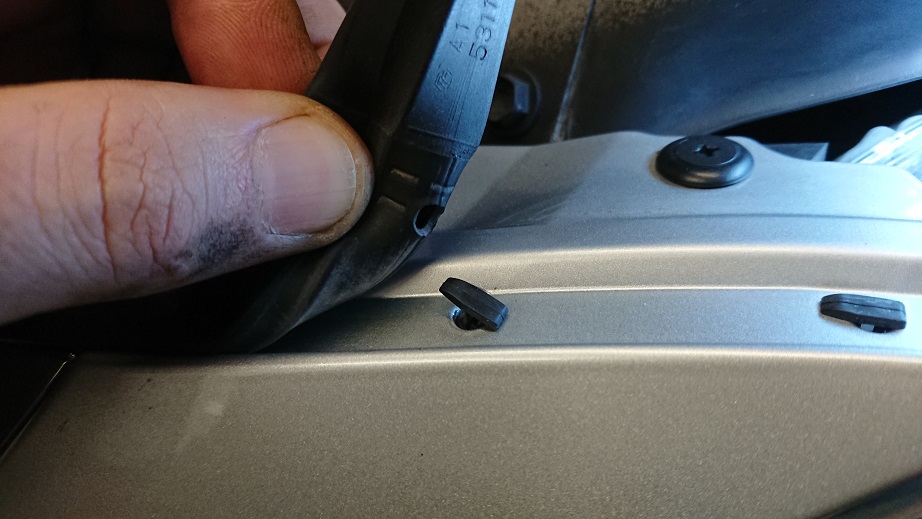
Remove the 2 clips circled in red and the 10 mm bolt circled in blue:
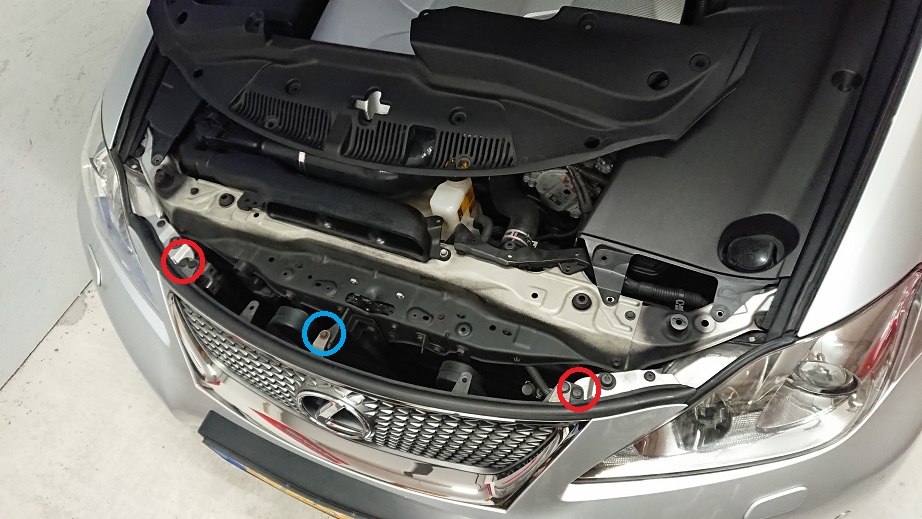
I find removing these clips easiest with a clip remover tool, but using two small flathead screwdrivers should work as well. The inner 2 clips keep the grille mesh and chrome surround together, so you can leave them in for now.
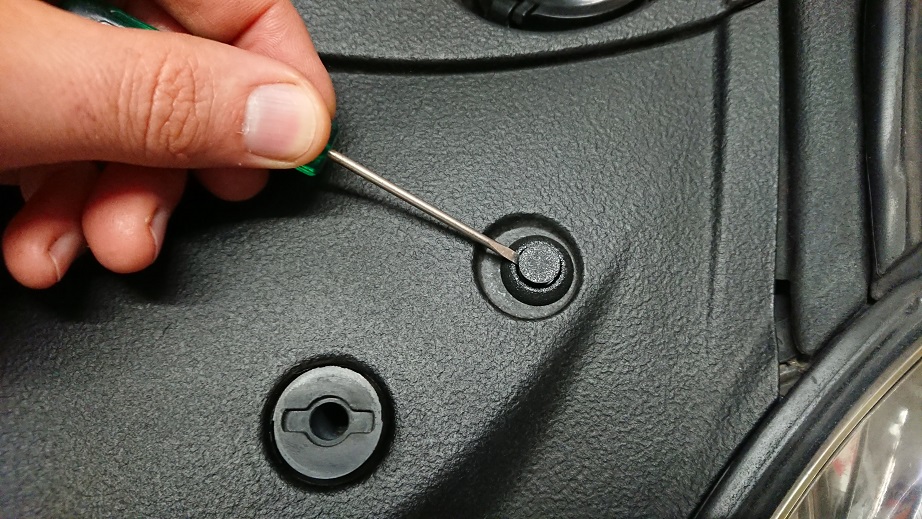
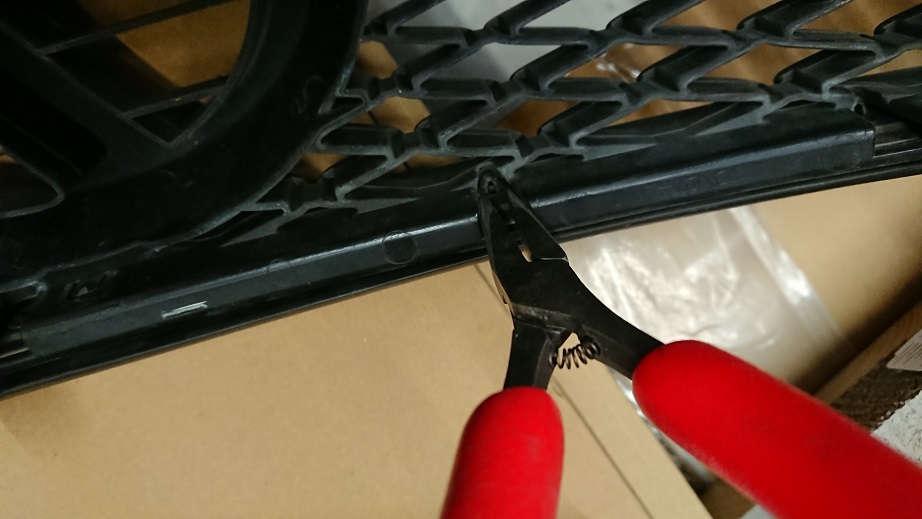
At this moment, the rubber weather strip/seal on top of the grille is the only thing preventing the grille from being taken out. Removing the strip also is the tricky part. It's held in place by 15 small plastic clips like this one:
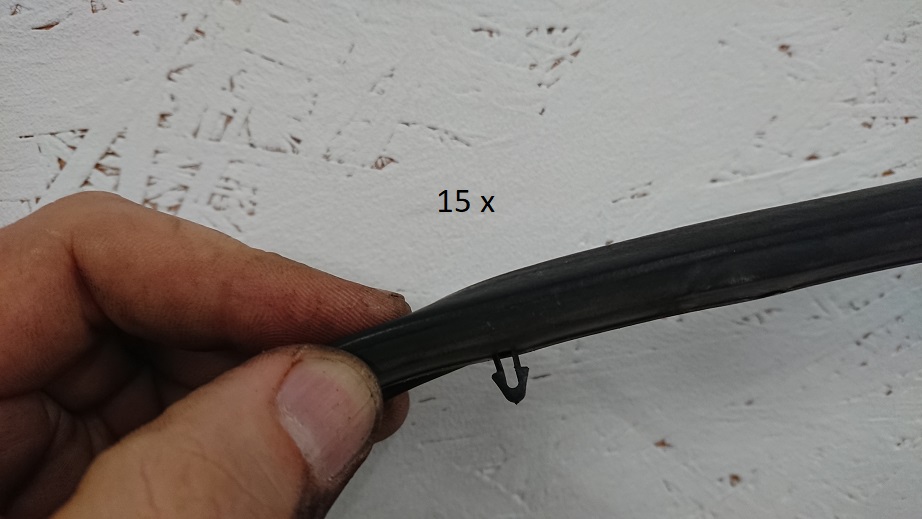
Of those 15, 6 are in the bumper (3 on each side) and 9 are in the grille. There are multiple ways to get them out. You can for instance use needle nose pliers to try and gently pry the clips loose, but I was most comfortable with leaving the strip attached to the grille. Whatever you do, take your time in order to prevent the clips from snapping!
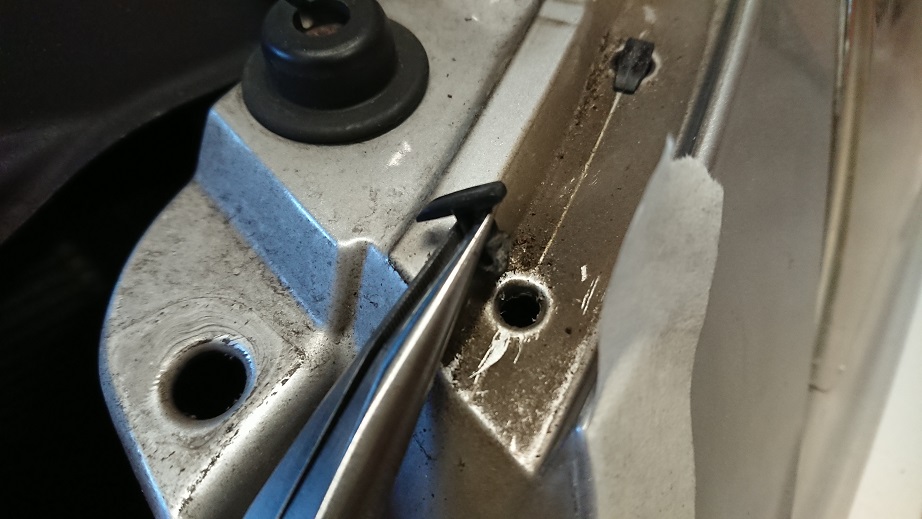
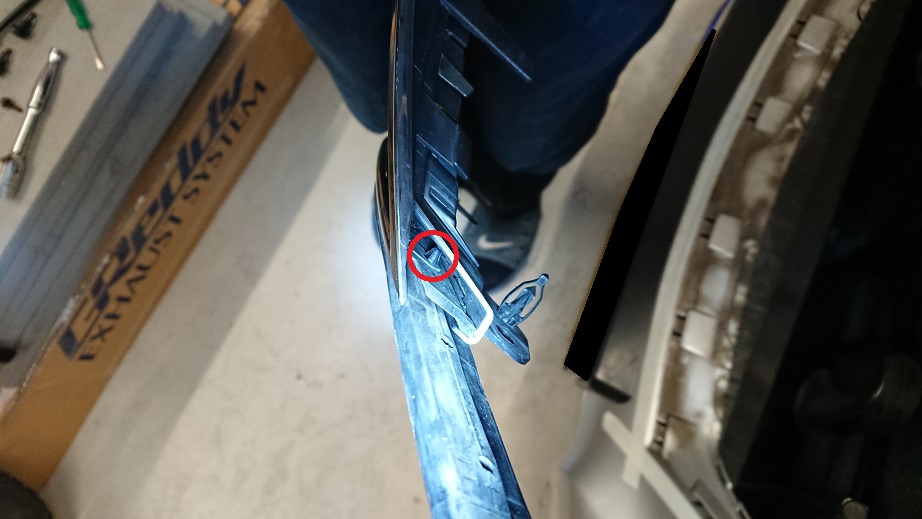
The weather strip has large slits/openings on the outer ends, allowing you to easily wiggle the 2 outer clips out with the small flathead screwdriver used earlier:
The 3rd and last clip in the bumper takes 5% more effort, but comes off the same way. Do this on both sides and the grille is ready to come out. Before actually taking the grille out, I recommend to put some masking tape on your bumper around the grille to prevent scratching your paint.
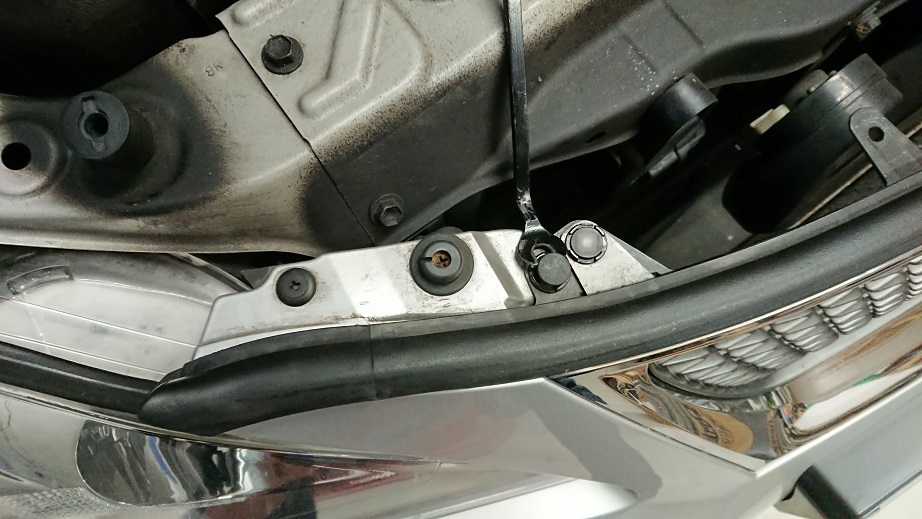
Now look behind the grille. You'll see the 7 snap-fit clips (3 on the bottom and 2 on each side of the grille) holding the chrome grille assy in the bumper. 3 of them are circled in red below. Gently pull them in/up, in order to wiggle/pull the grille out. Make sure you pull the grille forward and not upward, as some guide tabs may break.
If you want to split the grille assy: The mesh is attached to the chrome surround with multiple small snap-fit clips. Use a small flathead screwdriver to gently pry them off.
I now removed the left and right innermost remaining weather strip clips from the bumper with needle nose pliers, as the absence of the grille allows you to push them up with your fingers from underneath (reducing the risk of breaking them). I left the last 4 clips in the bumper as the slits in the weather strip allow for easy installation.
With the needle nose pliers and the grille off the car, you can quickly and easily take the strip off the grille in seconds. The center 7 clips are easily spotted:
While the outer clips are accessible from the sides of the grille (circled in red):
Before installing the new grille, you can use the opportunity to remove any built up dirt and clean everything normally out of reach:
Next, put the 2 weather strip clips taken off earlier, back into the strip (not the bumper). Install the strip on the new grille by pressing the clips into their holes and carefully put the grille in the bumper. Make sure you line up all snap-fit clips and guides and the grille assy should slide in place easily.
Although the outer 2 clips on both sides are accessible by the slits in the weather strip, I found it easiest to pull them upwards and push and shoehorn the strip back on with the small flathead screwdriver. Again; do what works best for you, but be gentle as they apparently snap off easily.
Finally, put the 2 large clips and 10 mm bolt back, reinstall the engne bay cover and 9 clips and you're done. Boom!

Remove the 9 clips holding the front engine bay cover circled in red:
With a small flathead screwdriver you can pop the center pin up. Then wiggle the entire clip out.
Remove the 2 clips circled in red and the 10 mm bolt circled in blue:
I find removing these clips easiest with a clip remover tool, but using two small flathead screwdrivers should work as well. The inner 2 clips keep the grille mesh and chrome surround together, so you can leave them in for now.
At this moment, the rubber weather strip/seal on top of the grille is the only thing preventing the grille from being taken out. Removing the strip also is the tricky part. It's held in place by 15 small plastic clips like this one:
Of those 15, 6 are in the bumper (3 on each side) and 9 are in the grille. There are multiple ways to get them out. You can for instance use needle nose pliers to try and gently pry the clips loose, but I was most comfortable with leaving the strip attached to the grille. Whatever you do, take your time in order to prevent the clips from snapping!
The weather strip has large slits/openings on the outer ends, allowing you to easily wiggle the 2 outer clips out with the small flathead screwdriver used earlier:
The 3rd and last clip in the bumper takes 5% more effort, but comes off the same way. Do this on both sides and the grille is ready to come out. Before actually taking the grille out, I recommend to put some masking tape on your bumper around the grille to prevent scratching your paint.
Now look behind the grille. You'll see the 7 snap-fit clips (3 on the bottom and 2 on each side of the grille) holding the chrome grille assy in the bumper. 3 of them are circled in red below. Gently pull them in/up, in order to wiggle/pull the grille out. Make sure you pull the grille forward and not upward, as some guide tabs may break.
If you want to split the grille assy: The mesh is attached to the chrome surround with multiple small snap-fit clips. Use a small flathead screwdriver to gently pry them off.
I now removed the left and right innermost remaining weather strip clips from the bumper with needle nose pliers, as the absence of the grille allows you to push them up with your fingers from underneath (reducing the risk of breaking them). I left the last 4 clips in the bumper as the slits in the weather strip allow for easy installation.
With the needle nose pliers and the grille off the car, you can quickly and easily take the strip off the grille in seconds. The center 7 clips are easily spotted:
While the outer clips are accessible from the sides of the grille (circled in red):
Before installing the new grille, you can use the opportunity to remove any built up dirt and clean everything normally out of reach:
Next, put the 2 weather strip clips taken off earlier, back into the strip (not the bumper). Install the strip on the new grille by pressing the clips into their holes and carefully put the grille in the bumper. Make sure you line up all snap-fit clips and guides and the grille assy should slide in place easily.
Although the outer 2 clips on both sides are accessible by the slits in the weather strip, I found it easiest to pull them upwards and push and shoehorn the strip back on with the small flathead screwdriver. Again; do what works best for you, but be gentle as they apparently snap off easily.
Finally, put the 2 large clips and 10 mm bolt back, reinstall the engne bay cover and 9 clips and you're done. Boom!
Last edited by Meurz; 04-14-19 at 05:00 PM.

The following 4 users liked this post by Meurz:

The following 4 users liked this post by McPierson:

Trending Topics
07-08-19, 03:14 PM
#8
Driver School Candidate
Thread Starter
 07-08-19, 04:42 PM
#9
Tech Info Resource

iTrader: (2)
Despite this fact, you'd be wise to buy spare clips before you remove anything. They really like to break even when you're trying to be careful. I bought a bag of 25 just for this reason.
04-21-22, 06:22 PM
#10

could you give me the link or the search statement for the bag of clips? Or are they nothing special?
04-21-22, 08:39 PM
#11
Here is one I bought and had success with:
04-27-22, 07:56 PM
#12
There are many generics for Fender Ledge Cover Clip - Lexus (90467-07211).
Here is one I bought and had success with:
https://www.amazon.com/gp/product/B07D148W4D/
Here is one I bought and had success with:
https://www.amazon.com/gp/product/B07D148W4D/
04-28-22, 06:39 AM
#13

Thread
Thread Starter
Forum
Replies
Last Post
maficrock
GS - 3rd Gen (2006-2011)
3
04-17-13 08:15 AM