


IJDMTOYS Rear LED Bumper Install


Thread Starter
Driver
Joined: Feb 2016
Posts: 132
Likes: 20
From: Saskatchewan
 IJDMTOY Rear LED Bumper Install
Thought I would post my results on the installation of these on my 2016 IS350 AWD (non f-sport)
To the guys at IJDMTOY feel free to use my pics to update your install instructions on your website 👍
First and foremost this can be a bit of a scary install for those not to comfy about ripping their car apart. Trust me though, it's not that difficult at all. The key is patience and to take your time.
First thing is to remove the six plastic clips along the bottom of the bumper
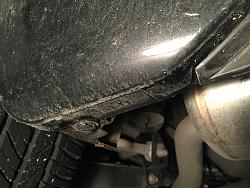
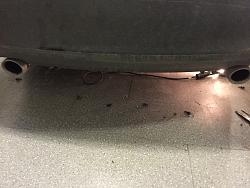
A flat head screw driver and needle nosed pliers is all you need to remove. Take your time removing these as they can/will break.
Please note, the MOST difficult part is removing the 10mm bolt from the inner wheel well. The bolt also has a Phillips screw driver head if you have trouble squeezing your ratchet in there.
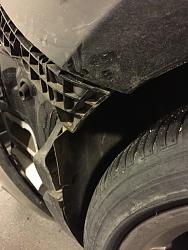
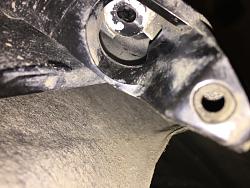
Now you don't need to remove the rear tire to get at it, as I didn't, but it would be way easier to get at that bolt if you do.
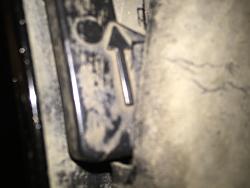
This is a pic of the passenger side wheel well. Notice the arrow, once you pull the inner liner to the side the bolt hole is to the right of that arrow.
Once you remove the inner wheel well bolts take a break and have a whiskey or a bowl. Whatever tickles your fancy because the hardest part of removing the rear bumper is over! Now it's all cake baby!!

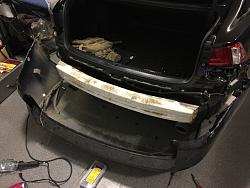
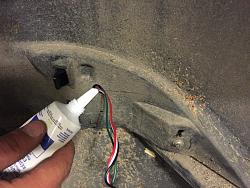
Next part is to remove the stock reflectors. You will need to drill a hole to run the wiring for the LED reflectors.
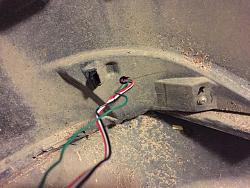
Once you run the wires I used a bit of weather proof Silicone to seal up the hole.
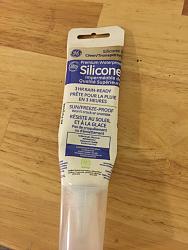
Next remove the rear tail lights to access the necessary wires to tap in to.
I found that you will need to have some extra wire to give you the proper length to install. I used some Cat 3 cable as it has 2 pairs of wires.
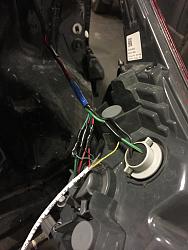
I also highly recommend using some quick connectors just in case you need to remove the bumper.
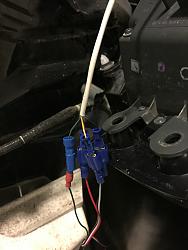
Follow the wiring guide available at IJDMTOY.
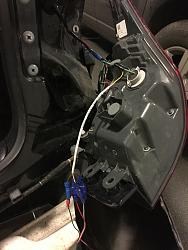
Before you go reattaching the bumper make sure to test the LED reflectors to ensure you have everything wired correctly.
If everything works reinstall the bumper in reverse order.
Once again the most difficult part is reinstalling the inner wheel well bolts. (I had another whiskey before doing it 👍)
As far as the LED lights go, they are fricken awesome!!!! I would highly recommend these! I've already had another IS owner flag me down asking where it got these bad boys. They look fantastic!!!
Good luck and feel free to contact me if you need a little help!
5 stars to IJDMTOY for this product!!
To the guys at IJDMTOY feel free to use my pics to update your install instructions on your website 👍
First and foremost this can be a bit of a scary install for those not to comfy about ripping their car apart. Trust me though, it's not that difficult at all. The key is patience and to take your time.
First thing is to remove the six plastic clips along the bottom of the bumper


A flat head screw driver and needle nosed pliers is all you need to remove. Take your time removing these as they can/will break.
Please note, the MOST difficult part is removing the 10mm bolt from the inner wheel well. The bolt also has a Phillips screw driver head if you have trouble squeezing your ratchet in there.


Now you don't need to remove the rear tire to get at it, as I didn't, but it would be way easier to get at that bolt if you do.

This is a pic of the passenger side wheel well. Notice the arrow, once you pull the inner liner to the side the bolt hole is to the right of that arrow.
Once you remove the inner wheel well bolts take a break and have a whiskey or a bowl. Whatever tickles your fancy because the hardest part of removing the rear bumper is over! Now it's all cake baby!!


Next part is to remove the stock reflectors. You will need to drill a hole to run the wiring for the LED reflectors.

Once you run the wires I used a bit of weather proof Silicone to seal up the hole.


Next remove the rear tail lights to access the necessary wires to tap in to.
I found that you will need to have some extra wire to give you the proper length to install. I used some Cat 3 cable as it has 2 pairs of wires.

I also highly recommend using some quick connectors just in case you need to remove the bumper.

Follow the wiring guide available at IJDMTOY.

Before you go reattaching the bumper make sure to test the LED reflectors to ensure you have everything wired correctly.
If everything works reinstall the bumper in reverse order.
Once again the most difficult part is reinstalling the inner wheel well bolts. (I had another whiskey before doing it 👍)
As far as the LED lights go, they are fricken awesome!!!! I would highly recommend these! I've already had another IS owner flag me down asking where it got these bad boys. They look fantastic!!!
Good luck and feel free to contact me if you need a little help!
5 stars to IJDMTOY for this product!!
Last edited by JWIS350; Oct 20, 2016 at 03:57 PM. Reason: My spelling sucks

Lexus Test Driver


Joined: Mar 2016
Posts: 9,531
Likes: 2,586
just figured it would be nice to get a pic of them turned on since you went thru all the trouble of taking all those pics and posting it. may help new members here if they are interested in modding and hearing/seeing this mod for the first time =)
Thread Starter
Driver
Joined: Feb 2016
Posts: 132
Likes: 20
From: Saskatchewan
Originally Posted by E46CT
just figured it would be nice to get a pic of them turned on since you went thru all the trouble of taking all those pics and posting it. may help new members here if they are interested in modding and hearing/seeing this mod for the first time =)

Last edited by JWIS350; Oct 20, 2016 at 03:15 PM.

Wow! That was pretty informative and very detailed with the bumper removal and everything. I liked how you left some feedback with every step, so that other owners can get a feel of the installation. I understand that sometimes it's hard to convey emotion in guides, especially from a company's install guide, so thank you for showing other drivers what it's like to install. (Like IKEA's installation is all pictures, no words lol)
And I also second E46CT, more pics! I would love to share them on our pages. And of course, credit will be given.
And I also second E46CT, more pics! I would love to share them on our pages. And of course, credit will be given.
Thread Starter
Driver
Joined: Feb 2016
Posts: 132
Likes: 20
From: Saskatchewan
Wow! That was pretty informative and very detailed with the bumper removal and everything. I liked how you left some feedback with every step, so that other owners can get a feel of the installation. I understand that sometimes it's hard to convey emotion in guides, especially from a company's install guide, so thank you for showing other drivers what it's like to install. (Like IKEA's installation is all pictures, no words lol)
And I also second E46CT, more pics! I would love to share them on our pages. And of course, credit will be given.
And I also second E46CT, more pics! I would love to share them on our pages. And of course, credit will be given.
Thank you for the compliments! Much appreciated. This was put together to add to the install instruction you have available. Please, feel free to use the images. I can email them to your directly if you need.
Agree with you and E46CT....I'll do up some more shots tonight. Everyone loves pics!
Oh, my apologies for adding the 'S' to the end of IJDMTOY....just noticed it now. Damn auto correct on the iPhone. LOL
Trending Topics
Hahaha, no doubt with those IKEA install instructions. Good thing I'm pretty good at putting Lego's together....its all pictures just like the cursed IKEA install sheets!
Thank you for the compliments! Much appreciated. This was put together to add to the install instruction you have available. Please, feel free to use the images. I can email them to your directly if you need.
Agree with you and E46CT....I'll do up some more shots tonight. Everyone loves pics!
Oh, my apologies for adding the 'S' to the end of IJDMTOY....just noticed it now. Damn auto correct on the iPhone. LOL
Thank you for the compliments! Much appreciated. This was put together to add to the install instruction you have available. Please, feel free to use the images. I can email them to your directly if you need.
Agree with you and E46CT....I'll do up some more shots tonight. Everyone loves pics!
Oh, my apologies for adding the 'S' to the end of IJDMTOY....just noticed it now. Damn auto correct on the iPhone. LOL


Intermediate
Joined: Oct 2015
Posts: 403
Likes: 46
From: Alberta
Cool... I was thinking about ordering a set to wire up as actual rear fog lights, since I got the OEM light stock with front and rear fog lights switches... I figure I might as well use them  Thanks for sharing
Thanks for sharing
Thread Starter
Driver
Joined: Feb 2016
Posts: 132
Likes: 20
From: Saskatchewan
UPDATED - Review 1 year after install - failing LEDs

3 LEDs on the bottom and 2 LEDs on the left side 2nd row from the bottom. This is with the brakes engaged.

3 bottom LEDs dead. Parking lights.

4 LEDs dead. Parking lights.

6+ LEDs dead here. With the brakes engaged. Middle top 3 LEDs flicker. (Pic doesn’t catch it)
First off I would like to say I love these bumper LED reflectors!!! Unfortunately, the quality of the LEDs used is not too good or the manufacturing process is weak.
I recently performed a walk around the vehicle and noticed some of the LEDs burnt out on the drivers side. As I proceeded around to the passenger side there were even more on that one that are dead!
Needless to say I am quite disappointed. There is no way LEDs should be failing after a year. I could maybe see one burning out but I have multiple LEDs failing/failed on both lenses. On the passenger side lense there is a group of 3 LEDs that flicker. Until the quality issues are resolved I would stay away from this light mod.
I have taken the time to remove the bumper AGAIN which you can see on the above install notes is a total PIA!! I double checked all of my wiring and connectors. Everything is as it was the day I installed them.
As I sit here and write this updated review I’m getting ready to remove them and put the stock lenses back in. With the number of LEDs dead it just looks trashy now.
Last edited by JWIS350; Apr 4, 2018 at 06:03 PM. Reason: Spelling


Advanced

Joined: Jun 2009
Posts: 643
Likes: 52
From: Alberta
Too bad they didn't last. That looked pretty awesome. FWIW, these lights are pretty cheap at $70 USD. Canadian Prairie winters are brutal. I have an interior LED bulb that refuses to work when it's -20°C or colder, but I've been too lazy to repalce it.
Does an OEM part for this exist? Would be interested in getting them if the quality was good.
Does an OEM part for this exist? Would be interested in getting them if the quality was good.
Thread Starter
Driver
Joined: Feb 2016
Posts: 132
Likes: 20
From: Saskatchewan
Originally Posted by computerwi
Too bad they didn't last. That looked pretty awesome. FWIW, these lights are pretty cheap at $70 USD. Canadian Prairie winters are brutal. I have an interior LED bulb that refuses to work when it's -20°C or colder, but I've been too lazy to repalce it.
Does an OEM part for this exist? Would be interested in getting them if the quality was good.
Does an OEM part for this exist? Would be interested in getting them if the quality was good.
If there was an OEM option I would have gone that route first. As another member posted, nothing beats OEM!


Intermediate
Joined: Mar 2017
Posts: 268
Likes: 32
From: CA
I've got these installed on my car as well for about a year now. I think I have like 5 or 6 of these diodes burnt or gone too. But considering they might just be the only option out there for now and the pricepoint i'm not going to really complain about it.