


Drilling backup camera
Hey All,
Trying to drill a hole for the backup camera into the center of the trunk inbetween the two license plate lights. However after disassembling the trunk lining, saw that theres another piece of metal that blocks the outer and inner trunk shells. Can't figure out how to remove it so that i can cleanly run the camera wires. Does anyone have any input in drilling a hole for the backup camera, tips, or suggestions? Thanks in advance!
This thread contains pictures of where i want the backup camera to be mounted (https://www.clublexus.com/forums/is-...up-camera.html). I don't have the OEM trunk w/. the backup camera holes
Have you consider this instead that mounts on the license plate light? some say it looks big though
https://www.clublexus.com/forums/is-...cturer-38.html
https://www.clublexus.com/forums/is-...cturer-38.html
Drilling a hole in an non nav trunk is more trouble than its worth. Me and Vroomin350 did it when we swapped trunks and it was a pain in the ***. This would probably hurt your resale value since you wont be able to cut the hole to OEM specs. I would advise against it.
Hm thanks for the suggestions.
Def will hurt resale value but im not too worried about that. The camera i'm trying to install is one of those where you need to drill a hole so it mounts nice and flush (Link: http://www.ebay.com/itm/150672622959...84.m1439.l2649)
I guess my biggest worry is running the wires through the outer to the inner trunk shells after drilling the hole. Will need to take a closer look tomorrow in the light to make sure its possible.

Rookie
Joined: Dec 2009
Posts: 59
Likes: 0
From: KS
Pull off the inner trunk liner on the deck lid. You can unbolt the inner taillamps. Then that piece that the license plate is on is not part of the sheet metal. It can be unbolted from the inside and removed. Then carefully center punch your drill point and drill. No sheet metal to go through. Depending on the depth of you camera, you'll need to take a ball peen hammer and lightly hammer the underlying sheet metal to accommodate the camera. Nobody but you will know that you have done this, it'll be COMPLETELY covered up. If you need pix of what the install looks like, PM me your phone # and I'll MMS you some.
Hey All,
Trying to drill a hole for the backup camera into the center of the trunk inbetween the two license plate lights. However after disassembling the trunk lining, saw that theres another piece of metal that blocks the outer and inner trunk shells. Can't figure out how to remove it so that i can cleanly run the camera wires. Does anyone have any input in drilling a hole for the backup camera, tips, or suggestions? Thanks in advance!
This thread contains pictures of where i want the backup camera to be mounted (https://www.clublexus.com/forums/is-...up-camera.html). I don't have the OEM trunk w/. the backup camera holes
Trying to drill a hole for the backup camera into the center of the trunk inbetween the two license plate lights. However after disassembling the trunk lining, saw that theres another piece of metal that blocks the outer and inner trunk shells. Can't figure out how to remove it so that i can cleanly run the camera wires. Does anyone have any input in drilling a hole for the backup camera, tips, or suggestions? Thanks in advance!
This thread contains pictures of where i want the backup camera to be mounted (https://www.clublexus.com/forums/is-...up-camera.html). I don't have the OEM trunk w/. the backup camera holes
Advanced
Joined: Nov 2011
Posts: 558
Likes: 10
From: 2015 GS350 San Antonio, TX
so we can all see them.
Pull off the inner trunk liner on the deck lid. You can unbolt the inner taillamps. Then that piece that the license plate is on is not part of the sheet metal. It can be unbolted from the inside and removed. Then carefully center punch your drill point and drill. No sheet metal to go through. Depending on the depth of you camera, you'll need to take a ball peen hammer and lightly hammer the underlying sheet metal to accommodate the camera. Nobody but you will know that you have done this, it'll be COMPLETELY covered up. If you need pix of what the install looks like, PM me your phone # and I'll MMS you some.
Pull off the inner trunk liner on the deck lid. You can unbolt the inner taillamps. Then that piece that the license plate is on is not part of the sheet metal. It can be unbolted from the inside and removed. Then carefully center punch your drill point and drill. No sheet metal to go through. Depending on the depth of you camera, you'll need to take a ball peen hammer and lightly hammer the underlying sheet metal to accommodate the camera. Nobody but you will know that you have done this, it'll be COMPLETELY covered up. If you need pix of what the install looks like, PM me your phone # and I'll MMS you some.
For all those that are curious on the progress, i took some pictures and will throw together a DIY in the coming week. Theres also a DIY on installing a seibon trunk into the isX50 that is very helpful with the process.
Thanks again CL!
Trending Topics
For now hopefully this picture helps others. It shows how the outer trunk shell is held in place. After you remove the taillights, key lock, open/close button, you are ready to remove the outer trunk shell.
First you'll have to remove the two nuts circled in green. It is situated near the inner nuts that holds the tailight to the trunk. After that is done, you simply have to pry the outer trunk shell off. Apply pressure to where the clips are, circled in red. I used a long screw driver wrapped in a cloth for leverage. Basically stick the screwdriver between the inner and outer trunk pieces, and pry outwards.
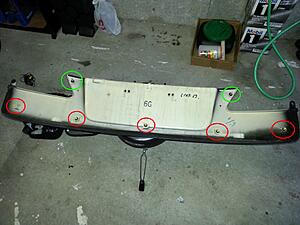
Hope this helps. Feel free to ask any questions.
Last edited by pmanliu; Nov 18, 2012 at 02:46 PM.
ClubLexus Stories
Celebrating Lexus & Toyota from Around the Globe

10 Lexus Bargains That are Cheaper Than a New Toyota RAV4
Joe Kucinski
8 Weirdest Things Lexus Has Ever Built
Verdad Gallardo
10 Lexus Designs That Have Aged Like Fine Wine
Verdad Gallardo
8 Tips for Improving Your Hybrid or Plug-in Hybrid's Efficiency!
Michael S. Palmer
10 Best Lexus Models No One Remembers
Joe Kucinski
TRD Off-Road Premium: Best 2026 4Runner, Except This One Thing
Michael S. Palmer
Top 10 Lexus & Toyotas to Drive Before You Die!
Joe Kucinski
Top 10 Lexus/Toyotas With The LEAST 5-Year Depreciation
Joe Kucinski
Lexus LC500 Convertible Auction: A Preview of Rising Values?
Brett Foote
Rookie
Joined: Dec 2009
Posts: 59
Likes: 0
From: KS
For now hopefully this picture helps others. It shows how the outer trunk shell is held in place. After you remove the taillights, key lock, open/close button, you are ready to remove the outer trunk shell.
First you'll have to remove the two nuts circled in green. It is situated near the inner nuts that holds the tailight to the trunk. After that is done, you simply have to pry the outer trunk shell off. Apply pressure to where the clips are, circled in red. I used a long screw driver wrapped in a cloth for leverage. Basically stick the screwdriver between the inner and outer trunk pieces, and pry outwards.
Hope this helps. Feel free to ask any questions.

Driver School Candidate
Joined: Oct 2014
Posts: 11
Likes: 0
From: AZ
For now hopefully this picture helps others. It shows how the outer trunk shell is held in place. After you remove the taillights, key lock, open/close button, you are ready to remove the outer trunk shell.
First you'll have to remove the two nuts circled in green. It is situated near the inner nuts that holds the tailight to the trunk. After that is done, you simply have to pry the outer trunk shell off. Apply pressure to where the clips are, circled in red. I used a long screw driver wrapped in a cloth for leverage. Basically stick the screwdriver between the inner and outer trunk pieces, and pry outwards.

Hope this helps. Feel free to ask any questions.
First you'll have to remove the two nuts circled in green. It is situated near the inner nuts that holds the tailight to the trunk. After that is done, you simply have to pry the outer trunk shell off. Apply pressure to where the clips are, circled in red. I used a long screw driver wrapped in a cloth for leverage. Basically stick the screwdriver between the inner and outer trunk pieces, and pry outwards.
Hope this helps. Feel free to ask any questions.
Intermediate


Joined: Dec 2013
Posts: 359
Likes: 20
From: Ontario

2nd gear
Joined: Sep 2023
Posts: 2
Likes: 0
From: California
Im thinking about doing this conversion and it seems that the only thing I should be worried about is drilling the hole? I�m js wondering if I�ll be able to connect the oem camera to the harness even tho I have the non back up camera trunk or do I need to do wiring myself?
Im thinking about doing this conversion and it seems that the only thing I should be worried about is drilling the hole? I�m js wondering if I�ll be able to connect the oem camera to the harness even tho I have the non back up camera trunk or do I need to do wiring myself?

Thread
Thread Starter
Forum
Replies
Last Post
igoro
IS - 2nd Gen (2006-2013)
2
Dec 28, 2018 01:47 PM
mangomike
RX - 3rd Gen (2010-2015)
1
Oct 17, 2015 07:07 AM