
IS250 Spark Plug DIY (half arsed) Basic necessity
 05-07-12, 09:25 AM
#61
VALVE SUB-ASSEMBLY, VENTILATION (RWD - REAR WHEEL DRIVE) (MTM - MANUAL TRANSMISSION)
Part #: 1220431040 (In Stock)
 06-06-12, 12:34 PM
#62
Driver School Candidate

Thanks a lot for the DIY guide. It turns out that my saving would be higher if I do it myself.
Here in Annapolis, MD, the local dealer quoted me $686.80 for spark plugs replacement! Parts $214.20 and Labor $472.60.
So far, I spent $120 for the plugs from Sewell, plus $20 for the gaskets, $20 more for tools, and if I pay myself $50/h, for approximate 3 hours, my own total would be around $300. So I have almost $400 in savings.
Thanks again,
Don
Here in Annapolis, MD, the local dealer quoted me $686.80
for spark plugs replacement! Parts $214.20 and Labor $472.60.So far, I spent $120 for the plugs from Sewell, plus $20 for the gaskets, $20 more for tools, and if I pay myself $50/h, for approximate 3 hours, my own total would be around $300. So I have almost $400 in savings.
Thanks again,
Don
06-22-12, 03:11 PM
#63
Driver School Candidate

Join Date: Feb 2012
Posts: 11
Likes: 0
Received 0 Likes
on
0 Posts
Jeff, I'm going to be doing this maintenance to my car soon and while looking through the parts I noticed that the PVC valve is also accessible once the Intake manifold is removed. I looked it up and the part is $4.00. Do you think it's worth it?

 05-13-13, 10:31 AM
#67
Driver School Candidate

Join Date: May 2011
Location: CA
Posts: 9
Likes: 0
Received 0 Likes
on
0 Posts
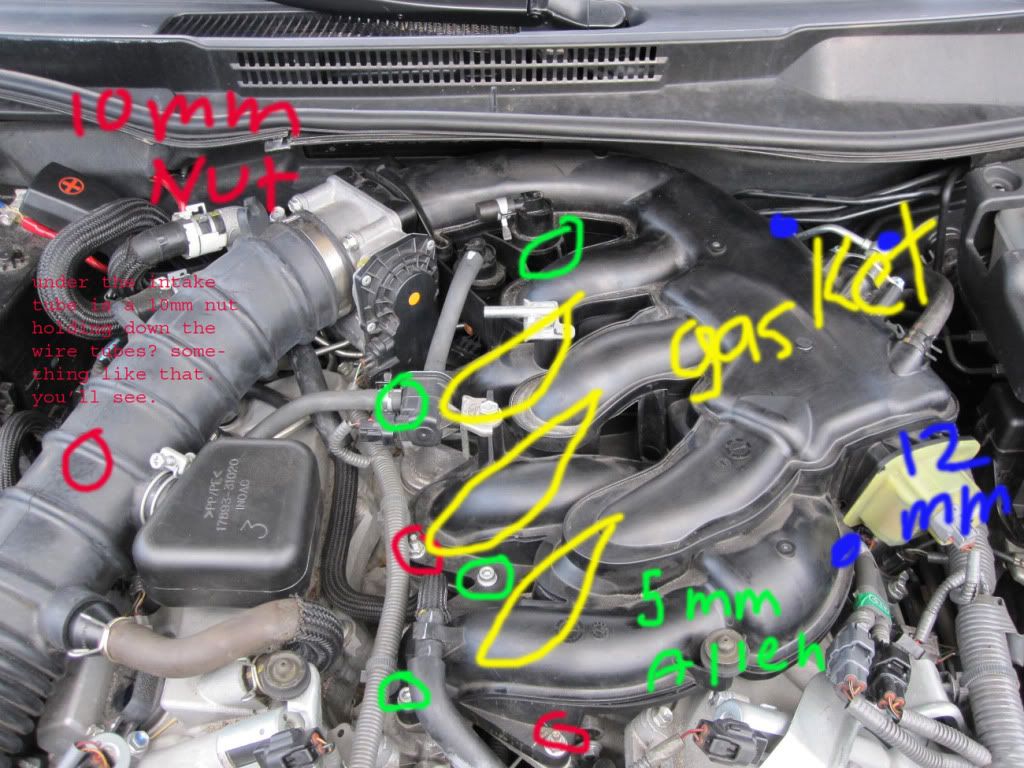
So I left the Camera at home and I didn't get to do the DIY for you guys. I'm just trying to break it down to show you how easy it is.
I guess this would be a more advanced DIY since I'm not really showing you what I did. but it's basic common sense right in front of your eyes.
I bought the newly released NGK spark plugs to replace the OEM factory Denso spark plugs.
Tools:
10mm Socket-----RED
12mm Socket-----BLUE
12mm Wrench-----BLUE
5mm Allen Key-----GREEN
Intake Mani. Gaskets (3 Pairs)-----YELLOW
Extension
Spark Plug Socket or 16mm Socket
I've marked the pictures with certain colors as to what tool you will use.
Pic 1
Pic 2
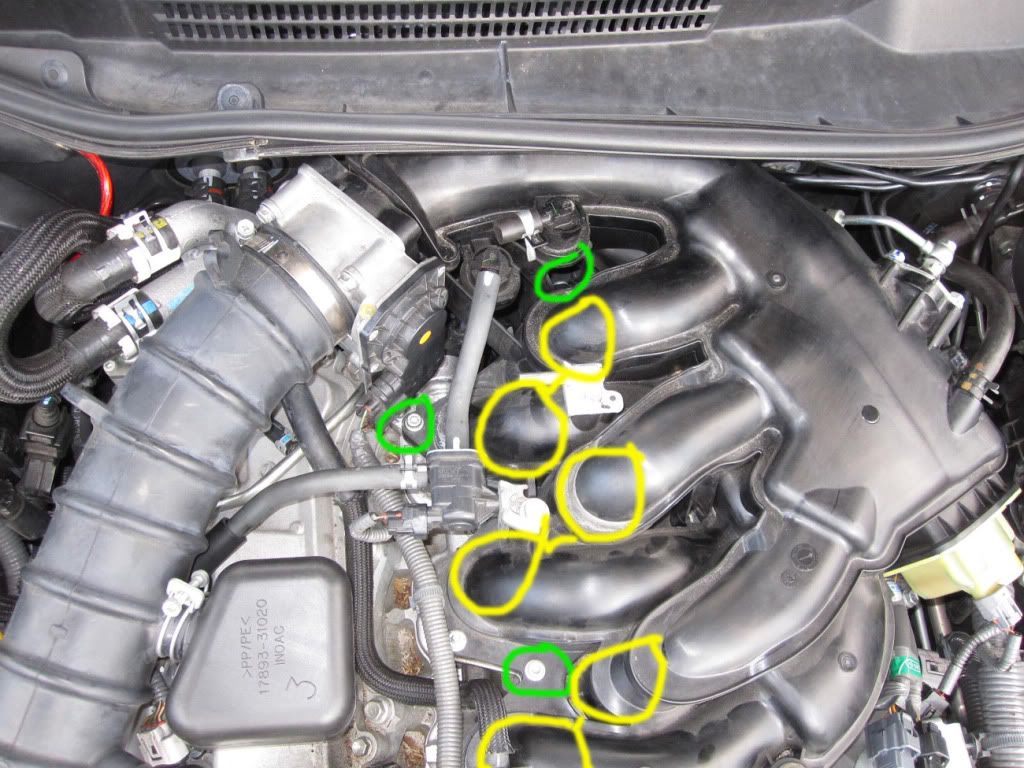
Pic 3 - All you have to do is remove the Intake for the left side spark plugs.

Pic 4
Pic 5

after you remove that there should be connectors attached to the spark plug tubes. remove those. each tube has a 10mm bolt holding it down. remove that. then use your extension and spark plug socket to remove your spark plugs.
hope this helps!
sorry in pic 5 it says look at pic 4 for reference but it's actually pic number 1. pic 4 was the file name :X
Heres the Link to the NGK spark plugs thread.
https://www.clublexus.com/forums/is-...ailable-3.html
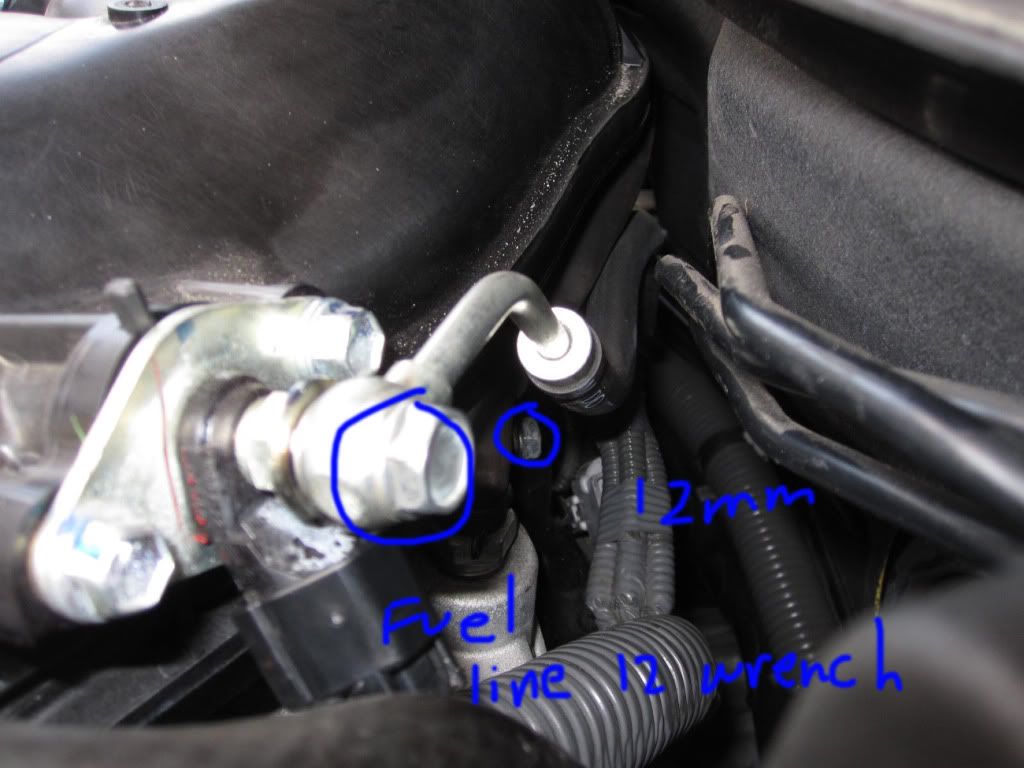
this took me about an hour and a half cause I didn't really know what to do at all. and that 12mm bolt behind the manifold is a BEEEECH
I have about 67k miles on my car. My OEM stock Denso plugs were still pretty good. so those who debate on changing them at 60k or 100k.. they will last till a 100k np IMO. I just like to change stuff out early to make the car last just like how I change my oil every 3k with synthetic when it's not necessary and can last till 5k. lol
I guess this would be a more advanced DIY since I'm not really showing you what I did. but it's basic common sense right in front of your eyes.
I bought the newly released NGK spark plugs to replace the OEM factory Denso spark plugs.
Tools:
10mm Socket-----RED
12mm Socket-----BLUE
12mm Wrench-----BLUE
5mm Allen Key-----GREEN
Intake Mani. Gaskets (3 Pairs)-----YELLOW
Extension
Spark Plug Socket or 16mm Socket
I've marked the pictures with certain colors as to what tool you will use.
Pic 1
Pic 2
Pic 3 - All you have to do is remove the Intake for the left side spark plugs.
Pic 4
Pic 5
after you remove that there should be connectors attached to the spark plug tubes. remove those. each tube has a 10mm bolt holding it down. remove that. then use your extension and spark plug socket to remove your spark plugs.
hope this helps!
sorry in pic 5 it says look at pic 4 for reference but it's actually pic number 1. pic 4 was the file name :X
Heres the Link to the NGK spark plugs thread.
https://www.clublexus.com/forums/is-...ailable-3.html
this took me about an hour and a half cause I didn't really know what to do at all. and that 12mm bolt behind the manifold is a BEEEECH
I have about 67k miles on my car. My OEM stock Denso plugs were still pretty good. so those who debate on changing them at 60k or 100k.. they will last till a 100k np IMO. I just like to change stuff out early to make the car last
just like how I change my oil every 3k with synthetic when it's not necessary and can last till 5k. lolCan anyone verify the correct part and part number. I looked it up at Sewell and they have it listed as "Air Surge Tank to Manifold" #17176. Is this correct?
07-09-13, 10:42 AM
#68
Driver School Candidate

Lexus recommend changing the gasket; they also recommend changing the gasket between the throttle body and the air surge tank.
Just a question to anyone that's done this. How did you get the Allen screw at the back of the manifold out (the one next to the VSV purge line). It's down a deep, narrow tunnel, and I can't get a socket down the tunnel.
Also, did anyone have any problems with seized bolts. All my Allen screws were seized solid, and I broke the head on one (the middle one down the shallow hole) trying to release it; so I've put half the plugs on hold, until I can work out :
a) How to undo the rear Allen bolt down the deep hole.
b) How to get the broken Allen bolt out of its hole
c) How to get the bolts that stay the rear of the manifold back in. They must have been under a lot of tension, because the holes in the stays don't line up with the holes in the "manifold", so I can't get them back in.
07-26-13, 03:42 PM
#69
Driver School Candidate
OK. I dug myself out of my hole, and changed the rest of the plugs.
Just to add to the good write up, I would like to add my comments:
Tools required (or at least strongly recommended)
1. Ratchet wrench with 10mm hex, 12mm hex and 5mm Allen bits (preferably 1/4", but 3/8" will be OK)
2. Extension bar for wrench (6" minimum, 6" and 3" bars available strongly recommended)
3. Torque wrench for plugs capable of 25 Nm (18 lb-ft). Usually means 3/8" with suitable extension bar and 16mm spark plug socket.
4. Flexhead 10mm ratchet combi wrench (for access to bolt behind throttle body). Access is too tight for a normal socket wrench, without removing the wiper cowling (which means also removing the windshield cowls, which are held with non-reusable clips)
Other materials recommended
1. Carb cleaner, throttle body cleaner or some other cleaning solvent. Once the air surge tank comes off the manifold, you'll find loads of crap and oil. Clean this off before reinstalling the surge tank to avoid fouling the gaskets.
2. Anti-seize compound. Use this for the bolts holding the surge tank to the manifold to avoid seizure. You may also wish to clean the threaded holes in the manifold casting with an M6 plug tap to remove oxide and corrosion before reinstalling the bolts.
Spare bolts (in case you drop some)
1. The bolts holding the surge tank to the manifold are M6x30 mm standard metric zinc plated Cap head machine screws.
2. The big bolts holding the surge tank to the stays are M8x20 mm standard metric zinc plated with washers. (Important note: Standard metric M8 bolts have 13mm heads. Japan industrial standard M8 bolts have 12 mm heads. Standard metric will fit, but you will need a different wrench)
3. The bolt holding the surge tank to the coolant hose stay is an M6x20 metric zinc plated bolt with washer.
4. If you lose one of the bolts holding the throttle body on, well you're probably hosed, because they look pretty specific to the part.
Other hints and tips
On my RHD IS250, access to the rear of surge tank stay bolt was greatly improved by removing the battery, which is on the car's left (right of engine bay as viewed from front). On LHD, I'm guessing the brake servo is in there, in which case, good luck!
 08-12-13, 02:13 PM
#72
Driver School Candidate
Once the epoxy hardened, I used a ratchet on the socket to remove the bolt.
Alternatively, use a broken bolt removal tool like http://buy1.snapon.com/catalog/item....e=&dir=catalog with a suitable impact driver.
08-15-13, 08:23 PM
#73
I broke the allen key in mine. I got the bolt out by sacrificing a 3/8" socket; I filled it with epoxy putty, then hammered the socket onto the Allen bolt (it's a very tight fit).
Once the epoxy hardened, I used a ratchet on the socket to remove the bolt.
Alternatively, use a broken bolt removal tool like http://buy1.snapon.com/catalog/item....e=&dir=catalog with a suitable impact driver.
Once the epoxy hardened, I used a ratchet on the socket to remove the bolt.
Alternatively, use a broken bolt removal tool like http://buy1.snapon.com/catalog/item....e=&dir=catalog with a suitable impact driver.
09-02-13, 04:49 PM
#74
Driver School Candidate

Join Date: Jul 2011
Location: IN
Posts: 2
Likes: 0
Received 0 Likes
on
0 Posts
Great post! I am planning to follow it and do it with another friend next weekend. I already bought the spark plug. What's this "Intake Mani. Gaskets (3 Pairs)-----YELLOW"? What's the parts for?
Thanks a lot for sharing!
Mike
Thanks a lot for sharing!
Mike
