
HowTo: Hardwired Valentine 1 or other radar detectors (merged threads-read full post)
 07-27-06, 07:46 PM
#61

New owner, picked up the IS350 yesterday. V1 went in today. If you're patient, you can strip the red and green and sandwich them into the plastic connector in the correct locations (orange and blue pins) snap it all back together and it will work fine. No soldering, no cutting, no splicing, no taps, and when it's time to remove it simply unplug the white connector, remove your cable and it factory again. I did this on my previous M5, and my current 06 4 Runner with no problems.
 07-27-06, 09:34 PM
#62
Lexus Test Driver
iTrader: (2)
Join Date: Mar 2006
Location: CA
Posts: 909
Likes: 0
Received 0 Likes
on
0 Posts
Originally Posted by crazyboi
has anyone ever thought about a real customization mod?
placing one unit behind the front grill, and having another unit somewhere in the back.
2 units because one unit is needed to be up near the mirror so that it can detect front and rear.
if we have 2 you could conseal it more.
then have it run to your center console, where you can put 2 remotes.
making it look professional. but could it work like that?
idk , just something i was thinking about..
09-01-06, 08:57 PM
#65
Driver School Candidate

Join Date: May 2006
Location: nj
Posts: 15
Likes: 0
Received 0 Likes
on
0 Posts
10-19-06, 02:00 PM
#66
Pole Position
Join Date: Sep 2006
Location: Oklahoma
Posts: 288
Likes: 0
Received 0 Likes
on
0 Posts
Finally took the V1 out of my windshield and installed it up and overhead using the Direct-Wire Power Adapter Kit (item #20305 and item #00030 available seperately at an additional cost).
Took me about an hour I'm hardly the electrician. Anyway the hardest part was finding the fuse box which is way underneath on the driver's side and connecting and the fuses are really tiny. Fuses are easy to pull with needle-nose plyers. I used the red 15A (seat heaters and ventilators) fuse which is fuse #13, it is hot only when the ignition is on and it is not hot when you turn off the ignition. If you're not trying to start the vehicle and you push the button once, this fuse is not hot; push it a second time and it's hot...accessory. Works for me!
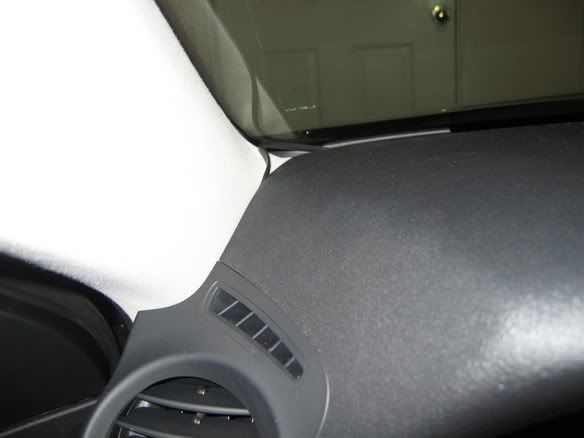
Anyway, since the fuse is so tiny you'll need a thin wire to insert and I still couldn't push the fuse back in all the way. Also I used the screw that holds the fuse box down as the ground. The easy part was pushing in the cabling into the cracks and hiding the cable in the headliner. Here's a pic before I completed from the V1 left across the top of the windshield under the headliner, all the way down the pillar (careful there's an airbag there) to the bottom of the windshield, and then come back about six inches and down:
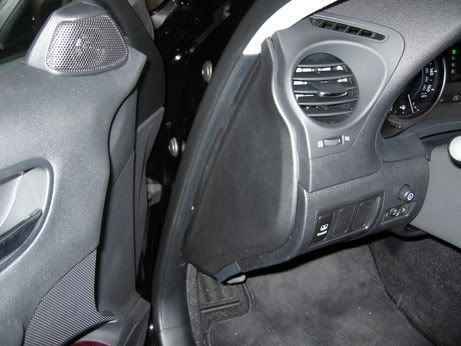
You could remove this panel to help with the wiring, the triangle wedge that you have to open the door to pop-off; use a coat hanger to help guide the cable:
Finally, the V1 is mounted low enough to still see the road ahead but beneath the top layer of the windshield:
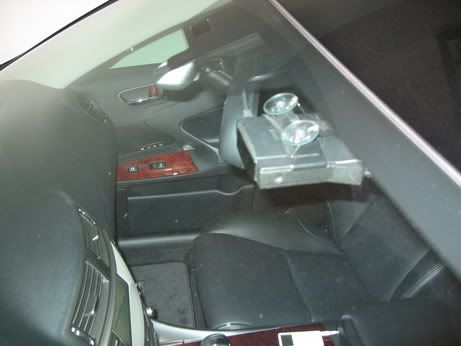
Positioned just right in the cabin, not too close to your head in case of accident (don't want Valentine permanently imprinted on your forehead), not at such an angle that you have to take your eyes off the road:
Edit: I used this particular fuse box area for power because it is switched. When you turn off the ignition, the V1 will power off by itself. When you start the car, the V1 will power on. No need to manipute the V1 power button. I have been unable to determine if any other fuse areas of the vehicle exhibit this behavior.
Took me about an hour I'm hardly the electrician.
Anyway the hardest part was finding the fuse box which is way underneath on the driver's side and connecting and the fuses are really tiny. Fuses are easy to pull with needle-nose plyers. I used the red 15A (seat heaters and ventilators) fuse which is fuse #13, it is hot only when the ignition is on and it is not hot when you turn off the ignition. If you're not trying to start the vehicle and you push the button once, this fuse is not hot; push it a second time and it's hot...accessory. Works for me!Anyway, since the fuse is so tiny you'll need a thin wire to insert and I still couldn't push the fuse back in all the way. Also I used the screw that holds the fuse box down as the ground. The easy part was pushing in the cabling into the cracks and hiding the cable in the headliner. Here's a pic before I completed from the V1 left across the top of the windshield under the headliner, all the way down the pillar (careful there's an airbag there) to the bottom of the windshield, and then come back about six inches and down:
You could remove this panel to help with the wiring, the triangle wedge that you have to open the door to pop-off; use a coat hanger to help guide the cable:
Finally, the V1 is mounted low enough to still see the road ahead but beneath the top layer of the windshield:
Positioned just right in the cabin, not too close to your head in case of accident (don't want Valentine permanently imprinted on your forehead), not at such an angle that you have to take your eyes off the road:
Edit: I used this particular fuse box area for power because it is switched. When you turn off the ignition, the V1 will power off by itself. When you start the car, the V1 will power on. No need to manipute the V1 power button. I have been unable to determine if any other fuse areas of the vehicle exhibit this behavior.
 11-04-06, 10:09 AM
#67
Driver School Candidate

Join Date: Dec 2005
Location: CA
Posts: 27
Likes: 0
Received 0 Likes
on
0 Posts
FYI...
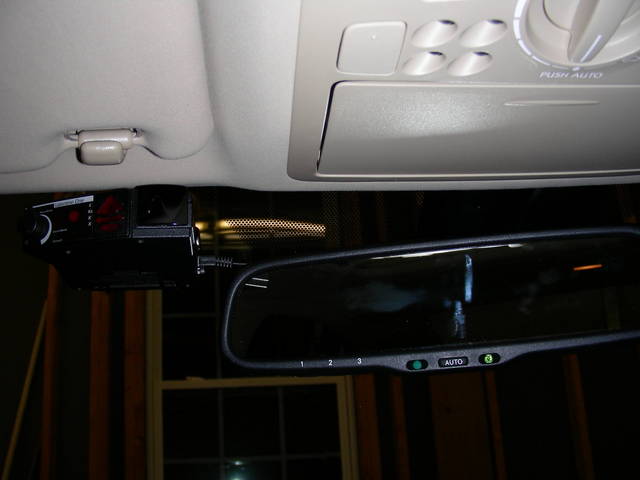
I used TexLux's method for the most part. Instead of stripping & soldering the wires, I used some crimp male pins and pushed those into the molex connector. This was very simple to install and does not alter any factory wires/harnesses.
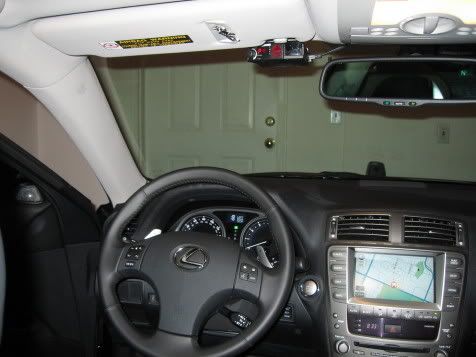
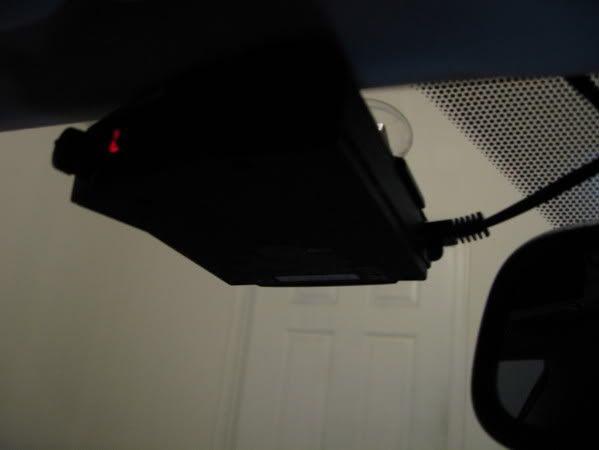
Also, I made a mirror mount for the V1. (This is more or less my prototype, so I hope to have something a little better in the near future.)
Let me know what you think about the position? I like it as you don't have to take your eyes away too much from a common spot (rear view mirror).

I used TexLux's method for the most part. Instead of stripping & soldering the wires, I used some crimp male pins and pushed those into the molex connector. This was very simple to install and does not alter any factory wires/harnesses.
Also, I made a mirror mount for the V1. (This is more or less my prototype, so I hope to have something a little better in the near future.)
Let me know what you think about the position? I like it as you don't have to take your eyes away too much from a common spot (rear view mirror).
 11-12-06, 03:37 PM
#69
Driver

Join Date: Nov 2005
Location: Dallas, Texas
Posts: 194
Likes: 0
Received 0 Likes
on
0 Posts
There is no need to remove the overhead J/B and risk breaking
the plastic clips or introducing rattles. The ignition power is
also available going to the rear view mirror.
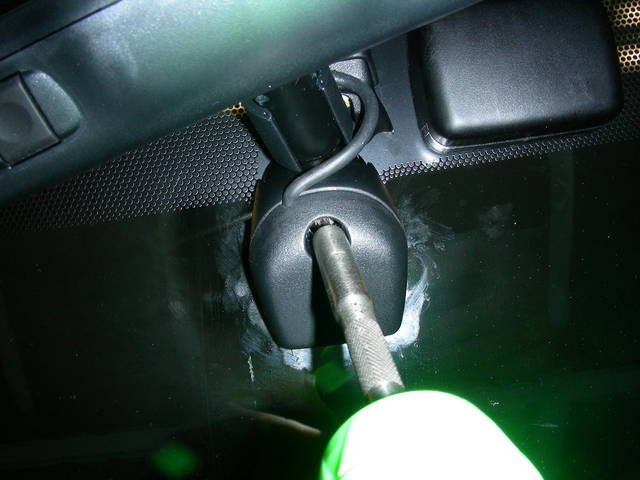
The rear view mirror is easily removed by loosening the T-20
torx screw securing it to the metal shoe glued to the windshield.
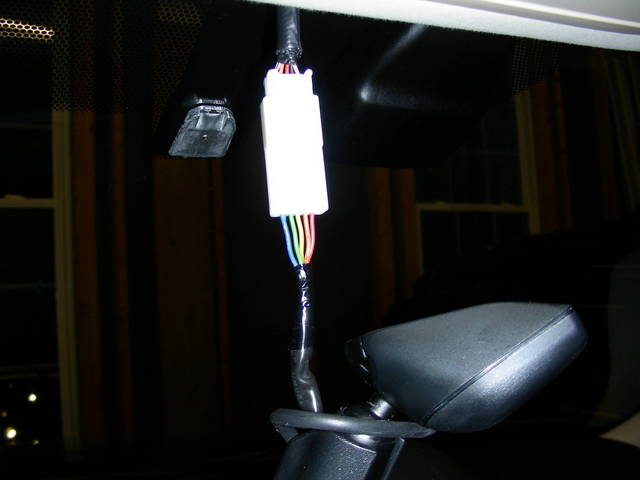
Lift up on the mirror and it will just lift off. There will be a connector
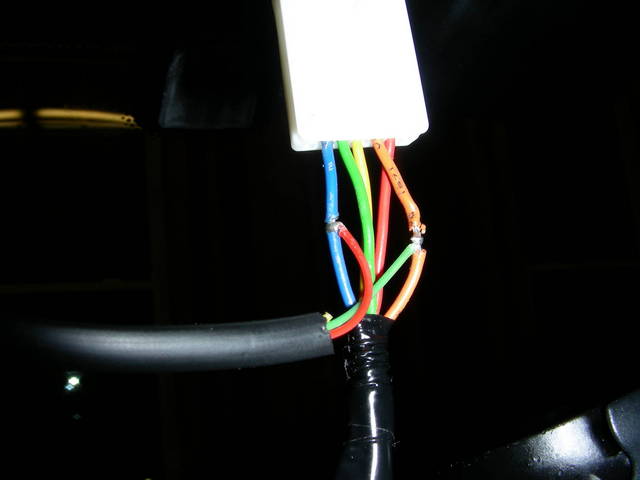
revealed behind the wire cover. The blue wire going to the mirror
is the negative and the orange wire is the positive ignition switched
wire. Carefully strip a small section of the mirror wires and
then wrap your Valentine One power wires around it. Soldering
the connection is recommended for a good reliable connection.
To finish the job, wrap each wire that you attached to with a
piece of electrical tape.
This is a real easy installation. You don't even have to worry about
getting the wires connected backwards because the Valentine
One unit is built to withstand reverse polarity in case of a misswire.

the plastic clips or introducing rattles. The ignition power is
also available going to the rear view mirror.
The rear view mirror is easily removed by loosening the T-20
torx screw securing it to the metal shoe glued to the windshield.
Lift up on the mirror and it will just lift off. There will be a connector
revealed behind the wire cover. The blue wire going to the mirror
is the negative and the orange wire is the positive ignition switched
wire. Carefully strip a small section of the mirror wires and
then wrap your Valentine One power wires around it. Soldering
the connection is recommended for a good reliable connection.
To finish the job, wrap each wire that you attached to with a
piece of electrical tape.
This is a real easy installation. You don't even have to worry about
getting the wires connected backwards because the Valentine
One unit is built to withstand reverse polarity in case of a misswire.
01-21-07, 05:18 PM
#70
Driver School Candidate

Join Date: Aug 2006
Location: TX
Posts: 9
Likes: 0
Received 0 Likes
on
0 Posts
Same technique used by using the mirror to the radar. Instead of cutting up my coiled power supply, i used a black standard telephone cord. Snipped the wires and plugged the red to orange and green to blue. Reversed did not power up. I guess the 795 is polarity sensitive.
02-10-07, 05:17 PM
#71
Driver School Candidate

Join Date: Dec 2006
Location: NY
Posts: 5
Likes: 0
Received 0 Likes
on
0 Posts
Hardwired the V1 today through the mirror (red to orange, green to blue). My first time soldering wires so instead of worrying about getting any on the interior, I just disconnected the wires. Pretty easy though if you take your time.
02-12-07, 04:40 PM
#72
Driver

Join Date: Feb 2007
Location: GA
Posts: 137
Likes: 0
Received 0 Likes
on
0 Posts
Has anyone hardwired the V1 with the remote concealed display?
In the next 4-6 weeks I'll be in the market for a IS350, and in the VW I use the remote display mounted at the inside top of the instrument cluster in front of the speedo & tach.
In the next 4-6 weeks I'll be in the market for a IS350, and in the VW I use the remote display mounted at the inside top of the instrument cluster in front of the speedo & tach.
02-14-07, 09:07 AM
#73
FYI...
I used TexLux's method for the most part. Instead of stripping & soldering the wires, I used some crimp male pins and pushed those into the molex connector. This was very simple to install and does not alter any factory wires/harnesses.
Also, I made a mirror mount for the V1. (This is more or less my prototype, so I hope to have something a little better in the near future.)
Let me know what you think about the position? I like it as you don't have to take your eyes away too much from a common spot (rear view mirror).
