
Driver
Here are notes about my recent radiator replacement.
It seems there was a design change since this no longer seems to be the case (unless I'm looking at the wrong thing)
"The overflow hose connector is on the other side of the filler neck."
http://mypageaboutrandomstuff.blogsp...placement.html
It seems there was a design change since this no longer seems to be the case (unless I'm looking at the wrong thing)
"The overflow hose connector is on the other side of the filler neck."
http://mypageaboutrandomstuff.blogsp...placement.html


Driver School Candidate
Quote:
It seems there was a design change since this no longer seems to be the case (unless I'm looking at the wrong thing)
"The overflow hose connector is on the other side of the filler neck."
http://mypageaboutrandomstuff.blogsp...placement.html
Thanks for the comparison pics. Looks like yours cracked in the same place as mine.Originally Posted by tomv
Here are notes about my recent radiator replacement.It seems there was a design change since this no longer seems to be the case (unless I'm looking at the wrong thing)
"The overflow hose connector is on the other side of the filler neck."
http://mypageaboutrandomstuff.blogsp...placement.html
Did you just replace the radiator, or did you do hoses and thermostat at the same time? What brand did you end up buying? Rock Auto has several brands, and prices vary pretty widely, and I probably need to get moving on this.


Driver
Quote:
Did you just replace the radiator, or did you do hoses and thermostat at the same time? What brand did you end up buying? Rock Auto has several brands, and prices vary pretty widely, and I probably need to get moving on this.
I just replaced the radiator, cap, and new fluid.Originally Posted by davintosh
Thanks for the comparison pics. Looks like yours cracked in the same place as mine.Did you just replace the radiator, or did you do hoses and thermostat at the same time? What brand did you end up buying? Rock Auto has several brands, and prices vary pretty widely, and I probably need to get moving on this.
I went with the Denso.
I've documented most of the removal here http://mypageaboutrandomstuff.blogsp...placement.html
- Radiator: Denso 2213144.. $80 from RockAuto https://www.rockauto.com/en/moreinfo...441484&jsn=365
- Radiator Cap: CARQUEST Radiator Cap Part No 10241... $8 at Advance Auto
- Coolant: Just over 2 gallons of ZEREX Asian Vehicle Red Ready-to-Use Antifreeze Coolant.. $13 each from Advance Auto
Driver School Candidate
Many thanks for that! I saw the Denso label once I got on my computer instead of the phone. And the photos on your blog are most helpful as well!
I got the parts ordered, and the coolant from Advance Auto; nice $8.00 discount for ordering online. I was also pretty pleased to stumble across the mylparts.com website. I've been a BMW guy for a lot of years, and have been really spoiled by the online parts databases (like RealOEM.com), and was glad to find an analog for the Lexus. Great parts diagrams along with part numbers for easy parts sourcing.
https://www.mylparts.com/auto-parts/...ric-gas-engine

Lead Lap
Quote:
I had to replace both motors. The brushes had worn a 1+mm grove into the motor shaft (commutator).Originally Posted by thomas1
Did you have to replace motors or just the brushes
Lead Lap
Quote:
I just ordered the OEM parts from an internet dealer. The OEM part is different on the 400h than the non-hybrids and I did not see aftermarket availability for the hybrids. The part was a Denso or something like that. I googled the Denso part number but got nothing back. It was something Toyota had Denso build specifically for the hybrid.Originally Posted by thomas1
Where did you end up getting the motors
Driver School Candidate
My new radiator showed up today, so I'm about to dive into the job. One possibly dumb question comes to mind before I start; is there any special procedure to bleeding the air from the system after I fill it back up? I've worked on a number of older BMW models where getting the air out is a bit tricky. If that's not the case with these cars, fantastic!
Thanks in advance!
Thanks in advance!
Driver School Candidate
So several have mentioned how much of a pain the lower bolts were; it's true. I did figure out an easier way to get at them than using a box wrench; a flex socket. There is a hole on each side of the radiator support through which you can see the bolts, and through which you can sneak a 3/8" extension with a flex socket on the end. I had a 14mm socket like that that I had used on other hard-to-reach fasteners, so I went to Sears for a 12mm, and it worked ok. I did run into a big snag on the left side though; the bolt was seized in the nut, and the nut started to turn in the plastic housing at the bottom of the radiator. Worked at it for way too long today, and it's still not out. Hoping for some inspiration tomorrow to finish the job.
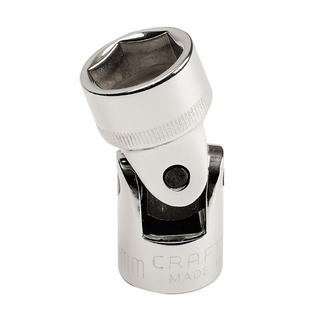
http://www.sears.com/craftsman-1-4in...p-00943198000P
http://www.sears.com/craftsman-1-4in...p-00943198000P


Quote:
Mine was clicking too. I was bout to replace them until I saw the price tag! for 12v fans! i took mine apart and clean out the carbon dust.. it was shocking how much was in there. (See pic) After cleaning, the clicking stopped. I will keep an eye on this part. (note that the fans are different left/right when putting things back together)Originally Posted by smassey321
Check your fan motors. The brushes on mine had worn down to nothing. They were clicking when I spun the fan by hand.
Quote:
http://www.sears.com/craftsman-1-4in...p-00943198000P
I should have followed your advice one the socket and got it before I began the job. After a few chose words taking the bolts out and then once again on the re installation... I ended up doing the lift both radiators and slide the bottom brace out method..Originally Posted by davintosh
So several have mentioned how much of a pain the lower bolts were; it's true. I did figure out an easier way to get at them than using a box wrench; a flex socket. There is a hole on each side of the radiator support through which you can see the bolts, and through which you can sneak a 3/8" extension with a flex socket on the end. I had a 14mm socket like that that I had used on other hard-to-reach fasteners, so I went to Sears for a 12mm, and it worked ok. I did run into a big snag on the left side though; the bolt was seized in the nut, and the nut started to turn in the plastic housing at the bottom of the radiator. Worked at it for way too long today, and it's still not out. Hoping for some inspiration tomorrow to finish the job.http://www.sears.com/craftsman-1-4in...p-00943198000P

Driver School Candidate
Quote:
http://www.sears.com/craftsman-1-4in...p-00943198000P
So it's been 9 months since I finished this job up, and it seems I might have to tear into the cooling system for the second time since completing it. The first time was in December; I was driving home from work when I suddenly I got a strong whiff of coolant, and shortly afterward, zero heat in the cabin. I guessed at something with the cooling system, but was within a few blocks from home, so I kept an eye on the temp gauge, and parked it in the garage. It was dark, but I could tell there was some coolant where it should be dry. I couldn't see where it came from, so decided to top up the radiator to see what happened, and everything I put in came directly out the bottom of the radiator because the lower hose was disconnected from the radiator.Originally Posted by davintosh
So several have mentioned how much of a pain the lower bolts were; it's true. I did figure out an easier way to get at them than using a box wrench; a flex socket. There is a hole on each side of the radiator support through which you can see the bolts, and through which you can sneak a 3/8" extension with a flex socket on the end. I had a 14mm socket like that that I had used on other hard-to-reach fasteners, so I went to Sears for a 12mm, and it worked ok. I did run into a big snag on the left side though; the bolt was seized in the nut, and the nut started to turn in the plastic housing at the bottom of the radiator. Worked at it for way too long today, and it's still not out. Hoping for some inspiration tomorrow to finish the job.http://www.sears.com/craftsman-1-4in...p-00943198000P
What the heck?!?!?
It just couldn't be that I had failed to tighten that clamp, but the hose was new, and the clamp was intact, but what else could explain the hose coming off? I noticed that the other end of the hose was not up against the engine block; apparently it had slipped a little too. I figured it was maybe that I hadn't tightened the clamps quite enough, so I decided to put everything back together, then keep tabs on it. Sure enough, both ends of the hose have been working loose again. Now that I've finally got some nicer (not sub-zero winter) weather, I'm going to pull the hose off again and snug things up again, but what do I have to do to keep it from working loose yet again?
I did replace the original spring-type hose clamps with standard screw-type clamps; can the spring-type provide a stronger grip on the hose than what I used? Is there enough of a difference to make it worthwhile swapping back to them? I didn't reuse the originals because I had so much trouble getting them off, and one flew off to the far corner of the garage when trying to put it on. No special tools in my garage.
I do recall the lower outlet on the original radiator had some rubber on it, but the new radiator didn't have that; is there a trick to increase the hose's traction on the radiator to keep it from slipping?
Of all the dumb problems to have to ask about... Sheesh.
Lead Lap
It is probably too late to confirm now but is the new hose the same length as the old one? The engine moves around a bit as it stops and starts. Have someone use the gas pedal to manually stop and start the ICS engine while you watch your hose.
I have found over the years that the spring type hose clamps provide much more uniform compression of the hose. I used to think the differently but after replace the hose and using the screw type I had leakage, put the spring clamp on and all leakage gone. Note they are also safer with the plastic inlet and outlets of many radiators...
Rookie
This is probably a dumb question - but why isn't there a service campaign for radiator leak since it seems to be a common issue, and I read somewhere on the RX330 forum that they have a safety campaign for theirs?