Wrapped wood trim pieces in 3M 1080 brushed black metallic
 01-26-14, 03:28 PM
#1
Lexus Champion
Thread Starter
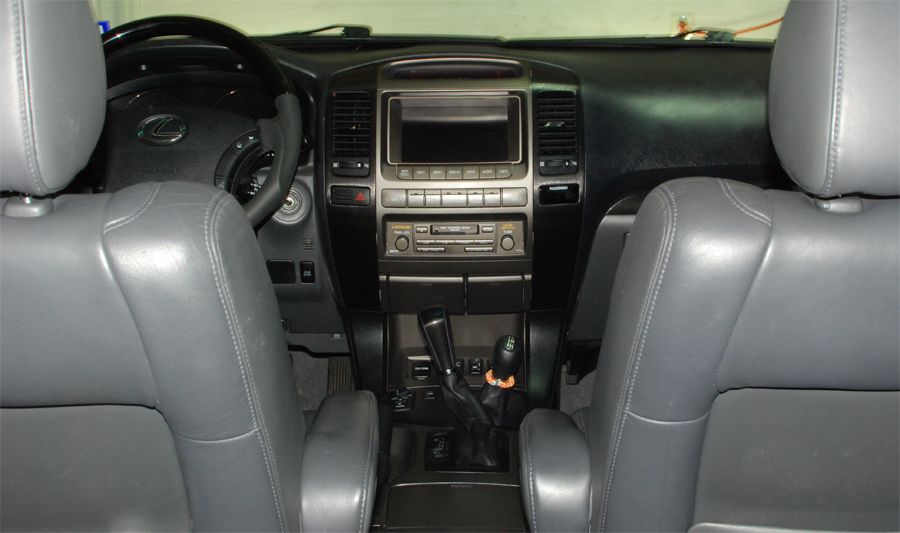
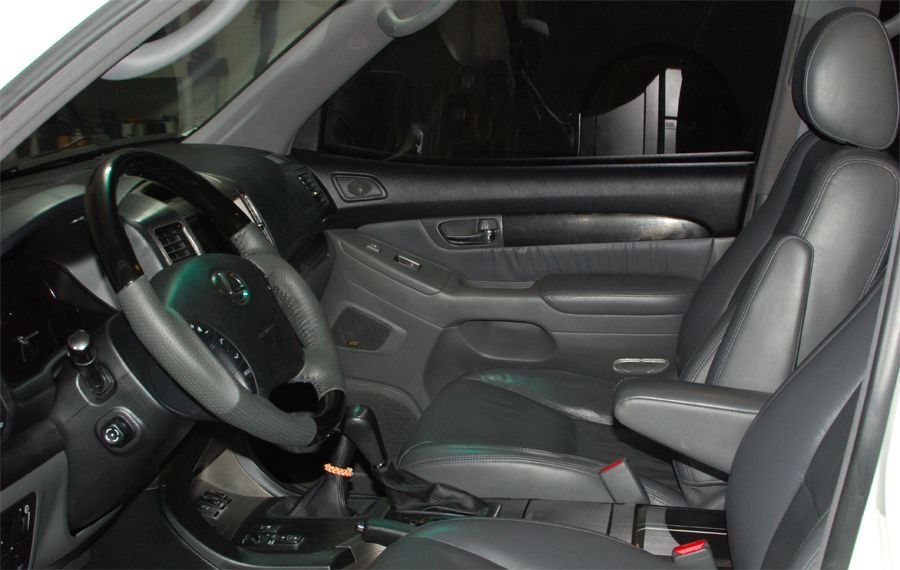
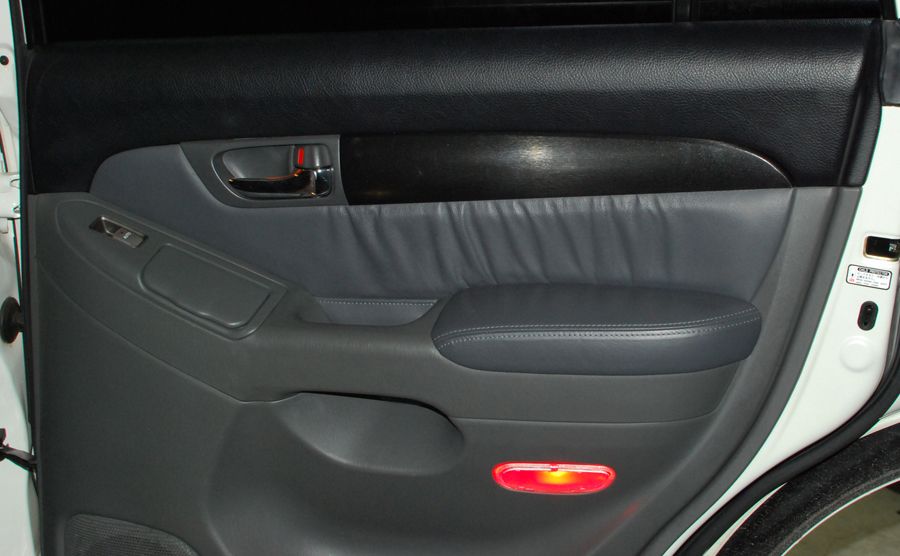
I'm not a fan of the golden birds-eye maple with the gray interior so I've been thinking of ways to change it. Originally I wanted to get my interior wood trim pieces hydro-dipped in a black wood grain, similar to the Sports package but I couldn't find any local places and with all of the fly by night hydro-dippers I didn't trust sending my pieces out of state.
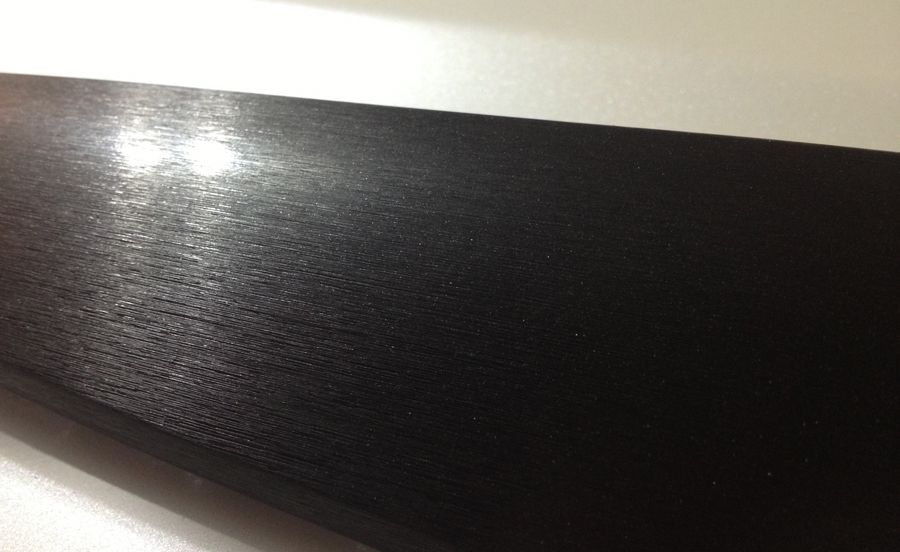
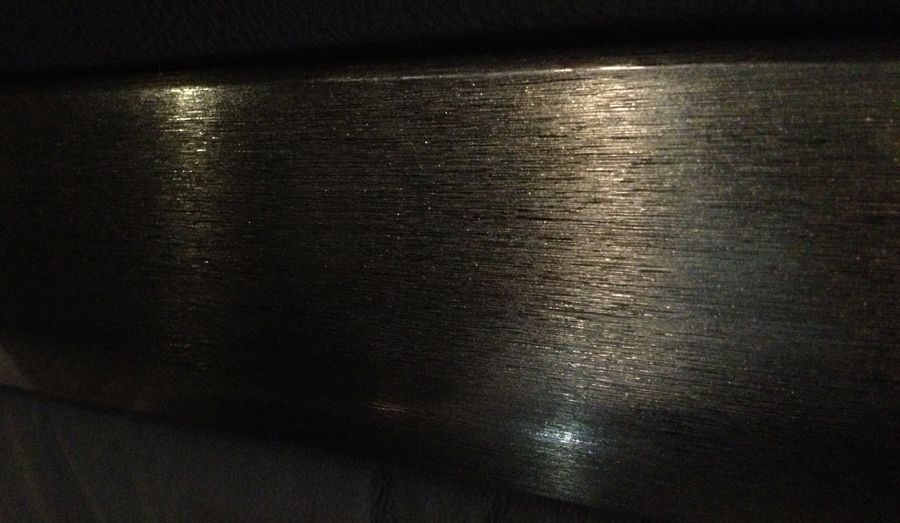
So I bought some 3M 1080 brushed black metallic vinyl and though I'd give it a try. Worst case I don't like, I'll peel it off. I'll be the first to say...yuck a sticker , that doesn't belong on our GX but this brushed metallic vinyl has a real brushed metallic look and feel to it and you'd never know it was vinyl by looking at it or touching it. They make other colors and textures too if you want a different look.
3M 1080 Brushed Black Metallic
3M 1080 Choices
A cool thing about this vinyl is you don't get any air bubbles in it : "3M� Comply� are air release channels allowing fast and easy, bubble-free installation of graphics." so install is very easy.
To install this you'll need:
- Start out by cutting out a piece of material 1/2" or so larger than the trim you'll be covering.
- Peel the backing off and lay the material on a flat surface with the sticky side facing you. Take the piece you want to cover, center it and lay it down. The brushed material has lines so try and get the lines straight. Don't worry if you don't get it right on the first try. You can peel it off and re-position it if needed.
- Once you have it lined up start at the top (or bottom) and work your way to the bottom (or top) and use your thumb to press it down and smooth it out as you go. When you have the surface completed now comes the corners.
*If using a heat gun it only takes about 3 seconds on low for the material to become very pliable so don't over pull it. You'll get a feel for it once you try it*
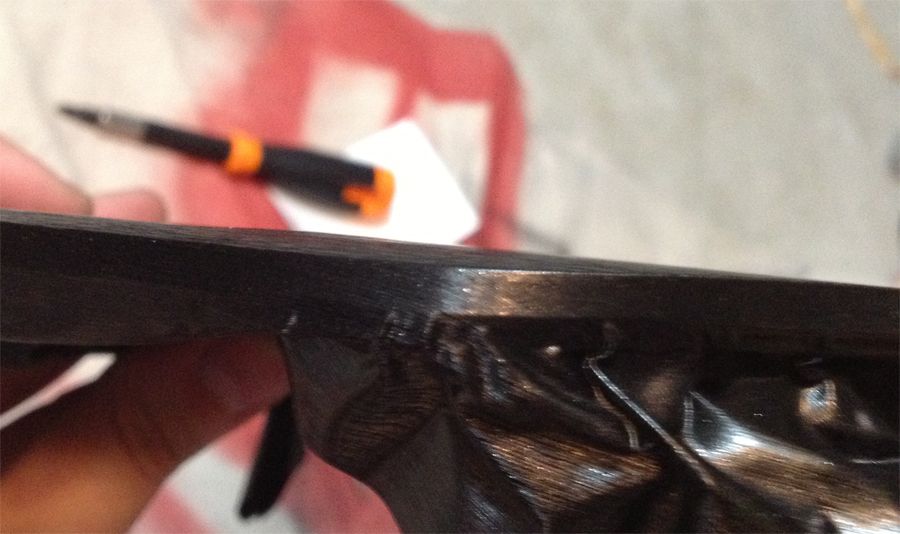
- Use your heat gun or hair dryer and heat the material up and pull it down around the corners and press it down to seal. You'll have to pull in several directions at a time to get the corners smooth. If you start getting creases on the corners heat it up for 2-3 second and keep pulling it until the creases are gone. You'll always have creases but the point is to pull the material until the creases are on the back side of the piece you're coving...see my pic below. You'll see the creases are on the back side. Once you're happy w/ the corners trim the excess material off.
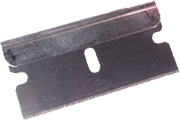
- Now for the openings. I used a razor blade for the cuts. The back side of the blade can be used to smooth down the material in a tight spot that you can't quite get a good seal on w/ your finger.
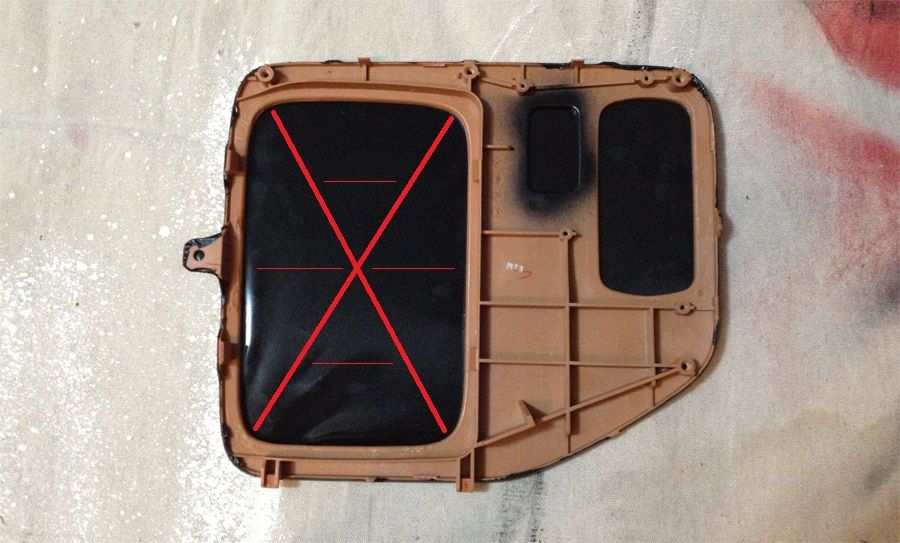
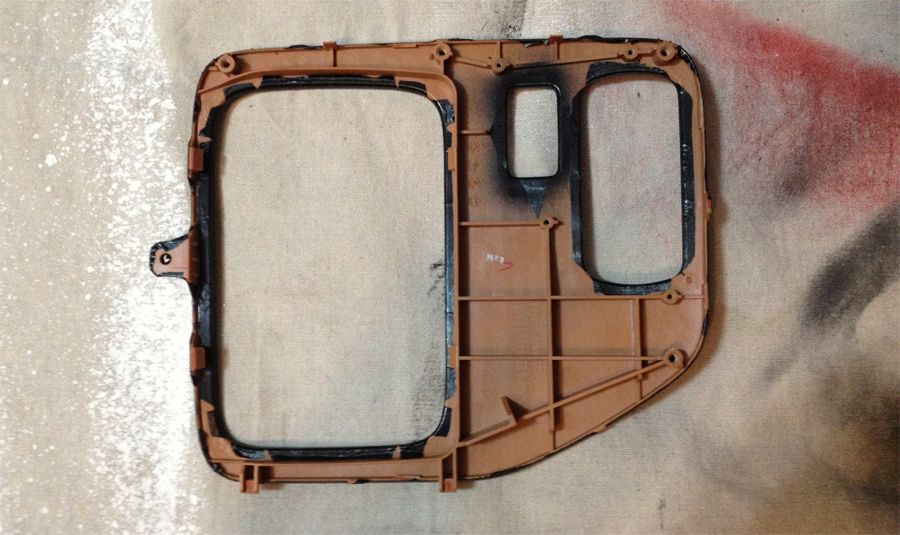
- Cut an "X" in the opening (thick red lines), on large openings cut the larger edge in half and trim the top triangle pieces before you start to pull (thin red lines), it makes it easier to pull. Heat the material up. Once it's heated up just fold the cut pieces over while you stretch it a little and press down along the edge to make a good seal. On larger opening you'll have to make a few relief cuts around the corners to make a good seal.
- Once you're happy with that trim off the excess material and you're done. If at anytime you get a crease try and smooth it out with your fingers and if need be re-heat the material for 2-3 seconds and then smooth it out. The creases will just disappear.


EDIT:
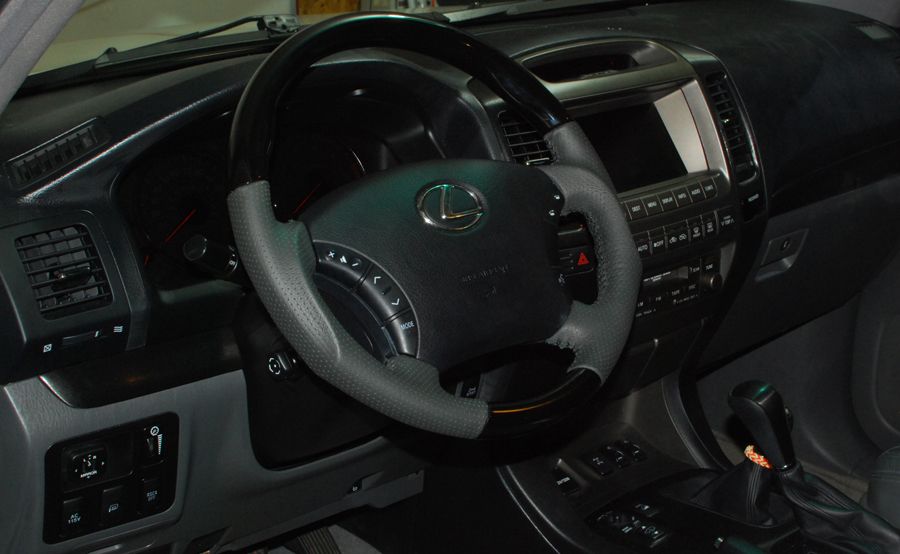
Finally done!!! Now I just have to wait until the new steering wheel arrives.
EDIT:
Steering wheel is on. This projector is official....DONE!
So I bought some 3M 1080 brushed black metallic vinyl and though I'd give it a try. Worst case I don't like, I'll peel it off. I'll be the first to say...yuck a sticker
, that doesn't belong on our GX but this brushed metallic vinyl has a real brushed metallic look and feel to it and you'd never know it was vinyl by looking at it or touching it. They make other colors and textures too if you want a different look.3M 1080 Brushed Black Metallic
3M 1080 Choices
A cool thing about this vinyl is you don't get any air bubbles in it : "3M� Comply� are air release channels allowing fast and easy, bubble-free installation of graphics." so install is very easy.
To install this you'll need:
- 3M 1080 of whatever color / finish you want
- razor blade
- tweezers
- heat gun or hair dryer
- Start out by cutting out a piece of material 1/2" or so larger than the trim you'll be covering.
- Peel the backing off and lay the material on a flat surface with the sticky side facing you. Take the piece you want to cover, center it and lay it down. The brushed material has lines so try and get the lines straight. Don't worry if you don't get it right on the first try. You can peel it off and re-position it if needed.
- Once you have it lined up start at the top (or bottom) and work your way to the bottom (or top) and use your thumb to press it down and smooth it out as you go. When you have the surface completed now comes the corners.
*If using a heat gun it only takes about 3 seconds on low for the material to become very pliable so don't over pull it. You'll get a feel for it once you try it*
- Use your heat gun or hair dryer and heat the material up and pull it down around the corners and press it down to seal. You'll have to pull in several directions at a time to get the corners smooth. If you start getting creases on the corners heat it up for 2-3 second and keep pulling it until the creases are gone. You'll always have creases but the point is to pull the material until the creases are on the back side of the piece you're coving...see my pic below. You'll see the creases are on the back side. Once you're happy w/ the corners trim the excess material off.

- Now for the openings. I used a razor blade for the cuts. The back side of the blade can be used to smooth down the material in a tight spot that you can't quite get a good seal on w/ your finger.

- Cut an "X" in the opening (thick red lines), on large openings cut the larger edge in half and trim the top triangle pieces before you start to pull (thin red lines), it makes it easier to pull. Heat the material up. Once it's heated up just fold the cut pieces over while you stretch it a little and press down along the edge to make a good seal. On larger opening you'll have to make a few relief cuts around the corners to make a good seal.
- Once you're happy with that trim off the excess material and you're done. If at anytime you get a crease try and smooth it out with your fingers and if need be re-heat the material for 2-3 seconds and then smooth it out. The creases will just disappear.


EDIT:
Finally done!!! Now I just have to wait until the new steering wheel arrives.
EDIT:
Steering wheel is on. This projector is official....DONE!
Last edited by RCsGX; 02-05-14 at 08:55 AM.
 01-26-14, 05:26 PM
#3
Lexus Champion
Thread Starter
I'm not wrapping the steering wheel since you'd always be able to see the seam. I don't know what I'm going to do with that yet. I'll probably either buy a used leather 4Runner wheel or a black wood wheel:

I don't want to do anything permanent like have it painted because as picky as I am I might get tired of this look a few months down the road.
 01-26-14, 05:46 PM
#5
Lexus Champion
Thread Starter
01-26-14, 08:38 PM
#7
Lexus Champion
Thread Starter

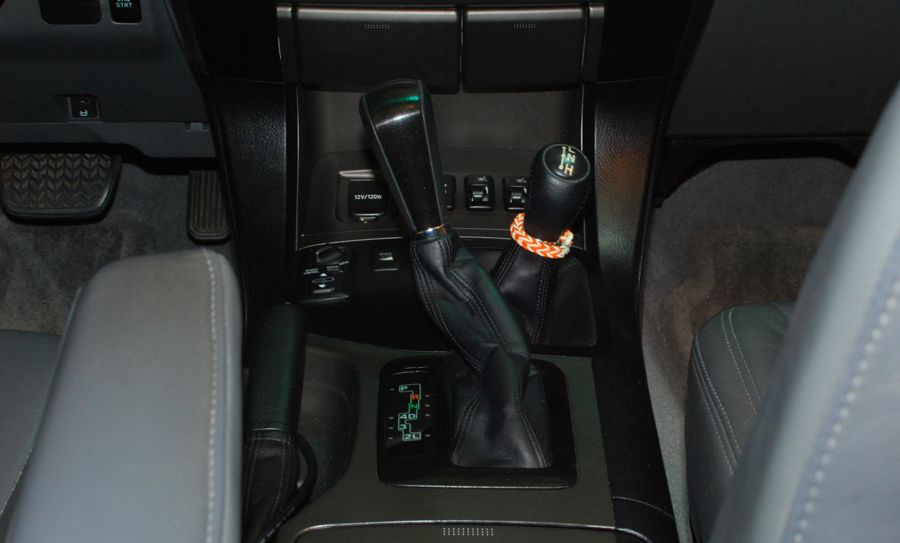
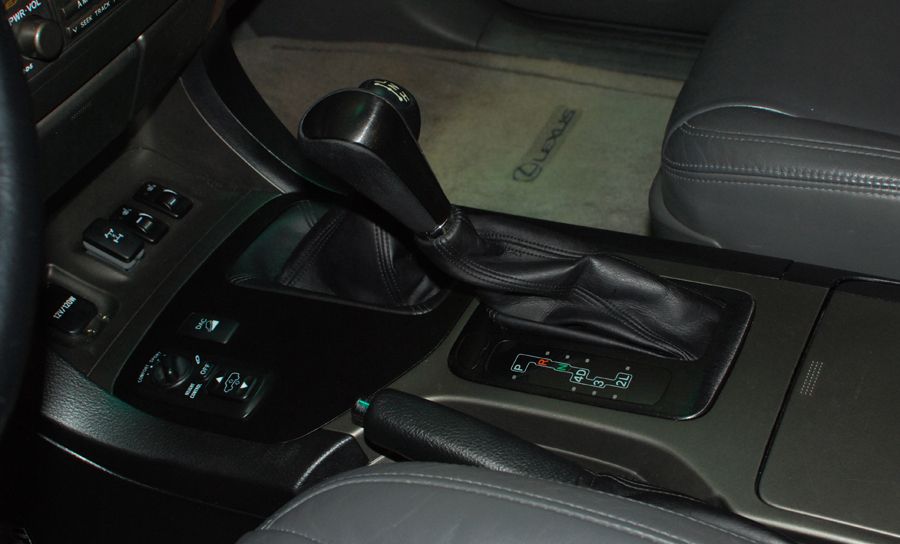
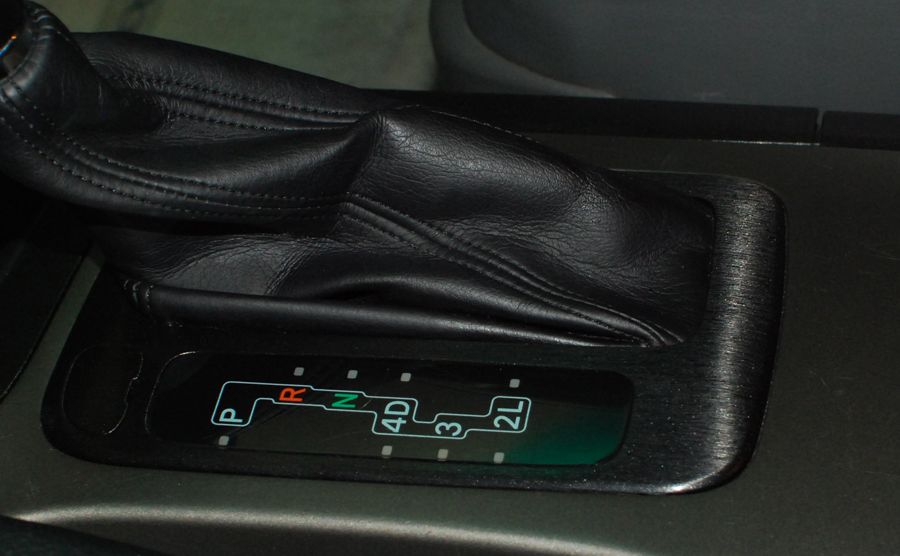
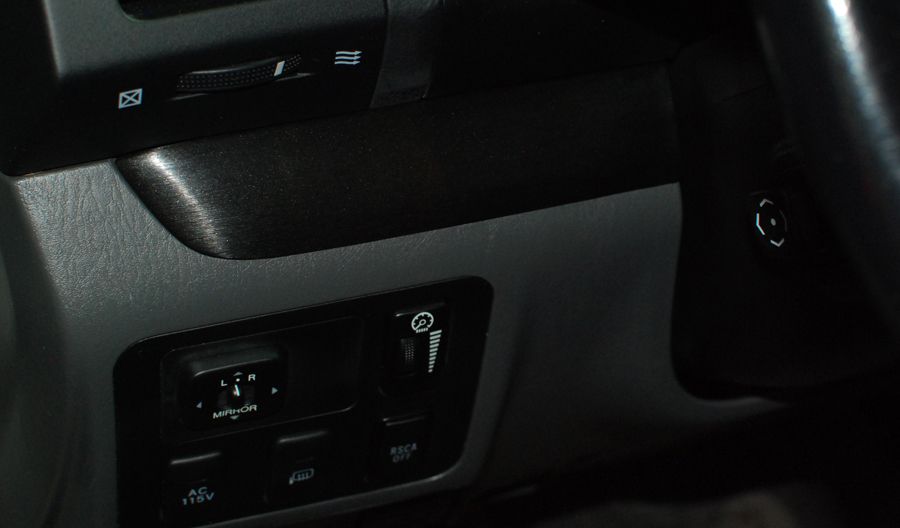
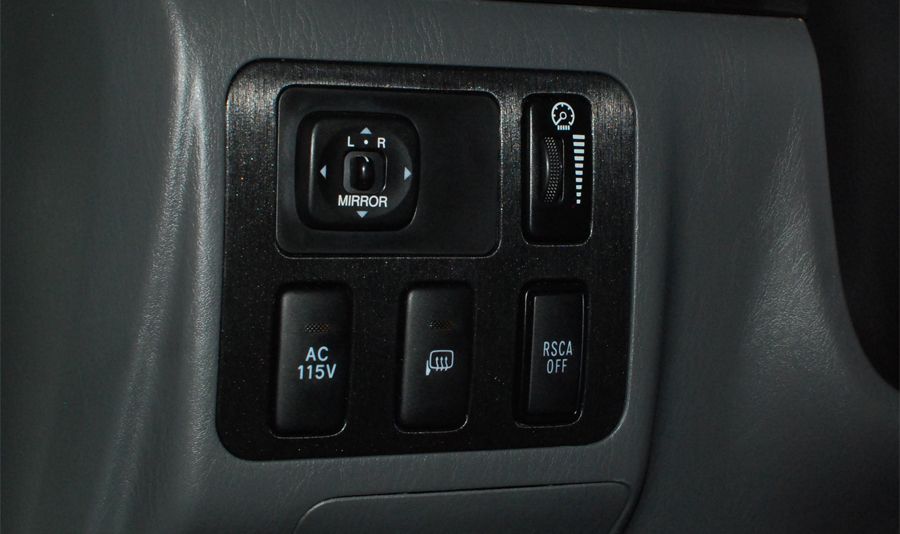
I just finished the transfer case trim and I also did the gear shift trim and did the little shift lock cover too.
This time I used my heat gun on low and wow what a difference! It's so much quicker and easier to form around edges, I didn't have to do relief cuts on edges, I just stretched it really good and trimmed the excess off. I did of course have to use relief cuts in an open area.
Last edited by RCsGX; 01-26-14 at 08:49 PM.
Trending Topics
01-27-14, 07:13 AM
#8
Pole Position
Nice work, turned out great!
01-27-14, 09:36 AM
#9
RCsGX - I love your Mods. Very nicely done! I had just inquired about this over at iH8Mud and here you are outlining the whole process - with great pictures to boot!! So for the openings, it looks like you stretched a large piece over all of it and then cut out the openings ... did you do that with an exacto knife? Pretty easy or any tricks/learnings?
01-27-14, 10:43 AM
#10
Lexus Champion
Thread Starter
Thanks. 
I appreciate it.
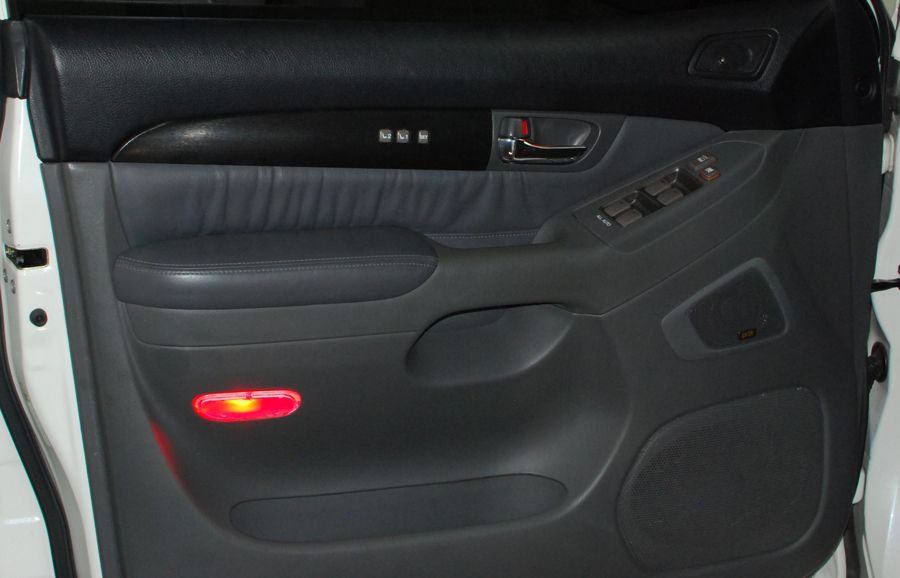
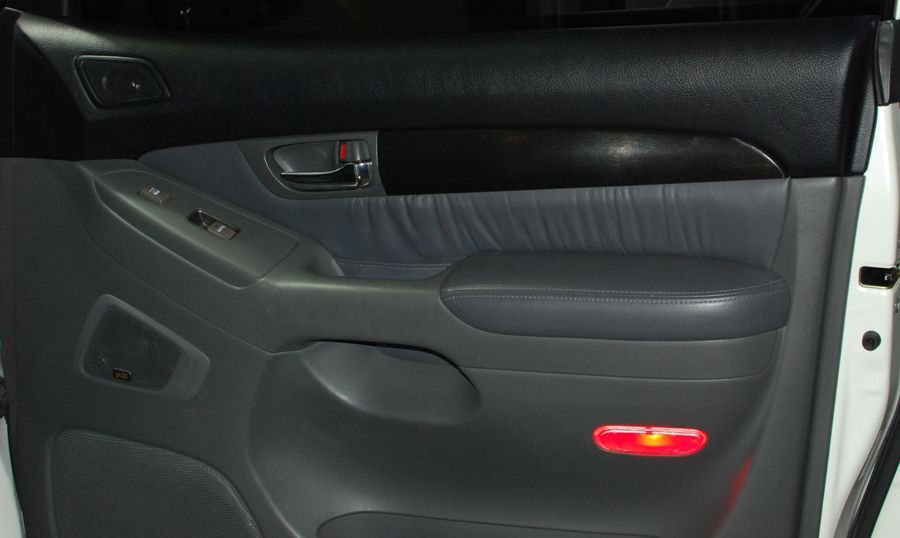
When I first did the back doors without a heat gun it was easy. I had to make a lot of tiny relief cuts around corners to get the material to contour w/ the edge. It took a few tries to get it right but it was doable. Once I used the heat gun though I was able to get the corners perfect the first try and it's one seamless corner instead of a lot of relief cuts.
Starting out take a piece about 1/2" or so larger than the piece you're covering. Peel the backing away and lay the material on a flat surface with the sticky side facing you. Take the piece you want to cover, center it and lay it down. The brushed material has lines so try and get the lines straight. Don't worry if you don't get it right on the first try. You can peel it off and re-position it if needed. Once you have it lined up start at the top (or bottom) and work your way to the bottom (or top) and use your thumb to press it down and smooth it out as you go. When you have the surface completed now comes the corners.
*If using a heat gun it only takes about 3 seconds on low for the material to become very pliable so don't over pull it. You'll get a feel for it once you try it*
Use your heat gun or hair dryer and heat it up and pull it down around the corners and press down to seal. You'll have to pull in several directions at a time to get the corners smooth. If you start getting creases on the corners heat it up for 2-3 second and keep puling it until the creases are gone. You'll always have creases but the point it to pull the material until the creases are on the back side of the material...see my pic above. You'll see the creases are on the back side. Once you're happy w/ the corners trim the excess material off.
Now for the openings. I used a razor blade for the cuts. The back side of the blade can be used to smooth down the material in a tight spot that you can't quite get a good seal on w/ your finger.
Cut an "X" in the opening (thick red lines), on large openings cut the larger edge in half and trim the top triangle pieces before you start to pull (thin red lines), it makes it easier to pull. Heat the material up. Once it's heated up just fold the cut pieces over while you stretch it a little and press down along the edge to make a good seal. On larger opening you'll have to make a few relief cuts around the corners to make a good seal. Once you're happy with that trim off the excess material and you're done. If at anytime you get a crease try and smooth it out with your fingers and if need be re-heat the material for 2-3 seconds and then smooth it out. The creases will just disappear.
That's all there is to it. For the cost of the material this has to be one of the best / cheapest mods.
RCsGX - I love your Mods. Very nicely done! I had just inquired about this over at iH8Mud and here you are outlining the whole process - with great pictures to boot!! So for the openings, it looks like you stretched a large piece over all of it and then cut out the openings ... did you do that with an exacto knife? Pretty easy or any tricks/learnings?
When I first did the back doors without a heat gun it was easy. I had to make a lot of tiny relief cuts around corners to get the material to contour w/ the edge. It took a few tries to get it right but it was doable. Once I used the heat gun though I was able to get the corners perfect the first try and it's one seamless corner instead of a lot of relief cuts.
Starting out take a piece about 1/2" or so larger than the piece you're covering. Peel the backing away and lay the material on a flat surface with the sticky side facing you. Take the piece you want to cover, center it and lay it down. The brushed material has lines so try and get the lines straight. Don't worry if you don't get it right on the first try. You can peel it off and re-position it if needed. Once you have it lined up start at the top (or bottom) and work your way to the bottom (or top) and use your thumb to press it down and smooth it out as you go. When you have the surface completed now comes the corners.
*If using a heat gun it only takes about 3 seconds on low for the material to become very pliable so don't over pull it. You'll get a feel for it once you try it*
Use your heat gun or hair dryer and heat it up and pull it down around the corners and press down to seal. You'll have to pull in several directions at a time to get the corners smooth. If you start getting creases on the corners heat it up for 2-3 second and keep puling it until the creases are gone. You'll always have creases but the point it to pull the material until the creases are on the back side of the material...see my pic above. You'll see the creases are on the back side. Once you're happy w/ the corners trim the excess material off.
Now for the openings. I used a razor blade for the cuts. The back side of the blade can be used to smooth down the material in a tight spot that you can't quite get a good seal on w/ your finger.
Cut an "X" in the opening (thick red lines), on large openings cut the larger edge in half and trim the top triangle pieces before you start to pull (thin red lines), it makes it easier to pull. Heat the material up. Once it's heated up just fold the cut pieces over while you stretch it a little and press down along the edge to make a good seal. On larger opening you'll have to make a few relief cuts around the corners to make a good seal. Once you're happy with that trim off the excess material and you're done. If at anytime you get a crease try and smooth it out with your fingers and if need be re-heat the material for 2-3 seconds and then smooth it out. The creases will just disappear.
That's all there is to it. For the cost of the material this has to be one of the best / cheapest mods.
01-27-14, 11:11 AM
#11
Thanks.
I appreciate it.
When I first did the back doors without a heat gun it was easy. I had to make a lot of tiny relief cuts around corners to get the material to contour w/ the edge. It took a few tries to get it right but it was doable. Once I used the heat gun though I was able to get the corners perfect the first try and it's one seamless corner instead of a lot of relief cuts.
Starting out take a piece about 1/2" or so larger than the piece you're covering. Peel the backing away and lay the material on a flat surface with the sticky side facing you. Take the piece you want to cover, center it and lay it down. The brushed material has lines so try and get the lines straight. Don't worry if you don't get it right on the first try. You can peel it off and re-position it if needed. Once you have it lined up start at the top (or bottom) and work your way to the bottom (or top) and use your thumb to press it down and smooth it out as you go. When you have the surface completed now comes the corners.
*If using a heat gun it only takes about 3 seconds on low for the material to become very pliable so don't over pull it. You'll get a feel for it once you try it*
Use your heat gun or hair dryer and heat it up and pull it down around the corners and press down to seal. You'll have to pull in several directions at a time to get the corners smooth. If you start getting creases on the corners heat it up for 2-3 second and keep puling it until the creases are gone. You'll always have creases but the point it to pull the material until the creases are on the back side of the material...see my pic above. You'll see the creases are on the back side. Once you're happy w/ the corners trim the excess material off.
Now for the openings. I used a razor blade for the cuts. The back side of the blade can be used to smooth down the material in a tight spot that you can't quite get a good seal on w/ your finger.
Cut an "X" in the opening (thick red lines), on large openings cut the larger edge in half and trim the top triangle pieces before you start to pull (thin red lines), it makes it easier to pull. Heat the material up. Once it's heated up just fold the cut pieces over while you stretch it a little and press down along the edge to make a good seal. On larger opening you'll have to make a few relief cuts around the corners to make a good seal. Once you're happy with that trim off the excess material and you're done. If at anytime you get a crease try and smooth it out with your fingers and if need be re-heat the material for 2-3 seconds and then smooth it out. The creases will just disappear.
That's all there is to it. For the cost of the material this has to be one of the best / cheapest mods.
01-27-14, 11:20 AM
#12
Lexus Champion
Thread Starter
Heck, I can't even install a plastic screen protector on my phone without getting bubbles everywhere!
3M perfected this stuff so well it makes your pieces look like you've been installing this stuff for years. Hmmmm, maybe I'll wrap my GX next.  joking....
01-27-14, 12:52 PM
joking....
01-27-14, 12:52 PM
#13

RC,
Man I am shocked, you really pulled it off, looks good. I would not be surprised if you wrap your entire truck,,,just kidding at least you dont have to worry about swirl marks and mirror looking paint.
I am on a mission to make my truck paint look like mirror, forget about my earlier post for taking a shortcut with 1 hour work.
I am all in with Dual Action polisher, 3 pads, cutting, polishing, waxing. It will take at least 8-10 hours.
I did my other car with just polymer synthetic wax looks awesome, since its only a year old. Didnt see any major difference on GX, thats why I am going all out.
Man I am shocked, you really pulled it off, looks good. I would not be surprised if you wrap your entire truck,,,just kidding
at least you dont have to worry about swirl marks and mirror looking paint.I am on a mission to make my truck paint look like mirror, forget about my earlier post for taking a shortcut with 1 hour work.
I am all in with Dual Action polisher, 3 pads, cutting, polishing, waxing. It will take at least 8-10 hours.
I did my other car with just polymer synthetic wax looks awesome, since its only a year old. Didnt see any major difference on GX, thats why I am going all out.
01-27-14, 01:55 PM
#14
Lexus Champion
Thread Starter
If I had the patience...maybe but it would take too long. Just wrapping these small trim pieces took over 2hrs. I couldn't image how long it would take to wrap our GX.

Make sure you clay the paint after you wash it. I had my GX fully detailed last month (clayed, compounded, polished, waxed) and the paint is literally as smooth as glass.
01-27-14, 04:10 PM
#15
The Color is silver, trust me I hate doing the exterior, last time I did it was over 20 years ago and hated it very much. The reason I am doing this, if you recall I mentioned I was bored and didn't do anything to my truck in a month.
I think I can get away without doing the clay, paint looks clean and feels like glass, I called Maguires and spoke to them also. I think I will take your advise and do the clay as well. Believe me this is the last time I am doing this to the truck. I hope I get my tinkering fix for a while by going thru all of this. LOL
I love to do the mechanical work and oil changes than to detail, compound and wax.
I have minor swirl marks on the hood and according to Maguire on the phone, he said electric DA polisher would make the job lot easier, and I can pick it up from Harbor Freight for $50, chemical for around $40.
How much pro charged you to clay, compound and detail?
Thanks.
If I had the patience...maybe but it would take too long. Just wrapping these small trim pieces took over 2hrs. I couldn't image how long it would take to wrap our GX.
What color is your GX?
WOW you really are about to go all out. I don't have the patience for that. I'm fine with washing & waxing and detailing the interior but paint correction, nope, I'll pay the pros for that.
Make sure you clay the paint after you wash it. I had my GX fully detailed last month (clayed, compounded, polished, waxed) and the paint is literally as smooth as glass.
Last edited by gxman1; 01-27-14 at 04:16 PM.