When you click on links to various merchants on this site and make a purchase, this can result in this site earning a commission. Affiliate programs and affiliations include, but are not limited to, the eBay Partner Network.
after searching for hours all through the internet for the video or photos of where the adjustment screws are, i finally had to look through this video of the headlight on youtube.
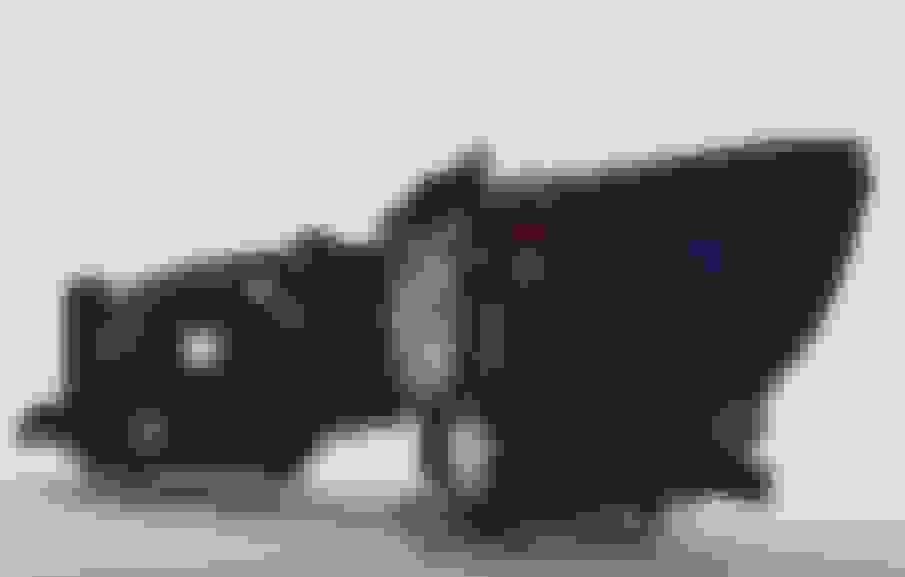
if you pause the video at 1:02, you see the two locations where you have to put the screwdriver in.
The red arrow is the direction the screwdriver goes into the gear to adjust the vertical. the blue arrow, you'll need the 20 inch screwdriver. and it is a bit hard to see and find. you'll see a shaft and it has to go through a hole in the fender of the car to get to it. the picture is from the passenger side headlight.
What should be the specs of adjustment for the headlights height?
I just picked up a 08 GS 350 AWD, but the headlights are shining low. My 06 had perfect headlight aim and shines really far without glare to drivers. I loved the headlights on the 06. The 08 is hard to drive with how low the lights shine. The AFS is working where the light dips and self levels when I turn on the car. .
tle in the previous post said that "The red arrow is the direction the screwdriver goes into the gear to adjust the vertical", so I guess red arrow adjusts the vertical and the blue one adjusts the horizontal!
The blue arrow adjust the vertical.
The red arrow adjust the horizontal.
You start with the vertical first, then you fix the horizontal after the vertical is set. When you adjust the vertical, it moves the side-to-side as well, so you have to do both. It took some work to get the screwdriver in the correct place to turn the nut. For the right side, I had to unclip the airbox and move it out of the way.
Originally Posted by professorm
Whay does the red arrow adjust? What does the blue arrow adjust?
Originally Posted by rxtarcher
tle in the previous post said that "The red arrow is the direction the screwdriver goes into the gear to adjust the vertical", so I guess red arrow adjusts the vertical and the blue one adjusts the horizontal!
I just finished adjusting my headlights. What a difference in visibility it made! Mine were pointing down to the ground. Now it cuts a nice beam far away, sharp cut off.
At first I adjusted them slightly above the level mark, since it was still a bit low at the level mark. When I was accelerating I realize it was lifting the light above the roof of parked cars, so I went back and put it at the location that the bubble meter says. It is perfect. I did hard pulls and the headlights still stay at the right height without blinding people.
The biggest challenge for me was finding somewhere that is perfectly level at night. I used a big shopping plaza and tried to find a place that was far from drainage where the landscape tilts to drain water.
My passenger side headlight will not adjust. It needs to tilt up, but as it comes up, before the bubble starts to move forward, the whole assembly begins to move right (toward the fender).
My passenger side headlight will not adjust. It needs to tilt up, but as it comes up, before the bubble starts to move forward, the whole assembly begins to move right (toward the fender).
Any suggestions??????
That's how it works. When you adjust the vertical, it moves the horizontal, so you always have to adjust both. I need to make a video about this. It is really complicated. It took me a long time to figure out. If you want, I would be willing to walk you through it.
My passenger side headlight will not adjust. It needs to tilt up, but as it comes up, before the bubble starts to move forward, the whole assembly begins to move right (toward the fender).
Thank you professorm! I really appreciate you for answering so fast! You're the best!
Drivers side did perfect. moved it up, bubble came to the center. Good to go.
But the Pass side did that weird thing.
I will go back out tomorrow and try again. I just have to figure out where the Horiziontal screw is.
Just FYI, guys... Since it's a bit difficult and requires quite a few turns to move the beam any significant amount, I figured you'd want to know what direction to turn the screwdriver:
Roll it forward to raise the beam height - (Counter-clockwise on the passenger side, clockwise on the driver's side).
This information doesn't seem to be disclosed anywhere on the web but here in this post. Enjoy.
FYI on my 09 gs350 i had to turn them opposite of what you said to get them to raise up. I originally thought i had stripped it but I was turning them the wrong way. 🤷♂️
The blue arrow adjust the vertical.
The red arrow adjust the horizontal.
You start with the vertical first, then you fix the horizontal after the vertical is set. When you adjust the vertical, it moves the side-to-side as well, so you have to do both. It took some work to get the screwdriver in the correct place to turn the nut. For the right side, I had to unclip the airbox and move it out of the way.
I just finished adjusting my headlights. What a difference in visibility it made! Mine were pointing down to the ground. Now it cuts a nice beam far away, sharp cut off.
At first I adjusted them slightly above the level mark, since it was still a bit low at the level mark. When I was accelerating I realize it was lifting the light above the roof of parked cars, so I went back and put it at the location that the bubble meter says. It is perfect. I did hard pulls and the headlights still stay at the right height without blinding people.
The biggest challenge for me was finding somewhere that is perfectly level at night. I used a big shopping plaza and tried to find a place that was far from drainage where the landscape tilts to drain water.
Hey man, are those two bolts the only thing you needed to adjust ? My 07 looks bright when standing in front but when driving at night, I can barely see. I even hit a pothole because of bad visibility...