
Detailed HID Fog Light Installation
 11-03-07, 12:17 AM
#1
Pole Position
Thread Starter
I would first like to thank 14wr3nc3 for showing us how this could be done. Having said that, I would like to add my experience and pictures of my HID installation. I decided not to add this to 14wr3nc3's thread because of the length, but Kudos again to 14wr3nc3 he is the MAAAAN!!!!!!

This picture already shows the plastic pins and the two 10mm hex screws removed (14wr3nc3's thread already shows you how to remove them).
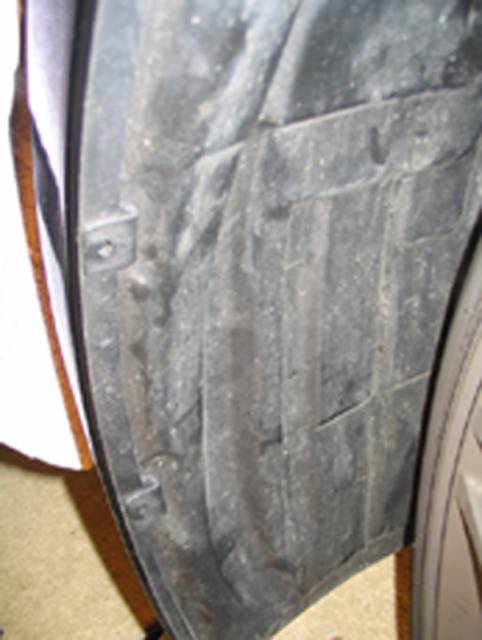
View showing 2 10mm Hex screws removed (Hex screw under car not shown but removed).
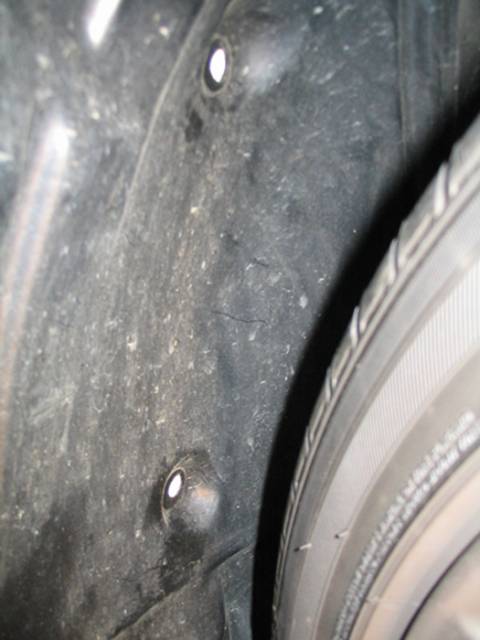
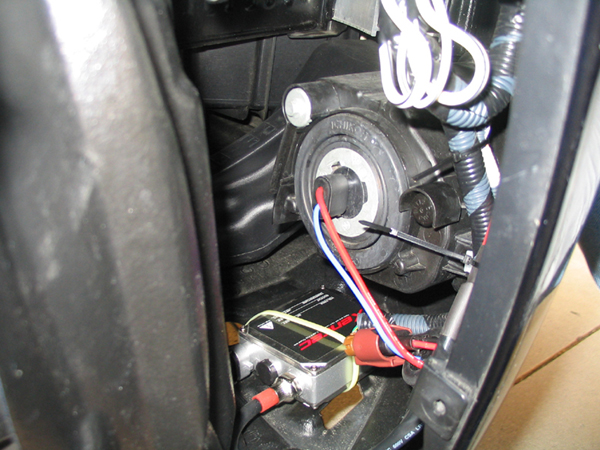
When I pushed in on the liner, I found it easier to remove if I also pulled out slightly on the bumper body near each clip starting with the bottom clip. The plastic bumper will flex but don't over do it. Then pull back the liner as shown and remove the halogen bulb from its housing. Connect the conversion cable (two wires from the ballast) to the HID bulb. Unscrew the protective cap on the HID bulb and remove the protective plastic base plate (used nippers to cut off). I suggest that you use latex gloves (examination gloves) when handling the HID bulb. Insert the bulb in the fog housing (just align tangs, insert and twist to lock). Then connect the car wiring bundle (two wires) to the ballast input power cable. If the cable does not already have a connector on the end, but an adapter connector like my kit had, make sure you install the wires from the ballast so you have the right polarity. The green wire with the yellow stripe going in to the car's power connector is the POSITIVE lead. If you get the hookup reversed it should not damage anything but the HIB bulb wont ignite.
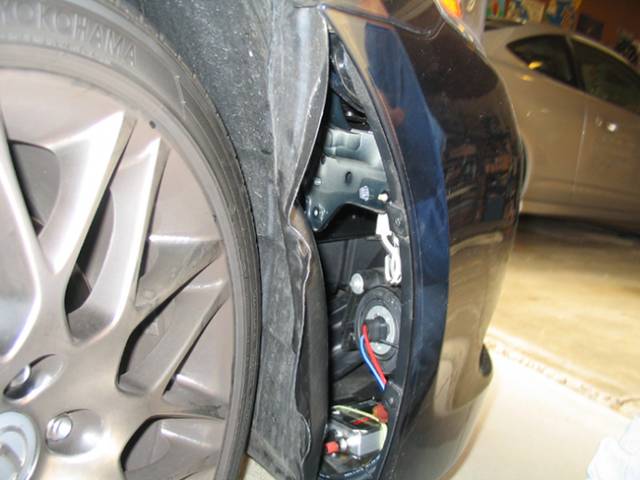
With all the connections made, turn on your fog lights to confirm everything is working. After you confirm, install the ballast in a suitable location. As you can see I chose the bottom of the bumper. I used the two sided tape provided, but also used a cable tie to secure it further (there are convenient holes to thread though and around the ballast as shown below). Then use smaller cable ties to secure the cables and then button her up.
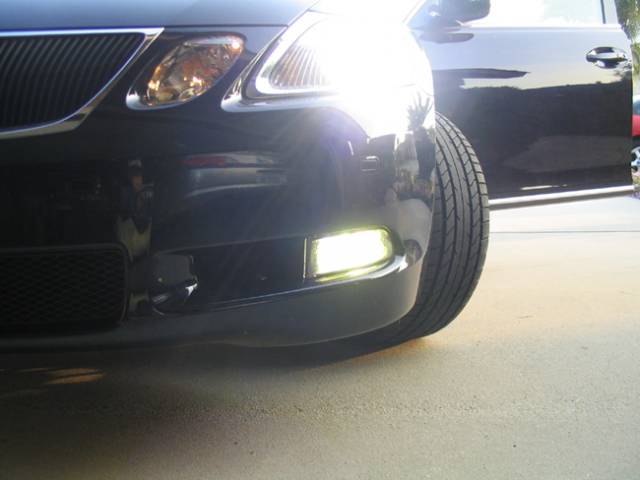
End result as shown.
Note:
The driver's side installation was more difficult due to the headlight washer bottle interference. But after doing that side first, the passenger side was a 10 minute job (already went through the learning curve).
Good luck
This picture already shows the plastic pins and the two 10mm hex screws removed (14wr3nc3's thread already shows you how to remove them).
View showing 2 10mm Hex screws removed (Hex screw under car not shown but removed).
When I pushed in on the liner, I found it easier to remove if I also pulled out slightly on the bumper body near each clip starting with the bottom clip. The plastic bumper will flex but don't over do it. Then pull back the liner as shown and remove the halogen bulb from its housing. Connect the conversion cable (two wires from the ballast) to the HID bulb. Unscrew the protective cap on the HID bulb and remove the protective plastic base plate (used nippers to cut off). I suggest that you use latex gloves (examination gloves) when handling the HID bulb. Insert the bulb in the fog housing (just align tangs, insert and twist to lock). Then connect the car wiring bundle (two wires) to the ballast input power cable. If the cable does not already have a connector on the end, but an adapter connector like my kit had, make sure you install the wires from the ballast so you have the right polarity. The green wire with the yellow stripe going in to the car's power connector is the POSITIVE lead. If you get the hookup reversed it should not damage anything but the HIB bulb wont ignite.
With all the connections made, turn on your fog lights to confirm everything is working. After you confirm, install the ballast in a suitable location. As you can see I chose the bottom of the bumper. I used the two sided tape provided, but also used a cable tie to secure it further (there are convenient holes to thread though and around the ballast as shown below). Then use smaller cable ties to secure the cables and then button her up.
End result as shown.
Note:
The driver's side installation was more difficult due to the headlight washer bottle interference. But after doing that side first, the passenger side was a 10 minute job (already went through the learning curve).
Good luck


 01-06-08, 04:58 PM
#5
Lead Lap
iTrader: (1)

Join Date: Oct 2001
Location: Kingdom of Kahlifonia
Posts: 476
Likes: 0
Received 0 Likes
on
0 Posts
Nice. Doesn't look very 6000K in the pic though...
I got a single inverted LED city light bulb that matches 6000K very well. Got it for like 7 bucks shipped (for the pair). I'll post the link later.
I'm waiting on my D4S 6000K bulbs to arrive...
My HID kit with ultra slim ballast was 99 dollars shipped. The HID bulbs 75 bucks shipped and the 7-8 bucks for the LED city lights. Not bad for less than 200 bucks. Maybe I should sell some of that stuff here and mark it up

Trending Topics
01-06-08, 11:00 PM
#8
Lexus Connoisseur
01-06-08, 11:46 PM
#9
Lead Lap
iTrader: (1)
Join Date: Oct 2001
Location: Kingdom of Kahlifonia
Posts: 476
Likes: 0
Received 0 Likes
on
0 Posts
Here are the bulbs I got for the city lights:
http://cgi.ebay.com/ebaymotors/ws/eB...186326027&rd=1
Here's the permanent link to the seller's store: http://stores.ebay.com/V-LEDS
I got the Inverted cone LED (HID White 194 wedge as they call it).
Then I got my HID kit here: http://cgi.ebay.com/ebaymotors/ws/eB...185203498&rd=1
Permanent store link: http://stores.ebay.com/HID-Outdoor-Equipments
I bought an HID kit from this guy before, but the big ballast style one. This small style has more wires. It has a separate ignitor, which I've never seen before, which attaches in line with the ballast. Then there's a separate fuse holder. A lot of wires I suppose, but whatever, it's nice, and for the price, you can't complain!!!! $99.98 shipped, I'm there!
Here's a video of my previous 6000K fog light kit I got from this guy (H3) on my old E55 AMG: http://www.youtube.com/watch?v=y8NLSSnTXs0
I'll post the info on my D4S bulbs once I get them and can attest to the quality.
 09-18-12, 04:03 AM
#13
Driver School Candidate

Join Date: Aug 2012
Location: CA
Posts: 34
Likes: 0
Received 0 Likes
on
0 Posts
thanks to HotShotEng and 14wr3nc3.
I installed my HID fogs. I did went into a little problem. Here is my 2 cents. The base of the bulbs is little thicker than the original and I couldn't lock the bulbs in position. My work around was to loose the screws a bit ( red arrow pointing to the screws) and turn the bulbs into lock position, then tighten the screws. Hope this helps someone who has the same problem I had.
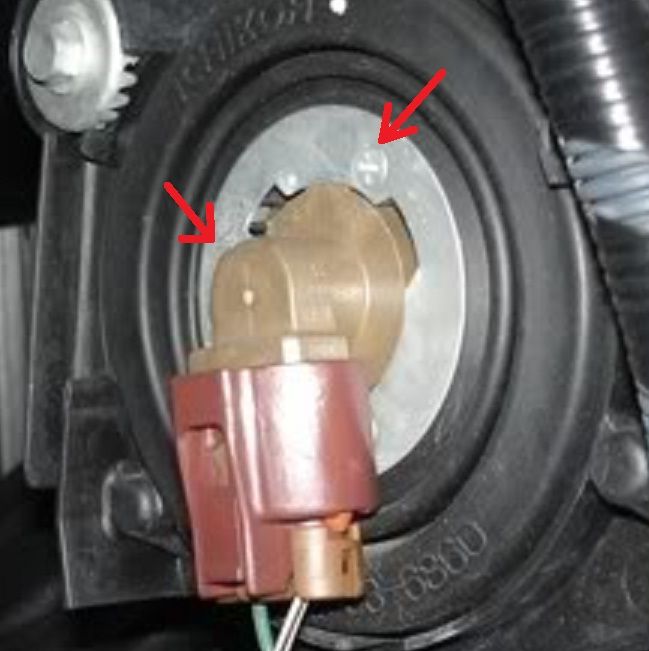
I installed my HID fogs. I did went into a little problem. Here is my 2 cents. The base of the bulbs is little thicker than the original and I couldn't lock the bulbs in position. My work around was to loose the screws a bit ( red arrow pointing to the screws) and turn the bulbs into lock position, then tighten the screws. Hope this helps someone who has the same problem I had.
09-28-12, 05:04 PM
#15

They'll run no hotter than regular halogen bulbs will, so don't sweat over it.
If you're referring to the ballast that is used to increase the voltage to strike the arc, again, it'll not be running any hotter than lukewarm, if even.
All this will have been tested, if they have genuine UL/T�V/BS conformity approval.
If you're referring to the ballast that is used to increase the voltage to strike the arc, again, it'll not be running any hotter than lukewarm, if even.
All this will have been tested, if they have genuine UL/T�V/BS conformity approval.