
VIAS Install '3rd Gen GS Edition'


Thread Starter
Pole Position

Joined: Aug 2001
Posts: 230
Likes: 1
From: OH
Well, the VIAS install is complete and I love it !!!!!
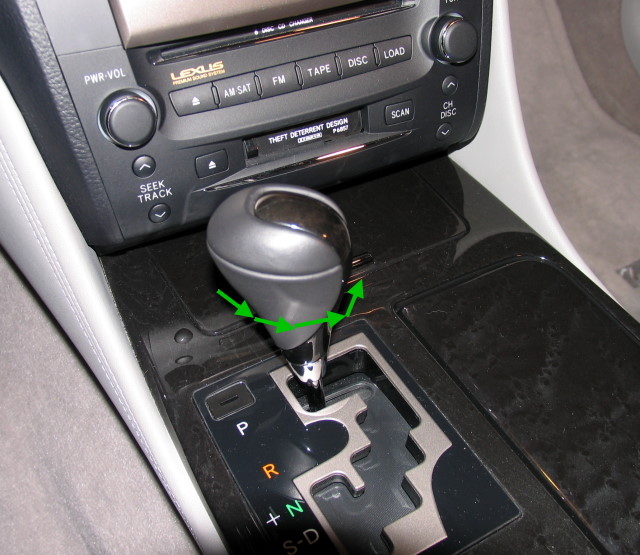
First, remove the shift **** by rotating counter clockwise.
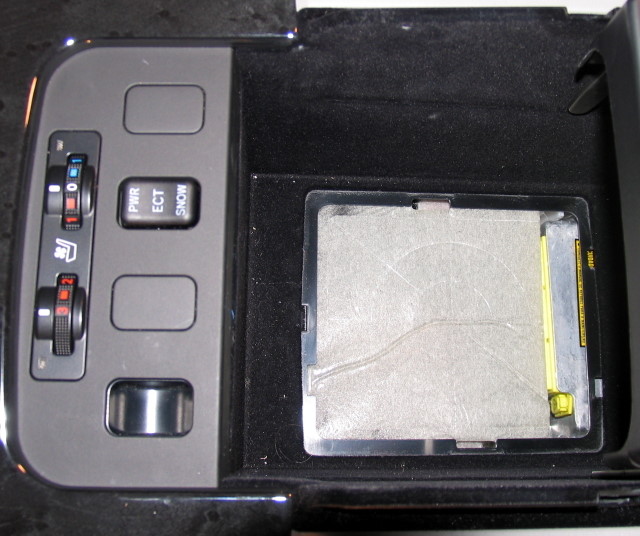
Next, assuming you want your ipod hidden away in your center console, find the little notch towards the front bottom of your storrage compartment and pop off the access pannel with a small screwdriver. it's difficult to pull up because the foam stuff below it is like a sticker.
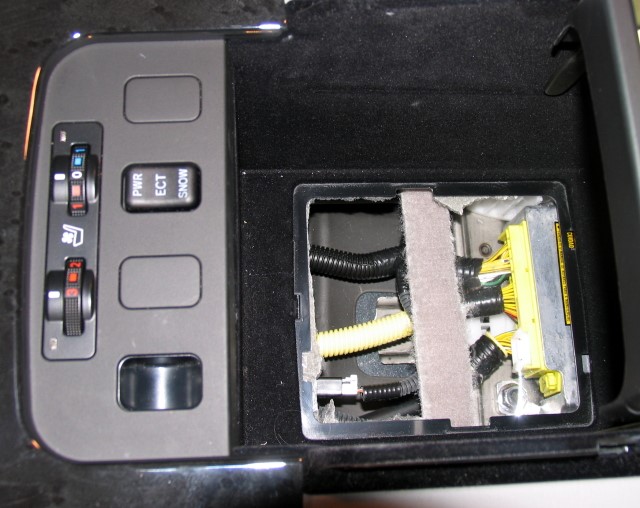
Next, either cut a hole in or remove the sticky foam film.. i elected to just remove it..
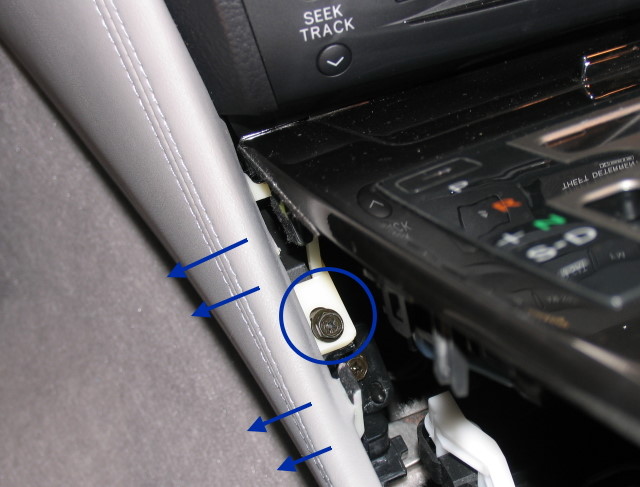
Next, pry up the top of the console.. i started from the back towards where it narrows on both sides of the heated seats controls.. It pops up easy there, then just run your fingers under each side and pop it up moving toward the dash.. there are 3-4 clips on each side.. In the photo below there is a screw that needs removed so you can pull the side panel outward enough to free the center console completely.. OR.. you can remove the little plastic thing just above the ashtray door (as seen later in the photos) and it should come right out (found this out later) Also, starting the car and puting the shifter in neutral first helps.. you can shut the car off while you continue but it will yell at you until you put it back in park ..
You will need to unplug the two power/accessory plugs to completely remove the center console and set it asside..
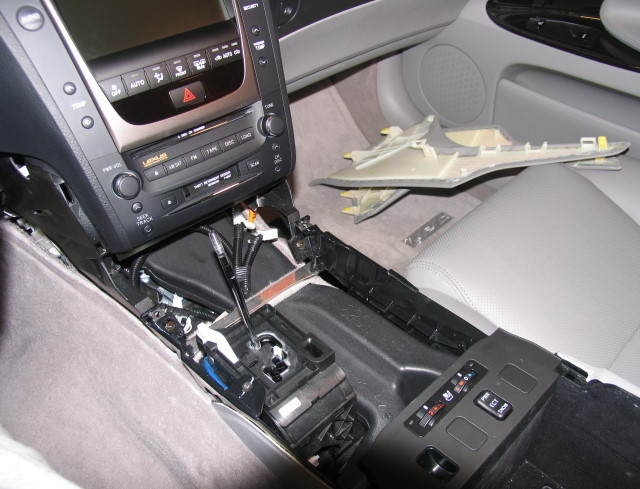
Here we have the center console top removed and the side panels removed. Once the center console top was removed, you remove each side panel by pulling the pack side outward towards the seat untill the clips are out, then the whole thing pulls out from the dash by pulling backward towards the back of the car.
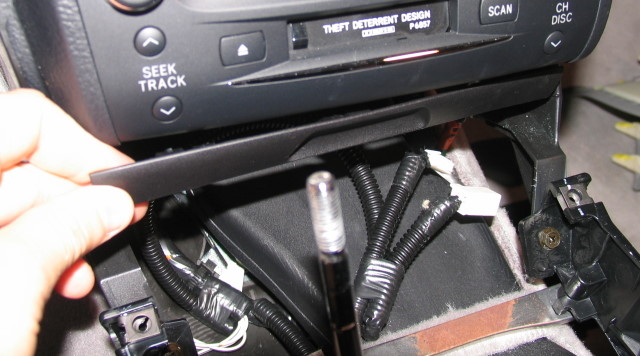
Here's that plastic thingy above the ashtray door that easily pops out and allows for easier removal and in reinstallation of the center console top.
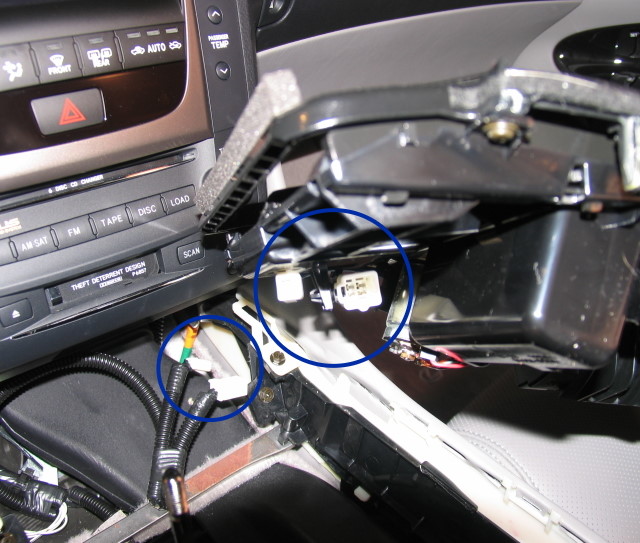
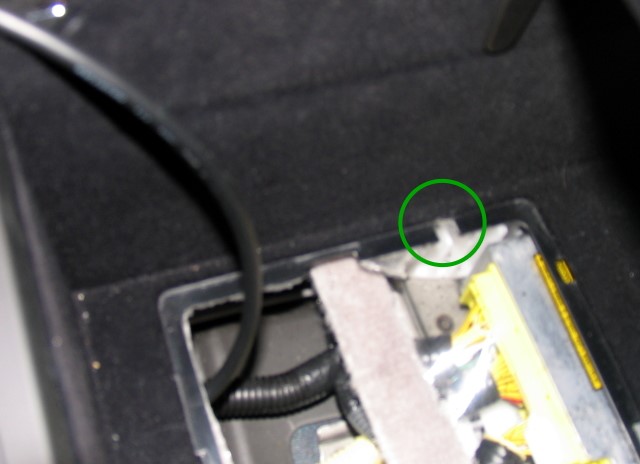
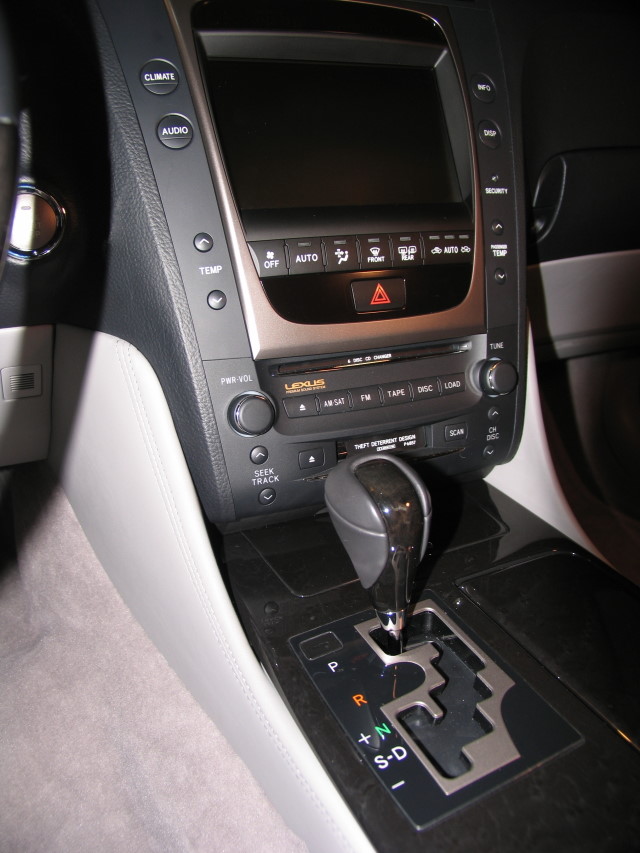
Next you will find two 10mm bolts on each side of the head unit.. remove all for of these bolts.. once removed, look under the head unit from the front, you will see two metal tab looking things sticking out, one on each side just below the bottom bolts you just removed.. they are attached directly where the bottom bolts screwed into. I didn't get a front shot but you can see one of them in this side shot just below the bottom green circle.. you need to grab these and pull on them to slide the entire head unit out.. It takes a good pull to get it out.. and i even used a small rag to grab the tabs with because they are somewhat painfull to pull on as hard as you need to, not to mention a bit sharp..

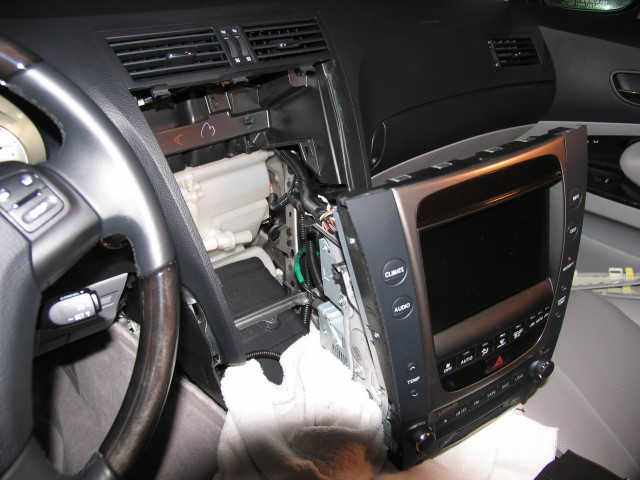
* TIP: cover the center area and shift stick with a folder over towel to protect from any accidential contact with the headunit and causing scratches...
Ok, here is the head unit removed.. now unplug the appropriate plug and connect the VIAS unit as instructed in the manual.. it's pretty easy.. every plug is different so you can't get the wrong one.. in my Non-Nav setup, it was the center plug in the bottom row on the back of the head unit.. Once you have the VIAS unit connected, go ahead and set it up according to the manual for your specific configuration.. Make sure the ipod integration and sound all work correctly before putting things back together.. This is where things got tricky for me but in a good way.. I didn't realize my ancient ipod 15gb was a 2nd gen, which does NOT work with the VIAS.. so after f'ing with the thing for 1/2hr before calling them and figuring out that was the problem, i was getting a bit steamed .. then i realized , I just discovered the perfect excuse to go out and buy a new 80gb ipod video .. so off to Target I go.. more on that later..
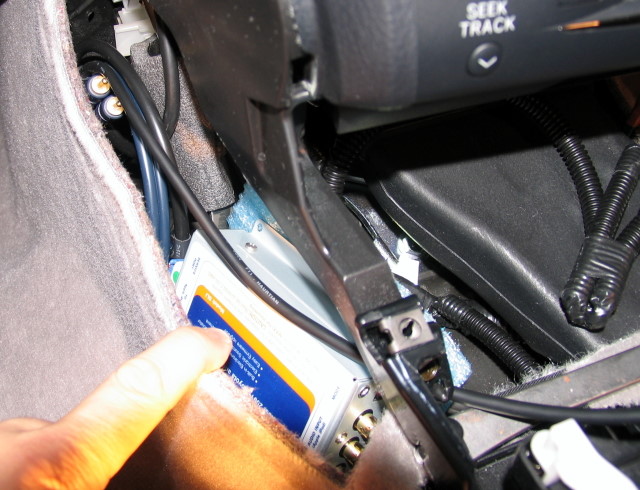
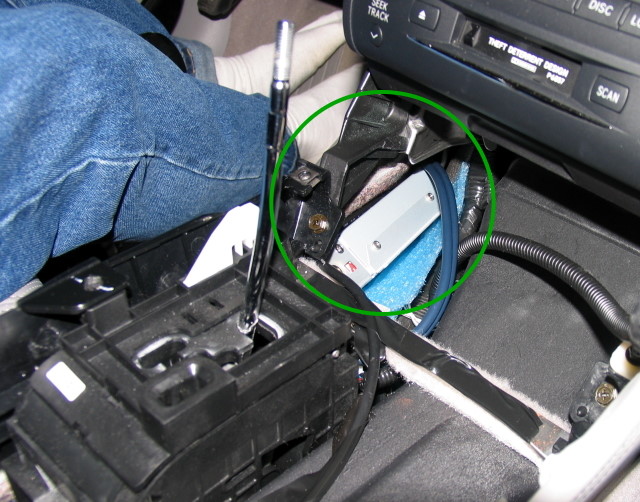
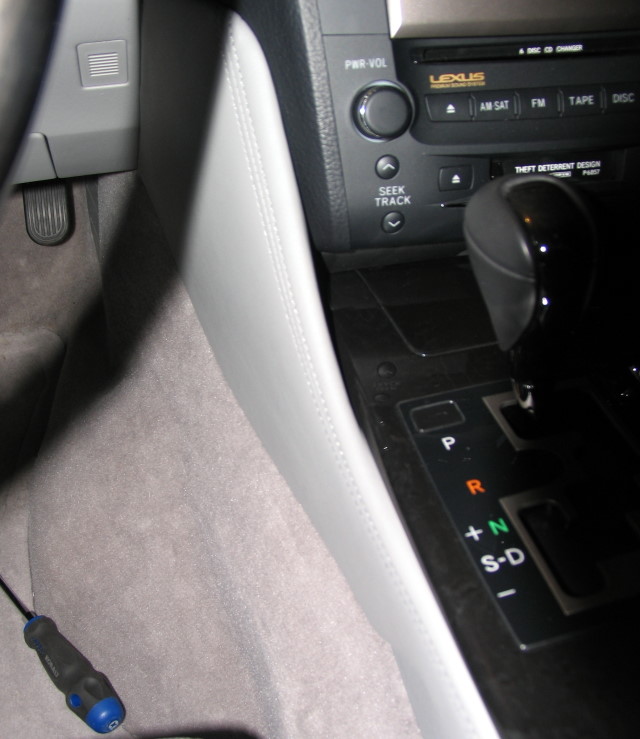
OK, things are pretty tight in there so next thing to do was figure out where to put the VIAS box so it's easy to access.. turns out there was enough space right on the drivers side just behind the carpet and just below the center console..
Continued in next post of thread (10 image max per post)...
First, remove the shift **** by rotating counter clockwise.
Next, assuming you want your ipod hidden away in your center console, find the little notch towards the front bottom of your storrage compartment and pop off the access pannel with a small screwdriver. it's difficult to pull up because the foam stuff below it is like a sticker.
Next, either cut a hole in or remove the sticky foam film.. i elected to just remove it..
Next, pry up the top of the console.. i started from the back towards where it narrows on both sides of the heated seats controls.. It pops up easy there, then just run your fingers under each side and pop it up moving toward the dash.. there are 3-4 clips on each side.. In the photo below there is a screw that needs removed so you can pull the side panel outward enough to free the center console completely.. OR.. you can remove the little plastic thing just above the ashtray door (as seen later in the photos) and it should come right out (found this out later) Also, starting the car and puting the shifter in neutral first helps.. you can shut the car off while you continue but it will yell at you until you put it back in park ..
You will need to unplug the two power/accessory plugs to completely remove the center console and set it asside..
Here we have the center console top removed and the side panels removed. Once the center console top was removed, you remove each side panel by pulling the pack side outward towards the seat untill the clips are out, then the whole thing pulls out from the dash by pulling backward towards the back of the car.
Here's that plastic thingy above the ashtray door that easily pops out and allows for easier removal and in reinstallation of the center console top.
Next you will find two 10mm bolts on each side of the head unit.. remove all for of these bolts.. once removed, look under the head unit from the front, you will see two metal tab looking things sticking out, one on each side just below the bottom bolts you just removed.. they are attached directly where the bottom bolts screwed into. I didn't get a front shot but you can see one of them in this side shot just below the bottom green circle.. you need to grab these and pull on them to slide the entire head unit out.. It takes a good pull to get it out.. and i even used a small rag to grab the tabs with because they are somewhat painfull to pull on as hard as you need to, not to mention a bit sharp..
* TIP: cover the center area and shift stick with a folder over towel to protect from any accidential contact with the headunit and causing scratches...
Ok, here is the head unit removed.. now unplug the appropriate plug and connect the VIAS unit as instructed in the manual.. it's pretty easy.. every plug is different so you can't get the wrong one.. in my Non-Nav setup, it was the center plug in the bottom row on the back of the head unit.. Once you have the VIAS unit connected, go ahead and set it up according to the manual for your specific configuration.. Make sure the ipod integration and sound all work correctly before putting things back together.. This is where things got tricky for me but in a good way.. I didn't realize my ancient ipod 15gb was a 2nd gen, which does NOT work with the VIAS.. so after f'ing with the thing for 1/2hr before calling them and figuring out that was the problem, i was getting a bit steamed .. then i realized , I just discovered the perfect excuse to go out and buy a new 80gb ipod video .. so off to Target I go.. more on that later..
OK, things are pretty tight in there so next thing to do was figure out where to put the VIAS box so it's easy to access.. turns out there was enough space right on the drivers side just behind the carpet and just below the center console..
Continued in next post of thread (10 image max per post)...
Thread Starter
Pole Position
Joined: Aug 2001
Posts: 230
Likes: 1
From: OH
Part 2...
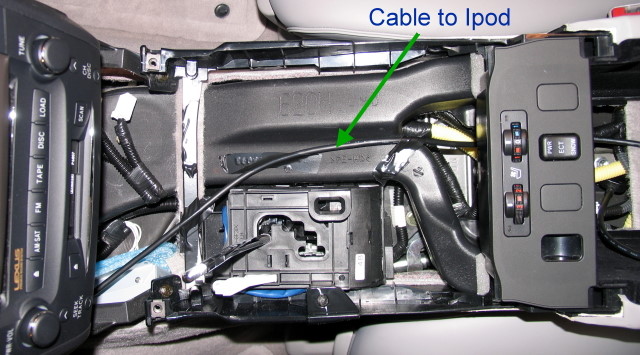
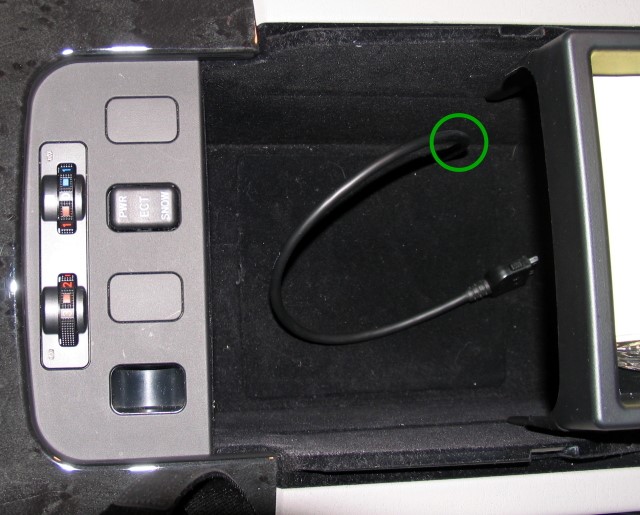
ok, now that the VIAS box is tucked away (more photos on that below), run the cable that connects to the ipod down through the center console, under and up through the storage area..
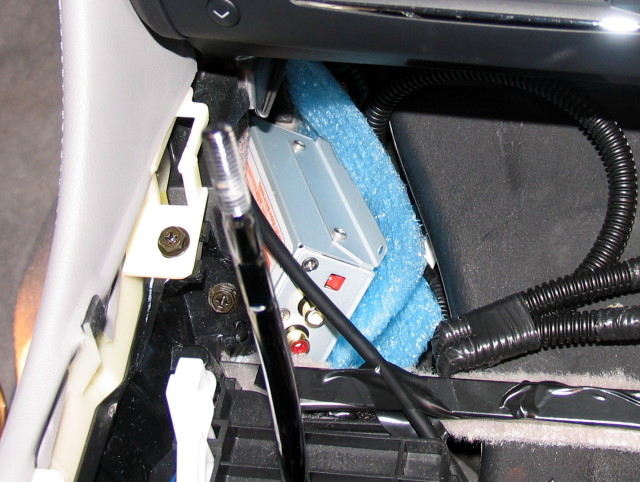
Another shot of the VIAS box tucked in the side.. I added a little padding (in blue) to keep things snug and avoid metal to metal or wires to metal contact..
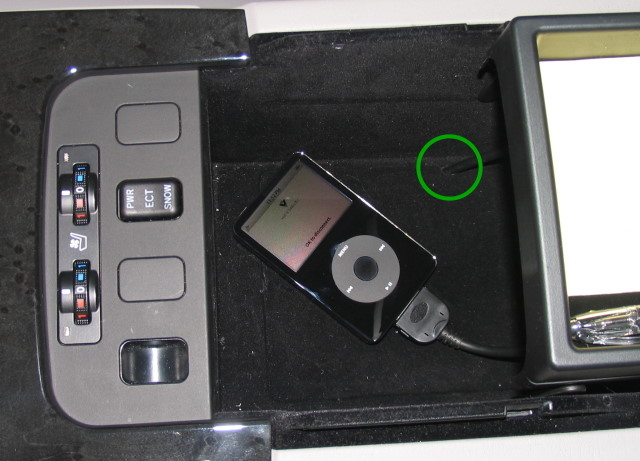
Now its time for some quick dremmel work... you need to notch out a hole both in the base of the storage area as well as in the hatch that covers the hole in the bottom of the storage area.. careful with that dremmel inside your car .. hehe..
With the hatch closed and your new ipod connector..
OK, now just reverse everything you did and put it all back together again! I got lucky.. not a scratch.. as good a new..
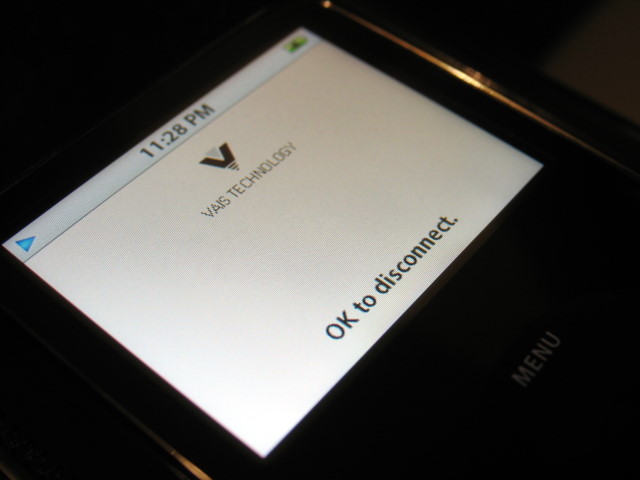
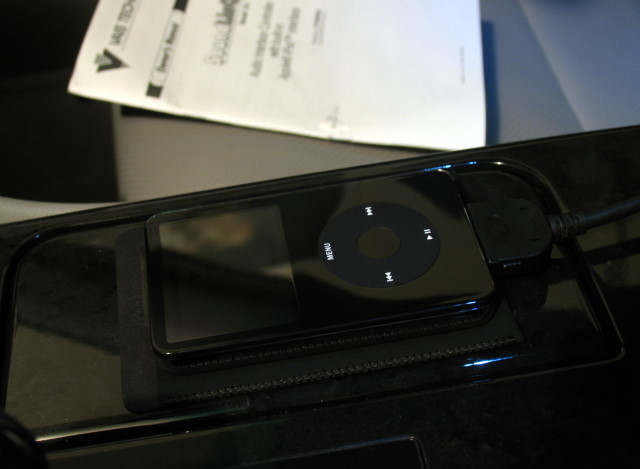
Here's the ipod video startup screen when plugged into the VAIS
The sweet new ipod video... damn thing looks so good against the dark wood, i want to mount it somewhere i can see it..
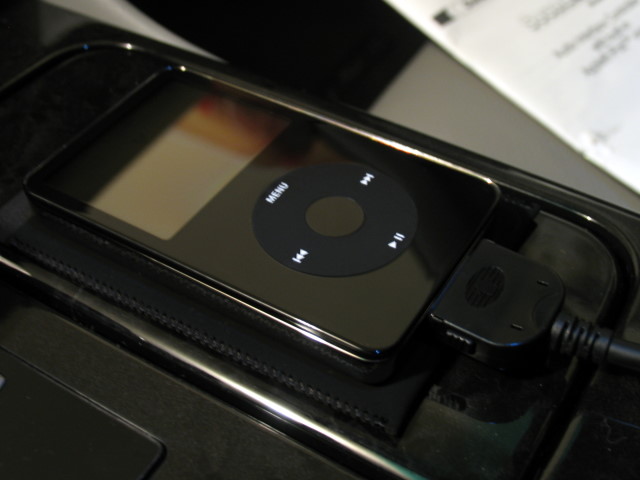
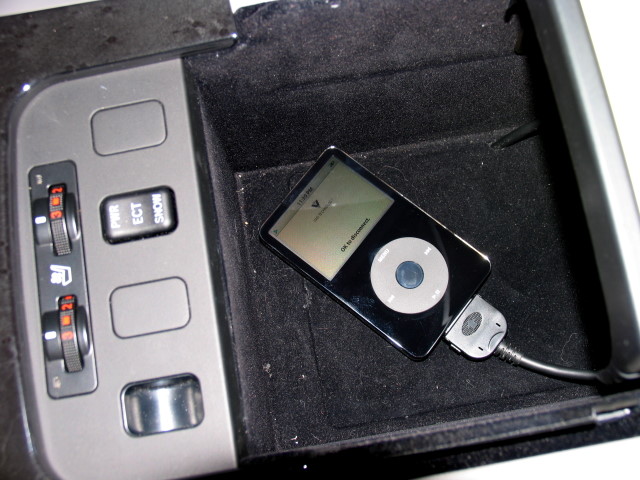
Ipod plugged in.. thinking of ways i can better secure it in there..
more photos in the next and final post..
ok, now that the VIAS box is tucked away (more photos on that below), run the cable that connects to the ipod down through the center console, under and up through the storage area..
Another shot of the VIAS box tucked in the side.. I added a little padding (in blue) to keep things snug and avoid metal to metal or wires to metal contact..
Now its time for some quick dremmel work... you need to notch out a hole both in the base of the storage area as well as in the hatch that covers the hole in the bottom of the storage area.. careful with that dremmel inside your car .. hehe..
With the hatch closed and your new ipod connector..
OK, now just reverse everything you did and put it all back together again! I got lucky.. not a scratch.. as good a new..
Here's the ipod video startup screen when plugged into the VAIS
The sweet new ipod video... damn thing looks so good against the dark wood, i want to mount it somewhere i can see it..
Ipod plugged in.. thinking of ways i can better secure it in there..
more photos in the next and final post..
Thread Starter
Pole Position
Joined: Aug 2001
Posts: 230
Likes: 1
From: OH
Part 3 .. (final)
Here are some extra photos and details of the install...
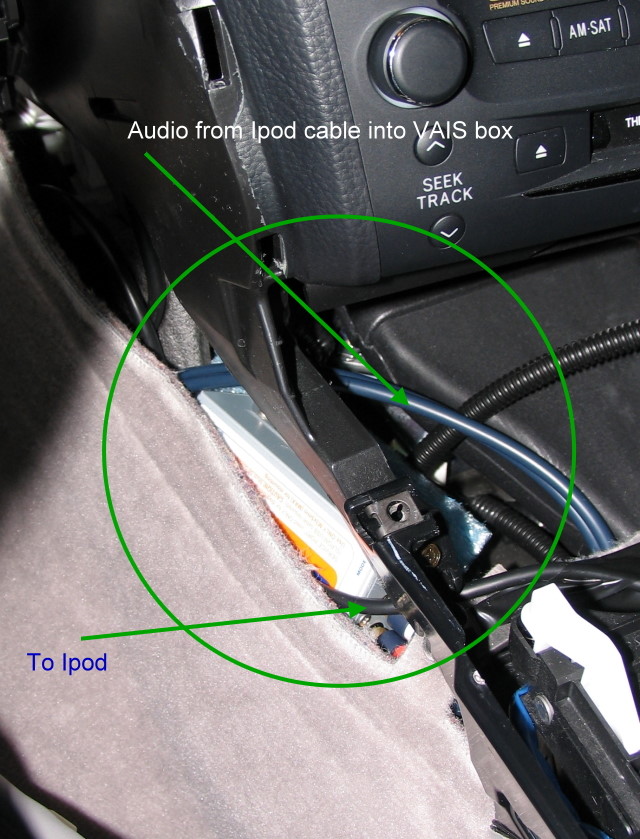
A bit more detail on the wiring.. the blue audio cables run from the 'Y' in the ipod cable to the other side of the VIAS box and into the audio input jacks labeled 'ipod'.. the black cable is coming from the ipod ..
Another view of the VIAS tucked away.. it is very snug in this position.. no double sided tape or screws were used to anchor it.. it wasn't needed IMO and after a 1/2 drive it hadn't moved or rattled in any way..
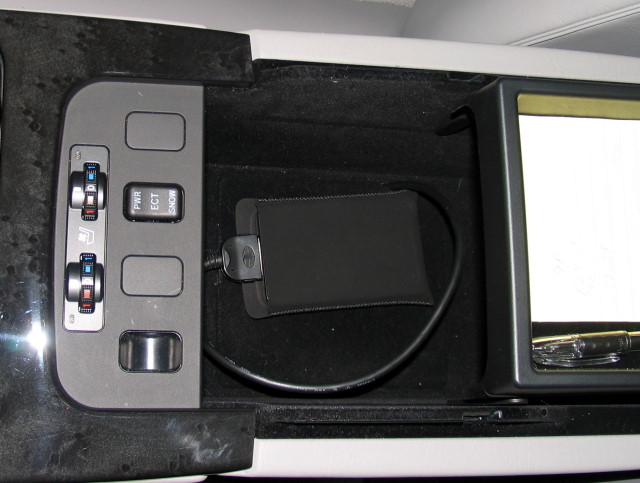
Another view of where the ipod connector comes through the storage compartment floor..
A temporary solution to keep the ipod from sliding around and add some protecion.. just put it in it's felt like cover which was included with the ipod. I'll probably find a better case to put it in that i can mount to the side of the storage area.
A post install shot showing that there is no carpet bulging or incorrect fitment of the side panels with the VIAS tucked in where it is.. and it will be very easy to access for upgrades.. crossing fingers that VIAS will soon have a solution to let me play videos from the ipod on the screen
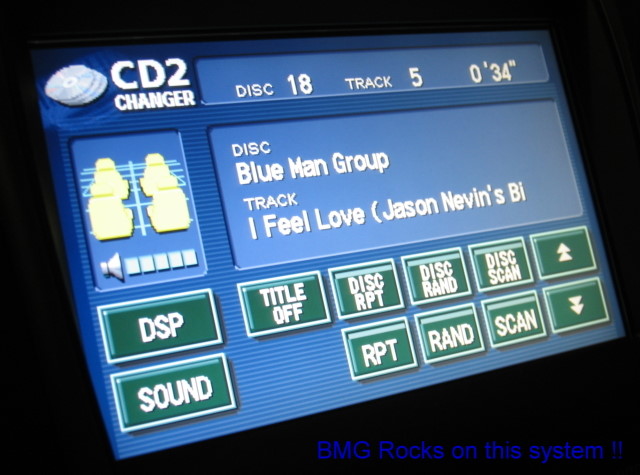
A shot of the new ipod interface.. Blue Man Group sounds unreal on the Pioneer system..
** One other tip on the install.. DO NOT attempt to remove the air vents above the head unit.. they are part of the dash and do not need removed in any way..
Thats it... i know there are many others that have taked advantage of the group buy, so i figured this may help with your install and ease your fears about ripping apart your dash Good luck...
Here are some extra photos and details of the install...
A bit more detail on the wiring.. the blue audio cables run from the 'Y' in the ipod cable to the other side of the VIAS box and into the audio input jacks labeled 'ipod'.. the black cable is coming from the ipod ..
Another view of the VIAS tucked away.. it is very snug in this position.. no double sided tape or screws were used to anchor it.. it wasn't needed IMO and after a 1/2 drive it hadn't moved or rattled in any way..
Another view of where the ipod connector comes through the storage compartment floor..
A temporary solution to keep the ipod from sliding around and add some protecion.. just put it in it's felt like cover which was included with the ipod. I'll probably find a better case to put it in that i can mount to the side of the storage area.
A post install shot showing that there is no carpet bulging or incorrect fitment of the side panels with the VIAS tucked in where it is.. and it will be very easy to access for upgrades.. crossing fingers that VIAS will soon have a solution to let me play videos from the ipod on the screen
A shot of the new ipod interface.. Blue Man Group sounds unreal on the Pioneer system..
** One other tip on the install.. DO NOT attempt to remove the air vents above the head unit.. they are part of the dash and do not need removed in any way..
Thats it... i know there are many others that have taked advantage of the group buy, so i figured this may help with your install and ease your fears about ripping apart your dash
Good luck...


Trending Topics


Driver School Candidate
Joined: Oct 2006
Posts: 29
Likes: 0
From: IN
Thanks for the great installation instructions! I'm ordering my SLI today and will put them to use. Group buy has two days left 12/14.
Link to group buy details:
https://www.clublexus.com/forums/sho...d.php?t=252414
Now, I need Santa to come thru with a shiny new iPod as the one I have is the original 1st Generation 5GB iPod. I believe that a 3rd Gen iPod or newer is needed to work with the SLI.
Link to group buy details:
https://www.clublexus.com/forums/sho...d.php?t=252414
Now, I need Santa to come thru with a shiny new iPod as the one I have is the original 1st Generation 5GB iPod. I believe that a 3rd Gen iPod or newer is needed to work with the SLI.
Ron, this is an awesome write up, any comments on the unit settings that you found to work best, changer emulation I assume, I have not looked at the specifics of that yet....thanks
Thread Starter
Pole Position
Joined: Aug 2001
Posts: 230
Likes: 1
From: OH
As far as settings go.. the install guide tells you which emulation mode you have to use based on your vehicle.. from what i can tell, you really don't have a choice.. For us, it's 'CD' .. which means you have CD1 - your regular 6-disc changer, and CD2 - the Ipod..
One thing i noticed at first when listening was that for some reason the volume level seemed low.. i could crank the stereo all the way to 63(max) without making my ears ring
, but with a regular CD that usually starts to happen in the 40s.. I figured out that turning off the Ipod's 'Sound Control' that auto adjust volume across all songs to be equal fixed the problem.. I had turned it on because the VIAS install manual suggested to do so.. But correct me if i'm wrong, the IPOD finds the lowest volume song file and adjusts all others down, so if you have one or more songs recorded at a low level, it affects all the others. Other than that, that's all i've noticed so far.. i may find more tips as i play with it some more.. I'll be on the road 8hrs this weekend so i'll get some play time soon


Pole Position
Joined: Jul 2006
Posts: 256
Likes: 0
From: KS
Ron - One of the best write-up (for level of detail, step by step instructions and pics) I've seen so far on on CL. However, one question. I believe VAIS Tech recommends their units be installed in a place with easy access and easy removal for times when (a) heaven forbid troubleshooting is necessary or; (b) software needs to be upgraded on the unit and you have to unplug and ship it back to VAIS tech.
Is the spot you chose for yours easily accessable without having to remove the trim again, etc.? Again, thanks for the excellent post.
Is the spot you chose for yours easily accessable without having to remove the trim again, etc.? Again, thanks for the excellent post.
Thread Starter
Pole Position
Joined: Aug 2001
Posts: 230
Likes: 1
From: OH
Ron - One of the best write-up (for level of detail, step by step instructions and pics) I've seen so far on on CL. However, one question. I believe VAIS Tech recommends their units be installed in a place with easy access and easy removal for times when (a) heaven forbid troubleshooting is necessary or; (b) software needs to be upgraded on the unit and you have to unplug and ship it back to VAIS tech.
Is the spot you chose for yours easily accessable without having to remove the trim again, etc.? Again, thanks for the excellent post.
Is the spot you chose for yours easily accessable without having to remove the trim again, etc.? Again, thanks for the excellent post.