Starter repair DIY 2000 GS300
 11-11-12, 03:54 AM
#1
Driver School Candidate
Thread Starter

Hi,
I had to repair my starter. I looked all over online and had trouble finding a tutorial for this particular make and model. As of now I'm not much of a mechanic so this was difficult initially to figure out. So I figured I would add this here to help others out.
The cost of the repair was around $180. The starter was $210, but Autozone gives you back around $50 once you return the core/old starter. The ratchet extension was $20 at Oriely's.
I had troubles with the car starting. It would start sometimes and then other times take about 10 cranks to start. First thought it was the battery, but after replacing it the problem persisted. So a neighbor helped me diagnose the starter by tapping it hard with a bar while I turned the key in the ignition and it fired right up. So that is one way to figure out if your starter needs to repaired. I believe Auto part stores check it as well, but if you can't drive it then this way may work for you.
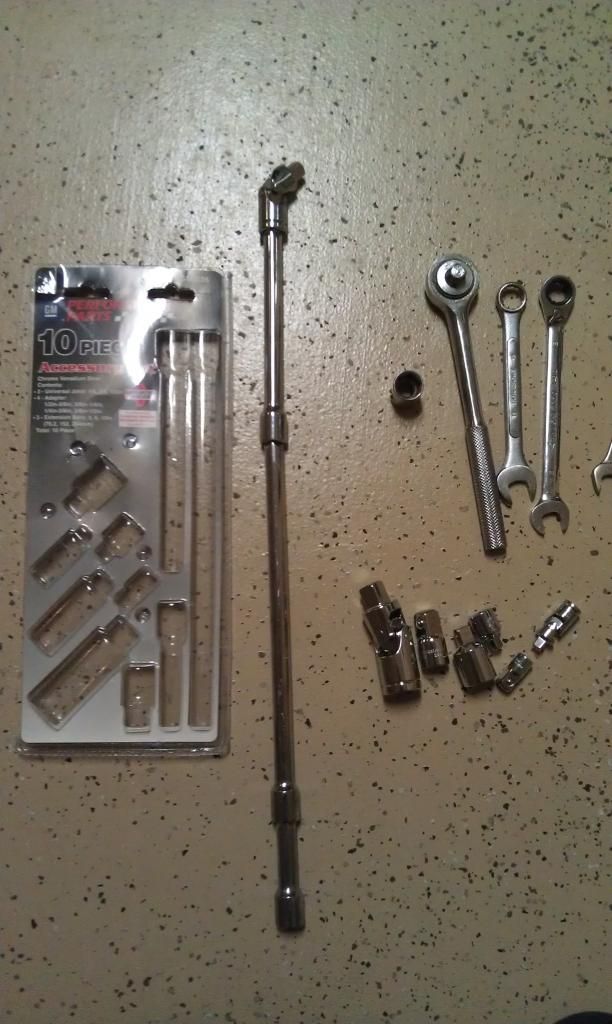
So after researching online I found most sources saying to lower the transmission in order to change out the starter. I do not have the proper tools to do this correctly and it seems like alot of work for such an easy fix. I have never tinkered with a transmission so I had to figure a way around it. The only way I found was buying an extension set to reach the top bolt.
tools:
12 mm wrench
14 socket
ratchet and extension set
So here's my solution.
1. unplug the battery and tie off the wires so it cant fall back to the battery.
2. jack up the car and put it on jack stands put the parking brake on with something behind the back tires to keep it from moving.
3. climb under the car and locate the starter. While standing over the engine its on the right side, while under the car its on the left side of the engine.
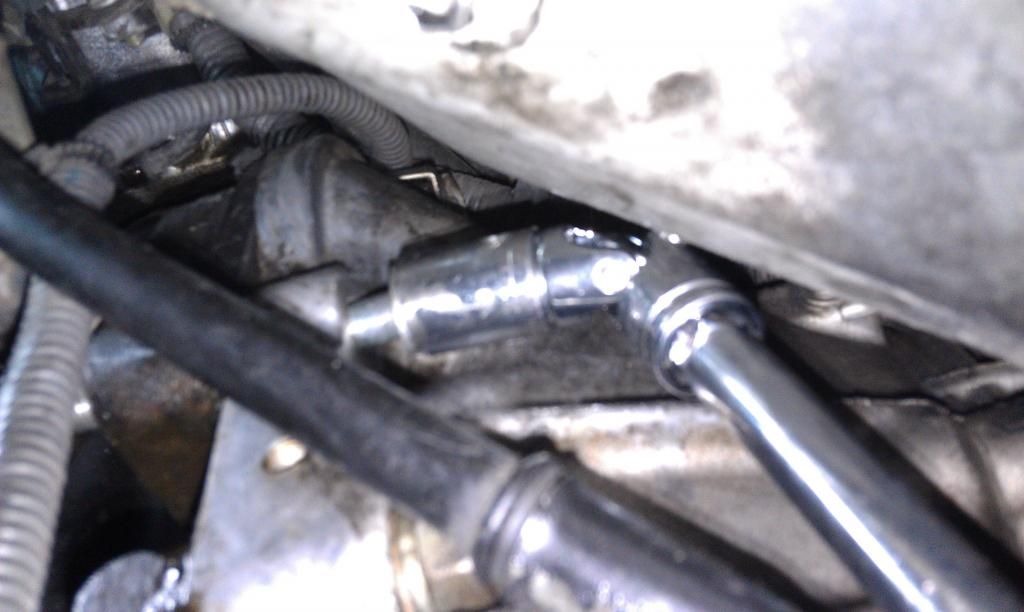
4. unscrew and unplug wires attached to the starter. One of my wires were attached to the bolt that holds the starter in place. Not sure if this is standard.
5. loosen the lower easy to reach bolt with a 14mm wrench or socket and ratchet.
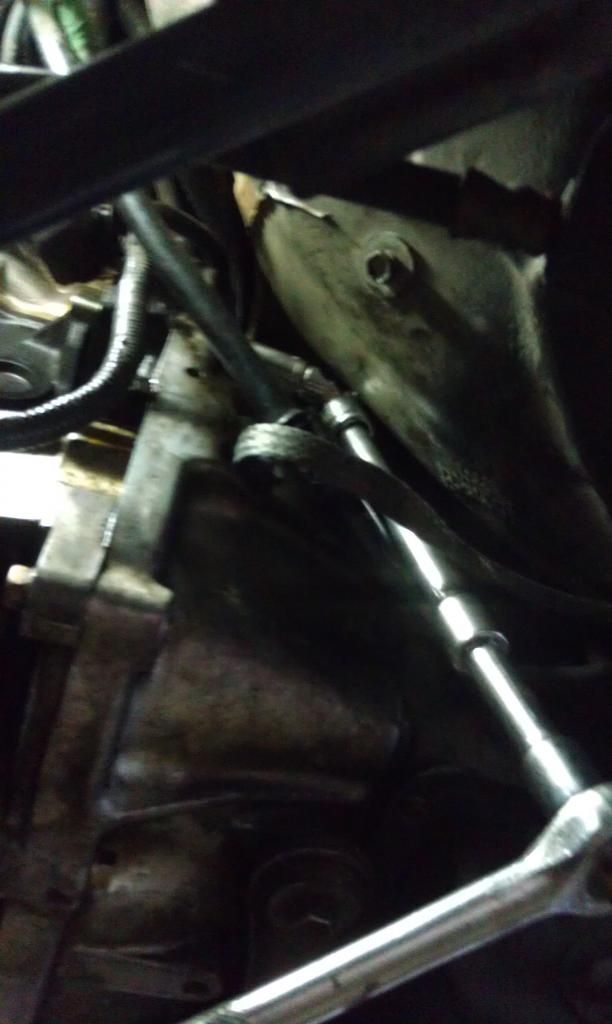
6. use the extension on the ratchet along with the 14mm socket to reach the top bolt and unscrew it.
7. with both bolts removed maneuver the starter out of the car by twisting and turning it. Its a tight fit so be careful not to yank any wires or lines out of their place.
8. wipe off area on the transmission where the starter bolts to the transmission. You want the area clean enough for metal to be grounded to the surface since its an electrical part. A wipe down with a shop towel should be good enough.
9. match up the new starter with the old to make sure its the proper part. Then maneuver the new starter into the correct place to fix the bolts back in. Make sure bolts are on as tight as they were when you took it off.
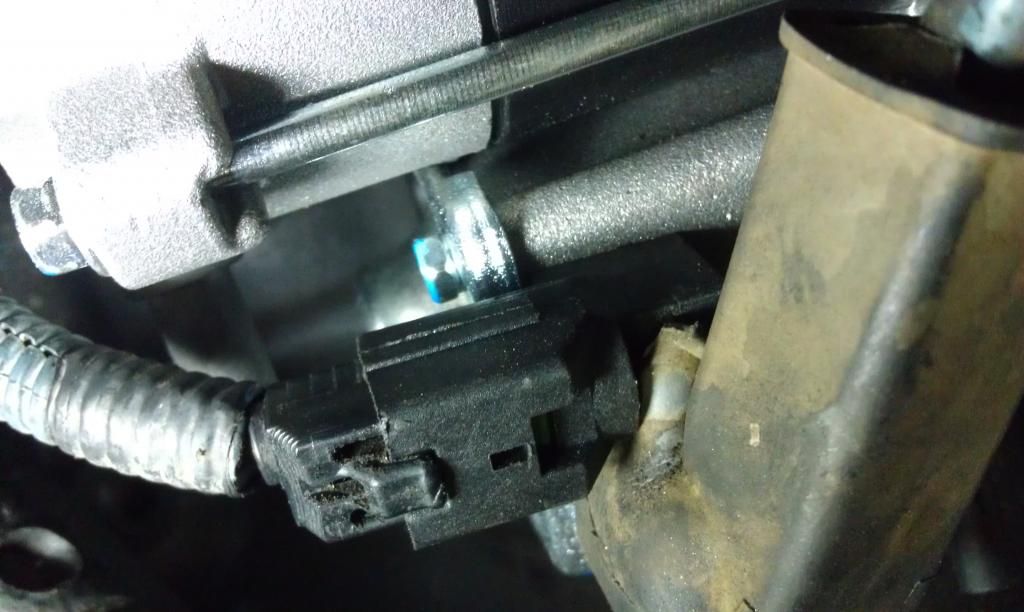
10. make sure you reconnect all the wires to the new starter that you unattached from the old starter. Should be three.
11. once everything is solid. Take the car down, reattach the battery, and start it up. Should work perfectly.
Note: you should check the old starter for damage to the gear that goes into the transmission. If any teeth are broken then you may need further repair. I read this somewhere and it didn't apply to me so I just replaced it with the new starter and kept it moving.
So that should save you a ton of cash and get your car back on the road in no time.
Here's some pics for you
The tools I used
Reaching the "impossible" top bolt with the extension set in this configuration
Reconnecting the connections to the new starter. The third wire was actually in between the top bolt and mount so I just put the bolt back through the wire when I replaced it.
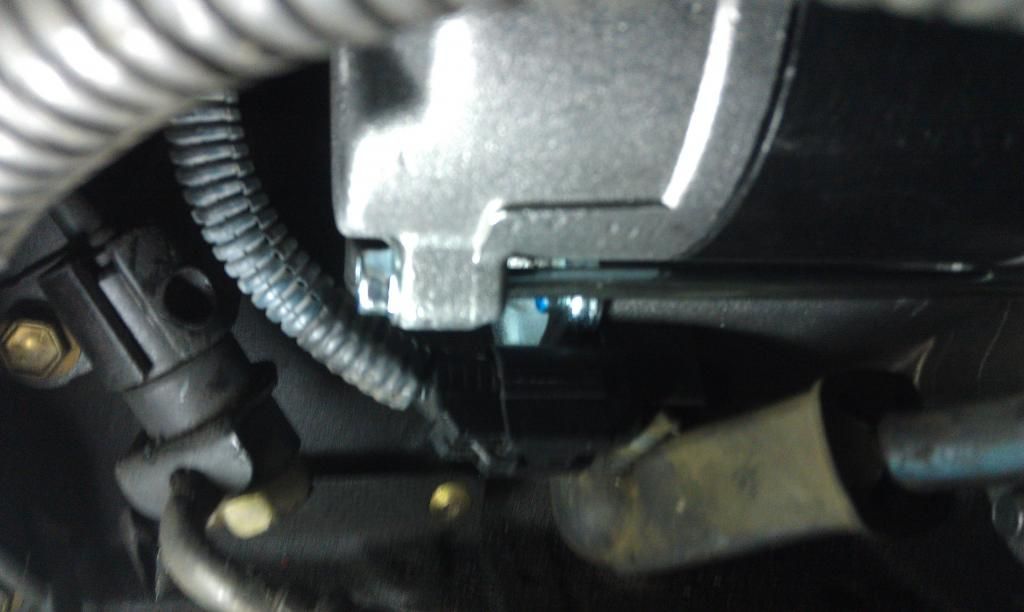
You can see the third wire in the coil going to the top bolt right above the socket. The socket is on the bottom bolt in this pic. Your car may be the same.
back on the road
I had to repair my starter. I looked all over online and had trouble finding a tutorial for this particular make and model. As of now I'm not much of a mechanic so this was difficult initially to figure out. So I figured I would add this here to help others out.
The cost of the repair was around $180. The starter was $210, but Autozone gives you back around $50 once you return the core/old starter. The ratchet extension was $20 at Oriely's.
I had troubles with the car starting. It would start sometimes and then other times take about 10 cranks to start. First thought it was the battery, but after replacing it the problem persisted. So a neighbor helped me diagnose the starter by tapping it hard with a bar while I turned the key in the ignition and it fired right up. So that is one way to figure out if your starter needs to repaired. I believe Auto part stores check it as well, but if you can't drive it then this way may work for you.
So after researching online I found most sources saying to lower the transmission in order to change out the starter. I do not have the proper tools to do this correctly and it seems like alot of work for such an easy fix. I have never tinkered with a transmission so I had to figure a way around it. The only way I found was buying an extension set to reach the top bolt.
tools:
12 mm wrench
14 socket
ratchet and extension set
So here's my solution.
1. unplug the battery and tie off the wires so it cant fall back to the battery.
2. jack up the car and put it on jack stands put the parking brake on with something behind the back tires to keep it from moving.
3. climb under the car and locate the starter. While standing over the engine its on the right side, while under the car its on the left side of the engine.
4. unscrew and unplug wires attached to the starter. One of my wires were attached to the bolt that holds the starter in place. Not sure if this is standard.
5. loosen the lower easy to reach bolt with a 14mm wrench or socket and ratchet.
6. use the extension on the ratchet along with the 14mm socket to reach the top bolt and unscrew it.
7. with both bolts removed maneuver the starter out of the car by twisting and turning it. Its a tight fit so be careful not to yank any wires or lines out of their place.
8. wipe off area on the transmission where the starter bolts to the transmission. You want the area clean enough for metal to be grounded to the surface since its an electrical part. A wipe down with a shop towel should be good enough.
9. match up the new starter with the old to make sure its the proper part. Then maneuver the new starter into the correct place to fix the bolts back in. Make sure bolts are on as tight as they were when you took it off.
10. make sure you reconnect all the wires to the new starter that you unattached from the old starter. Should be three.
11. once everything is solid. Take the car down, reattach the battery, and start it up. Should work perfectly.
Note: you should check the old starter for damage to the gear that goes into the transmission. If any teeth are broken then you may need further repair. I read this somewhere and it didn't apply to me so I just replaced it with the new starter and kept it moving.
So that should save you a ton of cash and get your car back on the road in no time.
Here's some pics for you
The tools I used
Reaching the "impossible" top bolt with the extension set in this configuration
Reconnecting the connections to the new starter. The third wire was actually in between the top bolt and mount so I just put the bolt back through the wire when I replaced it.
You can see the third wire in the coil going to the top bolt right above the socket. The socket is on the bottom bolt in this pic. Your car may be the same.
back on the road

The following users liked this post:
cheesemonk (01-08-19)
06-19-14, 09:45 PM
#2
Driver School Candidate

Join Date: Oct 2012
Location: ny
Posts: 1
Likes: 0
Received 0 Likes
on
0 Posts
This is an excellent description of the job. I have one additional hint to offer. When installing the new unit don't screw in the top bolt very much until you have the bottom snug. If you first screw the top bolt too much you will not be able to get a socket on the botom one.
When removing the old starter I needed to put a pipe on my socket wrench for leverage. I was so jammed in under the car that I could not get at a good angle to really put pressue on the rachet to loosen the bolt.
I purchased an Autozone starter. It works well but has a different sound than OEM. I thin kit actually cranks faster.
06-20-14, 12:29 PM
#3
Driver School Candidate

Join Date: May 2012
Location: united kingdom
Posts: 15
Likes: 0
Received 0 Likes
on
0 Posts
did mine a couple of weeks back but managed to remove and repair my starter as its the contacts and plunger in the solenoid 9times out of 10....took about a hour the whole job..think there is a thread about it somewhere on a how to? cost of parts �13 but unsure of where you are
06-25-14, 02:36 AM
#4
Driver School Candidate
Thread Starter
I'll definitely try that method with the screws next time around. I agree, using a pipe around a ratchet has spared me a lot of broken knuckles in the last repair job I did on the rear brake. I should do a post about it since I found a way to do it without taking off the brake mount. I wasted a lot of energy and time wrestling with this thing. The bolt was welded on. Even with a pipe and power lifter sort of strength it was not budging. So I may be able to help some poor sap on a tight budget like myself.
I did come across a couple videos about repairing the part the way you mentioned. Not sure why I didn't give it a shot. But congrats on saving the money and doing something cool. Great learning experience and it applies to other stuff. I fix alot of things on my own. So I know the reward. Good work. If I need to repair it again I will try this as well.
I did come across a couple videos about repairing the part the way you mentioned. Not sure why I didn't give it a shot. But congrats on saving the money and doing something cool. Great learning experience and it applies to other stuff. I fix alot of things on my own. So I know the reward. Good work. If I need to repair it again I will try this as well.
09-17-15, 05:48 PM
#5

I decided to rebuild my starter rather than replace. I spent about $65 would have been about $45 if I didn't do the brushes and I got the parts from Toyota I can't find my receipt right now, but I did get a great deal on parts. I will give approximate prices. I would suggest doing research for prices online then go into your local Toyota dealer and ask them if they can match them. If you get a good parts guy they will match prices and you don't pay shipping.
28226-74070 Repair kit $11.50
28226-22050 Repair kit $8.25
28235-55050 Plunger $22
28165-76070 Plunger Return Spring $2.00
28140-76070 Holder and Brushes. $19.00
Honestly I probably wouldn't do the Holder and brushes again. On the starter there are 4 brushes and the holder only comes with 2. To get the other 2 you need to buy the starter housing which is crazy expensive and the brushes are designed to last forever anyways. Here is a Youtube link. You don't have to get as far into it as the video, but that's up to you.
Last edited by lexo98; 09-17-15 at 05:49 PM. Reason: added link
09-17-15, 10:08 PM
#6
Driver

Join Date: Mar 2015
Location: Az
Posts: 135
Likes: 0
Received 0 Likes
on
0 Posts
One of my very close friends is head manager of the service dept. At a Toyota dealership that's close by, all Ill say is being cool as hell, having part Numbers ready, and dead serious, a tip making sure you will not be forgotten for your next visit there will honestly take you long ways.... Haha they choose the prices, trust me haha I've paid cost for a long time now but those tips I mentioned have been told to me. Dont let others see any donation you may make.

Thread
Thread Starter
Forum
Replies
Last Post