


1999 Lexus GS 400 Starting Problems


Lexus Test Driver
Joined: Oct 2007
Posts: 975
Likes: 6
From: CA

Double-check the lines and hoses for coolant to the radiator and what not. I think it is a coolant flow / pressure problem

Instructor


Joined: Nov 2005
Posts: 1,001
Likes: 51
From: Mountainair, NM
The coolant tube is a press fit into its base.
You must have inadvertently moved, pulled or bent the tube.
You will need to reseat the tube, remove the coolant hose from the tube and with a small block of wood and a hammer start tapping until the tube is seated into its base.
From the picture it looks like 1/8", you can do this without removing the manifold.
Don't know about the coolant coming from the bolt but it could be loose.
You should be able to get a 12mm socket down there with an extension maybe a swivel.
Good luck...
You must have inadvertently moved, pulled or bent the tube.
You will need to reseat the tube, remove the coolant hose from the tube and with a small block of wood and a hammer start tapping until the tube is seated into its base.
From the picture it looks like 1/8", you can do this without removing the manifold.
Don't know about the coolant coming from the bolt but it could be loose.
You should be able to get a 12mm socket down there with an extension maybe a swivel.
Good luck...

Driver School Candidate
Joined: Jun 2010
Posts: 23
Likes: 0
From: CA
Knock Sensor CODE, any1 know how to By-pass with RESISTOR?
The coolant tube is a press fit into its base.
You must have inadvertently moved, pulled or bent the tube.
You will need to reseat the tube, remove the coolant hose from the tube and with a small block of wood and a hammer start tapping until the tube is seated into its base.
From the picture it looks like 1/8", you can do this without removing the manifold.
Don't know about the coolant coming from the bolt but it could be loose.
You should be able to get a 12mm socket down there with an extension maybe a swivel.
Good luck...
You must have inadvertently moved, pulled or bent the tube.
You will need to reseat the tube, remove the coolant hose from the tube and with a small block of wood and a hammer start tapping until the tube is seated into its base.
From the picture it looks like 1/8", you can do this without removing the manifold.
Don't know about the coolant coming from the bolt but it could be loose.
You should be able to get a 12mm socket down there with an extension maybe a swivel.
Good luck...
thanks! i bought a used 1 from a recylery... and bought gaskets from lexus and it stilled bubbled out a lil coolant... but i just put gasket silicone high temp around, and hope its good.. so far so good for now...
but i have another issue... after everything is so called fixed...
check engine light came on, and shop saids it the knock sensor... i remeber it was brittle and blue it... but dammm!!! i dont wanna take the manifold back off!!! the shop said that i can by-pass it with a RESISTOR to turn it off. does anybody know the wattage or Range of the RESISTOR???
Instructor
Joined: Nov 2005
Posts: 1,001
Likes: 51
From: Mountainair, NM
We have relatively high compression motors that rely highly on correct timing for performance and efficiency not to mention protecting the motor from pre-ignition and detonation.
If you care about your car, do not bypass your knock sensor.
The knock sensor detects engine knock and sends a voltage signal to the ECU, in turn the ECU controls the engine timing.
With the knock sensor not working your car is running in OPEN MODE or default safe mode so that timing will not advance as it would in CLOSED LOOP.
If you care about your car fix it right...
...off soap box.
Good Luck
If you care about your car, do not bypass your knock sensor.
The knock sensor detects engine knock and sends a voltage signal to the ECU, in turn the ECU controls the engine timing.
With the knock sensor not working your car is running in OPEN MODE or default safe mode so that timing will not advance as it would in CLOSED LOOP.
If you care about your car fix it right...
...off soap box.
Good Luck


Lead Lap
Joined: Jan 2008
Posts: 514
Likes: 0
From: Canada
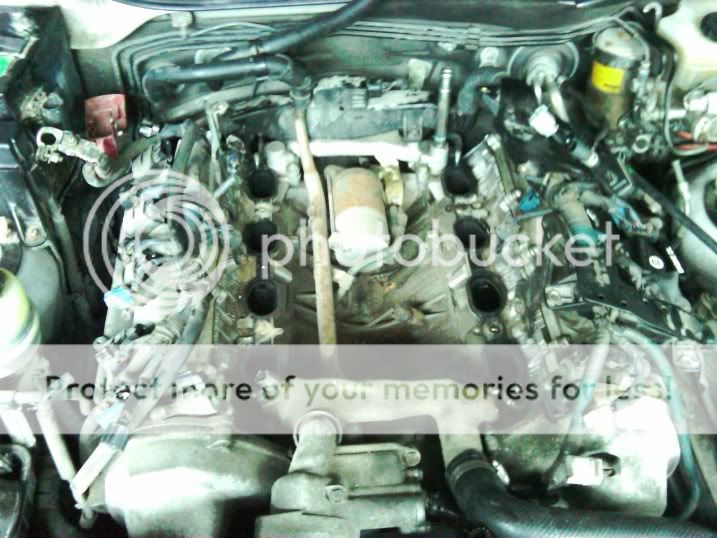
I was having starter problems for 3 months and after reading this thread I thought I'd repair my starter. I replaced the plunger and contacts inside the solenoid. Now the GS starts up like brand new. If you do this DIY I recommend you take the upper, lower intake manifolds, and the throttle body off as one piece. Saves a lotta time and effort. Here's some pictures.

Last edited by Chumacher; Aug 3, 2010 at 02:07 PM.

Lead Lap
Joined: Jan 2008
Posts: 514
Likes: 0
From: Canada
There are 4 bolts on the far corners and 6 torx bolts that hold the entire intake manifold down. Re-install as a star pattern when tightening the bolts. If you disconnect all the sensors that connect to the manifold and the throttle body you can take it off as one piece. As mentioned before you'll spill coolant from the hoses that connect to the manifold. You'll also have to disconnect the throttle cable and take off 2 of the brackets that screw into the engine cover. There are a few bolts that connect the fuel rails to the manifold. You'll have to unscrew those and pull them to the side to create room for the manifold to come off. Also when taking the intake manifold out you have to lift it and turn it 30 degrees counter clockwise. On the back right corner is an intake hose that can't be removed so you'll have to work around that corner. Then pull to the left and it should be able to come off. Good luck!
Last edited by Chumacher; Aug 3, 2010 at 03:44 PM.

Driver School Candidate
Joined: Aug 2006
Posts: 2
Likes: 0
From: CA
The excellent details and pictures enabled me to resolve the starting issues within my GS400. Thanks all!
Additionally, anyone else who decides to "rebuild" the starter may find the additional details helpful:
1. Begin by draining about 1 Gallon of coolant (make sure the car is cooled down). This will minimize coolant spillage. I only had a few drops overall! The drops was when I removed the coolant line going into the throttle body. If you are careful you may be able to avoid any coolant spillage.
2. Fuel Line: I was able to remove the starter without removing the fuel line.
Note - If you choose to remove the fuel line take extreme caution. I almost stripped the fuel line. You will need a 14mm and 19mm flare wrenches. For the 14mm I recommend using a higher end flare wrench such SK tools, MAC, or Snap-on brand. I used a relatively new 14mm Craftsman and almost stripped the fuel line (which is why I decided not to remove the fuel line). However the fuel line needed to be tightened. The Craftsman failed and ended up using an SK flare wrench, which completed the job even with a half chewed up fuel line. For the 19mm I used a Craftsman flare wrench since I do not have an SK version.
3. Removing the starter: Two 14mm bolts are located on the Bell Housing side. Removal is a bit tricky with the limited space.
Good luck!
Additionally, anyone else who decides to "rebuild" the starter may find the additional details helpful:
1. Begin by draining about 1 Gallon of coolant (make sure the car is cooled down). This will minimize coolant spillage. I only had a few drops overall! The drops was when I removed the coolant line going into the throttle body. If you are careful you may be able to avoid any coolant spillage.
2. Fuel Line: I was able to remove the starter without removing the fuel line.
Note - If you choose to remove the fuel line take extreme caution. I almost stripped the fuel line. You will need a 14mm and 19mm flare wrenches. For the 14mm I recommend using a higher end flare wrench such SK tools, MAC, or Snap-on brand. I used a relatively new 14mm Craftsman and almost stripped the fuel line (which is why I decided not to remove the fuel line). However the fuel line needed to be tightened. The Craftsman failed and ended up using an SK flare wrench, which completed the job even with a half chewed up fuel line. For the 19mm I used a Craftsman flare wrench since I do not have an SK version.
3. Removing the starter: Two 14mm bolts are located on the Bell Housing side. Removal is a bit tricky with the limited space.
Good luck!
Lexus Test Driver
Joined: Oct 2007
Posts: 975
Likes: 6
From: CA
The excellent details and pictures enabled me to resolve the starting issues within my GS400. Thanks all!
Additionally, anyone else who decides to "rebuild" the starter may find the additional details helpful:
1. Begin by draining about 1 Gallon of coolant (make sure the car is cooled down). This will minimize coolant spillage. I only had a few drops overall! The drops was when I removed the coolant line going into the throttle body. If you are careful you may be able to avoid any coolant spillage.
2. Fuel Line: I was able to remove the starter without removing the fuel line.
Note - If you choose to remove the fuel line take extreme caution. I almost stripped the fuel line. You will need a 14mm and 19mm flare wrenches. For the 14mm I recommend using a higher end flare wrench such SK tools, MAC, or Snap-on brand. I used a relatively new 14mm Craftsman and almost stripped the fuel line (which is why I decided not to remove the fuel line). However the fuel line needed to be tightened. The Craftsman failed and ended up using an SK flare wrench, which completed the job even with a half chewed up fuel line. For the 19mm I used a Craftsman flare wrench since I do not have an SK version.
3. Removing the starter: Two 14mm bolts are located on the Bell Housing side. Removal is a bit tricky with the limited space.
Good luck!
Additionally, anyone else who decides to "rebuild" the starter may find the additional details helpful:
1. Begin by draining about 1 Gallon of coolant (make sure the car is cooled down). This will minimize coolant spillage. I only had a few drops overall! The drops was when I removed the coolant line going into the throttle body. If you are careful you may be able to avoid any coolant spillage.
2. Fuel Line: I was able to remove the starter without removing the fuel line.
Note - If you choose to remove the fuel line take extreme caution. I almost stripped the fuel line. You will need a 14mm and 19mm flare wrenches. For the 14mm I recommend using a higher end flare wrench such SK tools, MAC, or Snap-on brand. I used a relatively new 14mm Craftsman and almost stripped the fuel line (which is why I decided not to remove the fuel line). However the fuel line needed to be tightened. The Craftsman failed and ended up using an SK flare wrench, which completed the job even with a half chewed up fuel line. For the 19mm I used a Craftsman flare wrench since I do not have an SK version.
3. Removing the starter: Two 14mm bolts are located on the Bell Housing side. Removal is a bit tricky with the limited space.
Good luck!
Driver School Candidate
Joined: Aug 2006
Posts: 2
Likes: 0
From: CA
The fuel line has enough "play" where you may:
(1) lift the intake manifold up
(2) turn the manifold left and right to clear the coolant line on the firewall
(3) move the intake manifold forward
Note: The intake manifold will remain in the engine bay.
Hope this helps!
(1) lift the intake manifold up
(2) turn the manifold left and right to clear the coolant line on the firewall
(3) move the intake manifold forward
Note: The intake manifold will remain in the engine bay.
Hope this helps!

Lead Lap
Joined: Jan 2007
Posts: 589
Likes: 2
From: 21045
I did this over the weekend and thought I would share my experience
Just a couple of notes on this install.
1-Have friend to help out when you're ready to remove the manifold
2-you have enough room to get to the starter bolts once the intake manifold is off.
3- be careful when putting the manifold back on. I broke my coolant temp. sensor when I was doing mine. it's on the passenger side right behind the thermostat housing.
It cost me $25 to but a new one at Advance Auto Parts. I was getting a p0115 code and the car was in limp mode.
Ok I think that's all. Thanks DeLorean00 for the write up and pictures. It was very helpful.
Just a couple of notes on this install.
1-Have friend to help out when you're ready to remove the manifold
2-you have enough room to get to the starter bolts once the intake manifold is off.
3- be careful when putting the manifold back on. I broke my coolant temp. sensor when I was doing mine. it's on the passenger side right behind the thermostat housing.
It cost me $25 to but a new one at Advance Auto Parts. I was getting a p0115 code and the car was in limp mode.
Ok I think that's all. Thanks DeLorean00 for the write up and pictures. It was very helpful.