Weapon*R Intake Install
 02-23-02, 12:43 PM
#1
Lexus Champion
Thread Starter
a clublexus member requested the GS300 intake instructions, and since my site is down ill put it here.
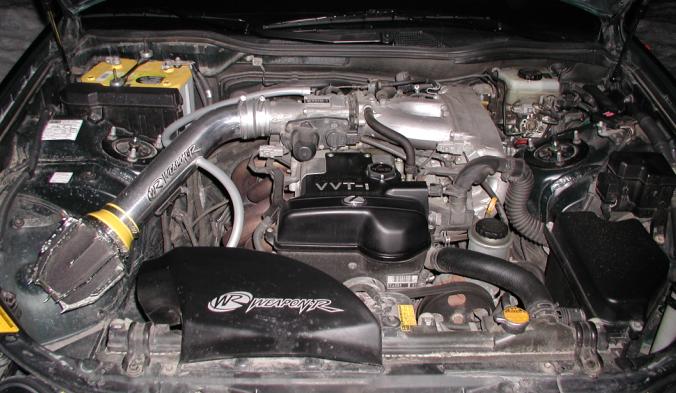
WEAPON*R GS300 INTAKE INSTALLATION:
I just got the Weapon*R intake and installed it. After i took it out and re-installed the stock intake, and then started taking pictures and doing a how-to section. I hope this helps you guys install it. Just one point about it, Since it was already installed when i took it out and put it back in i left one vaccum hose thats really tough to get on and off, i'll let you know when that comes up. Also the AFM was already clippped, i'll get to that later too. Hope This Helps You Install It.
Tools Needed:
* Ratchet
* 8MM Ratchet Bit
* 10MM Ratchet Bit
* Pliars
* Vice (not neccesarry but very helpfull)
* Extra Pair Of Hands (will help you do the job better, but again not neccesarry)
Steps:
1) Get all of your tools and intake parts ready for when you need them, it will help the job go more smoothly. Pop your hood and wait for the engine to cool if you have been running it recently.
2) Disconnect the negative terminal on the battery, but make sure you dont put it in a position where it can make contact with the terminal, i sugest bending it down beside the battery. Picture:
 02-23-02, 12:46 PM
#2
Lexus Champion
Thread Starter
3) Find all of the bolts on the stock intake, there are three, and unbolt them.
4) Unplug the plug from the MAF. Push down and pull out, do not raise that tab, push it and pull, it will come out.
5) Now it is time to locate the three stock black hoses on the stock intake and take them off (on the 2nd picture that silver hose will be black on a stock GS300). Pictures:
4) Unplug the plug from the MAF. Push down and pull out, do not raise that tab, push it and pull, it will come out.
5) Now it is time to locate the three stock black hoses on the stock intake and take them off (on the 2nd picture that silver hose will be black on a stock GS300). Pictures:
02-23-02, 12:49 PM
#5
Lexus Champion
Thread Starter
8) Alright now you've got the stock intake out. now just remove two vaccum hoses from the body of the car. There is one hose you have to leave in there, its the hose cloest to the front of the car, and it sits near the botttom of the car somewhere, dont unplug it from the car, only the intake.
9) Now take the big stock air box and locat the MAF and unscrew the two big bolts picture:
9) Now take the big stock air box and locat the MAF and unscrew the two big bolts picture:
02-23-02, 12:49 PM
#6
Lexus Champion
Thread Starter
10) Now slowly pull the MAF out of the stock intake. See that rubber thing that is laying there that sealed the MAF to the plastic? take that off and keep it somewhere where it wont get dusty, it needs to go on your new intake to seal the air Also keep the bolts you will need them too. Picture:
02-23-02, 12:51 PM
#7
Lexus Champion
Thread Starter
11) Ok, now lay that rubber thing on the Weapon*R intake MAF opening and then lay the MAF down on it so the arrow rocket shapped end faces the direction of air flow. Check to see if it lays down proporly, if not you need to clip some of the plastic off with clippers. pictures:
Trending Topics
02-23-02, 12:52 PM
#8
Lexus Champion
Thread Starter
12) When it fits well, align the rubber tabs with your fingers so you can only see the tab on each end, and make sure it is in well. Then put in the bolts and tighten them. When they are tight pull each tab, if the tabs move it isn't tight enough to seal air.
13) Now it is time to install the main pipe onto the car. First put the silicon attacher with a clamp onto the throttle body and lightly tighten. picture:
13) Now it is time to install the main pipe onto the car. First put the silicon attacher with a clamp onto the throttle body and lightly tighten. picture:
02-23-02, 12:53 PM
#10
Lexus Champion
Thread Starter
16) Ok now attach all the MAF clip to the MAF on the intake.
17) Now take your thickest and longest vaccum hose that came with the kit, and slide it onto the engine hole in the circle of the picture. Be warned it is tough getting that hose on but it will go on i promise, it just takes some force. Dont worry these hoses can strech at lot and can take very very high temperatures so dont worry about them ripping. Before inserting the hose into the intake, cut it with scissors to the best length (shorter the better). picture:
17) Now take your thickest and longest vaccum hose that came with the kit, and slide it onto the engine hole in the circle of the picture. Be warned it is tough getting that hose on but it will go on i promise, it just takes some force. Dont worry these hoses can strech at lot and can take very very high temperatures so dont worry about them ripping. Before inserting the hose into the intake, cut it with scissors to the best length (shorter the better). picture:
02-23-02, 12:54 PM
#11
Lexus Champion
Thread Starter
18) Now you have to do the "T" vacum hose install. First get your other thick vacum hose and attach the plastic "T" to it. If you want you can attach the other end to the other nipple on the intake Picture:
02-23-02, 12:55 PM
#13
Lexus Champion
Thread Starter
20) Ok now take the last hose that came with the kit and attach it to the other side of the "T". Measure the best lenth for the hose to be to line up to the nipple on the engine and then cut it, and then slide it on. It attaches here. Picture:
02-23-02, 12:55 PM
#14
Lexus Champion
Thread Starter
21) now take the first hose we put on the "T" thats attached to the intake off of the intake, and cut it with scissors to a shorter better lenth and put it back on
22) now take your filter and attach your clamp to it. slide it on the intake and then lightly tighten it only enough so it doesn't fall off, get a friend to hold it there, now if the intake sits how you want it to, tighten the clamps at the throttle body tight, and i mean tight so the intake doesn't move.
23) now take your L-braket and straight braket and find a place for them. To get them to fit you have to bend them into place, here are pictures of how i did mine, i would suggest using my way because it works great! pictures:
02-23-02, 12:58 PM
#15
Lexus Champion
Thread Starter
24) now tighten the bolt on the intake, tighten the bolts at the throttle body some more and re-connect your battery and your done! of couse you still have to add the stick on emblems and maybe stickers to the car!
Conclusion: this intake is amazing, it looks good, sounds good, and gives real-world power. If you have a loud exhaust on a GS300 like I do, you will notice that you overall exhaust/intake noise is much less due to the added power which equals added backpressure decreasing noise. There is definatly a noticable power gain and i think you would really like this intake if you really love performance!
--------
There ya go man let me know if you have any questions... about the MAF clipping i've installed it on another car and we didnt need to clip the MAF so u probobly wont have to on yours, lay it down and if it fits nicely then you dont have to clip anything.