
At Last! My new 2000-2001 ES Tail lights!
 10-28-07, 02:09 AM
#1
Intermediate
Thread Starter
My Baby is finally complete! The last pieces of my new ES 2000-2001 Tailights arrived for my 1997 model and I have finally been able to fit them. They look spectacular!  These lights cost me the earth as I bought all four pieces brand new from Toyota/Lexus.
I have wanted these lights for so long - even before I bought my ES (work that one out! )
)
For everyone who still asks - yes they do fit! I was so excited that I decided to take pictures and do a little (or big) write up on the process.
The tools you will need are a 10mm spanner, phillips head screwdriver, blunt butter knife and a spoon. Here is the process:
Yay! they have arrived

Bootlid pieces came with the ES300 logo on it (i will remove this as I already have the logo on the body of my car)

The outer body pieces:

Unfortunately the outer pieces come as standard with a small orange cap inside them for the signal/indicator, so using 'silver globes' on the rear is a waste of time because the orange cap is visible from the outside and is sealed inside. These lights are way too expensive to try to remove the orange plastic cap. I would never try it! It's a little annoying because you really want that 'clear look', but never mind they still look awesome. Here's a picture so you can see what i mean:

Here's another angle from the back of the light with the orange cap -

As I mentioned earlier the lights came with the es300 badge stuck on the tail light.

I removed the badge because I already have the badge on the body of the car. You will see in the pics later that I have removed it. I removed it very easily by using fishing line and gently 'flossing' it. I used a fine but strong line and gently moved it back and forth in a sawing motion. Once the letters were removed, there was still the double sided tape residue stuck on the lense. I gently peeled it of using my finger in a slow rolling/rubbing motion. Any small traces that were left, I cleaned off gently with some non abrasive car polish/wax and a soft cloth. I guess it came off easily because the lights were brand new:
I installed the boot lid lights first. First you have to remove the boot lining:

The boot lining is held in by several small plugs, here's what mine looked like:

These lights cost me the earth as I bought all four pieces brand new from Toyota/Lexus. I have wanted these lights for so long - even before I bought my ES (work that one out!
) For everyone who still asks - yes they do fit! I was so excited that I decided to take pictures and do a little (or big) write up on the process.
The tools you will need are a 10mm spanner, phillips head screwdriver, blunt butter knife and a spoon. Here is the process:
Yay! they have arrived
Bootlid pieces came with the ES300 logo on it (i will remove this as I already have the logo on the body of my car)
The outer body pieces:
Unfortunately the outer pieces come as standard with a small orange cap inside them for the signal/indicator, so using 'silver globes' on the rear is a waste of time because the orange cap is visible from the outside and is sealed inside. These lights are way too expensive to try to remove the orange plastic cap. I would never try it! It's a little annoying because you really want that 'clear look', but never mind they still look awesome. Here's a picture so you can see what i mean:
Here's another angle from the back of the light with the orange cap -
As I mentioned earlier the lights came with the es300 badge stuck on the tail light.
I removed the badge because I already have the badge on the body of the car. You will see in the pics later that I have removed it. I removed it very easily by using fishing line and gently 'flossing' it. I used a fine but strong line and gently moved it back and forth in a sawing motion. Once the letters were removed, there was still the double sided tape residue stuck on the lense. I gently peeled it of using my finger in a slow rolling/rubbing motion. Any small traces that were left, I cleaned off gently with some non abrasive car polish/wax and a soft cloth. I guess it came off easily because the lights were brand new:
I installed the boot lid lights first. First you have to remove the boot lining:
The boot lining is held in by several small plugs, here's what mine looked like:
 10-28-07, 02:11 AM
#2
Intermediate
Thread Starter
I removed them using a blunt butter knife and a spoon. I inserted the butter knife into the slot and then used the spoon on the opposite side to lever underneath to get them out. Using the spoon really helped get some leverage to pull the plugs out without damaging them. (
I'm not holding the spoon in the photo because I was holding the camera!

The boot liner removed: You can see where the holes are for the plugs. When you remove the plugs put them into a container or bowl so you don't lose them!


I'm not holding the spoon in the photo because I was holding the camera!
The boot liner removed: You can see where the holes are for the plugs. When you remove the plugs put them into a container or bowl so you don't lose them!
10-28-07, 02:17 AM
#3
Intermediate
Thread Starter
This is looking up and the inside of the boot lid. Undo the nuts pictured. There is one in the square opening too (arrow):

Another shot:

You then need to remove two other nuts on the outer side:

Another pic:

Another shot:
You then need to remove two other nuts on the outer side:
Another pic:
10-28-07, 02:41 AM
#4
Intermediate
Thread Starter
Then unplug the wiring harness at the back of the lights and remove the old light:

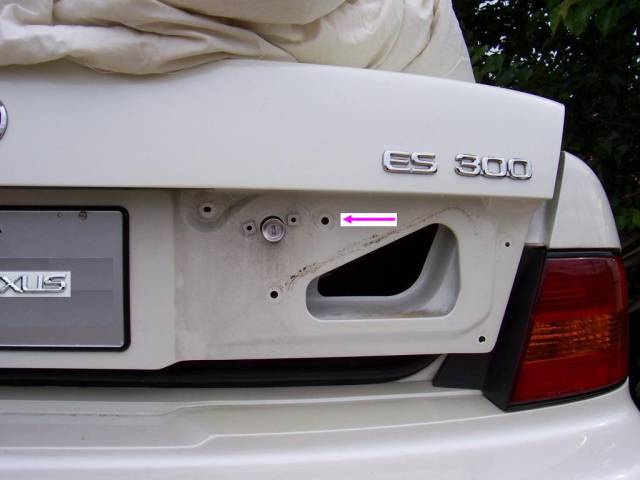
On the right hand side were the boot lock is in the tail light, I had a bit of trouble trying to access one of the nuts so I undid the bolts that hold the barrel and the lock onto the inside of the boot to give me a bit more space with the spanner:

Here's a shot from the outside so you can see how close the nut is to the key hole on the boot (pink arrow) it's hard getting the spanner inside!:
Both lights removed - Looks a bit like a BMW now! (The blanket on top of the boot was to stop the lid from flying up! :

Make sure you clean the body of the car where the old lights have been. I used a polish and wax to clean away any dirt and make it nice and smooth and clean. This will make sure you new rubber seals on the new lights will fit snugly against the car.
Now fit the new ones - Here's a picture of the back of the new tails. Mine came with the new wiring harness. You need this new harness to operate the extra set of tail lights in the bootlid - My 1997 Australian model wasn't fitted with the extra tail light globes on the bootlid when you upgrade to new lights so you need the new harness. - USA ones may be different??
[IMG]https://www.clublexus.com/gallery/data//500/medium/Picture_01313.jpg
[/IMG]
Now slot in the new lights and bolt them on using the nuts from your old lights: I put cling wrap on the outside to stop them getting scratched while I was installing them.

On the right hand side were the boot lock is in the tail light, I had a bit of trouble trying to access one of the nuts so I undid the bolts that hold the barrel and the lock onto the inside of the boot to give me a bit more space with the spanner:
Here's a shot from the outside so you can see how close the nut is to the key hole on the boot (pink arrow) it's hard getting the spanner inside!:
Both lights removed - Looks a bit like a BMW now! (The blanket on top of the boot was to stop the lid from flying up! :
Make sure you clean the body of the car where the old lights have been. I used a polish and wax to clean away any dirt and make it nice and smooth and clean. This will make sure you new rubber seals on the new lights will fit snugly against the car.
Now fit the new ones - Here's a picture of the back of the new tails. Mine came with the new wiring harness. You need this new harness to operate the extra set of tail lights in the bootlid - My 1997 Australian model wasn't fitted with the extra tail light globes on the bootlid when you upgrade to new lights so you need the new harness. - USA ones may be different??
[IMG]https://www.clublexus.com/gallery/data//500/medium/Picture_01313.jpg
[/IMG]
Now slot in the new lights and bolt them on using the nuts from your old lights: I put cling wrap on the outside to stop them getting scratched while I was installing them.
10-28-07, 03:09 AM
#5
Intermediate
Thread Starter
Now for the outer body lights. You need to remove the plastic moulding guard inside the boot. Mine was held in by 2 plastic phillips head screws:

Here's another pic with the moulding removed. You can see the screw holes. Make sure you put the screws into a container so you don't lose them!

Here's the back of the outer lights on the car - you can see where the nuts are that you need to undo. Don't undo the two marked in the picture (with a red symbol) these are for the bumper i think. No need to undo them.

On my model one of the nuts you need to undo was hiding behind a plastic clip that holds the wiring secure:

Unplug the wiring harness with the globes - you will use them on the new lights. Then gently pull the old light off:

Again, as with the inner lights make sure you clean/polish around the body where the old lights were to provide a smooth clean seal for the new lights (i haven't cleaned mine yet in the pic!)

Then slot in the new lights. Again, I put cling wrap/film on the outside to protect them while installing them. Then using the old nuts, bolt them back on and plug in the old wiring harness and globes from the old lights. TIP: don't overtighten the nuts that hold the lights on - this will pull the lights abnormally closer, or inwards into the body of the car and could put stress on the lense or even crack them.

Once bolted on and plugged in, replace the tail light moulding guards with the two plastic screws. Once you're happy with the installation replace the boot lining and refit the plastic plugs to hold it on.
And now the finished product.........
See below:
Here's another pic with the moulding removed. You can see the screw holes. Make sure you put the screws into a container so you don't lose them!
Here's the back of the outer lights on the car - you can see where the nuts are that you need to undo. Don't undo the two marked in the picture (with a red symbol) these are for the bumper i think. No need to undo them.
On my model one of the nuts you need to undo was hiding behind a plastic clip that holds the wiring secure:
Unplug the wiring harness with the globes - you will use them on the new lights. Then gently pull the old light off:
Again, as with the inner lights make sure you clean/polish around the body where the old lights were to provide a smooth clean seal for the new lights (i haven't cleaned mine yet in the pic!)
Then slot in the new lights. Again, I put cling wrap/film on the outside to protect them while installing them. Then using the old nuts, bolt them back on and plug in the old wiring harness and globes from the old lights. TIP: don't overtighten the nuts that hold the lights on - this will pull the lights abnormally closer, or inwards into the body of the car and could put stress on the lense or even crack them.
Once bolted on and plugged in, replace the tail light moulding guards with the two plastic screws. Once you're happy with the installation replace the boot lining and refit the plastic plugs to hold it on.
And now the finished product.........
See below:
10-28-07, 03:19 AM
#6
Intermediate
Thread Starter
So glad to see the end of these lights....
BEFORE:

AFTER (number plate is not real - just look at the lights!)


 I love them! I think they look great - especially on white ES's
BEFORE:
AFTER (number plate is not real - just look at the lights!)
I love them! I think they look great - especially on white ES's
10-28-07, 03:36 AM
#7
Intermediate
Thread Starter
NOTE: Just one thing guys - My ES is an AUSTRALIAN version, and I'm not sure if it's the same on the USA one, but when I went to plug in the new wiring harness from the new bootlid lights the plug wouldn't fit. I think this is because when I had the original factory 97 orange lights there was never any tail lights fitted in the bootlid piece - just the reverse light. (This maybe different in the USA?)
This may also be because I bought the bootlid lights from the USA - perhaps they have different plugs compared to the Aussie ones??
Here's some pictures:
This pink arrow in the first pic is the new wiring harness plug from the new lights and the piece i'm holding is the plug that runs from the car that powers the lights. The plug I'm holding only has 2 pins in it and the new harness plug has 3 pins - presumably to power the extra set of red tail lights on the boot lid:

Here's another angle to see the size difference:

At the moment I haven't got the use of the lights on the bootlid because I can't plug them in!! Looks like I will have to buy an end plug from a 2000-2001 model and fit it on. - I have already made enq's about this but I'm waiting to hear back from the dealer.
I will keep you posted!
I hope you enjoyed my write up (remember, it is a guide only)
This may also be because I bought the bootlid lights from the USA - perhaps they have different plugs compared to the Aussie ones??
Here's some pictures:
This pink arrow in the first pic is the new wiring harness plug from the new lights and the piece i'm holding is the plug that runs from the car that powers the lights. The plug I'm holding only has 2 pins in it and the new harness plug has 3 pins - presumably to power the extra set of red tail lights on the boot lid:
Here's another angle to see the size difference:
At the moment I haven't got the use of the lights on the bootlid because I can't plug them in!! Looks like I will have to buy an end plug from a 2000-2001 model and fit it on. - I have already made enq's about this but I'm waiting to hear back from the dealer.
I will keep you posted!
I hope you enjoyed my write up (remember, it is a guide only)
Trending Topics
 10-28-07, 08:28 PM
#9
Intermediate
Thread Starter
Well I just heard back from the dealer - I need two new end socket plugs from a 2000-2001 ES.
So that they could match and order the correct plugs they told me that they needed the 5 digit number that would be printed on the new wiring harness plug. I had to take out one of the new bootlid tail lights so that I could see the number on the plug! The number on the end of mine was 11399
The dealer has told me that they will have to get the part shipped from Japan so I have to wait now for about 2-3weeks for the new socket plugs!
Going to cost approx $29 Australian dollars which includes the shipping.
In the meantime I have run two small wires from the original plug on the car to the new bootlid reverse lights so at least I have the use of the reverse lights.
Now the waiting continues!.........
LEX ES 300
So that they could match and order the correct plugs they told me that they needed the 5 digit number that would be printed on the new wiring harness plug. I had to take out one of the new bootlid tail lights so that I could see the number on the plug!
The number on the end of mine was 11399The dealer has told me that they will have to get the part shipped from Japan so I have to wait now for about 2-3weeks for the new socket plugs!
Going to cost approx $29 Australian dollars which includes the shipping.
In the meantime I have run two small wires from the original plug on the car to the new bootlid reverse lights so at least I have the use of the reverse lights.
Now the waiting continues!.........
LEX ES 300


