
ES300: Replacing Cluster Backlighting Bulbs
 03-26-07, 12:47 AM
#1
Lexucanafer
Thread Starter
Removing the cluster ('92-'96) ES300:
IMPORTANT TIP: If the ignition key is turned while the cluster is disconnected from the dash, the airbag light inside the cluster will come on and stay on once the cluster is reconnected. So as a precaution, I recommend you disconnect your negative battery terminal before starting the project, just to play it safe. EXCEPTION: those who still have the factory radio installed and don't know their radio's 3-digit security code. Disconnecting the battery will lock up the radio until the security code is entered.
1) First, adjust your steering wheel to its lowest position.
2) You need to then pop open the two plastic tabs at the top of the cluster that hide two Phillips screws. The tabs are hinged at the back so use a small knife or flat head screwdriver to pry them open at the front edge so you can get to the screws behind them. Be careful not to scratch the plastic on your bezel.
3) Once the screws are removed you should be able to slide the cluster bezel (which frames your cluster and contains your display brightness control and Tripmeter/Odo and Reset buttons) forward so that you can disconnect the two small wiring harnesses behind it. The bezel has two large clips that keep it in place but when you pull the bezel forward they should let go. Each harness connector has a locking tab so you will have to depress the tab while grasping and gently wiggling the connector to free it. Don't pull on the wires themselves!
4) Once the two harnesses have been disconnected and the bezel has been set aside, you will need to remove the four screws which mount the cluster to the dash. There is a black Phillips head screw going through each of the cluster's four mounting holes - top left, top right, bottom left, bottom right.
5) Then you can pull the cluster forward and disconnect the three color-coded wiring harnesses at the back (see photo below). They also have locking tabs. **Again, do not pull on the wires themselves.**
Disassembling the cluster to get to the backlighting sockets
IMPORTANT TIP: The front face of the instrument cluster is made of fairly soft smoked clear plastic and can be easily scratched. When working with the cluster, lay it on a soft towel to protect the face from damage.
A) Remove white plastic protective shroud from back of cluster
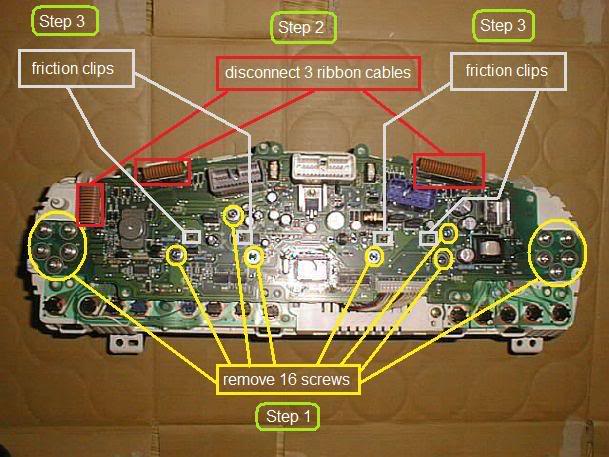
There are seven (7) Phillips head screws to remove.

B) Disconnect top circuit board
1) There are sixteen (16) Phillips head screws to remove.
IMPORTANT TIP: When re-assembling the cluster once the backlighting bulbs are replaced, be sure that all 16 screws are snug again, but don't overtighten them. Leaving any of these screws loose when re-assembling the cluster could result in one or more of your gauges not functioning.
2) There are also three (3) ribbon cables to disconnect. The ribbon cables can easily be disconnected by pulling up on the black plastic locking rings that surround the connectors and then sliding the ribbon cables out of the connectors.
3) Once the screws are out and the ribbon cables are disconnected, lift the circuit board straight up to free the speedometer and tachometer contact pins that stick up through four holes on the top circuit board from underneath and are clamped by friction clips. The pins will just slide free of the friction clips when you gently pull up on the board.
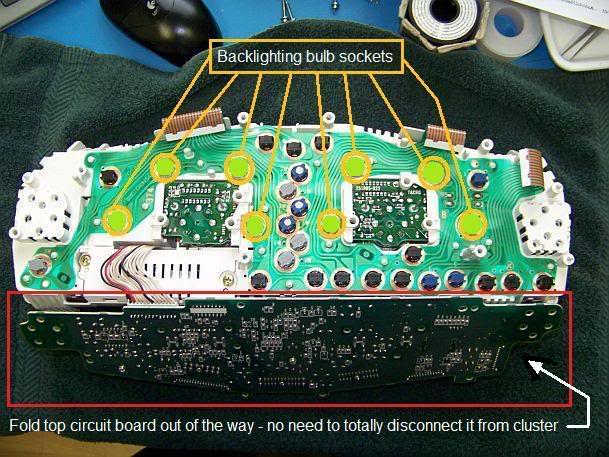
C) Fold top circuit board out of the way to expose backlighting sockets underneath
There is no need to fully disconnect the top circuit board from the cluster. The harness on the left side with the black, red, and white wires can remain connected (see photo below).
D) Backlighting sockets are exposed
The eight green backlighting sockets pull out by turning them to unlock them.
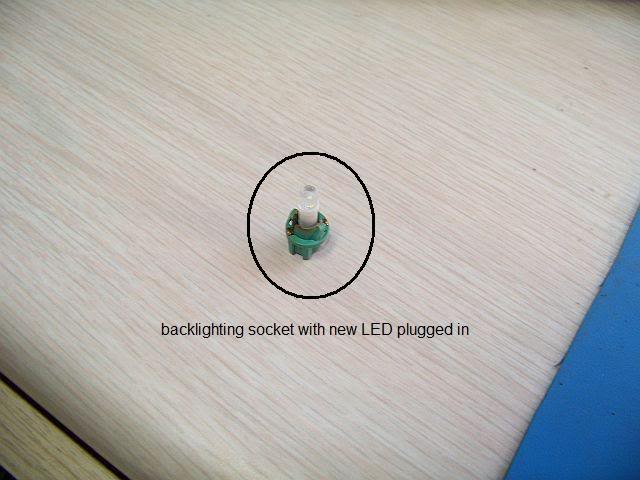
E) Replace the burnt out incandescent backlighting bulbs with new bulbs or LEDs
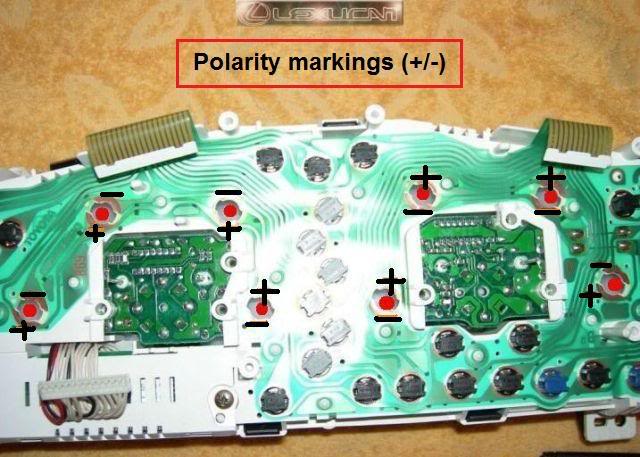
The old incandescent bulbs should come out of the sockets easily. Just wiggle and gently pull on them with your fingers until they come loose. Replace with new bulbs or LEDs (noting the correct polarity if you use LEDs). See photo below for proper positive and negative (+/-) polarity orientation. If you use incandescent bulbs, proper polarity is not important.
IMPORTANT TIP: It is wise to replace ALL EIGHT of the backlighting bulbs at once, even if only a few of them were burnt out. You probably don't want to have to go through this process again in a few months to replace another burnt out bulb.
Tools Needed:
Small Flat head screwdriver or pocket knife
Medium Phillips head screwdriver
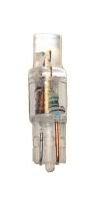
Replacement Incandescent Bulbs:
14V wedge-base - Lexus Part No.: 83119-24570
or
Toyota Part No.: 90069-98004
Source:
#74 Miniature Indicator Lamp - 14 Volt - T1-3/4 Sub Mini Wedge Base - EIKO #74
Manufacturer: EIKO International
Manufacturer's Part Number: 74
14V .1A/T1-3/4 Sub Mini Wedge Base
14 Volts
Filament: C-2F
1,000 Life Hours
T-1 3/4 Bulb
Sub-Miniature Wedge (W2.1x4.9d)
Length: .80 in.
Sold by Full Case Only (10)
$5.31 per box.
(Bulb source info contributed by CL member: Esource ...thank you!)
LED Sources:
Dialight.com (P/N: 5861A06103F)
JKL Components Corp. (P/N: LE-0504-01W) PDF Data Sheet
Superbrightleds.com (P/N: 74-W)
e-bay.com (try entering 286 LED (or) 74 LED into the e-bay search box)
**I'm told a very popular e-bay seller of these LEDs is warden_jp2002**
Photo example of a flat-topped 5mm wedge-base LED:
Flat-topped LEDs emit light from the sides as well as the top.
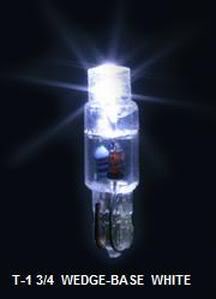
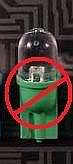
IMPORTANT TIP: The use of rounded or domed LEDs is not recommended for the cluster backlighting. They emit light primarily from the top and can cause severe "spotting" (uneven light distribution) in the instrument cluster display. Flat-topped LEDs emit light from both the sides and the top. This helps to reduce the "spotting" effect.
Rounded or domed LED (not recommended) :
Link to needle fix DIY write-up:
If your factory illuminated gauge needles are flickering or totally burnt out (common to the 2nd generation ES300) HERE is my detailed DIY write-up for fixing them - A perfect time to do it while your cluster is out of the car! Get your <RED TIPPED NEEDLES while they're HOT!
Comparison Photos:
The "old look" with burnt out incandescent backlighting bulbs and dead needles!
The "new look" with white/blue LED backlighting and new <RED TIPPED NEEDLES!

IMPORTANT TIP: If the ignition key is turned while the cluster is disconnected from the dash, the airbag light inside the cluster will come on and stay on once the cluster is reconnected. So as a precaution, I recommend you disconnect your negative battery terminal before starting the project, just to play it safe. EXCEPTION: those who still have the factory radio installed and don't know their radio's 3-digit security code. Disconnecting the battery will lock up the radio until the security code is entered.
1) First, adjust your steering wheel to its lowest position.
2) You need to then pop open the two plastic tabs at the top of the cluster that hide two Phillips screws. The tabs are hinged at the back so use a small knife or flat head screwdriver to pry them open at the front edge so you can get to the screws behind them. Be careful not to scratch the plastic on your bezel.
3) Once the screws are removed you should be able to slide the cluster bezel (which frames your cluster and contains your display brightness control and Tripmeter/Odo and Reset buttons) forward so that you can disconnect the two small wiring harnesses behind it. The bezel has two large clips that keep it in place but when you pull the bezel forward they should let go. Each harness connector has a locking tab so you will have to depress the tab while grasping and gently wiggling the connector to free it. Don't pull on the wires themselves!
4) Once the two harnesses have been disconnected and the bezel has been set aside, you will need to remove the four screws which mount the cluster to the dash. There is a black Phillips head screw going through each of the cluster's four mounting holes - top left, top right, bottom left, bottom right.
5) Then you can pull the cluster forward and disconnect the three color-coded wiring harnesses at the back (see photo below). They also have locking tabs. **Again, do not pull on the wires themselves.**
Disassembling the cluster to get to the backlighting sockets
IMPORTANT TIP: The front face of the instrument cluster is made of fairly soft smoked clear plastic and can be easily scratched. When working with the cluster, lay it on a soft towel to protect the face from damage.
A) Remove white plastic protective shroud from back of cluster
There are seven (7) Phillips head screws to remove.
B) Disconnect top circuit board
1) There are sixteen (16) Phillips head screws to remove.
IMPORTANT TIP: When re-assembling the cluster once the backlighting bulbs are replaced, be sure that all 16 screws are snug again, but don't overtighten them. Leaving any of these screws loose when re-assembling the cluster could result in one or more of your gauges not functioning.
2) There are also three (3) ribbon cables to disconnect. The ribbon cables can easily be disconnected by pulling up on the black plastic locking rings that surround the connectors and then sliding the ribbon cables out of the connectors.
3) Once the screws are out and the ribbon cables are disconnected, lift the circuit board straight up to free the speedometer and tachometer contact pins that stick up through four holes on the top circuit board from underneath and are clamped by friction clips. The pins will just slide free of the friction clips when you gently pull up on the board.
C) Fold top circuit board out of the way to expose backlighting sockets underneath
There is no need to fully disconnect the top circuit board from the cluster. The harness on the left side with the black, red, and white wires can remain connected (see photo below).
D) Backlighting sockets are exposed
The eight green backlighting sockets pull out by turning them to unlock them.
E) Replace the burnt out incandescent backlighting bulbs with new bulbs or LEDs
The old incandescent bulbs should come out of the sockets easily. Just wiggle and gently pull on them with your fingers until they come loose. Replace with new bulbs or LEDs (noting the correct polarity if you use LEDs). See photo below for proper positive and negative (+/-) polarity orientation. If you use incandescent bulbs, proper polarity is not important.
IMPORTANT TIP: It is wise to replace ALL EIGHT of the backlighting bulbs at once, even if only a few of them were burnt out. You probably don't want to have to go through this process again in a few months to replace another burnt out bulb.
Tools Needed:
Small Flat head screwdriver or pocket knife
Medium Phillips head screwdriver
Replacement Incandescent Bulbs:
14V wedge-base - Lexus Part No.: 83119-24570
or
Toyota Part No.: 90069-98004
Source:
#74 Miniature Indicator Lamp - 14 Volt - T1-3/4 Sub Mini Wedge Base - EIKO #74
Manufacturer: EIKO International
Manufacturer's Part Number: 74
14V .1A/T1-3/4 Sub Mini Wedge Base
14 Volts
Filament: C-2F
1,000 Life Hours
T-1 3/4 Bulb
Sub-Miniature Wedge (W2.1x4.9d)
Length: .80 in.
Sold by Full Case Only (10)
$5.31 per box.
(Bulb source info contributed by CL member: Esource ...thank you!)
LED Sources:
Dialight.com (P/N: 5861A06103F)
JKL Components Corp. (P/N: LE-0504-01W) PDF Data Sheet
Superbrightleds.com (P/N: 74-W)
e-bay.com (try entering 286 LED (or) 74 LED into the e-bay search box)
**I'm told a very popular e-bay seller of these LEDs is warden_jp2002**
Photo example of a flat-topped 5mm wedge-base LED:
Flat-topped LEDs emit light from the sides as well as the top.
IMPORTANT TIP: The use of rounded or domed LEDs is not recommended for the cluster backlighting. They emit light primarily from the top and can cause severe "spotting" (uneven light distribution) in the instrument cluster display. Flat-topped LEDs emit light from both the sides and the top. This helps to reduce the "spotting" effect.
Rounded or domed LED (not recommended) :
Link to needle fix DIY write-up:
If your factory illuminated gauge needles are flickering or totally burnt out (common to the 2nd generation ES300) HERE is my detailed DIY write-up for fixing them - A perfect time to do it while your cluster is out of the car! Get your <RED TIPPED NEEDLES while they're HOT!
Comparison Photos:
The "old look" with burnt out incandescent backlighting bulbs and dead needles!
The "new look" with white/blue LED backlighting and new <RED TIPPED NEEDLES!
Last edited by Lexucan; 04-07-09 at 02:40 PM.

The following users liked this post:
avhart (02-23-21)
03-26-07, 01:48 AM
#2
Replacement Bulbs:
12V 5mm Wedge base #74 (Lexus P/N: 83119-24570)
(or) LED equivalent
12V 5mm Wedge base #74 (Lexus P/N: 83119-24570)
(or) LED equivalent
I've read on lextech.org that they use number 24 bulbs? Also, is there a clear plastic light diffuser that spreads the light onto the numbers? I've had trouble in a friend's honda with spotting and the led not fitting the diffuser b/c of the plastic.
03-26-07, 02:12 AM
#3
Lexucanafer
Thread Starter
I want to replace the 8 bulbs with leds from superbright leds
I've read on lextech.org that they use number 24 bulbs? Also, is there a clear plastic light diffuser that spreads the light onto the numbers? I've had trouble in a friend's honda with spotting and the led not fitting the diffuser b/c of the plastic.
I've read on lextech.org that they use number 24 bulbs? Also, is there a clear plastic light diffuser that spreads the light onto the numbers? I've had trouble in a friend's honda with spotting and the led not fitting the diffuser b/c of the plastic.
Diffuser - In my '93 ES300 the original filament bulbs had blue rubber boots over the bulbs, which I suppose would act like a light diffuser of sorts. When I replaced the bulbs with LEDs (which are a different shape to the bulbs) I removed the boots from the old bulbs and put them on the LEDs but because of the different shape they were not a good fit. I tried glueing them in place with Krazy Glue but that did not work well. So, I ended up not using the boots at all. There may be a very slight amount of "spotting" with the LEDs but nothing very noticeable, IMO.
This is the shape of the LEDs I used:
They have a flat top and are designed to spread the beam of light over a wider angle than the normal domed top version.
Last edited by Lexucan; 04-10-07 at 08:56 PM.
03-26-07, 10:54 AM
#5
And the 8 bulbs are for the actual backlighting of the rpm/mph guages? In my car, the guages are yellowish/incandescent color and then don't have a boot. I'm assuming the boot is used only to change the bulb's color.
03-26-07, 01:23 PM
#6
Lexucanafer
Thread Starter
My 8 original incandescent bulbs had little blue boots on them. They didn't seem to affect the colour of the gauges though - still yellowish - so I assumed they must be to help diffuse the light.....but maybe not.

Last edited by Lexucan; 03-30-07 at 09:25 AM.
Trending Topics
 03-31-07, 09:59 PM
#9
I want replace es300 95 backlights with white or blue leds.
how do you search for equivalent led replacement?
how do you search for equivalent led replacement?
04-08-07, 12:47 AM
#10
YAY! I have (most) of my Leds installed. Kinda disappointed at the quality of the ebay hid's though. Some of the leds where 'white' and some of them were kinda of like..ultraviolet whitish.. gotta have a talk with that ebay seller
Two of the light bulbs i didn't have time to switch the polarity so those are out for now.
Otherwise, There wasn't any extreme spotting from the leds, although I'm gonna stick a diffuser on the bulb to eliminate that problem.
for 7 bucks....that is a nice improvement over the oem yellow incandecent.
BTW, Just adding to Lexucan's write up...
1. I found it confusing when i took the cluster apart, You have to remove the white plastic cover, then you undo the black clips that hold the plastic circuit strips and then you take a small flat head screwdriver to remove the clip. Then remove all screws and carefully remove and set on a soft surface (anti static). To remove the light bulbs for the back lighting (green bases) twist with needle nosed pliers (I tried using my fingers for the middle ones..which were impossible)
2. # 74 AREN'T a direct replacement for the cluster bulb. However, they WILL fit, since they are slightly thinner, you need to stick something like electrical tape inbetween the tape and the plastic base to fill up the space. This ensures they won't come out of place.
Now...on to the pics!

Removing the cluster!
You DONT need to remove the battery as long as you don't turn your car on with the cluster removed.
This pic is about 75 % brightness. I never use my backlight/needles at full power b/c they started going out two years ago, and to prevent the needles from dieing, i keep my parking lights on all the time and NEVER use them at full power. Theres some minor spotting...but is a major improvement over the incandescent bulbs.
Check engine light...E shift solenoid...
I ordered these on ebay..from china, and they sent me a bluish light (left) and the white (on the right)
I need to take the cluster out to reverse the bulbs b/c they are opposite polarity.

Entire cluster.
Things i will do tommorow. Black out the 'unleaded fuel only'/ KPH markings/"x1000 rpm"
Add light diffusers and fix the other bulbs.
gotta have a talk with that ebay seller Two of the light bulbs i didn't have time to switch the polarity so those are out for now.
Otherwise, There wasn't any extreme spotting from the leds, although I'm gonna stick a diffuser on the bulb to eliminate that problem.
for 7 bucks....that is a nice improvement over the oem yellow incandecent.
BTW, Just adding to Lexucan's write up...
1. I found it confusing when i took the cluster apart, You have to remove the white plastic cover, then you undo the black clips that hold the plastic circuit strips and then you take a small flat head screwdriver to remove the clip. Then remove all screws and carefully remove and set on a soft surface (anti static). To remove the light bulbs for the back lighting (green bases) twist with needle nosed pliers
(I tried using my fingers for the middle ones..which were impossible)2. # 74 AREN'T a direct replacement for the cluster bulb. However, they WILL fit, since they are slightly thinner, you need to stick something like electrical tape inbetween the tape and the plastic base to fill up the space. This ensures they won't come out of place.
Now...on to the pics!
Removing the cluster!
You DONT need to remove the battery as long as you don't turn your car on with the cluster removed.
This pic is about 75 % brightness. I never use my backlight/needles at full power b/c they started going out two years ago, and to prevent the needles from dieing, i keep my parking lights on all the time and NEVER use them at full power. Theres some minor spotting...but is a major improvement over the incandescent bulbs.
Check engine light...E shift solenoid...
I ordered these on ebay..from china, and they sent me a bluish light (left) and the white (on the right)
I need to take the cluster out to reverse the bulbs b/c they are opposite polarity.
Entire cluster.
Things i will do tommorow. Black out the 'unleaded fuel only'/ KPH markings/"x1000 rpm"
Add light diffusers and fix the other bulbs.
04-10-07, 07:05 AM
#12
Lexucanafer
Thread Starter
Looking good tuan92129 
Thanks for adding to the DIY write-up to help keep ppl from getting confused.
Supposedly a picture is worth a thousand words, but....not always.
Too bad your LEDs aren't all the same color. I ordered two from ebay for my licence plate lights. They BETTER be the same color or "something" is going to fly!
You are lucky to still have 4 working needles! Good idea to keep the brightness down to try to preserve them as long as possible. Unfortunately, two of mine were already completely dead when I bought my car
04-10-07, 10:36 AM
#13
Lexus Test Driver
Looking good tuan92129
Thanks for adding to the DIY write-up to help keep ppl from getting confused.
Supposedly a picture is worth a thousand words, but....not always.
Too bad your LEDs aren't all the same color. I ordered two from ebay for my licence plate lights. They BETTER be the same color or "something" is going to fly!
You are lucky to still have 4 working needles! Good idea to keep the brightness down to try to preserve them as long as possible. Unfortunately, two of mine were already completely dead when I bought my car
 Do they just one day burn out or gradually or what? I actually didnt know they did burn out until seeing pics on CL.
04-10-07, 10:59 AM
Do they just one day burn out or gradually or what? I actually didnt know they did burn out until seeing pics on CL.
04-10-07, 10:59 AM
#14
Lexucanafer
Thread Starter
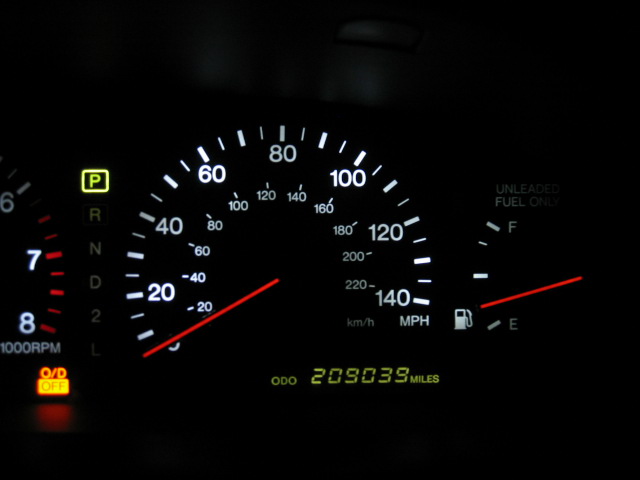
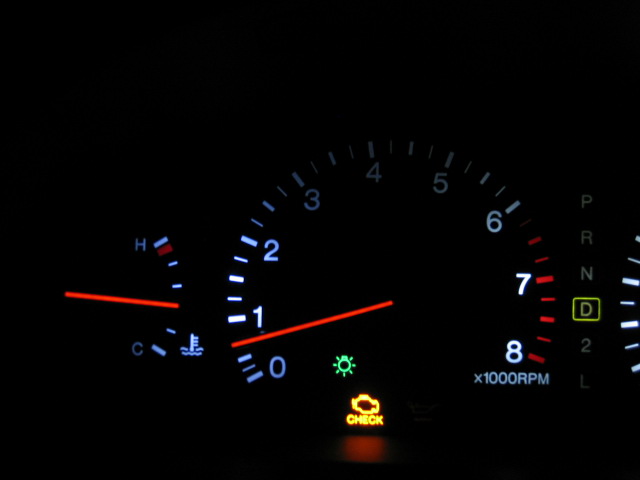
When the needles are dying, I think they usually start to "flicker" and often a section of a needle will burn out before the whole needle dies completely. You can see this in the "before" pic I posted above of my cluster. The speedo and fuel gauge needles are still partially lit but are obviously on their way out.
If I were you, I'd do as tuan92129 does and ALWAYS drive with the parking lights on (even during the daytime) and ALWAYS reduce the brightness of the cluster display. This will help to keep your needles from burning out. Having four fully illuminated needles in a '92 ES is a pretty rare thing, IMO !!!
04-10-07, 03:07 PM
#15
Lexus Test Driver
Thanx Lexucan! Um....here is my 100K photo which youve seen. So the backlights are incandescent bulbs and not LEDs right? Ill dim the brightness of my cluster to keep em going. Ill be referring to your DIY when the time comes, the red tips look badass!! One day about a year ago or so my temp needle had a slow flicker to it, then it had a dead spot so I whacked it and theyve been fine!
Ill be referring to your DIY when the time comes, the red tips look badass!! One day about a year ago or so my temp needle had a slow flicker to it, then it had a dead spot so I whacked it and theyve been fine!