When you click on links to various merchants on this site and make a purchase, this can result in this site earning a commission. Affiliate programs and affiliations include, but are not limited to, the eBay Partner Network.
How To: Spin-On Oil Filter Conversion (No More Cartridge)
New to the forum, but thought I'd share some information for anyone who may be interested.
Probably not a modification that everyone is looking to do, but here's a quick write up on how I changed from the factory "cartridge" style oil filter to a "spin-on" type.
The first question you probably have is "why?". Although it isn't a common concern, the factory "cartridge" style filter prevents you from running a sandwich plate for an oil cooler, oil temperature or pressure gauges or relocate your oil filter to an easier to reach location. In addition, since many Toyota engines take interchangeable filters, this conversion lets you use any filter intended for 4A-GE (old Corolla / MR2), 3S-GTE (Celica / MR2) 2ZZ-GE (newer Celica / Matrix / Lotus), or even 2JZ-GTE (Supra) engines, which have far more options available.
Although the photos are of my CT, the same parts and process should work for anything with a 2ZR engine including the Prius, newer Matrix, and a few Scion vehicles.
All of the parts you need:
Oil Filter Bracket (15609-0T060)
Union (90904-04006)
O-Ring x2 (96723-24020)
Flange Bolt x4 (91551-F0835) (Optional)
Oil Filter (90915-YZZF2) (Or other filter of your choice)
Start by tightening the union into the bracket using a 12mm allen. This can be done after the bracket is installed, but because of the undertray on the CT I found it easier to assemble outside of the car.
Jack up the car and drain the oil. You are going to need to gain access to side of the oil filter bracket. In the case of the CT, it is located behind this panel in the passenger's side wheel well.
Simply remove the push clips and move the panel out of the way. Next remove the 4 bolts holding the oil filter bracket to the engine.
And remove the two o-rings that are used to seal the bracket to the engine.
Place the new o-rings in the grooves in the block, align the new oil filter bracket with the engine, and install the bolts. Tighten the bolts down to secure the bracket.
Install your filter of choice, fill the engine back up with oil, and check for any leaks. Provided there are no issues, you are done. A simple and relatively inexpensive modification that now allows you numerous options for sandwich plates, oil coolers, sensors, and aftermarket filters.
I still don't understand why would one do this on a hybrid? I know you mentioned your reasons. But why? What are the advantages? Will it make my CT200h last "like longer"? The usual long life span of a CT200h with the already specified routine maintenance schedule is not good enough?
Originally Posted by ptetra
New to the forum, but thought I'd share some information for anyone who may be interested.
Probably not a modification that everyone is looking to do, but here's a quick write up on how I changed from the factory "cartridge" style oil filter to a "spin-on" type.
The first question you probably have is "why?". Although it isn't a common concern, the factory "cartridge" style filter prevents you from running a sandwich plate for an oil cooler, oil temperature or pressure gauges or relocate your oil filter to an easier to reach location. In addition, since many Toyota engines take interchangeable filters, this conversion lets you use any filter intended for 4A-GE (old Corolla / MR2), 3S-GTE (Celica / MR2) 2ZZ-GE (newer Celica / Matrix / Lotus), or even 2JZ-GTE (Supra) engines, which have far more options available.
Although the photos are of my CT, the same parts and process should work for anything with a 2ZR engine including the Prius, newer Matrix, and a few Scion vehicles.
All of the parts you need:
Oil Filter Bracket (15609-0T060)
Union (90904-04006)
O-Ring x2 (96723-24020)
Flange Bolt x4 (91551-F0835) (Optional)
Oil Filter (90915-YZZF2) (Or other filter of your choice)
Start by tightening the union into the bracket using a 12mm allen. This can be done after the bracket is installed, but because of the undertray on the CT I found it easier to assemble outside of the car.
Jack up the car and drain the oil. You are going to need to gain access to side of the oil filter bracket. In the case of the CT, it is located behind this panel in the passenger's side wheel well.
Simply remove the push clips and move the panel out of the way. Next remove the 4 bolts holding the oil filter bracket to the engine.
And remove the two o-rings that are used to seal the bracket to the engine.
Place the new o-rings in the grooves in the block, align the new oil filter bracket with the engine, and install the bolts. Tighten the bolts down to secure the bracket.
Install your filter of choice, fill the engine back up with oil, and check for any leaks. Provided there are no issues, you are done. A simple and relatively inexpensive modification that now allows you numerous options for sandwich plates, oil coolers, sensors, and aftermarket filters.
Will it make my CT200h last "like longer"? The usual long life span of a CT200h with the already specified routine maintenance schedule is not good enough?
No, but it doesn't negatively impact the performance, reliability, or longevity of the vehicle either. The fact that it allows more choices in oil filter, placement, and oil cooling and monitoring (which depending on your use case could improve the life span of the vehicle) is worth a few bucks to me. If your goal is simply to drive your car for as long as possible, for as little money as possible, then this mod is definitely unnecessary.
Took me a couple tries to understand this.. maybe it's early. But superb. Excellent write up. I just did my oil change yesterday and this is definitely something i'll do next time. Sneaking an oil filter wrench on the filter assembly and doing an o-ring and undoing the safety clip was such a chore.
Question... would you recommend using blue (or even red--why not) loctite on the union? Or did you?
I really would love to relocate the oil filter to the top somewhere.. like BMW. that way I can do oil changes simply by opening the hood and using an extractor. god i miss my BMW oil changes w/ extractor. 5 minutes in and out. no mess, no fuss. Everything done from the top.
Question... would you recommend using blue (or even red--why not) loctite on the union? Or did you?
I personally didn't use any loctite, although it probably wouldn't hurt as long as it is oil resistant (most are). The threads on the union are very deep and long, so you can really torque the union down tight.
Originally Posted by E46CT
I really would love to relocate the oil filter to the top somewhere.. like BMW. that way I can do oil changes simply by opening the hood and using an extractor. god i miss my BMW oil changes w/ extractor. 5 minutes in and out. no mess, no fuss. Everything done from the top.
I'm actually working on this for that very reason.
It would replace the oil filter bracket entirely with 2 -10AN fittings so you could run an external oil filter head wherever you want.
I personally didn't use any loctite, although it probably wouldn't hurt as long as it is oil resistant (most are). The threads on the union are very deep and long, so you can really torque the union down tight.
I'm actually working on this for that very reason.
It would replace the oil filter bracket entirely with 2 -10AN fittings so you could run an external oil filter head wherever you want.
Spectacular. I assume that would use the existing Toyota O-rings? Attach some braided fittings.. and what filter head would you recommend or thinking of using? Just a commuter car.. so something at LEAST as effective as stock (or TBH i'd rather just use stock) Anyone sell that/offer that currently? I'd also love to mount the oil filter in a nice stock looking position. i wonder if you have anything in mind. Something with least amount of plumbing possible. Also would make sure to avoid as many bends as possible and any rubbing. Looking forward to seeing what you come up with
This is one mod i haven't done so your insight would be appreciated.
Yes it would use stock o-rings (the grooves are actually in the block which means the back of the adapter just needs to be flat).
As far as a head goes, I personally would use something like Earl's 2178ERL but there are some cheaper options like Perma-cool's 1211 if you don't care so much about how it looks. Those both use factory Toyota filters. Then you'd have to come up with some hose and fittings.
As a complete package, I'm thinking you might end up just under $200 (bracket, filter head, all fittings, hoses, o-rings, etc). Not cheap, but if you plan on having the car for a long time, the convenience could very quickly outweigh the cost.
Definitely would get the Earl's. Not sure i'd trust the other one haha. I'll add this to my list of things to do. This and the oil catch can. two functional mods I can get behind. Definitely worth the convenience of not having to get under your car. I'd need to have an extremely oe-looking setup though. Optimum reliability. No chance of chaffing, rubbing, etc. Would love to see what you come up with.
Buying the parts from Toyota tomorrow. All said it's just about $100 and the beauty is being able to run larger filter and I don't need a special tool when changing the filter. I already have a specific one for my wife's NX and my RCF and that's two too many in my opinion... Paying $30 for one that would only be used on the CT is just silly so I'll use that money and get normal spin on oil filters that I can do by hand..etc.
I like mods like this. I wish I could do the same for my RCF and wife's NX honestly but sadly there are no options to do so.
If the cartridge design was like our mercedes and at the top of the engine bay I wouldn't even bother changing it. On that it's superior to the toyota design. ZERO mess and super easy to change. The fact that I have to get under the car anyways to change the filter cartridge on this I might as well make it easier. Plus also changing out the drain plug for a fumoto valve. Then oil changes will be a breeze and pretty mess free!
Ordered from Toyota! Total price came to about $120 and that was with two different oil filter ordered.
Parts used:
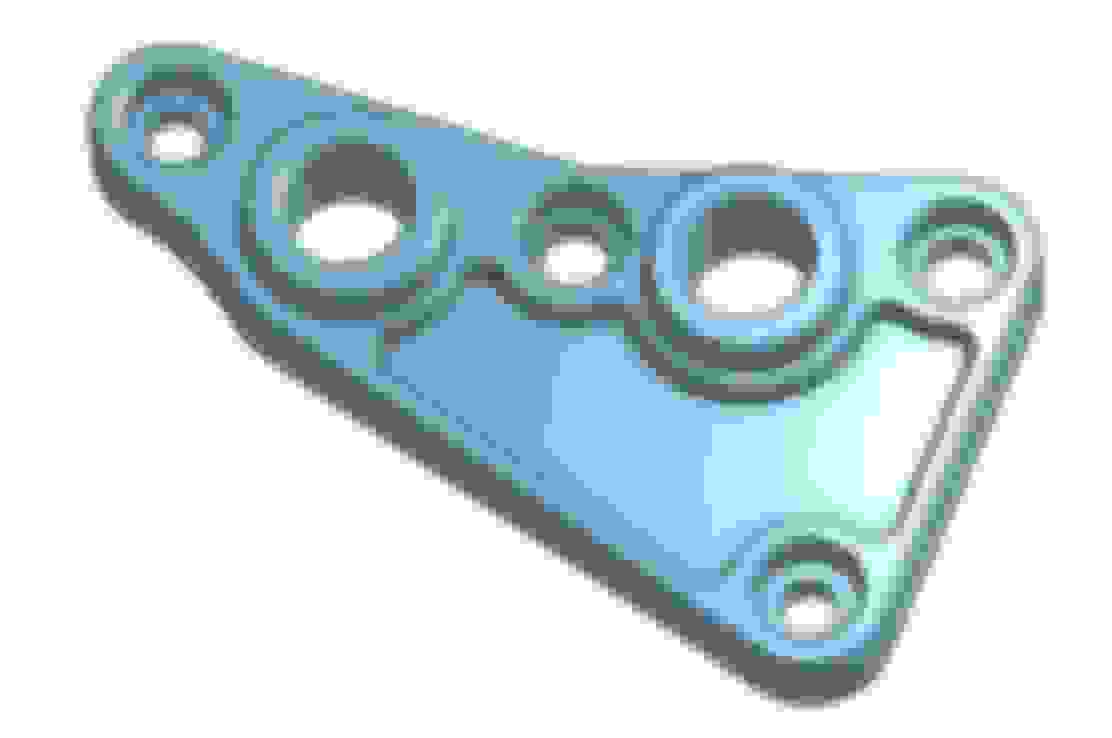
Oil Filter housing: 15609-0T060 (New Part: 15609-0T070)
Engine oil Seal (2) : 96723-24020
Union for Oil Filter housing: 90904-04006
Bolts (4): 90105-A0452 *Some people reuse the existing ones but they are only $1 so I just replaced them.
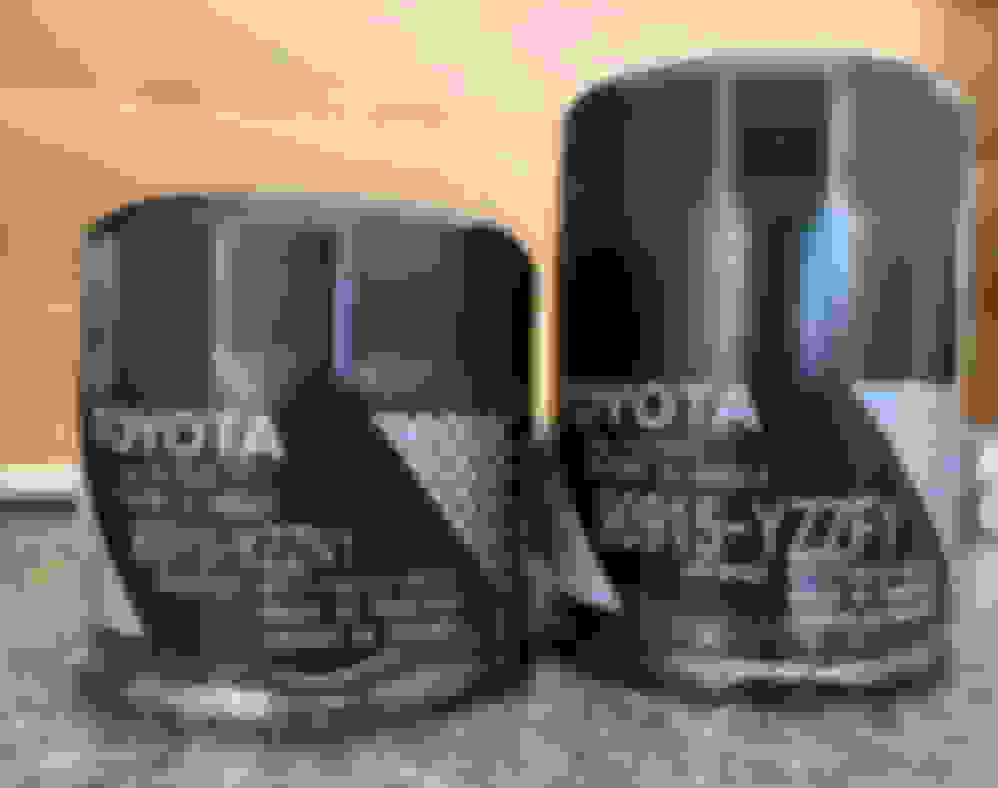
Lexus Filter: 90915YZZN1 (Supersession(s): 90915-YZZN1; 90915YZZF2) Note that I also ordered filter: 90915YZZF1. This is a larger filter. Seen in the picture below:
Edit: There is a new part number for the oil assembly. Engine Oil Filter Housing: 15609-0T070 (THIS IS THE ONE I ORDERED, its newer revision of what is posted in the video and thread and also comes up on the actual Lexus parts site as a valid part for the CT.)
*NOTE: If you buy the above oil filter housing from Lexus it is almost 20-30 more than buying the same part number from the Toyota dealer...lol So ALL parts I ordered were from a Toyota dealer. I could not source the bolts on Lexus but would image they would be more expensive as well but on the parts site they listed unavailable.
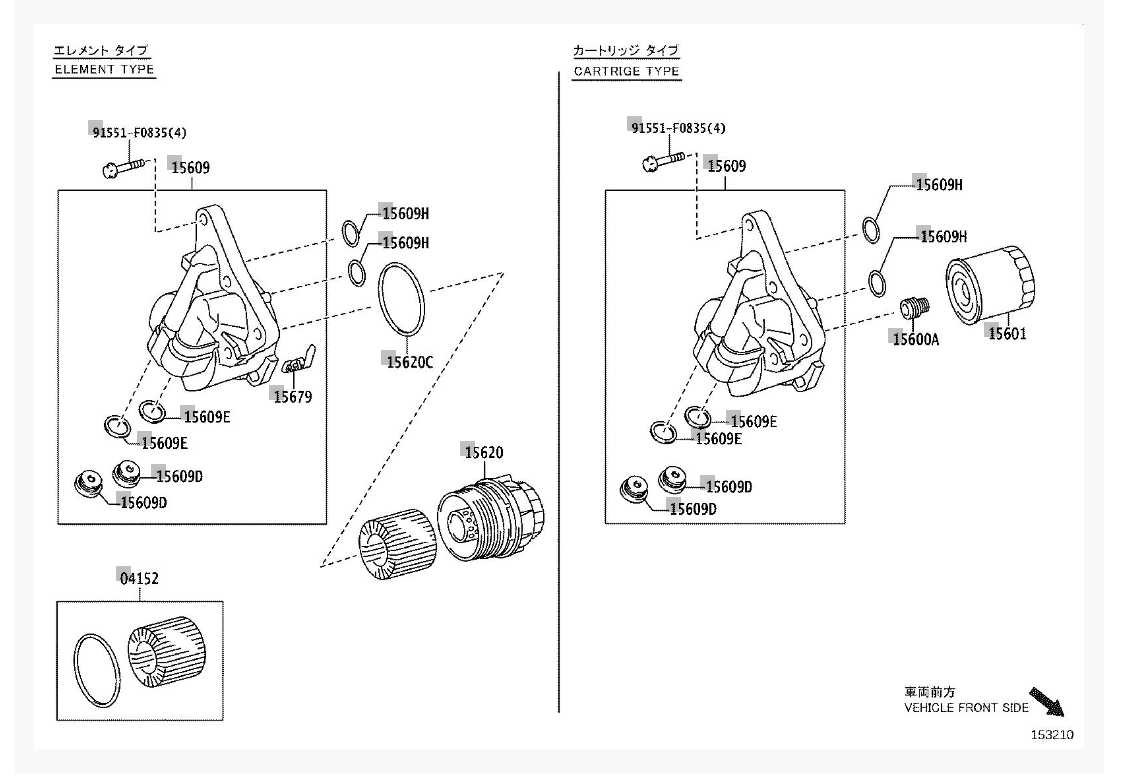
For the 2017 CT parts diagram under oil filter for the parts look up you can see that there are two options for the oil filter assembly. Cartridge on left, spin on filter at the right. When looking at the part number it only shows compatibility for 2017.
But since our engines are the same this will work no problem, I can't imagine anything changing in the engine. In fact prius owners on the forum that I went to used this same one as well. From reading on the Toyota forums the reason why Toyota switched to the spin on filter with some later model cars when they had initially been using cartridge oil filters is because too many people were bringing them back with cracked caps. And a new cap housing on the left diagram is around $40. So I guess they deemed that warranty repair or replacement was costing more money than it should, hence the switch over...etc. Interesting bit of info.
The beauty of now being able to run a spin on filter is not only do you get your choice and pick of a better filter which would also have an anti drain back valve which the cartridge does not, but you won't need special tools nor any nonsense like that. AND you can run a larger filter which is nice.
I also bought a fumoto valve so oil changes should be super simple with zero tools!
My 2021 ES with the A25AFXS uses the same YZZN1 filter. That larger YZZF1 filter looks tempting. I assume if X AND Y are interchangeable for you, then they should for me, given the YZZN1 working for both systems. Curious are the specs exactly the same between the filters? Threads, holes, valves etc. Also the newer drivetrains use an electric variable oil pressure pump. So not sure if there's any issues with that. Bigger is usually better!
According to bob the oil guy folks and on toyota nation the filter is exact spec with the pressure valve and everything else, threads..etc.. On the prius forums they were worried about the larger filter hitting the engine casing becaues it pops out slightly but the dude that put the filter on said there was like an inch gap around it so nothing was touching..etc. I am positive that it will work with the ct.
Since the filter is sideways the length of the filter shouldn't matter in terms of the larger one, but I agree bigger is normally better. I just didn't want to spend $30 for another stupid cartridge tool...lol
They shipped my stuff so I should have it next week. It's just coming from Richmond which is 2 hrs from me. I might even have it tomorrow?
Well that was pretty quick I received everything.
I will note that the part number I used which is included in the picture is a newly revised version which actually has a triangle at the bottom so when you unscrew the oil filter it will drip down nicely compared to the round one that's used in the thread.
I ordered both oil filters but I will be using the YZZ F1 because it's about an inch longer.
 09-06-18, 05:59 AM