
For all you DIY detailers!
 04-24-12, 11:23 PM
#1
Driver
Thread Starter
Join Date: Apr 2012
Location: WI
Posts: 169
Likes: 0
Received 0 Likes
on
0 Posts
First of all, I'm not promoting myself, or any business for that matter. I'm making a thread of "how to's" with no product placement, or any skirting of promoters. This a labor directing thread  Just trying to spread knowledge, not charge for it.
Lets start with the most basic thing you'll be doing to you car. The basic "wash and wax".
Subject: 2012 Prius V
Supplies needed:
Wash bucket
Wash Mit/Brush
Soap of your choice
Wax/Applicator of your choice
Microfiber towels (Remove wax)
Towels (Drying after wash)
1. Pick your choice of degreaser and liberally spray the wheels/tires/wells/engine bay as needed (engine cool). Let soak for a short period of time to let it work on grime/dirt/brake dust.
2. Wash off (Power washer is ideal) all degreased areas until all degreaser is gone! It will leave a film on painted materials if not careful. This is when you should pre-wet the car to remove most dust.
3. Pick your "scrubbing apparatus"! I like using a wash mit, because you pay more attention (you'll miss less spots). Scrub the entire car, all glass, roof, everything except the wheels.
4. Rinse ALL soap off of the car, starting on the roof, work your way down to the rockers.
5. Dry the entire car, including jambs/inner doors. I prefer using a Waterblade, and finish using regular towels til mostly dry, and finish with microfiber towels.
6. Now that the car is dry, make sure you have a cool/shaded area to wax your car. Using the wax of your choice, try to do a couple panels at a time, using the "wax on, wax off" method like Mr. Miyagi says. I put a good coat of wax on each panel to make sure I have complete coverage.
7. Apple any form of tire shine and wheel polish now!
8. Open your favorite microbrew, because you should ideally be done with the basic wash you can do at home with the bare bones of maintenance items. If you have wax that gets into grooves, onto plastic, or glass, be sure to get it off before it dries, or it will leave the nasty white film. I'd use any class cleaner for glass after watching anyways.
This will save you a lot of money, if you do it yourself! I believe my place of work would charge $75 for this two hour job.
The car pictured is literally brand new, and I'm demonstrating with this because there is zero paint correction needed. Just the process I described will achieve these results.


Just trying to spread knowledge, not charge for it.Lets start with the most basic thing you'll be doing to you car. The basic "wash and wax".
Subject: 2012 Prius V
Supplies needed:
Wash bucket
Wash Mit/Brush
Soap of your choice
Wax/Applicator of your choice
Microfiber towels (Remove wax)
Towels (Drying after wash)
1. Pick your choice of degreaser and liberally spray the wheels/tires/wells/engine bay as needed (engine cool). Let soak for a short period of time to let it work on grime/dirt/brake dust.
2. Wash off (Power washer is ideal) all degreased areas until all degreaser is gone! It will leave a film on painted materials if not careful. This is when you should pre-wet the car to remove most dust.
3. Pick your "scrubbing apparatus"! I like using a wash mit, because you pay more attention (you'll miss less spots). Scrub the entire car, all glass, roof, everything except the wheels.
4. Rinse ALL soap off of the car, starting on the roof, work your way down to the rockers.
5. Dry the entire car, including jambs/inner doors. I prefer using a Waterblade, and finish using regular towels til mostly dry, and finish with microfiber towels.
6. Now that the car is dry, make sure you have a cool/shaded area to wax your car. Using the wax of your choice, try to do a couple panels at a time, using the "wax on, wax off" method like Mr. Miyagi says. I put a good coat of wax on each panel to make sure I have complete coverage.
7. Apple any form of tire shine and wheel polish now!
8. Open your favorite microbrew, because you should ideally be done with the basic wash you can do at home with the bare bones of maintenance items. If you have wax that gets into grooves, onto plastic, or glass, be sure to get it off before it dries, or it will leave the nasty white film. I'd use any class cleaner for glass after watching anyways.
This will save you a lot of money, if you do it yourself! I believe my place of work would charge $75 for this two hour job.
The car pictured is literally brand new, and I'm demonstrating with this because there is zero paint correction needed. Just the process I described will achieve these results.
Last edited by bjohn; 04-24-12 at 11:38 PM.
 04-24-12, 11:35 PM
#2
Driver
Thread Starter
Join Date: Apr 2012
Location: WI
Posts: 169
Likes: 0
Received 0 Likes
on
0 Posts
Cleaning Door Jambs!
This is a more labor intensive cleaning process than anything. The vehicle depicted is what I'd call average for being "dirty". Most people NEVER clean these areas... Take a look at any high mileage older car and you'll see that.
Subject: 2010 Toyota Tacoma
Supplies needed:
I use a generic plastic cleaner, non aggressive. Soapy water may even work if not grimy.
Large brush
Small detail brush
Towels (Microfiber, and regular towels)
Lots of patience!
Shop Vac (Not necessary, but helpful with dirt)
1. I'd begin with wetting all dirty areas with your cleaning fluid of choice and let them soak, depending on how dirty your jambs are.
2. Use the large brush to clean the door sill, and inner door framework (especially below your door panel). Look under your door, thats where it is likely the filthiest.
3. Spray more cleaner and wipe the area and see how its looking. Repeat these steps til the areas are clean! This is more of a labor thing than skill. You basically will be scrubbing the areas til they are clean
Tip: Make sure you spread open the weather stripping, especially be where your feet pass by. Lots of dirt will be in there if never cleaned! A Shop Vac helps here.
This door jamb was cleaned with nothing but elbow grease, and the above supplies. No black magic
04-24-12, 11:48 PM
#3
Driver
Thread Starter
Join Date: Apr 2012
Location: WI
Posts: 169
Likes: 0
Received 0 Likes
on
0 Posts
This next DIY is how to remove those notorious road salt stains... People in the Northern Hemisphere like myself, know these are unavoidable. Somehow road salt, when dried darn near turns to stone on carpets. Your arms will probably look shredded after doing this yourself 
Subject: 2009 Toyota Matrix
Supplies needed:
Shop Vac
Stiff bristled brush (For carpet)
Foaming carpet cleaner
Stain remover (Make sure it doesn't remove dye from carpet! Read the label)
Possibly carpet dye, if you scrub the color out of the carpet
1. Vacuum the area of all dirt/debris to get a good idea of what you are up against.
2. I applied the foaming carpet cleaner, and scrubbed very hard with a brush to break up the salt deposit. Repeating this step MANY times.
3. I applied stain remover to remove some discoloration from the area, scrubbing again. Make sure you regularly vacuum so you dont end up with a lake on your floor
4. Repeat steps 2, and 3 until a clean carpet is restored!
Like I said, carpet dye might have to be used if the color fades. This is not a big deal, and will likely blend in fine, especially with black/dark carpets. The car I was working on faded a little as you can see, not enough to use dye though.
04-25-12, 12:46 PM
#4
What would you do / use to deal with sticky residue from sticking stuff to the dash or plastic interior? Like the double sided stickies that come with air fresheners and stuff. Some of them are really annoying to remove.
 04-26-12, 06:23 PM
#7
Driver
Thread Starter
Join Date: Apr 2012
Location: WI
Posts: 169
Likes: 0
Received 0 Likes
on
0 Posts
Trending Topics
05-03-12, 05:25 PM
#8
Driver
Thread Starter
Join Date: Apr 2012
Location: WI
Posts: 169
Likes: 0
Received 0 Likes
on
0 Posts
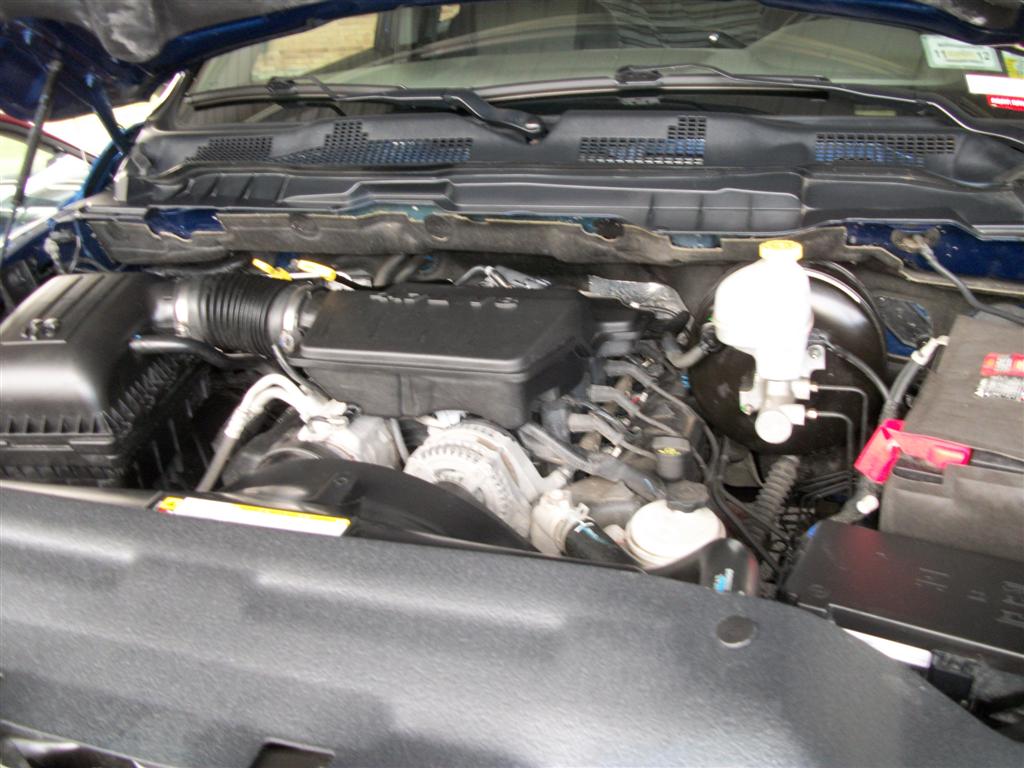
A LOT of people have questions about cleaning your engine bay. I've watched people hand clean them for hours while I laugh, and do it in five minutes. Again, no black magic, zero elbow grease was required, and I literally used two things to accomplish these great results.
Subject: 2010 Toyota Highlander
Supplies needed:
Your favorite flavor of degreaser
Power washer (My power washer heats the water to 180*+)
Towels (If you'd like to hand dry after)
1. Make sure there is no exposed wiring, all weather packs are sealed, and water cant get inside anything easily.
2. SOAK the entire engine bay, radiator support, firewall, under-hood, fender-wells in degreaser. Let stand for 5 minutes to do its dirty work.
3. Power wash starting with the under-hood (work your way down), be mindful of sensitive electronics.
4. Hand dry any areas you'd like to (I always do this), and enjoy your like new engine bay!
You can use plastic treatments to restore a "wet" look to your engine cover, this didnt need anything like that. This is a very straight forward cleaning process, and most people over think this step, if they ever actually do it!
 05-03-12, 07:08 PM
#10
Dysfunctional Veteran
A LOT of people have questions about cleaning your engine bay. I've watched people hand clean them for hours while I laugh, and do it in five minutes. Again, no black magic, zero elbow grease was required, and I literally used two things to accomplish these great results.
Subject: 2010 Toyota Highlander
Supplies needed:
Your favorite flavor of degreaser
Power washer (My power washer heats the water to 180*+)
Towels (If you'd like to hand dry after)
1. Make sure there is no exposed wiring, all weather packs are sealed, and water cant get inside anything easily.
2. SOAK the entire engine bay, radiator support, firewall, under-hood, fender-wells in degreaser. Let stand for 5 minutes to do its dirty work.
3. Power wash starting with the under-hood (work your way down), be mindful of sensitive electronics.
4. Hand dry any areas you'd like to (I always do this), and enjoy your like new engine bay!
You can use plastic treatments to restore a "wet" look to your engine cover, this didnt need anything like that. This is a very straight forward cleaning process, and most people over think this step, if they ever actually do it!
Before:

After:
^I achieved the above results without ever touching the engine bay with water in any form.
And the overall result of the truck in question (mine):
 05-17-12, 02:12 PM
#11
Driver
Thread Starter
Join Date: Apr 2012
Location: WI
Posts: 169
Likes: 0
Received 0 Likes
on
0 Posts
Those yummy bugs....
Subject: Toyota Sienna
Supplies needed:
Your favorite flavor of degreaser (dilute according to directions and use on a test spot)
Power washer (Car wash if you don't have one)
Scrubbing brush/soap
Wax
1. Liberally spray bug guts areas with degreaser, no need to wet the car first.
2. Let sit for a short time (5 minutes or less).
3. Power wash all degreased areas til they are as bug free as possible.
4. Do a regular wash to finish the cleaning of bugs, they shouldn't be hard to get off at this point.
5. Dry car and apply wax to reseal the paint where you degreased.
Some will argue degreaser shouldn't be put on paint. My answer to that is, Toyota recommends it and I have never has a single problem with it. It may however leave a gross film of you let it dry completely. Just use your head also, the leftover black spots are rock chips.


Please no more hijacking, feel free to show your way on your own thread
Subject: Toyota Sienna
Supplies needed:
Your favorite flavor of degreaser (dilute according to directions and use on a test spot)
Power washer (Car wash if you don't have one)
Scrubbing brush/soap
Wax
1. Liberally spray bug guts areas with degreaser, no need to wet the car first.
2. Let sit for a short time (5 minutes or less).
3. Power wash all degreased areas til they are as bug free as possible.
4. Do a regular wash to finish the cleaning of bugs, they shouldn't be hard to get off at this point.
5. Dry car and apply wax to reseal the paint where you degreased.
Some will argue degreaser shouldn't be put on paint. My answer to that is, Toyota recommends it and I have never has a single problem with it. It may however leave a gross film of you let it dry completely. Just use your head
also, the leftover black spots are rock chips.Please no more hijacking, feel free to show your way on your own thread
Last edited by bjohn; 05-22-12 at 07:48 PM.
05-18-12, 01:29 PM
#12
Actually, some degreasers do have a negative impact on the clear. You could say at varying dilutions, it'll affect the clear too. Slow oxidation may occur with prolonged use which is easy to see on a black car. If you're on a single stage Toyota, watch out because that'll oxidize it quick if you don't dilute it correctly.
Should always add: "Please dilute according to directions and use on a test spot" to any tip you give John
Should always add: "Please dilute according to directions and use on a test spot" to any tip you give John

Thread
Thread Starter
Forum
Replies
Last Post