Lexus IS: How to Replace Front Shocks
Shock absorbers are the cushion between your vehicle and the road. Worn shocks can cause an uncomfortable ride and advanced wear on related suspension components. Here is how to replace them yourself on the Lexus IS.
This article applies to the Lexus IS (2005-2013).
A vehicle's suspension contributes to its stability and a comfortable ride for you and your passengers. Harsh roads and a spirited driving style can cause suspension wear. Pot holes are brutal to the dampening system of your shocks and can degrade the shocks' ability to rebound properly. Common signs of wear are noted when pressing the brakes and the front of the vehicle leans forward. Similarly, when you're "breaking" into a turn and the body of the vehicle feels like it is shifting. Excess vibrations when traveling on a smooth road are other indicators that it's time to replace your front shocks. The front shock absorbers are housed in the strut assembly. The strut assembly must first be removed to access the shock assembly.

Materials Needed
- 10mm, 14mm, and 17mm sockets
- Breaker bar
- Torque wrench
- Hydraulic jack, wheel chocks, and jack stands
- Spring compressor
- 19mm wrench
Step 1 - Loosen wheel and raise the car
Chock the rear wheels and loosen the front wheel lug nuts. Raise the car and secure with jack stands.

Step 2 - Remove ABS speed sensor bolt and wires
Remove the 10mm nut attached to the shock absorber using the socket wrench and set aside.
Pro Tip
Turn the wheel full lock to the side which you are working on to gain more clearance.
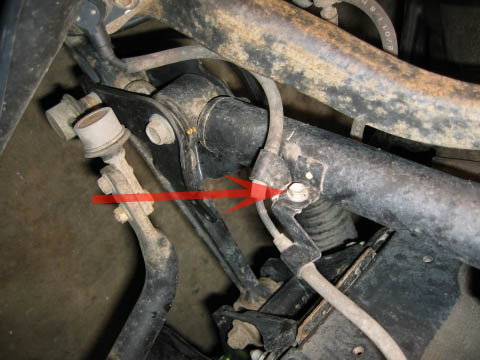
Step 3 - Remove lower shock absorber nut
Using a 19mm wrench on the inside and a 17mm socket on a breaker bar on the outside, remove the bolt.
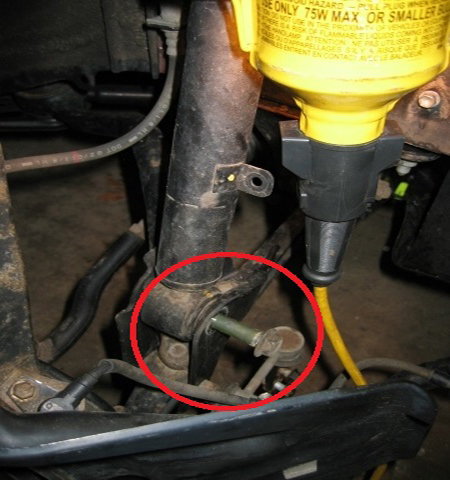
Figure 3. Remove lower nut. 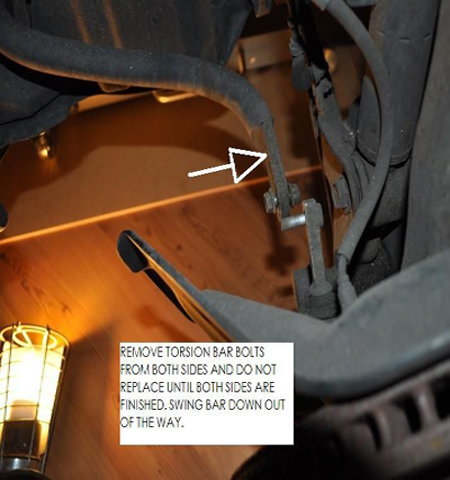
Figure 4. Remove torsion bar bolts.
Pro Tip
Remove stabilizer bolts to gain clearance. See figure 4.
Step 4 - Remove strut tower nuts
These are located in the engine bay and are 14mm.

Pro Tip
If your car comes with AVS motor over the strut as seen in figure 5, it can be turned counter clockwise and moved to the side.
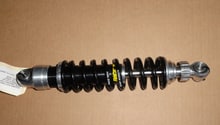
Step 5 - Remove strut assembly and compress spring
Now the entire assembly can be removed and you can compress the spring. The spring nut can be removed now as long as the spring is fully compressed.

Figure 6. Remove the assembly and compress the spring using your spring compressor. 
Figure 7. Be sure to compress the spring before removing the nut shown above.
Step 6 - Assemble new strut
Replace the shock absorber in the strut assembly.

Step 7 - Install the new strut onto the car
Now you can re-install the strut assembly as one unit. Don't forget to torque to 47 ft lb.
Pro Tip
Insert the strut assembly and loosely tighten one strut nut. This will give you room to rotate the bottom of the strut and align the bottom bolt to the strut bracket.
Featured Video: How to Change Front Struts
Related Discussions
- DIY Lexus Lowering Spring Guide - ClubLexus.com
- DIY Lexus Suspension Install - ClubLexus.com
- DIY Replacing Front Shocks - ClubLexus.com