Log In
Register
Forums
Vendor News
Club Lexus Vendor Product Announcements
Lexus Model Forums
IS Models
RC Models
GS Models
SC Models
LC Model (2018-present)
LFA Model (2012)
CT 200h Model (2011-2017)
HS 250h Model (2010-2012)
ES Models
LS Models
UX Models (2019-present)
NX Models
RX Models
TX Models (2024-present)
GX Models
LX Models
RZ Model (2023-present)
Lexus Prototypes and Next-Gen Technology
Vendor Marketplace and Member Classifieds
Marketplace
General Classifieds
Club Lexus Vendor Marketplace
Lexus Special Interest Forums
Automotive Care & Detailing
Lexus Audio, Video, Security & Electronics
Lighting
Maintenance
Wheels, Tires & Brakes Forum
Special Interest Groups
Lexus Motorsports and Racing
General Forums
Car Chat
EV Chat
Local Chapters and Regional Forums
Regional ClubLexus Forums
NELOC
Florida Lexus Club
Chicago Lexus Club
Northern California Lexus Club
CL of Southern California
CL of Hawaii
North Texas Lexus Club
Site Suggestions & Problems
Site Suggestions & Problems
Gallery
Tools
Car Payment Calculator
Tire Rim Calculator
Vin Decoder
Recalls
Technical Service Bulletins (TSBs)
Members List
Live Feed
Marketplace
Marketplace
Vendor Directory
Become a Vendor
Lexus News
Lexus CT200h
Lexus ES
Lexus GS
Lexus GX
Lexus HS250h
Lexus IS
Lexus IS-F
Lexus LC500
Lexus LFA
Lexus LS
Lexus LX
Lexus NX
Lexus RC
Lexus RX
Lexus RZ
Lexus SC
Lexus TX
Lexus UX
New Posts
How-Tos
FAQ
View Dark Mode
Please register or login to enable Dark Mode.
Log In
Register
Threads
Google
Threads
Posts
Advanced
Dark Mode
Please register or login to enable Dark Mode.
Log In
Forgot your Password?
By logging into your account, you agree to our
Terms of Use
and
Privacy Policy
, and to the use of cookies as described therein.
or
Login with Google
Login with Facebook
Recent
Commented
Albums
My Pictures
Door Panel Removal
RelicsStic
April 26, 2014
12
0
Sort:
Most Recent
Default
Most Recent
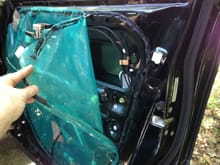
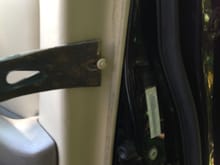
Pull back the vapor barrier while keeping a bead of the uncured sealing rubber in place.
0
2014/04/26 12:04:01
236210
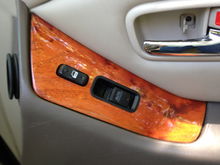
The electric switch plate with wood grain finish.
0
2014/04/26 11:55:34
236210
With the switch plate removed, the final screw is accessible.
0
2014/04/26 11:55:22
236210
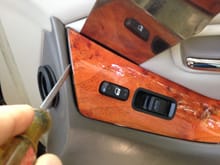
The sprung tab is near the tip of the screwdriver in this picture.
0
2014/04/26 11:55:09
236210
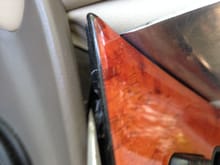
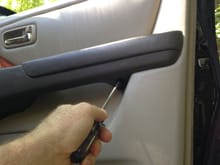
Start prying on this end to access the sprung tab holding the switch plate in place.
0
2014/04/26 11:54:57
236210
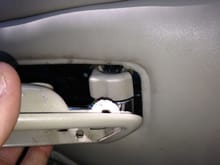
Do not pry the rivets as shown. Instead, push the button in the center of the rivet head to release the butterfly wings and pull the rivet out.
0
2014/04/26 11:54:36
236210
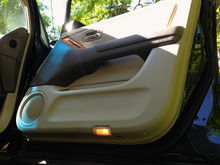
The passenger door.
0
2014/04/26 11:54:27
236210
There are two notch clips on the latch handle bezel. One on top just above the lock switch and one symmetrically located on the bottom. Finagle them.
0
2014/04/26 11:53:39
236210
Location of fasteners that are visible before removing any parts.
0
2014/04/26 11:53:25
236210
Gently pry open the screw cover to access the screw in the latch handle recess.
0
2014/04/26 11:53:24
236210
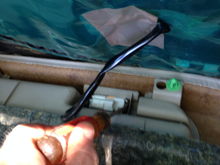
I removed the courtesy light from the back of the door panel. Then I disconnected it and pulled the cable back through.
0
2014/04/26 11:53:07
236210
Screw accessible from the underside of the armrest
0
2014/04/26 11:52:57
236210