
Shifter/Power Switch/VSC Switch/LED Mod
 12-16-14, 09:03 AM
#16
Pole Position
Thread Starter
Turn the shifter plate bottom up. The coin lid is held in place by a latch dead center between the VSC and Power switches. You will also notice there is a tiny spring covered with lithium grease. You need to remove the latch pin first. Take a set of thin needle nose pliers and compress the legs towards each other and the latch lever will drop out. Now take caution when removing the latch pin because the spring is under tension. If you are not careful the pin will fly out and you run the risk on losing it.
With the coin latch pin out of the way you can now remove the shifter face plate which has multiple clips on the perimeter. I found by removing the face plate you are less likely to mar or scratch the finish.
Now take two or three very thin screw drivers (blade) and pry the bottom sides of the switch housing. There are two larger clips at the front and rear of the housing that hold the switch secure to the shifter plate. I hope this helps.

 12-16-14, 09:53 AM
#18
Pole Position
Thread Starter
Yes. Take your time. If you look at the south end of the switch (face down), you should see a pin. Pry the top south end and with a second blade screw driver push in the pin. Now from the top or face of the switch apply pressure in an effort to pop out the switch. The bulb is located on the side of the switch.
12-20-14, 04:44 PM
#20
Pole Position
Thread Starter
Thanks Sid!
btw I wonder if these lights can be changed too ? (plug and play hopefully..) as well as the door switches.. hating the green!! be nice if that temperature display light could be change to something easier on the eyes
Attachment 348894
btw I wonder if these lights can be changed too ? (plug and play hopefully..) as well as the door switches.. hating the green!! be nice if that temperature display light could be change to something easier on the eyes
Attachment 348894
As for the door switches, the lights are very tiny LED SMDs soldered on a circuit board. Last year I changed out the LED green SMDs with 3526 SMD white LEDs. The door switch lights are now white and stand out, but not overwhelming. This mod requires basic electronic knowledge and soldering skills; patience is also a must when working with small objects.
12-22-14, 07:29 AM
#21
Bimmer, I decided to open the Climate Control console to determine if the device has LED or incandescent bulbs. First and foremost the console is a bit tricky to dismantle. I discovered the Climate Control has LED bulbs soldered directly on the circuit board.
As for the door switches, the lights are very tiny LED SMDs soldered on a circuit board. Last year I changed out the LED green SMDs with 3526 SMD white LEDs. The door switch lights are now white and stand out, but not overwhelming. This mod requires basic electronic knowledge and soldering skills; patience is also a must when working with small objects.
As for the door switches, the lights are very tiny LED SMDs soldered on a circuit board. Last year I changed out the LED green SMDs with 3526 SMD white LEDs. The door switch lights are now white and stand out, but not overwhelming. This mod requires basic electronic knowledge and soldering skills; patience is also a must when working with small objects.
 ?
? I have never soldered before but I have a friend whose done this stuff so I really do plan on doing those cluster ones and interior dash ones.. I was looking for the thread for when you did your cluster lights but cant find it :/ could you please remind me what leds you ordered for the cluster? is it same as the door 3526 SMD?
Again, really appreciate your help as always.
12-22-14, 08:50 AM
#22
Pole Position
Thread Starter
Will do later today. As for the instrument cluster I used 5050 SMD LEDs since they give off more light than the 3526 OEM LEDs. The 5050 LEDs are like three in one LEDs.
12-22-14, 01:33 PM
#23
Pole Position
Thread Starter
You are the man! thank you i really appreciate it! I cant attempt anything yet as its freezing here lol so thanks for checking for me. Do you plan on changing those in the climate control ?
I have never soldered before but I have a friend whose done this stuff so I really do plan on doing those cluster ones and interior dash ones.. I was looking for the thread for when you did your cluster lights but cant find it :/ could you please remind me what leds you ordered for the cluster? is it same as the door 3526 SMD?
Again, really appreciate your help as always.
? I have never soldered before but I have a friend whose done this stuff so I really do plan on doing those cluster ones and interior dash ones.. I was looking for the thread for when you did your cluster lights but cant find it :/ could you please remind me what leds you ordered for the cluster? is it same as the door 3526 SMD?
Again, really appreciate your help as always.
Here is the informaiton you requested for the LEDs.
The name of the vendor I purchased the LEDs is Lighthouse LEDS. Below is the link for the cool white 3528 SMD/LEDs I used for the door switches.
http://lighthouseleds.com/catalogsea...C2SMDCOOLWHITE
The link below is for the 5050-SMD Cool Clear White LEDs.
http://lighthouseleds.com/plcc-6-505...ight-10-0.html
Just remember 5050 SMD indicates it's a 5.0mm x 5.0mm "surface-mount-diode." The number signifies the size of the diode in millimeters. The 5050 is three diodes in one. Please note the polarity (positive/anode and negative/cathode) of leds. Most often if you can not see any of these markings, a small notch or dot will indicate the negative side of an led. This also goes for markings on a circuit board too.
PM me if you have questions.
12-22-14, 01:46 PM
#25
Pole Position
Thread Starter
All bulbs/lights in the shifter Light, Power Switch and VSC Switch require NO soldering.
Bimmer was asking questions for the Instrutment cluster and door switches which DO require soldering. Light is plug in type for the shifter and screw in or twist for the Power and VSC switches.
12-22-14, 02:43 PM
#26
I'm doing this mod right now and have the darnest time with the PWR switch. I can't separate it the guts of the switch from the flat housing. Any tips?
>Does the actual top side (ECT PWR SNOW) switch separate to allow the guts to be pulled through the bottom?
>>GOT IT! Will post photos of the PWR Switch soon and the "latches" that lock it into place.
>Does the actual top side (ECT PWR SNOW) switch separate to allow the guts to be pulled through the bottom?
>>GOT IT! Will post photos of the PWR Switch soon and the "latches" that lock it into place.
Last edited by ShawnOk; 12-22-14 at 02:56 PM.
12-22-14, 05:00 PM
#27
Ok, so just finished the install. Much thanks for the instructions from DarthSid. A few notes I will add... I had the hardest time removing the PWR switch. The photos below should help anyone having trouble. (as you can see i broke one of the walls circled in red). The clips were really tough to release. But with patience, the switches will remove. Use a few small blade screwdrivers to wedge the edges out until the switch actually pries loose. Neither surface rocker will actually come out. Only the "guts" will be removed. Once you have the switches installed and the LED's in place, CHECK YOUR CONNECTIONS! I found that the PWR switch actually runs in reverse polarity also. So when the headlights are on it receives normal power, but when the headlights are off they are powered in reverse polarity (and thus illuminate when not supposed to be illuminated ie. daytime)! I recommend to have the headlights on when checking polarity and before actually clipping the switches back into the mounting spots on the back of the flat shifter panel. Good luck to all, and thanks again DarthSid!
>>Also, I had to cut a small part of the "wall" around the inner side of the VSC switch to allow more light to illuminate the letters. Didn't mess up any of the function but did allow more light to fill the letters.
>>Also, I had to cut a small part of the "wall" around the inner side of the VSC switch to allow more light to illuminate the letters. Didn't mess up any of the function but did allow more light to fill the letters.
Last edited by ShawnOk; 12-22-14 at 05:16 PM.
12-22-14, 05:05 PM
#28
Pole Position
Thread Starter
I'm glad you were able to finally remove the switch. Yes, it's a tuff little bugger to remove. How do you like your new display on the switches and shifter? For members attempting this mod please do not remove the rocker off the power switch. The key is to remove the power switch from the bottom of the shift plate. Nice pictures.
Last edited by DarthSid; 12-22-14 at 05:08 PM.
01-11-15, 10:56 AM
#30
Hey guys. Nice work DarthSid. I might as well contribute to the topic.
I took the power window button controls appart and also the climate control to find out what to replace.
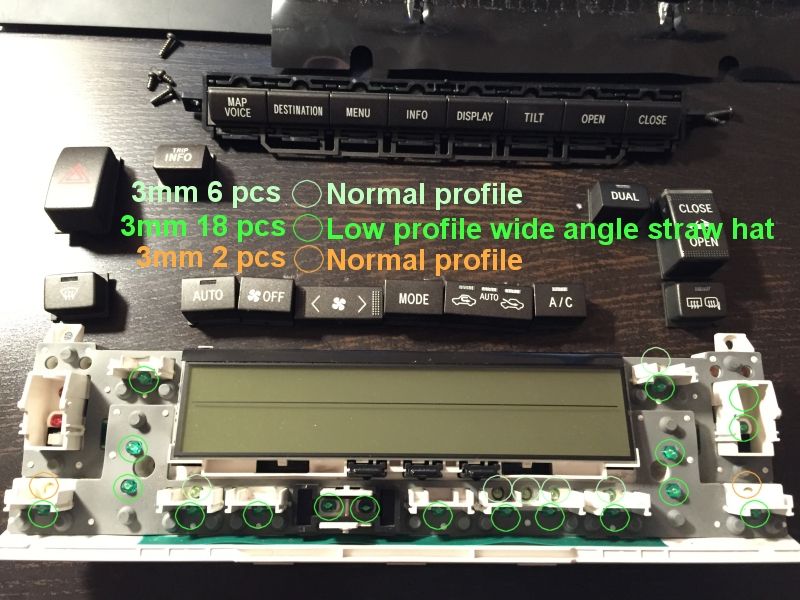
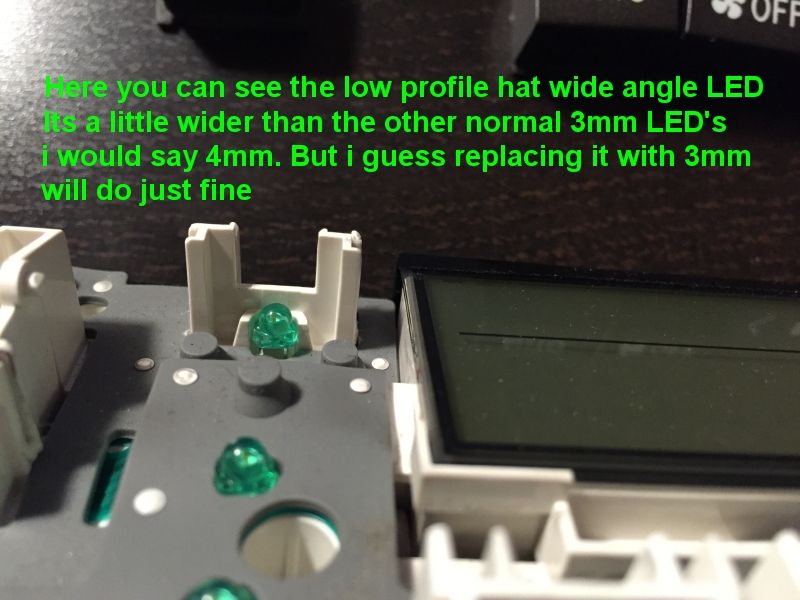
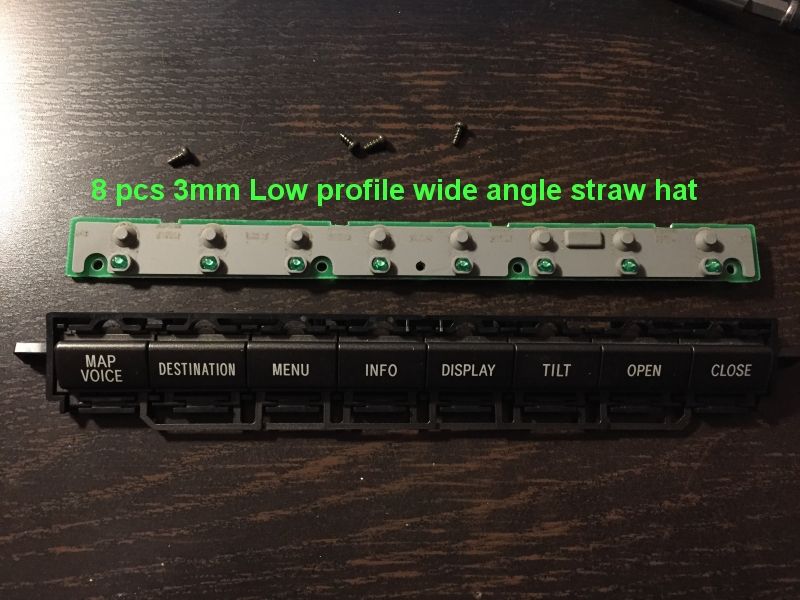
The green LED's are small wide angle straw hat type. My mesurements says about 4mm but i dont think its possible to buy those anywhere so i will be soldering white 3mm or 5mm straw hat LED's instead of the green ones. I will need 26 in total.
I will also change the light green ones for when some of the buttons are activated. There are 6 of those. Normal 3mm LED's. There are also two amber 3mm LED's (for the front, rear/mirror heat buttons). I want to replace the 6 with amber LED's because i think it fits the Lexus theme with amber.
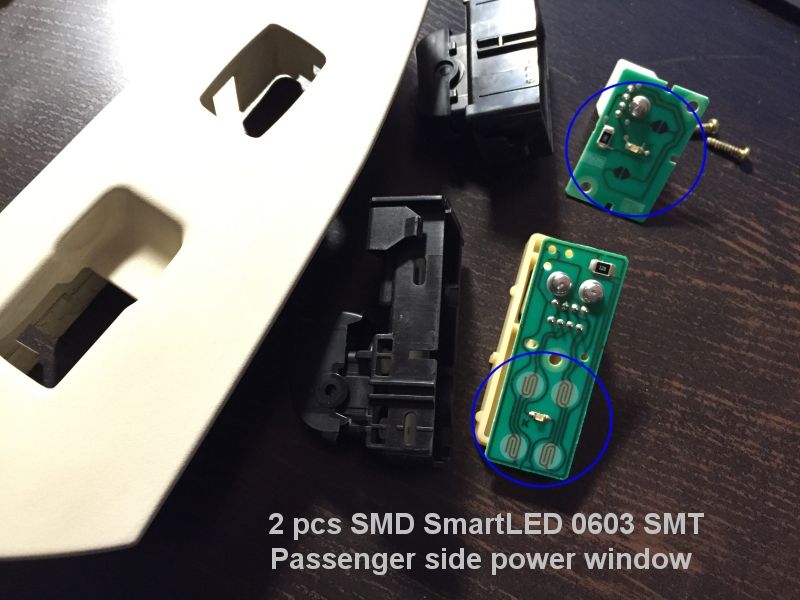
The power window control buttons are small SMD SmartLED 0603 SMT diodes. 3 for the driverside and 2 for the passenger side. So 5 in total.
All of them are available on ebay and similar so go ahead
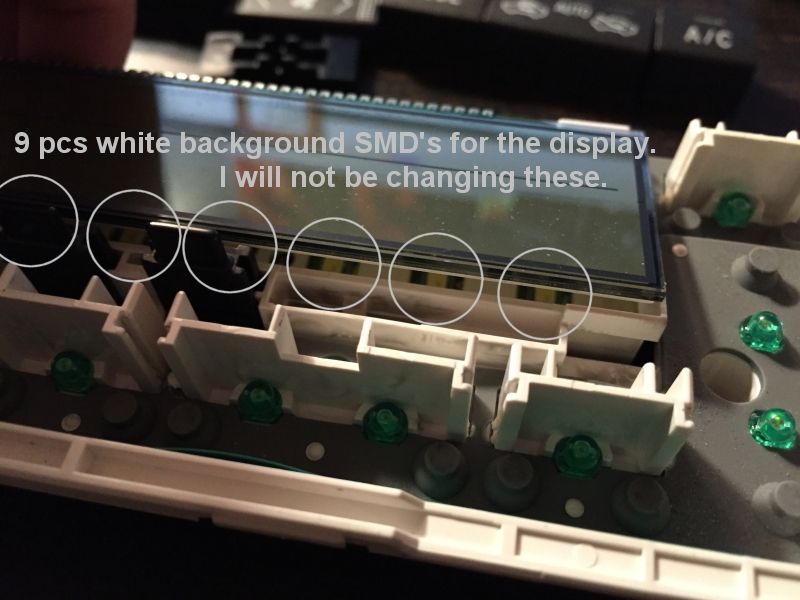
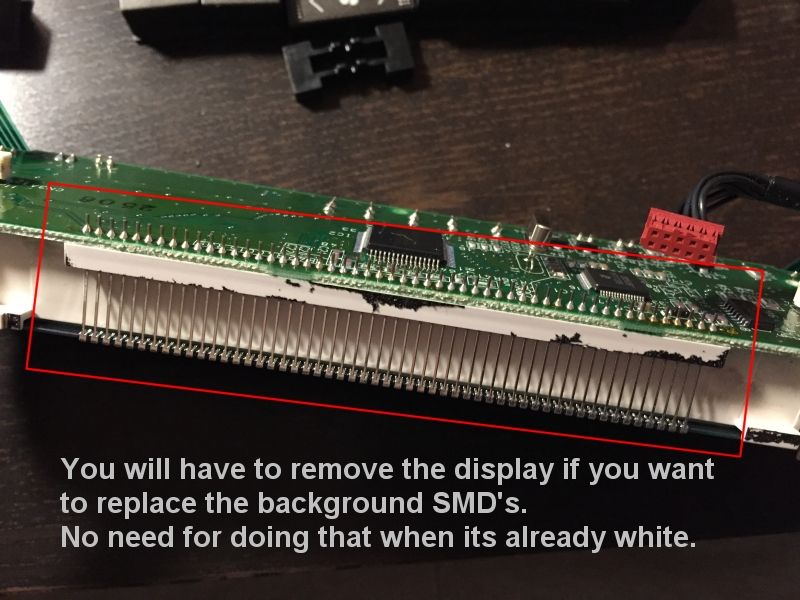
Off-topic. But i have a problem with my clock display. One of the letters are not working 100% correct. I have seen others have the same problem. Does anyone know if there is a fix for this? I have checked the soldering on the display and it looks fine, so i guess the display is defect? Not sure if its possible to get a new replacement display. Dont want to ask Lexus for a price on a complete new climate control unit.
Well here's some pictures
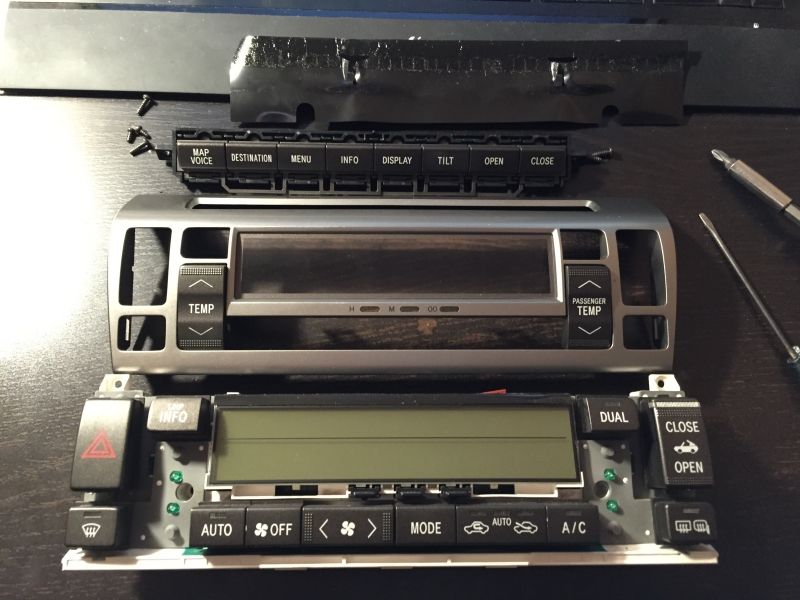

I took the power window button controls appart and also the climate control to find out what to replace.
The green LED's are small wide angle straw hat type. My mesurements says about 4mm but i dont think its possible to buy those anywhere so i will be soldering white 3mm or 5mm straw hat LED's instead of the green ones. I will need 26 in total.
I will also change the light green ones for when some of the buttons are activated. There are 6 of those. Normal 3mm LED's. There are also two amber 3mm LED's (for the front, rear/mirror heat buttons). I want to replace the 6 with amber LED's because i think it fits the Lexus theme with amber.
The power window control buttons are small SMD SmartLED 0603 SMT diodes. 3 for the driverside and 2 for the passenger side. So 5 in total.
All of them are available on ebay and similar so go ahead
Off-topic. But i have a problem with my clock display. One of the letters are not working 100% correct. I have seen others have the same problem. Does anyone know if there is a fix for this? I have checked the soldering on the display and it looks fine, so i guess the display is defect?
Not sure if its possible to get a new replacement display. Dont want to ask Lexus for a price on a complete new climate control unit.Well here's some pictures